Colour Bar: Mixing with the Scale
Tutorial 20.12: Colour Bar: Mixing with the Scale
Introduction
The Mix screen is where the stylist weighs each product live against the plan's targets. It's the beating heart of the Colour Bar — a big weight readout, Tare and Capture buttons, and a running recipe that ticks off as you go.
Who this is for: Stylists / colourists at the Colour Bar station What you'll learn:
- Read the LiveWeightCard (weight, stable indicator, battery, target)
- Tare the scale
- Capture weights and advance through bowls
- Finalise the mix and hand off to the till
Time to complete: 10-15 minutes
Prerequisites
- A formula planned on the Edit screen (Tutorial 20.11) or a Copy & edit template
- Scale paired (Tutorial 20.14 — DRAFT) or the mock driver active for planning-only work
Heads up — BLE driver still landing. The native Acaia Pearl driver is in Phase 3c, still to ship. Until it's released, live-weighing claims below describe the intended flow; on current builds you'll either see the mock driver (dev/staging) or the flow described in Tutorial 20.6 (web app formula dialog) for production weighing.
The Mix screen layout
From top to bottom:
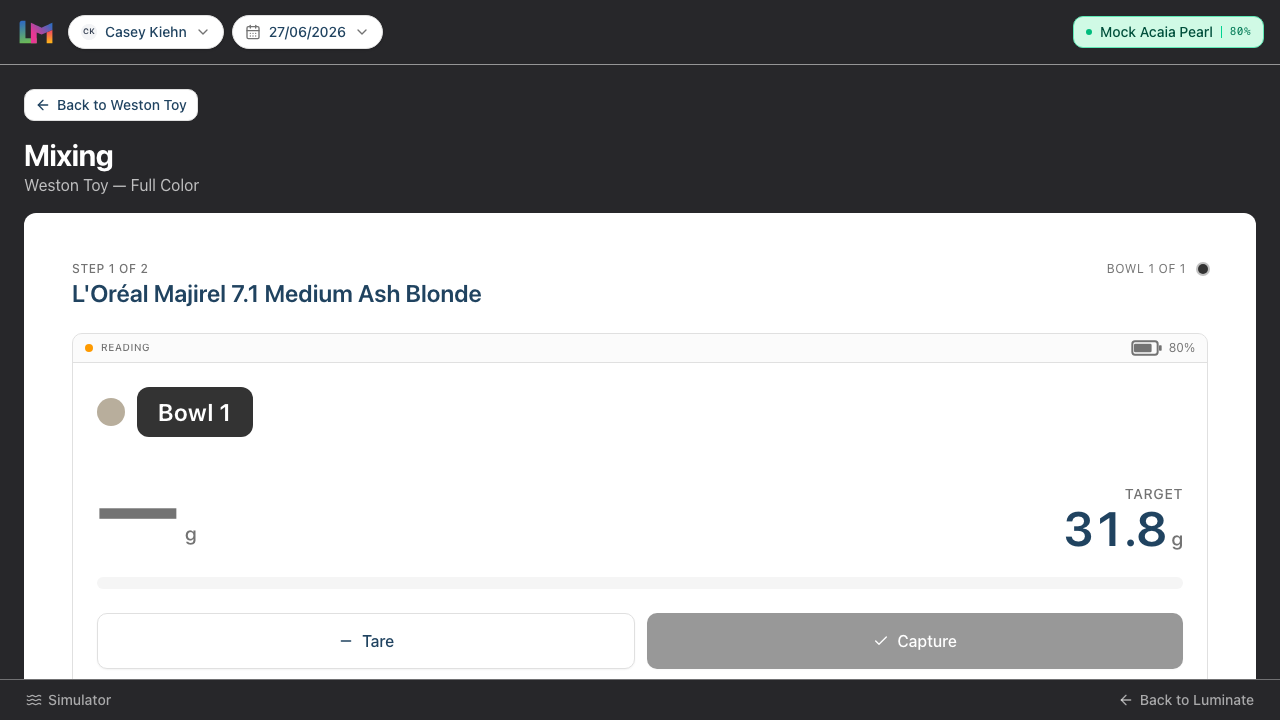
- Active item card — a small "Step X of Y" label with the product name underneath; on the right, a "Bowl N of M" label and the step indicator (one dot per bowl)
- LiveWeightCard — a big solid Bowl N chip (with the product's colour swatch dot) naming the bowl on the scale, the large live weight readout with the target shown just as big beside it, a progress bar with an "X.X g to go" / "X.X g over target" / "On target" line underneath, status strip (Stable / Reading / Scale disconnected + optional battery), and Tare and Capture buttons. A small hint line appears under the buttons when Capture is disabled
- Recipe so far — bowl N — every item in the current bowl, each with a colour swatch dot; a green tick next to captured rows (showing
X.X g) and the remaining rows showingtarget Xg. The item currently being weighed is highlighted in blue with a Now weighing badge, and developer items carry a violet Developer badge. Tap any un-captured row to weigh that item next — handy if you want to pour out of order - "All bowls mixed" card — emerald card that appears once every item has a captured weight, with a Done — apply colour button
Step-by-Step Instructions
Step 1: Place the empty bowl on the scale and Tare
- Put the empty bowl on the scale
- Tap Tare on the LiveWeightCard
- The weight readout resets to
0 g
Tare before every product, not just every bowl. Capture records the absolute weight currently on the scale as that item's actual, so if you pour a second product on top of the first without taring, its captured weight would include the first product too. Tare → pour one product → Capture → tare → pour the next. Taring also zeroes out the empty bowl's own weight, so it doesn't matter that bowls weigh slightly different amounts.
Step 2: Pour product until you hit the target
- The active item's target shows large next to the readout —
TARGEToverX.X g— with a progress bar underneath and a runningX g to goline below it - Pour slowly — the weight increases in real time
- A green dot + Stable appears in the status strip when the reading settles (a few hundred milliseconds without change)
- An amber dot + Reading means the scale is still fluctuating — wait a moment before capturing
- If you pour past the target, the weight turns amber and the progress bar turns amber — over-target is allowed, just visual feedback
Step 3: Capture the weight
- With a stable reading close to the target, tap Capture
- The weight is recorded as the item's
actual_grams - The item ticks off in the Recipe so far panel
- The Active item card advances to the next uncaptured item
If there's another product for the current bowl, tare again and keep pouring. When you move to a new bowl, re-tare too.
Weighing out of order? The Colour Bar normally cues up the next uncaptured item for you, but you can tap any un-captured row in Recipe so far to make it the active item instead. The row you tap highlights blue and shows a Now weighing badge, and the LiveWeightCard re-points to that item's target.
Step 4: Work through all bowls
The step indicator at the top shows your progress across bowls. Keep pouring, taring between bowls, and capturing — the Colour Bar advances automatically.
Step 5: Finalise
When every item has been captured, the emerald "All bowls mixed" card appears:
- Tap Done — apply colour
- The formula finalises immediately — there's no confirmation dialog, so only tap when you're ready
- Stock decrements, overage billing (if any) stages onto the draft transaction, and the Colour Bar returns to Today with the toast "Formula saved. Apply colour now — weigh leftovers when you return."
Step 6: What happens if the scale disconnects mid-mix?
- The LiveWeightCard turns to Scale disconnected state
- Tare and Capture are disabled
- You can continue using the Colour Bar — you just can't capture until the scale reconnects
Once the scale reconnects, Tare and Capture re-enable. Your captures so far are safe — saved to the server as you went.
Reading the LiveWeightCard
The status strip has one of three connection states. Over-target and low-battery are visual modifiers layered on top.
| Indicator | What you see | What to do |
|---|---|---|
| Stable | Green pulsing dot + "STABLE" | Safe to Capture |
| Reading | Amber dot + "READING" | Wait a moment, let the scale settle |
| Scale disconnected | BluetoothOff icon + "SCALE DISCONNECTED" | Check the scale (awake, paired, in range). Tare and Capture are disabled |
| Over target (modifier) | Weight number, the "over target" delta line, and the progress bar all turn amber | You've overpoured — either adjust the bowl or Capture the higher weight; overage billing handles it |
| Battery low (modifier) | The battery icon turns amber at ≤ 20% (the percentage figure beside it stays in its normal colour) | Charge the scale between appointments |
When Capture is disabled, a hint appears directly under the buttons explaining why. The exact strings are:
- "Pair a scale to capture readings."
- "Place the bowl on the scale to read the weight."
- "Waiting for a stable reading…"
Common Pitfalls
"Capture is greyed out"
Capture is disabled when the scale is disconnected, there's no reading yet (nothing on the pan), or the reading isn't stable. Check the hint under the buttons — it tells you which one. A weight of 0.0 g with a stable reading is allowed (sometimes you deliberately capture nothing for an item).
"I overpoured — now what?"
Either tip a bit back out (not always possible with colour), or accept the higher actual. The formula's overage will simply be larger. The charge rule handles it.
"The scale shows a weight but the Colour Bar says disconnected"
Connection recently dropped. Give it a few seconds to reconnect, or force a re-pair via Tutorial 20.14 (when published). Meanwhile you can still hand-enter actuals via the web app's formula dialog (Tutorial 20.6).
"I completed a bowl but the Recipe so far doesn't reflect it"
Refresh the page. Your captures are server-side so nothing's lost — the UI just hasn't caught up.
"I tapped Done but nothing happened"
Network blip — Done — apply colour posts straight to the server without a local confirmation step. Wait a second, then tap again. If it persists, switch to the web app dialog (Tutorial 20.6) to finalise — the data is the same.
Tips and Best Practices
- Re-tare before every product, always — not just between bowls. Capture stores the scale's absolute reading, so a product poured on top of an un-tared one captures both their weights combined.
- Wait for Stable — Capturing on Reading leaves small-but-systematic errors across a full mix.
- Glance at the battery before each appointment — a 20-minute charge is cheaper than a missed capture.
- Capture isn't a countdown — no-one's penalising you for hesitating. Pour past target, pour back, settle, Capture.
- Keep an eye on the progress bar — over-target is a normal part of the workflow, not an error.
Related Tutorials
- Tutorial 20.11: Colour Bar: Planning a Formula — the screen before this one
- Tutorial 20.13: Colour Bar: Reweighing Leftovers — the screen after this one
- Tutorial 20.14: Pairing Your Acaia Pearl Scale (DRAFT) — pairing flow
- Tutorial 20.15: Troubleshooting the Colour Bar & Scale
- Tutorial 20.8: Overage Billing Explained — what happens after Finalise
Frequently Asked Questions
Can I edit the plan mid-mix?
Yes — return to Edit from the appointment hub. Your current actuals are preserved when you save the edit.
Why doesn't it weigh for me automatically?
The Colour Bar reads the scale continuously but waits for a stable reading before allowing Capture. This stops you capturing a fluctuating weight and producing bad actuals.
Does Capture commit the formula immediately?
No — Capture records the actual for one item. The formula finalises when you tap Done — apply colour at the end.
What if the scale connects to the wrong device (e.g. another stylist's iPad)?
The Acaia Pearl pairs to one device at a time. Disconnect from the other device first. The long-term plan is per-device pairing handled by the app (Tutorial 20.14).
Is there a way to weigh without capturing?
Yes — just read the weight on the display. Capture is the "commit this weight as this item's actual" button. If you're just checking, don't tap it.
Last Updated: April 2026