Targeting the Right Customers with Segment Filters
Tutorial 19.2: Targeting the Right Customers with Segment Filters
Introduction
Not every message should go to every customer. A "We miss you!" offer makes no sense for someone who visited last week, and a VIP reward shouldn't go to a first-time walk-in. Segment filters let you narrow down exactly who receives your campaign based on their appointment history, spending, preferences, and more.
This tutorial explains every available filter, how filters combine, how marketing consent is enforced for you, and how to build targeted audiences for common salon scenarios.
Who this is for: Salon owners, admins, and managers creating marketing campaigns.
What you'll learn:
- How segment filters work and how they combine (AND logic)
- How marketing consent is enforced automatically (it isn't a filter you add)
- Every available filter type and what it does
- How the campaign type (marketing vs transactional) changes the base audience
- How the live recipient count estimate works
- Channel requirements for email and SMS campaigns
- Practical filter combinations for common marketing scenarios
Time to complete: 15-20 minutes
Prerequisites
Before you begin, make sure you have:
- Familiarity with creating campaigns, including choosing the channel and campaign type (see Tutorial 19.1)
- Customers in your system with varying appointment history, spending, and consent settings (see Tutorial 3.1 for adding customers)
- An understanding of marketing consent (see Tutorial 3.3 for customer preferences)
Step-by-Step Instructions
Step 1: Access the Audience Step
- Create a new campaign or edit an existing draft (see Tutorial 19.1)
- Navigate to step 2, Audience, using the step navigation at the top
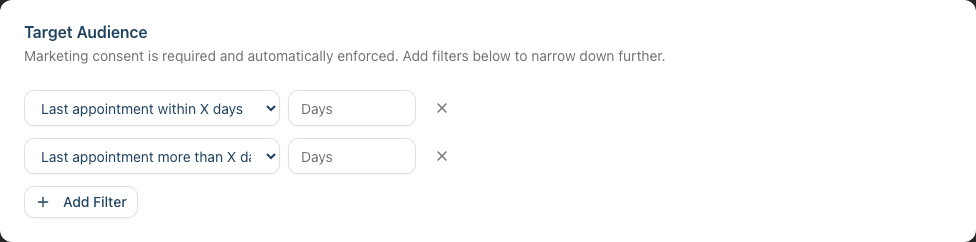
- You'll see the Target Audience card. Its description depends on the campaign type you chose in step 1:
- Marketing campaigns: "Marketing consent is required and automatically enforced. Add filters below to narrow down further."
- Transactional campaigns: "Optional filters to narrow the transactional audience."
Step 2: Understand How Filters Combine
All segment filters use AND logic — a customer must match every filter you add to be included. For example, if you add "Last appointment within 30 days" AND "Is VIP customer", only customers who are both VIP and visited within the last 30 days will receive the campaign.
The more filters you add, the narrower your audience becomes.
Step 3: Understand the Base Audience (Consent Is Enforced Automatically)
You do not add a consent filter — Luminate enforces consent for you, based on the campaign type:
- Marketing campaigns are only ever sent to customers who have opted in to marketing on that channel (email marketing consent for email campaigns, SMS marketing consent for SMS campaigns). This is required by law and is applied automatically. You cannot turn it off, and there is no consent filter to add or remove.
- Transactional campaigns are operational notices (closures, staff changes). Instead of marketing consent, they require the customer to have opted in to transactional messages on that channel and to have an upcoming appointment or one completed within the last 12 months. A blue information banner on the Audience step reminds you of this baseline.
In both cases, the base audience is the starting point. Any segment filters you add can only narrow this audience further — they can never widen it to include customers who haven't consented.
Step 4: Add a Filter
- Click the Add Filter button below the existing filters
- A new filter row appears with a dropdown to select the filter type
- Choose a filter type from the dropdown
- If the filter requires a value (such as a number of days or an amount), enter it in the field that appears
- The Estimated recipients count updates automatically as you add or modify filters
To remove a filter, click the X button on the right side of the filter row.
When no filters have been added, the builder shows the message "No filters added — the campaign will target all eligible email contacts" (or "all eligible SMS contacts" for SMS campaigns). The Add Filter button is disabled once you have added every available filter type — each filter type can only be used once.
Step 5: Understand All Available Filters
There are 13 filter types, grouped below by category. (Note there is no "marketing consent" filter — consent is enforced automatically, as explained in Step 3.)
Appointment-Based Filters
| Filter | What It Does | Input |
|---|---|---|
| Last appointment within X days | Customers who completed an appointment within the specified number of days | Number of days |
| Last appointment more than X days ago | Customers who have visited before but haven't completed an appointment within the specified number of days | Number of days |
| Never had an appointment | Customers who have never had a completed appointment | None |
| Appointment count at least | Customers with at least this many completed appointments | Minimum count |
| Appointment count at most | Customers with no more than this many completed appointments | Maximum count |
| Has an appointment on | Customers with an appointment on a specific day, or anywhere within a date range. Cancelled and no-show appointments are excluded, but scheduled, confirmed, and completed appointments all count | Date or date range |
Spending Filters
| Filter | What It Does | Input |
|---|---|---|
| Total spend at least | Customers whose total spend meets or exceeds this amount | Currency amount |
| Total spend at most | Customers whose total spend is at or below this amount | Currency amount |
| Has outstanding balance | Customers who have unpaid or partially paid transactions | None |
Customer Attribute Filters
| Filter | What It Does | Input |
|---|---|---|
| Birthday month | Customers born in the selected month | Select a month (January–December) |
| Referral source | Customers whose referral source exactly matches the text you enter | Text (e.g., "Google", "Facebook") |
| Has badge | Customers who have a specific badge assigned | Select a badge (VIP, Prefers Silence, Often Late, Often Early, Frequent Visitor, New Customer) |
| Is VIP customer | Customers with the VIP badge (a shortcut for the "Has badge" → VIP combination) | None |
Note: The appointment-based filters that say "completed" (everything except Has an appointment on) only count appointments with a completed status. Has an appointment on is the exception — it counts any appointment that isn't cancelled or a no-show, so it can match upcoming bookings too.
Step 6: Read the Estimated Recipients Count
Below the filters, you'll see the Estimated recipients indicator:
- While calculating, you'll see a spinning icon with "Calculating..."
- Once ready, it shows the count in bold. The wording depends on the campaign type and channel:
- Marketing email: "42 customers with an email address matching your filters"
- Marketing SMS: "42 customers with a phone number matching your filters"
- Transactional (either channel): "42 customers in the transactional audience matching your filters"
- If the estimate can't be calculated, you'll see "Unable to estimate"
This count reflects the number of active customers who:
- Are in the base audience for the campaign type (marketing consent, or the transactional baseline — see Step 3)
- Match all your filters
- Have the required contact information (email address for email campaigns, phone number for SMS campaigns)
The estimate updates every time you add, remove, or change a filter, or change the channel or campaign type.

Step 7: Build Targeted Audiences for Common Scenarios
Here are practical filter combinations for common salon marketing goals. (All assume a marketing campaign, so marketing consent is already enforced — you don't add it.)
Win Back Lapsed Customers
Goal: Re-engage customers you haven't seen in a while.
- Last appointment more than 60 days ago — targets customers who have visited before but not recently
Reward Your VIPs
Goal: Send an exclusive offer to your most loyal customers.
- Is VIP customer — only customers with the VIP badge
- Last appointment within 90 days — ensures they're still active
Birthday Month Special
Goal: Send a birthday treat to customers celebrating this month.
- Birthday month — select the current month
Encourage First-Timers to Return
Goal: Follow up with customers who've only visited once.
- Appointment count at least — set to 1
- Appointment count at most — set to 1
- Last appointment more than 14 days ago — give them time to have returned on their own
High-Value Customer Appreciation
Goal: Thank your biggest spenders.
- Total spend at least — set to your threshold (e.g., 500)
Common Pitfalls
"My recipient count dropped to zero after adding a filter"
Filters use AND logic, so each additional filter narrows the audience further. If you're too specific, you may exclude everyone. Try removing one filter at a time to see which one is causing the drop. Also remember that the base audience is already limited to customers who have the required contact information and the right consent (marketing consent for marketing campaigns, or the transactional baseline for transactional campaigns).
"I can't find a marketing consent filter to add"
There isn't one — and that's intentional. Marketing consent is enforced automatically for every marketing campaign, so you never need to add it as a filter. Customers who haven't opted in to marketing on the campaign's channel are excluded before any of your filters even run.
"The referral source filter isn't matching any customers"
The referral source filter matches the exact text in the customer's referral source field. Make sure you're entering the value exactly as it appears on customer profiles — for example, "Google" rather than "google search". Check a few customer profiles to see how the referral source is recorded.
"I'm not sure what counts as a 'completed' appointment"
Most appointment-based filters only count appointments with a completed status — cancelled, no-show, and scheduled appointments are not included. The one exception is Has an appointment on, which counts any appointment that isn't cancelled or a no-show (so it includes upcoming scheduled and confirmed bookings as well as completed ones).
"I added every filter and the Add Filter button stopped working"
Each filter type can only be used once. Once you've added all 13 filter types, the Add Filter button is disabled because there's nothing left to add. This is rarely useful in practice — a handful of well-chosen filters is almost always better than stacking all of them.
Tips and Best Practices
- You don't manage consent here — marketing consent is enforced automatically for marketing campaigns. Focus your filters on who within your opted-in audience should receive this particular message
- Start broad, then narrow — begin with one or two filters and check the estimated count. Add more filters only if the audience is too large
- Use birthday campaigns monthly — set a recurring reminder to create a birthday campaign at the start of each month using the Birthday month filter
- Combine appointment and spending filters thoughtfully — "Last appointment more than 60 days ago" AND "Total spend at least 200" targets high-value customers you're at risk of losing
- Check the estimate before proceeding — always verify the estimated recipient count before moving to the next step. If the count seems unexpectedly low or high, review your filters and double-check the campaign type
- Remember that customers need contact info — even if a customer matches all your filters and has consented, they won't receive the campaign if they're missing an email address (for email) or phone number (for SMS)
Related Tutorials
- Tutorial 19.1: Introduction to Marketing Campaigns — creating your first campaign, choosing the channel, and choosing the campaign type
- Tutorial 19.3: Sending, Scheduling, and Testing Campaigns — what to do after building your audience
- Tutorial 3.3: Customer Preferences and Communication Consent — managing marketing consent and communication preferences
- Tutorial 3.1: Adding and Managing Customer Profiles — ensuring your customers have complete contact information
Frequently Asked Questions
Can I use OR logic instead of AND?
No, all filters combine with AND logic. Every customer must match all filters to be included. If you need to reach two different groups (e.g., VIPs OR customers who haven't visited in 60 days), create two separate campaigns — one for each group.
What happens if I don't add any filters?
The campaign targets everyone in the base audience for that campaign type who has the required contact information. For a marketing campaign that means all active customers who have opted in to marketing on the campaign's channel. For a transactional campaign it means customers with an upcoming or recently-completed appointment who have opted in to transactional messages on that channel.
Do I need to add a consent filter to stay compliant?
No. Marketing consent is always enforced automatically — there's nothing for you to add or remember. Customers who haven't opted in are never included in a marketing campaign, regardless of which filters you set.
Does the "Total spend" filter include refunded transactions?
Yes, the total spend calculation includes both completed and refunded transactions. Deposit credits applied to a transaction are subtracted from the total.
Can I save a set of filters to reuse later?
Not directly, but you can duplicate a sent campaign to create a new draft with the same filters. This is a great way to reuse a proven audience segment. See Tutorial 19.3 for details on duplicating campaigns.
How does the "Last appointment more than X days ago" filter work exactly?
It includes customers who have had at least one completed appointment in the past, but whose most recent completed appointment was more than X days ago. It does not include customers who have never had an appointment — use the "Never had an appointment" filter for those.
What's the difference between "Last appointment within X days" and "Has an appointment on"?
"Last appointment within X days" looks only at completed appointments in a rolling recent window. "Has an appointment on" looks at a specific calendar date or range and counts any appointment that isn't cancelled or a no-show — including upcoming scheduled and confirmed bookings. Use "Has an appointment on" when you want to reach people booked in on a particular day (for example, to message everyone due in next Saturday).
Are inactive or deleted customers included?
No. Segment filters only target active customers in your salon. Archived or inactive customers are automatically excluded.
Last Updated: June 2026