
Daily Closing Procedures
Tutorial 17.2: Daily Closing Procedures
Introduction
A thorough closing routine is just as important as opening properly. End-of-day procedures ensure your cash balances, appointments are properly recorded, and you're prepared for the next business day. This guide provides a comprehensive closing checklist to help you wrap up each day efficiently.
Consistent closing procedures protect your business by catching discrepancies early, ensuring all transactions are properly recorded, and preparing the salon for a smooth start the next morning.
Who this is for: Owners, Admins, Managers, and staff members responsible for closing the salon.
What you'll learn:
- How to close and reconcile the cash drawer
- Marking no-shows and cancellations
- Processing any unbilled appointments
- Reviewing tomorrow's schedule
- Checking outstanding customer balances
- End-of-day reporting
Time to complete: 15-20 minutes
Prerequisites
Before you begin, make sure you have:
- Access to your Luminate account with appropriate permissions
- All customers have left the premises
- All services for the day have been completed
Step-by-Step Instructions
Step 1: Process Any Remaining Transactions
Before closing, ensure every service from the day has been paid for.
- Click Appointments in the sidebar menu
- The calendar opens in Day view, showing today's bookings (use the Day / Week / List buttons to switch view)
- Work through the day's appointments and identify any where the client was seen but payment hasn't been taken yet
- For each one that still needs payment:
- Click on the appointment to open it
- Click Create Transaction to open the POS (if you already started a sale earlier, the button reads Continue Transaction)
- Take the payment and complete the transaction
Identifying appointments that still need payment:
- Open the appointment and check the Payments tab — if no payment is recorded, it still needs billing
- The Create Transaction button is your cue: it appears on appointments that haven't been billed yet
- A customer's profile also shows their visit history, so you can confirm whether a recent appointment was paid
Tip: Take payment before marking an appointment Complete — once an appointment is set to Complete, the Create Transaction button is no longer shown.
Step 2: Mark No-Shows and Late Cancellations
Update any appointments where customers didn't arrive or cancelled at the last minute.
Still in Appointments, Day view for today
Look for appointments still showing as Scheduled or Confirmed where the time has passed
For each no-show:
- Click on the appointment to open it
- On the Details tab, in the row of status buttons (Scheduled, Confirmed, Arrived, Complete, No Show), click No Show
- The status changes immediately — no confirmation dialog is shown
For late cancellations:
- Click on the appointment
- Click the Cancel button (in the page header, or the Cancel button alongside the status buttons)
- In the Cancel Appointment dialog, review the customer, service, and time, then click Cancel Appointment to confirm (or Keep Appointment to back out)
Tip: Recording no-shows accurately helps identify patterns and customers who frequently miss appointments.
Note: The cancellation dialog confirms the cancellation only — it doesn't ask for a reason or handle deposit refunds. If a deposit was taken and needs refunding, handle that separately through the transaction (see Tutorial 2.2).
Step 3: Close the Cash Drawer
The cash drawer reconciliation is a critical end-of-day task.
- Click Cash Drawers in the sidebar menu
- Find your open cash drawer (showing an Active badge in green)
- Review the session summaries shown on the drawer card:
- Revenue - the day's takings broken down by Cash, Card, Vouchers, Other, and a Total
- Cash in Drawer - the Opening Float, Cash Transactions taken during the session, and the Expected Balance (what should physically be in the drawer)
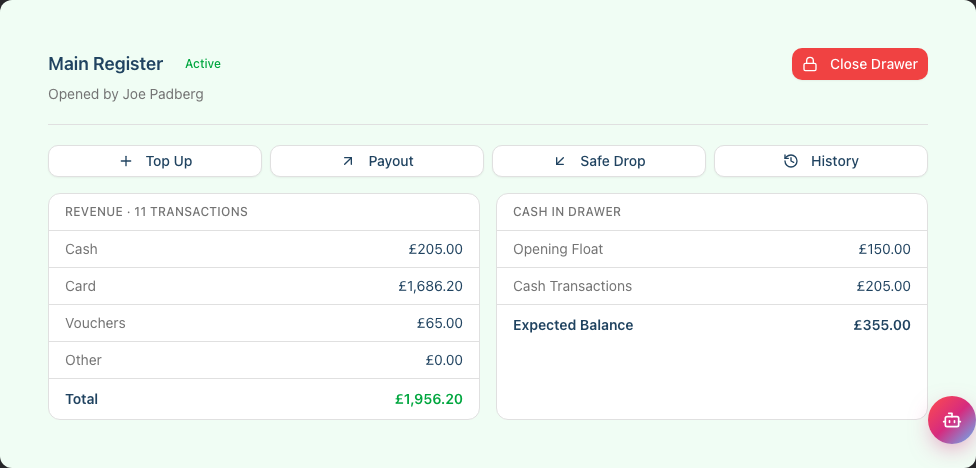
Click Close Drawer
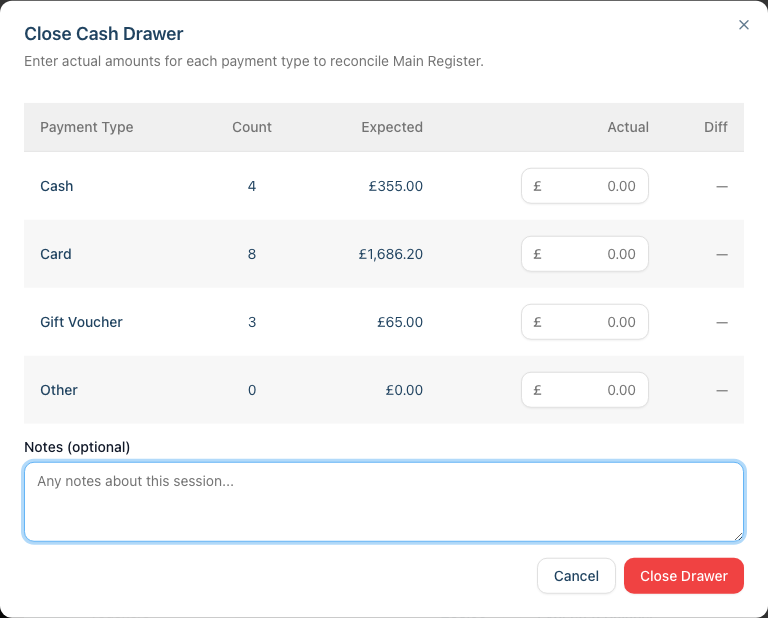
In the Close Cash Drawer dialog, you'll see a reconciliation table with a row for each payment type (Cash, Card, Gift Voucher, Other) and columns for Count, Expected, Actual, and Diff:
- Count the physical cash in your drawer carefully
- Enter the counted amount in the Actual column for Cash (you can also record actual card, voucher, and other totals)
- The Diff column and the overall variance indicator update automatically
The overall variance indicator shows:
- Balanced (green) - Your count matches the expected amount
- Over (blue) - More than expected
- Short (red) - Less than expected
If there's a variance, add an explanation in the Notes (optional) field
Click Close Drawer to complete the reconciliation
Understanding variances:
- Small variances (under £1) are common due to rounding
- Larger variances should be investigated and documented
- Consistent variances may indicate a process issue
Step 4: Review Tomorrow's Schedule
Prepare for the next day by reviewing upcoming appointments.
Click Appointments in the sidebar menu
Navigate to tomorrow's date using the date picker or navigation arrows
Review the schedule for:
- Total appointment count - Is it a busy day?
- Staff coverage - Are all needed staff rostered?
- First appointment time - What time should you open?
- Colour services - Check skin test validity
- New customers - Any first-time visitors to prepare for?
Note any appointments that need preparation:
- Special products to have ready
- Extended time slots for complex services
- VIP customers requiring extra attention
Step 5: Check the Roster for Tomorrow
Confirm staffing is adequate for tomorrow's appointments.
- Click Roster in the sidebar menu
- Make sure you're viewing the week that includes tomorrow — use Next Week / Previous Week, or click Select to pick a date (This Week returns you to the current week)
- The roster shows each staff member as a row and the days of the week as columns, with shift times and a Total Hours column. Verify:
- All staff needed for appointments are rostered
- Shift times cover appointment times (with buffer)
- No conflicting approved leave (leave shows as a coloured band in the day cell)
If you spot a problem:
- Contact staff immediately to arrange cover
- Consider contacting customers to reschedule if needed
- Update the roster accordingly
Step 6: Check Outstanding Balances
Review any customers with unpaid amounts.
- Click Reports in the sidebar menu
- Under Financial Reports, select Accounts Receivable
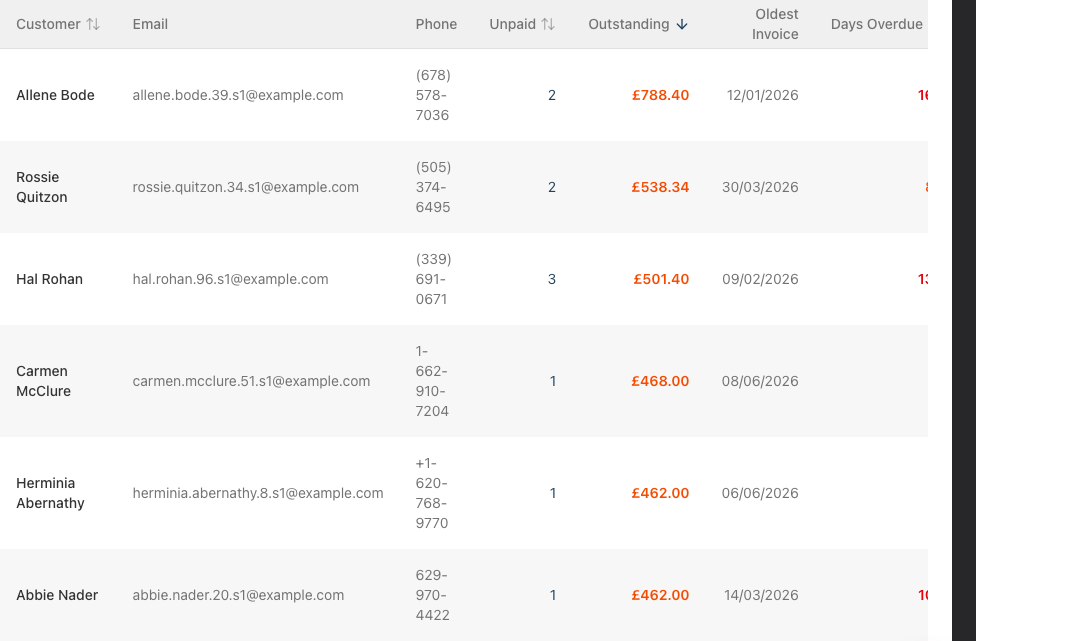
- Review the list of customers with outstanding balances. The table shows Customer, Email, Phone, Unpaid (number of unpaid invoices), Outstanding (amount owed), Oldest Invoice, and Days Overdue
- Use the summary cards at the top (Total Outstanding, Customers with Balance, Average Balance, Oldest Overdue) for an at-a-glance picture, and the filters to narrow by minimum balance, days overdue, or number of unpaid invoices
- Note any balances that:
- Are significantly overdue
- Belong to customers visiting tomorrow
- Need follow-up action
Taking action on outstanding balances:
- For customers visiting soon, you can collect the balance during their next visit
- For overdue amounts, consider sending a reminder message
- For very old debts, discuss write-off options with your manager
- Use Export CSV if you want to work through the list outside the app
Step 7: Record Any Cash Drops or Movements
If you removed cash for safe storage during the day, ensure it's recorded. Cash movements are recorded against the open session, so review the History before you close the drawer.
- Click Cash Drawers in the sidebar menu
- On the open drawer, the quick-action buttons are Top Up, Payout, Safe Drop, and History
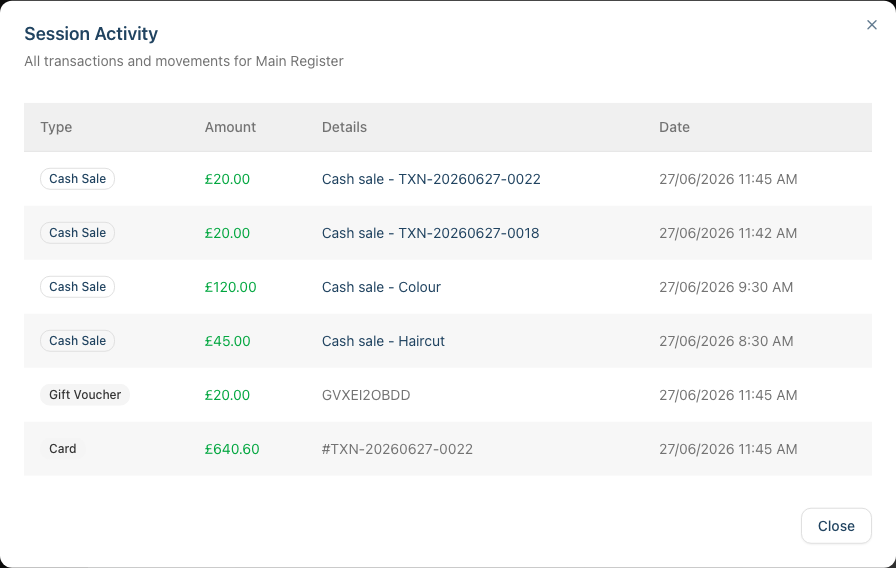
- Click History to open the Session Activity dialog and review every transaction and cash movement for the session. Movements appear with labels such as:
- Top Up - Cash added to the drawer
- Payout - Cash removed for expenses
- Safe Drop - Cash moved to the safe
- Float Adjustment - a correction to the float
- Cash Sale / Refund - takings and refunds from transactions
Note: All movements should have been recorded during the day. This is just a final verification.
Step 8: Review Daily Performance (Optional)
Take a few minutes to review the day's performance.
Click Dashboard in the sidebar menu
Open the Analytics tab and use the period selector to choose Today
Review key metrics:
- Revenue and sales breakdown
- Staff performance rankings
- Rebook rate for the period
For more detailed analysis:
- Click Reports > Daily Revenue for a transaction breakdown
- Click Reports > Staff Performance for individual stats
Note: The Analytics tab and its reports are available to Owners, Admins, and Managers. Staff and Receptionists won't see the full analytics.
Daily Closing Checklist
Use this quick reference checklist each evening:
| Task | Location | Time |
|---|---|---|
| Process remaining transactions | POS / Appointments | 5 min |
| Mark no-shows and cancellations | Appointments | 3 min |
| Close and reconcile cash drawer | Cash Drawers | 5 min |
| Review tomorrow's appointments | Appointments | 3 min |
| Check tomorrow's roster | Roster | 2 min |
| Check outstanding balances | Reports > Accounts Receivable | 2 min |
| Verify cash movements recorded | Cash Drawers > History | 1 min |
Total time: approximately 20 minutes
Common Pitfalls
"The cash drawer is short and I don't know why"
Common causes include: incorrect change given, unrecorded payouts, transactions processed as cash but paid by card. Check the movement history for the session. If you can't find the discrepancy, document it clearly in the closing notes.
"I forgot to mark appointments as no-show before closing"
You can still update appointment statuses after the day ends. Go to Appointments, select the past date, and update the status. This ensures accurate reporting and customer history.
"A customer left without paying"
If you notice this at closing, you have options:
- Contact the customer to arrange payment
- Create a pending transaction for collection at their next visit
- Document the situation for your manager
"An appointment still offers Create Transaction but I'm sure they paid"
Check if the payment was accidentally linked to a different customer or created as a standalone transaction. Look in Transactions for the payment. If found, you may need to link it to the correct appointment.
Tips and Best Practices
Start closing procedures 30 minutes before you need to leave - This prevents rushing and missing important steps.
Count cash twice - Always count your cash drawer at least twice before entering the closing amount. A moment of extra care prevents discrepancies.
Don't ignore small variances - While occasional small differences are normal, patterns of variances should be investigated. They may indicate process issues or training needs.
Communicate issues immediately - If you discover significant problems during closing (missing payments, major variances, etc.), contact your manager before leaving.
Prepare for tomorrow as part of closing - Reviewing tomorrow's schedule while the day is fresh helps you anticipate needs and start the next day smoothly.
Secure all cash properly - Follow your salon's procedures for cash storage. Never leave cash unsecured overnight.
Log out of shared devices - If you use shared computers or tablets, log out of Luminate to protect customer and business data.
Related Tutorials
- Tutorial 17.1: Daily Opening Procedures - Start each day right
- Tutorial 2.5: Using the Cash Drawer - Detailed cash drawer operations
- Tutorial 8.5: Managing Outstanding Balances - Handle customer debts
- Tutorial 9.2: Running Revenue Reports - Analyse daily performance
- Tutorial 2.2: Booking and Managing Appointments - Update appointment statuses
Frequently Asked Questions
What if I find a variance but can't explain it?
Document the variance clearly in the closing notes. Include the amount, the date, and any circumstances that might be relevant (busy day, new staff, etc.). Patterns of unexplained variances should be reviewed with management.
Should I still close the cash drawer if we only had card payments?
Yes. Even if no cash transactions occurred, you should still close the drawer session. Your closing balance should match your opening float exactly. This maintains the audit trail and confirms no cash was handled.
What if I discover a problem after I've already closed the drawer?
A closed session can't be reopened or edited — its figures are locked for the audit trail. Document the issue in your records and inform your manager. You can open a fresh session on the same drawer next time you trade, and any correction can be handled as an adjustment then.
How do I handle appointments that finished after our official closing time?
Complete all transactions before closing the cash drawer, even if it's after hours. You can close the drawer whenever you finish - there's no cut-off time. Just ensure all that day's business is processed.
Should I review tomorrow's schedule if someone else is opening?
If possible, yes. You may notice issues that the opening person wouldn't know about. At minimum, hand over any important notes about tomorrow's appointments to the person opening.
Last Updated: January 2026