Notification Channel Configuration
Tutorial 13.3: Notification Channel Configuration
Introduction
Luminate sends automated notifications to keep your customers informed about their appointments, transactions, and special occasions. The Notifications page lets you configure exactly when and how these messages are sent — by email, SMS, WhatsApp, or any combination.
Effective notification configuration helps reduce no-shows with timely reminders, encourages rebooking with thoughtful follow-ups, and maintains customer relationships through birthday greetings. This tutorial covers how to configure each notification type, choose between email, SMS, and WhatsApp channels, and customise timing to suit your salon's workflow.
Who this is for: Salon owners and administrators who want to configure customer communication settings.
What you'll learn:
- Understanding the different notification types
- Pausing all messaging temporarily
- Adding and configuring appointment reminders
- Setting up follow-up messages
- Configuring birthday notifications
- Managing instant notifications
- Setting up skin test reminders and expiry reminders
- Configuring outstanding balance reminders
- Enabling and disabling individual notifications
Time to complete: 15-20 minutes
Prerequisites
Before you begin, make sure you have:
- Owner, Admin, or Manager role in Luminate
- Understanding of your salon's customer communication preferences
- SMS credits if you want to use SMS notifications (see the SMS tab in Salon Settings)
Step-by-Step Instructions
Step 1: Access Notification Settings
- Click Notifications in the left sidebar menu
- You'll see the Notifications page with two tabs: Configuration and Templates
- The Configuration tab is selected by default, showing all notification types
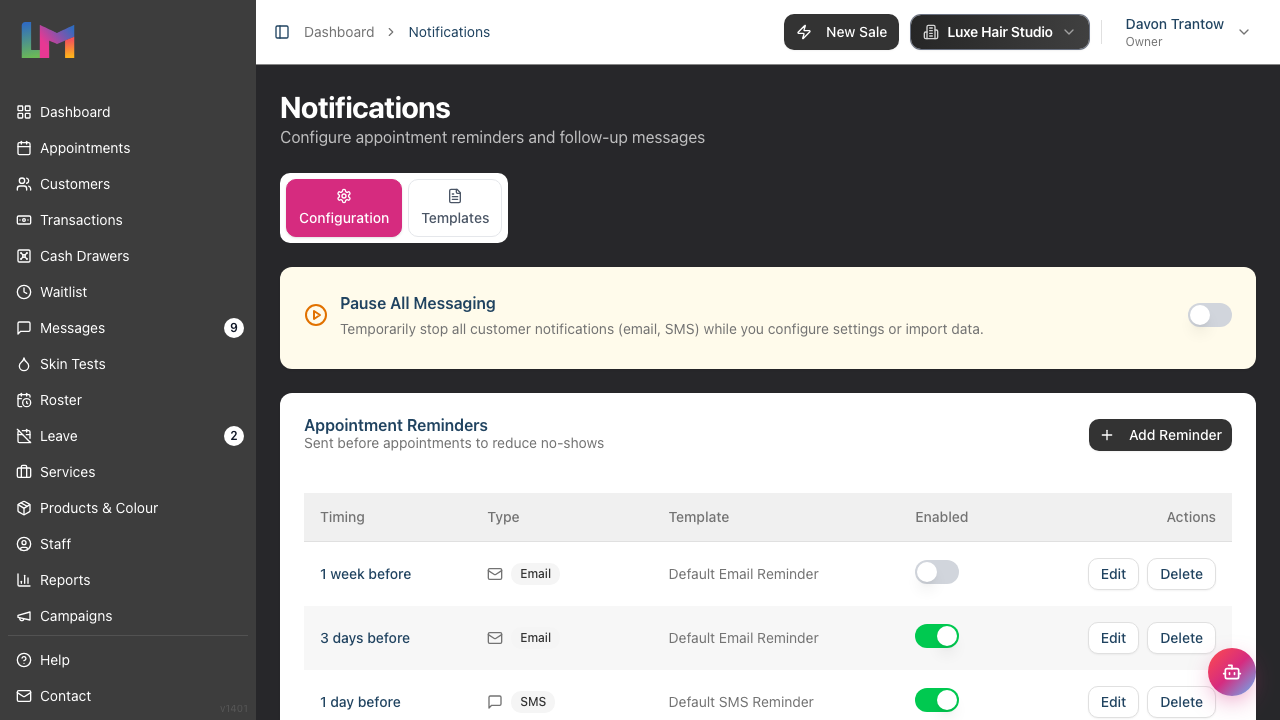
The page is organised into sections for each notification category:
- Pause All Messaging
- Appointment Reminders
- Follow-up Messages
- Birthday Notifications
- Instant Notifications
- Skin Test Reminders
- Skin Test Expiry Reminders
- Outstanding Balance Reminders
Step 2: Pause All Messaging (Optional)
At the top of the Configuration tab, you'll find the Pause All Messaging toggle. This is useful when:
- You're importing customer data and don't want to trigger notifications
- You're configuring settings and want to test without sending messages
- You need to temporarily stop all automated customer communications
When enabled, all customer notifications (email, SMS, and WhatsApp) are paused. Toggle it off when you're ready to resume normal messaging.
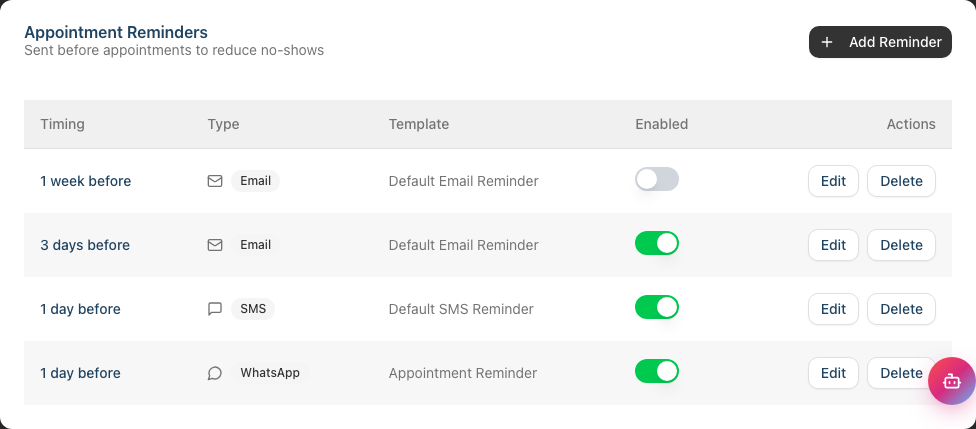
Step 3: Configure Appointment Reminders
Appointment reminders are sent before appointments to reduce no-shows. You can set multiple reminders at different times through different channels.
Viewing existing reminders: The Appointment Reminders section shows a table with:
- Timing - When the reminder is sent (e.g., "1 day before")
- Type - Email, SMS, or WhatsApp
- Template - The message template used
- Enabled - Toggle switch to activate/deactivate
- Actions - Edit or Delete buttons
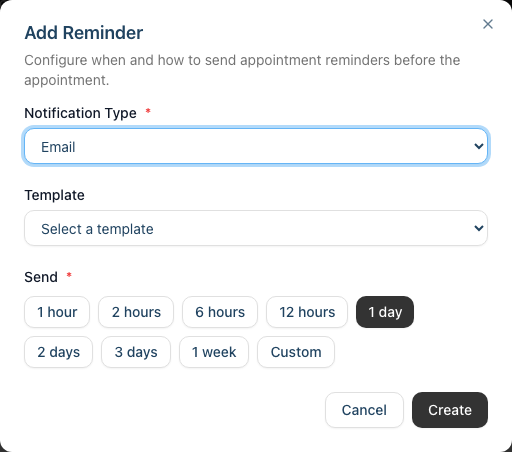
Adding a new reminder:
- Click Add Reminder in the Appointment Reminders section
- In the dialog that appears:
- Select Notification Type: Email, SMS, or WhatsApp
- Choose a Template:
- For Email and SMS, pick one of your own templates from the Templates tab
- For WhatsApp, pick one of the pre-approved templates supplied by Meta — these can't be edited inline
- Set the Send timing using the preset buttons or Custom option
- Click Create to save the reminder
Editing a reminder:
- Click Edit next to the reminder you want to modify
- Update the type, template, or timing as needed
- Click Update to save changes
Enabling/disabling reminders:
- Use the toggle switch in the Enabled column
- Disabled reminders remain configured but won't be sent
- This is useful for temporarily pausing reminders without deleting them
Timing options for reminders:
- 1 hour before
- 2 hours before
- 6 hours before
- 12 hours before
- 1 day before
- 2 days before
- 3 days before
- 1 week before
- Custom (enter any number of hours)
Step 4: Configure Follow-up Messages
Follow-up messages are sent after appointments, typically to thank customers, request feedback, or encourage rebooking.
Adding a follow-up:
- Click Add Follow-up in the Follow-up Messages section
- In the dialog:
- Select Notification Type: Email, SMS, or WhatsApp
- Choose a Template (your own template for Email/SMS, or a Meta pre-approved WhatsApp template)
- Set the Send timing using the preset buttons or Custom option
- Click Create to save
Timing options for follow-ups:
- 1 hour after
- 1 day after
- 2 days after
- 1 week after
- 2 weeks after
- Custom (enter any number of hours)
Best practice: Send a brief thank-you within 24 hours, then a rebooking reminder 1-2 weeks later.
Step 5: Configure Birthday Notifications
Birthday notifications help maintain customer relationships by sending greetings on (or around) their birthday. These only go to customers who have given marketing consent.
Adding a birthday notification:
- Click Add Birthday Notification in the section
- In the dialog:
- Select Notification Type: Email, SMS, or WhatsApp
- Choose a Template from birthday templates (Email/SMS use your own templates and fall back to the default if you don't pick one; WhatsApp uses the Meta pre-approved birthday template)
- Select When to Send: Options include "1 week before", "On birthday", "1 day after", etc.
- Set the Send Time: The specific time of day (e.g., "09:00")
- Click Create to save
Timing options:
- 1 week before
- 3 days before
- 1 day before
- On birthday
- 1 day after
- 3 days after
- 1 week after
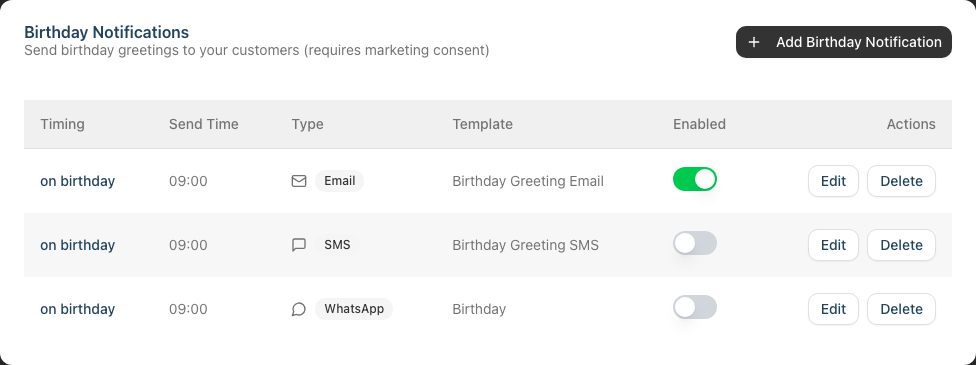
Marketing consent requirement: Birthday notifications require the customer to have opted in to marketing communications. Customers without marketing consent won't receive these messages regardless of settings.
Step 6: Manage Instant Notifications
Instant notifications are sent automatically when specific events occur. Unlike other notification types, these are simple on/off toggles without custom timing.
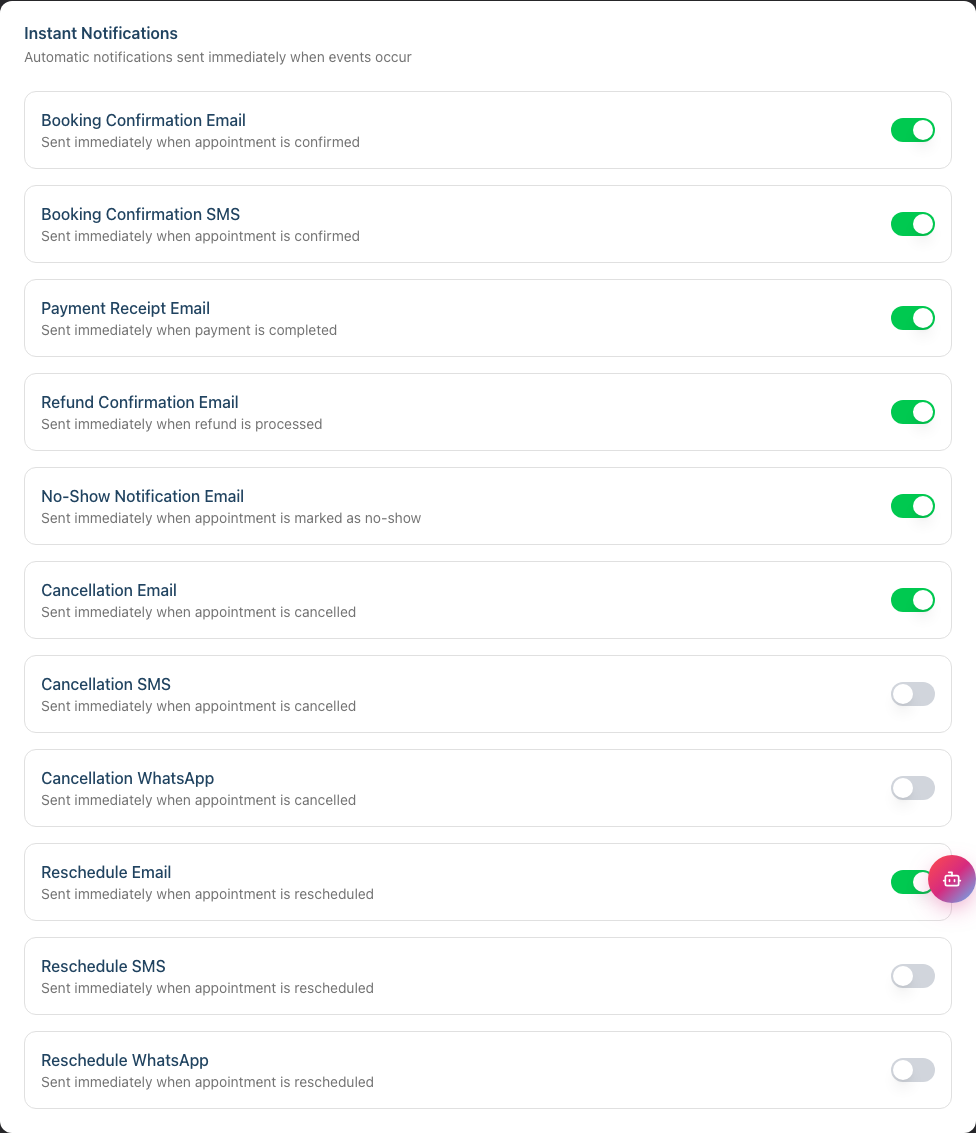
Available instant notifications:
| Notification | Trigger | Description |
|---|---|---|
| Booking Confirmation Email | Appointment created | Confirms a new appointment via email — fires for both staff-booked and customer-booked appointments |
| Booking Confirmation SMS | Appointment created | Confirms a new appointment via SMS — fires for both staff-booked and customer-booked appointments |
| Payment Receipt Email | Payment completed | Sends a receipt when payment is processed |
| Refund Confirmation Email | Refund processed | Confirms when a refund has been issued |
| No-Show Notification Email | Marked as no-show | Informs customer when marked as no-show |
| Cancellation Email | Appointment cancelled | Confirms appointment cancellation via email |
| Cancellation SMS | Appointment cancelled | Confirms appointment cancellation via SMS |
| Cancellation WhatsApp | Appointment cancelled | WhatsApp equivalent of the cancellation notification (uses a Meta pre-approved template) |
| Reschedule Email | Appointment moved | Notifies the customer when an appointment is moved to a new date or time |
| Reschedule SMS | Appointment moved | SMS equivalent of the reschedule notification |
| Reschedule WhatsApp | Appointment moved | WhatsApp equivalent of the reschedule notification (uses a Meta pre-approved template) |
Enabling/disabling: Use the toggle switch next to each notification type. There's no additional configuration — these send immediately when the event occurs. The booking-confirmation, cancellation, and reschedule toggles apply to both staff-initiated changes and customer-initiated changes made via the online booking portal, so a customer rebooking themselves online is governed by the same toggles as a receptionist doing it on the phone.
Step 7: Configure Skin Test Reminders
Skin test reminders notify customers who need a patch test before their colour appointment. This helps ensure safety compliance and reduces appointment issues.
Adding a skin test reminder:
- Click Add Reminder in the Skin Test Reminders section
- In the dialog:
- Select Notification Type: Email, SMS, or WhatsApp
- Choose a Template (your own template for Email/SMS, or a Meta pre-approved WhatsApp template)
- Set Days Before Appointment: When to send relative to the appointment
- Set Send Time: The time of day to send
- Click Create to save
Timing options:
- 2 weeks before
- 10 days before
- 1 week before
- 5 days before
- 3 days before
- 2 days before
- 1 day before
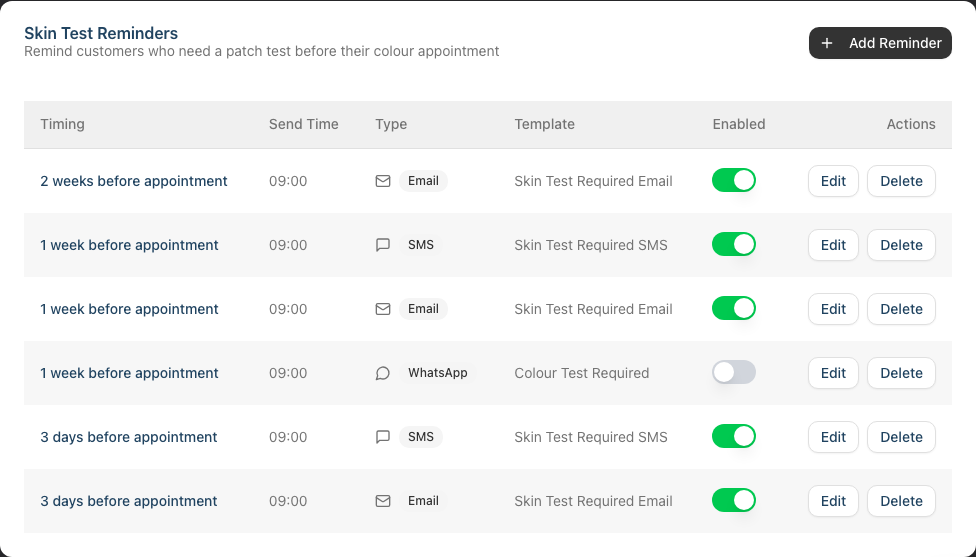
How it works: Luminate automatically identifies appointments for customers who need a skin test (based on their skin test records and the services booked). Reminders are sent only to those who actually need them.
Step 8: Configure Skin Test Expiry Reminders
Skin test expiry reminders notify customers when their existing patch test is about to expire. This is separate from reminders for customers who need a new test before an appointment.
Adding an expiry reminder:
- Click Add Reminder in the Skin Test Expiry Reminders section
- In the dialog:
- Select Notification Type: Email, SMS, or WhatsApp
- Choose a Template (your own template for Email/SMS, or a Meta pre-approved WhatsApp template)
- Set Timing: When to send relative to the expiry date
- Set Send Time: The time of day to send
- Click Create to save
Timing options:
- 1 month before expiry
- 3 weeks before expiry
- 2 weeks before expiry
- 10 days before expiry
- 1 week before expiry
- 5 days before expiry
- 3 days before expiry
- 1 day before expiry
How it works: Luminate tracks each customer's skin test expiry date and sends reminders before it expires, prompting them to book a new patch test.
Step 9: Configure Outstanding Balance Reminders
Outstanding balance reminders notify customers about unpaid amounts on their account. These help with payment collection for partially paid or unpaid transactions.
Adding a balance reminder:
- Click Add Reminder in the Outstanding Balance Reminders section
- In the dialog:
- Select Notification Type: Email or SMS (WhatsApp is not available for balance reminders)
- Select a Template from outstanding balance templates
- Choose Send After: How long after the balance becomes overdue
- Click Create to save
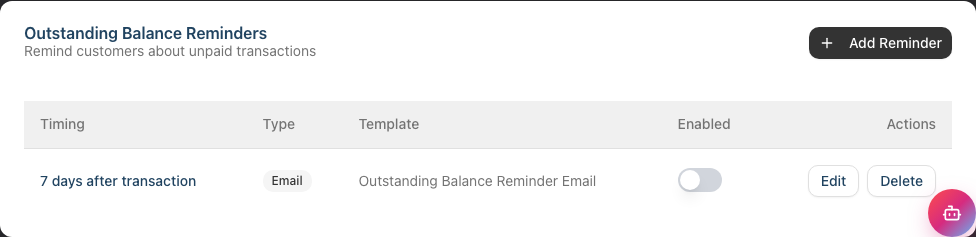
Timing options:
- 1 day overdue
- 3 days overdue
- 1 week overdue
- 2 weeks overdue
- 3 weeks overdue
- 1 month overdue
- 2 months overdue
- 3 months overdue
Step 10: Enable or Disable Notifications Globally
Each notification has an individual toggle switch for enabling/disabling. This allows you to:
- Temporarily pause notifications without deleting configuration
- Test notification setup before going live
- Disable specific channels (e.g., turn off SMS but keep email)
Common Pitfalls
"Reminders aren't being sent"
Check that:
- The notification is enabled (toggle is on)
- The "Pause All Messaging" toggle is off
- The customer has a valid email address or phone number
- For SMS: you have sufficient SMS credits
- For marketing-related notifications: the customer has marketing consent
"Customer didn't receive the notification"
Check the customer's contact details. Email notifications require a valid email address; SMS and WhatsApp both require a valid mobile number (and the customer needs to have WhatsApp installed to receive WhatsApp messages). Also check your salon's SMS credit balance for SMS sends.
"I set up multiple reminders but only one was sent"
Multiple reminders at the same timing merge into one. If you have two "1 day before" reminders (one email, one SMS), both should send. If they're both email, only one sends.
"Birthday notifications aren't sending"
Birthday notifications require:
- Customer has a date of birth recorded
- Customer has marketing consent enabled
- The notification is enabled
- "Pause All Messaging" is off
"Skin test reminders going to wrong customers"
Skin test reminders are based on the customer's skin test status and booked services. Ensure skin test records are accurate and services are correctly tagged as requiring skin tests.
Tips and Best Practices
Don't over-communicate - One reminder 24-48 hours before is often sufficient. Too many reminders can annoy customers.
Use SMS for urgent reminders - SMS has higher open rates than email. Use it for day-before or same-day reminders.
Use email for detailed content - Follow-ups with rebooking links or detailed receipts work better as emails.
Time reminders appropriately - Send morning reminders (9-10 AM) rather than evening ones. Customers are more likely to see and act on them.
Test before going live - Create a test appointment for yourself to verify notifications arrive correctly.
Monitor SMS credits - Set up auto top-up or check credits regularly to avoid running out during busy periods.
Review quarterly - Check which notifications have good engagement and adjust timing or content accordingly.
Stagger multiple reminders - If using multiple reminders, space them out (e.g., 1 week before and 1 day before) rather than clustering them.
Use the Pause All Messaging feature - When importing data or making bulk changes, pause messaging first to avoid sending unwanted notifications.
Related Tutorials
- Tutorial 10.1: Setting Up Appointment Reminders - Detailed reminder configuration
- Tutorial 10.2: Birthday Notifications and Customer Engagement - Birthday message strategies
- Tutorial 10.3: Creating Custom Notification Templates - Creating and editing templates
- Tutorial 10.5: SMS Balance and Usage Tracking - Managing your SMS credits
- Tutorial 11.2: GDPR Compliance - Understanding consent requirements for marketing communications
Frequently Asked Questions
Can I preview what a notification will look like?
Yes. Edit the template from the Templates tab to see a preview of the message content. The actual notification includes customer-specific details populated from their record.
What's the difference between reminders and follow-ups?
- Reminders are sent before an appointment to prompt attendance
- Follow-ups are sent after an appointment for thank-you messages, feedback requests, or rebooking encouragement
Do SMS notifications cost extra?
Yes. SMS messages use credits from your SMS balance. You can view your balance and purchase credits from the SMS tab in Salon Settings.
What about WhatsApp — is it the same as SMS?
WhatsApp is a separate channel from SMS. It uses pre-approved message templates supplied by Meta (you can't edit the wording inline), and messages are delivered over the customer's WhatsApp account rather than their mobile network. The customer still needs a valid mobile number for the salon to reach them on WhatsApp.
Can customers opt out of notifications?
Customers can opt out of marketing communications (affecting birthday and promotional messages). Transactional notifications (appointment confirmations, receipts) are always sent as they're considered essential service communications.
What happens if I run out of SMS credits?
SMS notifications fail to send when credits are exhausted. Email notifications continue unaffected. Consider enabling auto top-up to prevent this.
Can I send notifications in multiple languages?
Templates are created in a single language. For multilingual salons, create multiple templates and assign them to appropriate customer segments, or use a single language understood by all customers.
Do reminders send if the appointment is cancelled?
No. Reminders only send for confirmed appointments. Cancelled appointments don't trigger reminders.
Can I see which notifications were sent to a customer?
Customer communication history is available in the Messages section. This shows sent emails, SMS messages, WhatsApp messages, and their status.
What time zone are send times based on?
All notification times use your salon's configured timezone. A reminder set for "09:00" sends at 9 AM in your salon's timezone.
Can I have different notification settings for different salons?
Yes. Each salon has independent notification configuration. This allows different communication strategies for different locations.
What's the difference between Skin Test Reminders and Skin Test Expiry Reminders?
- Skin Test Reminders are sent before appointments when a customer needs a patch test for their upcoming service
- Skin Test Expiry Reminders are sent when a customer's existing patch test is about to expire, regardless of whether they have an appointment booked
What does "Pause All Messaging" do?
It temporarily stops all automated customer notifications (email, SMS, and WhatsApp). Manual messages can still be sent through conversations. This is useful during data imports or when configuring settings.
Last Updated: May 2026