Creating Custom Notification Templates
Tutorial 10.3: Creating Custom Notification Templates
Introduction
Notification templates control what your customers see when they receive messages from your salon. Whether it's an appointment reminder, birthday greeting, payment receipt, or any other automated communication, well-crafted templates help maintain your brand voice and ensure customers have the information they need.
Luminate provides a visual email builder for creating polished HTML emails and a streamlined SMS editor for concise text messages. Both support dynamic tokens that automatically insert customer and appointment details like names, dates, and times.
This tutorial covers everything you need to know about creating, editing, and managing notification templates for the Email and SMS channels. WhatsApp is also available as a notification channel, but WhatsApp messages use pre-approved templates that are managed centrally rather than built here — see Channels: Email, SMS and WhatsApp below.
Who this is for: Salon owners and administrators who want to customise automated customer communications.
What you'll learn:
- Understanding template types and channels
- Creating email templates with the visual builder
- Creating SMS templates with character counting
- How WhatsApp templates differ from email and SMS
- Using dynamic tokens for personalisation
- Setting default templates
- Managing and organising your template library
Time to complete: 20-30 minutes
Prerequisites
Before you begin, make sure you have:
- Owner or Admin role access (requires the manage-notifications permission)
- A clear idea of what message you want to create
- Your salon logo uploaded (optional, for email headers - this appears automatically)
Step-by-Step Instructions
Step 1: Navigate to Template Management
- From any page in Luminate, click Notifications in the main sidebar menu
- Click the Templates tab at the top of the page
- You'll see the Message Templates card with a list of existing templates and filtering options
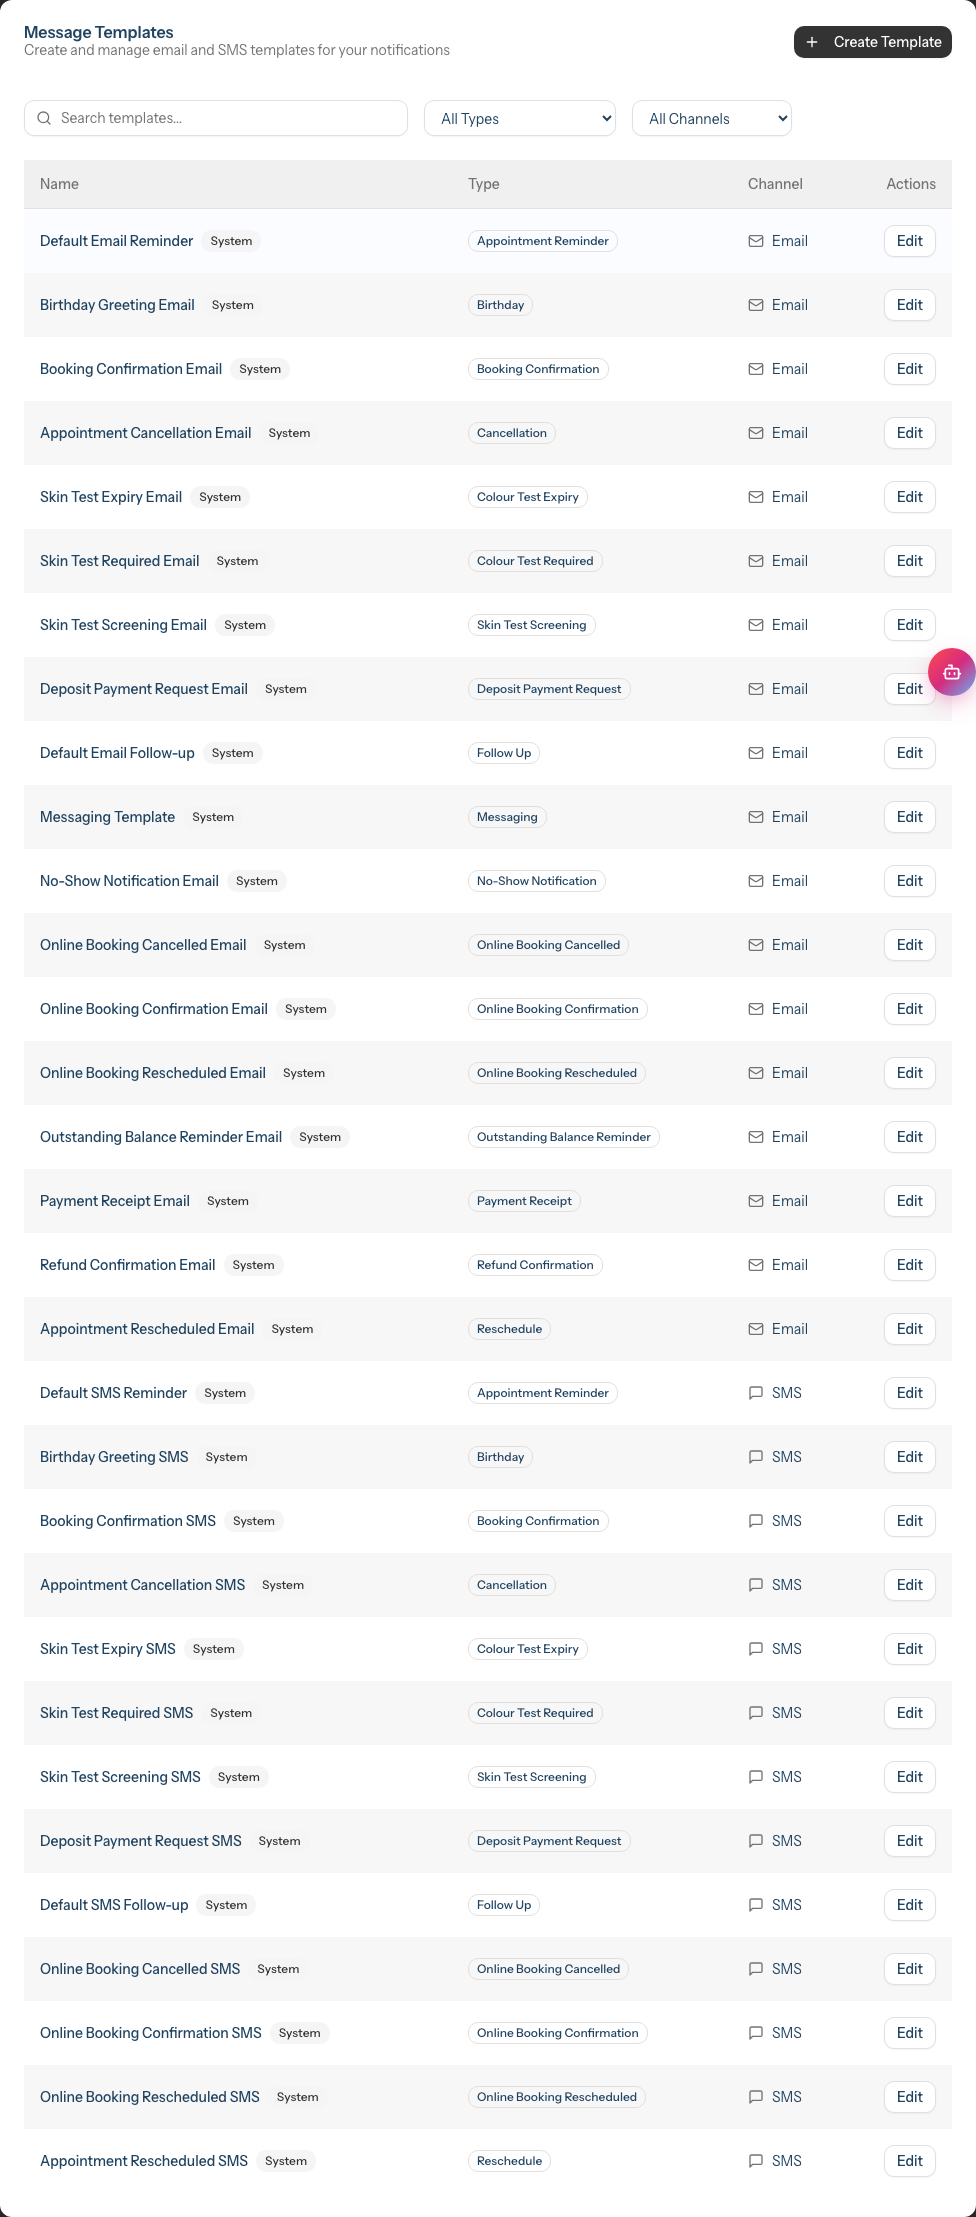
The Templates tab shows:
- Search - Find templates by name or subject
- Type filter - Filter by template type (Appointment Reminder, Birthday, etc.)
- Channel filter - Filter by Email, SMS, or WhatsApp
- Template table - Lists each template's Name, Type and Channel, with Edit and Delete actions. System templates are marked with a System badge next to their name
Note: The library lists the email and SMS templates you create (plus any system templates). WhatsApp templates are pre-approved and managed centrally, so they do not appear in this list even though WhatsApp is offered as a channel filter — see Channels: Email, SMS and WhatsApp.
Step 2: Understand Template Types
Templates are categorised by their purpose:
| Type | Used For |
|---|---|
| Appointment Reminder | Messages sent before appointments |
| Booking Confirmation | Confirmation when appointment is booked |
| Cancellation | Notification when appointment is cancelled |
| Reschedule | Notification when appointment is rescheduled |
| Follow Up | Messages sent after appointments |
| Birthday | Customer birthday greetings |
| Skin Test Expiry | Warning when skin test is expiring |
| Skin Test Required | Reminder to book a patch test |
| Messaging | Two-way conversation templates |
| Payment Receipt | Confirmation of payment |
| Refund Confirmation | Confirmation of refund |
| Outstanding Balance Reminder | Reminder about unpaid amounts |
| No-Show Notification | Notification when customer doesn't attend |
| Online Booking Confirmation | Confirmation for online bookings |
| Online Booking Cancelled | Cancellation of online booking |
| Online Booking Rescheduled | Reschedule notification for online bookings |
| Skin Test Screening | Pre-screening questions for a patch test |
| Deposit Payment Request | Request for an online booking deposit |
Each type can have templates for different channels (Email, SMS).
Note: You can create new templates for the following types:
- Appointment Reminder
- Follow Up
- Birthday
- Outstanding Balance Reminder
- Skin Test Expiry
- Skin Test Required
Other template types (Booking Confirmation, Cancellation, etc.) are system-managed. You can edit the existing system templates for these types, but cannot create additional ones.
Channels: Email, SMS and WhatsApp
Notifications in Luminate can be sent over three channels, but they are not all authored the same way:
| Channel | How the message is created |
|---|---|
| Built here in the visual email builder (see Step 3) | |
| SMS | Written here in the SMS editor (see Step 4) |
| Chosen from a list of pre-approved templates — not written in Luminate |
Email and SMS are the only channels available when you create or edit a template on this page — the Channel dropdown offers Email and SMS, and that choice is fixed once the template is saved.
WhatsApp works differently. WhatsApp requires every message template to be approved by Meta (the company behind WhatsApp) before it can be sent. Because of this, you don't write WhatsApp message content inside Luminate. Instead, a set of pre-approved WhatsApp templates is made available to your salon, and you choose the one you want when you configure a reminder or notification on the Configuration tab — not from the template builder.
When you pick WhatsApp as the channel while adding a reminder, follow-up, birthday or skin-test notification, the template field becomes a read-only picker listing the approved WhatsApp templates, each with a short preview of its wording. For step-by-step guidance on assigning a WhatsApp template, see Tutorial 10.1: Setting Up Appointment Reminders and Tutorial 10.2: Birthday Notifications and Customer Engagement.
In short: use this page to build your Email and SMS templates. To use WhatsApp, choose an approved WhatsApp template when setting up the reminder or notification itself.
Step 3: Create an Email Template
- Click the Create Template button (top right of the Templates tab)
- You're taken to the template creation page
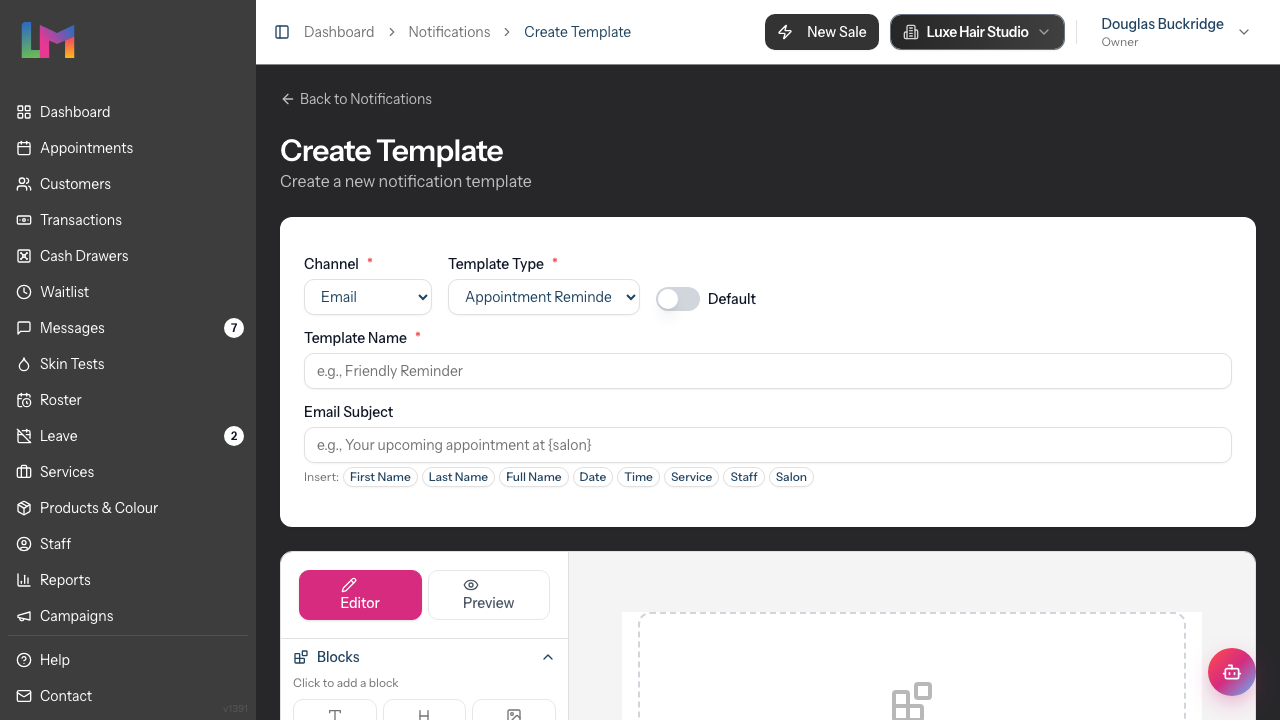
Configure basic settings (top section):
- Channel - Select Email from the dropdown
- Template Type - Choose the appropriate type (e.g., "Appointment Reminder")
- Default toggle - Turn ON if this should be the default template for this type
- Template Name - Enter a descriptive name (e.g., "Friendly Reminder - Email")
Set the email subject:
Email Subject - Enter the subject line customers will see in their inbox
- Example: "Your appointment at {salon} is coming up!"
- Notice the
{salon}token - it will be replaced with your salon name
Insert tokens - Click the token buttons below the subject field to add dynamic content:
- First Name, Last Name, Full Name
- Date, Time
- Service, Staff
- Salon
Build the email body:
- The Email Builder appears below the settings. This visual editor lets you design professional emails without coding.
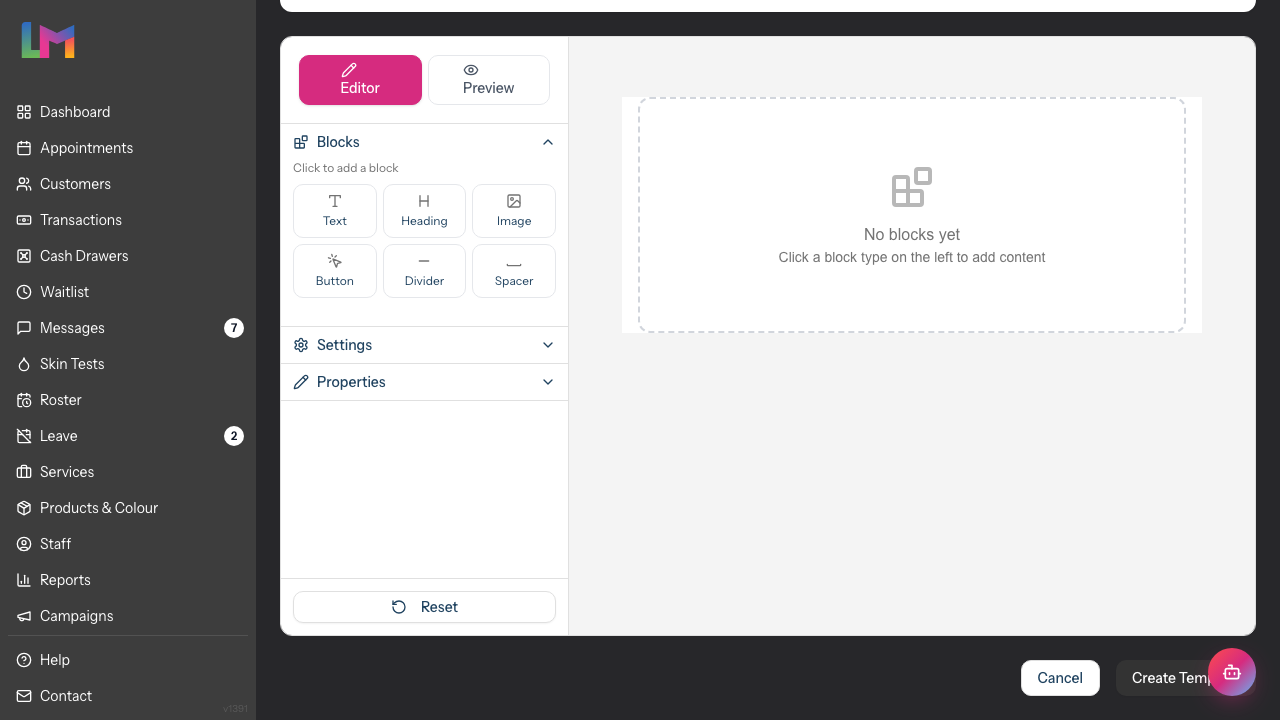
The email builder includes:
- Sidebar with three accordion sections:
- Blocks - Click to add content blocks to your email
- Settings - Configure document-wide settings (width, colours, fonts)
- Properties - Edit the selected block's content and styling
- Editor/Preview tabs - Switch between building and previewing your email
- Visual canvas - See your email as you build it
Note: Your salon branding (logo or name) is automatically added to the top of every email template. This uses the logo you've uploaded in Salon Settings, or displays your salon name if no logo is set.
Available blocks:
- Text - Body copy with formatting options
- Heading - Large text for titles (H1, H2, H3)
- Image - Insert images with URL
- Button - Call-to-action buttons (e.g., "View Appointment")
- Divider - Visual separator between sections
- Spacer - Add vertical spacing
Build your email by clicking blocks in the sidebar to add them. Click any block in the canvas to select it and edit its properties in the sidebar. Use tokens like
{first_name}within text blocks for personalisation.Click Create Template (or Save Changes when editing) in the top-right corner
Step 4: Create an SMS Template
SMS templates are simpler than email but require careful attention to length.
- Click Create Template
- Channel - Select SMS
- Template Type - Choose the appropriate type
- Default toggle - Turn ON if this should be the default
- Template Name - Enter a descriptive name (e.g., "24hr Reminder - SMS")
Write the SMS message:
The SMS Message section appears with a text area and helpful tools:
- Token buttons (above the text area) - Click to insert tokens at your cursor position
- Character counter - Shows current character count
- Remaining characters - Shows how many characters are left in the current segment
- Segment indicator - A badge showing how many SMS segments the message will use
- Emoji warning - If you type an emoji or special character, an "Emojis detected (70 char limit)" note appears
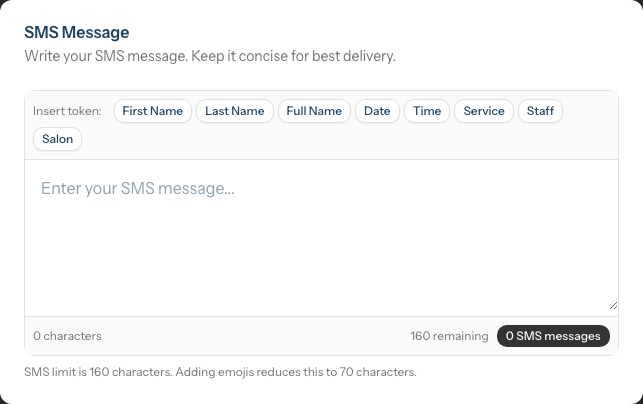
- Type your message in the text area. Keep it concise - SMS messages should be under 160 characters if possible to avoid multiple segments (which cost more credits).
SMS Character Limits:
- Standard messages (GSM characters): 160 characters for a single SMS, or 153 per segment for longer messages
- Messages with emojis/special characters (Unicode): 70 characters for a single SMS, or 67 per segment for longer messages
The editor displays a warning when your message will be split into multiple SMS messages.
- On the right side, there's an Available Tokens card. Click any token here to copy it to your clipboard, then paste where needed.
Example SMS templates:
Reminder: {first_name}, your {service} appointment is tomorrow at {time}. See you at {salon}! To reschedule, call us on [your number].
Hi {first_name}! Just a reminder about your appointment today at {time}. Looking forward to seeing you! - {salon}
- Click Create Template to save
Step 5: Use Dynamic Tokens
Tokens are placeholders that get replaced with actual values when the message is sent.
| Token | Replaced With | Example |
|---|---|---|
{first_name} |
Customer's first name | Sarah |
{last_name} |
Customer's last name | Johnson |
{full_name} |
Customer's full name | Sarah Johnson |
{date} |
Appointment date | 15th January 2026 |
{time} |
Appointment time | 2:30 PM |
{service} |
Service name | Cut & Colour |
{staff} |
Staff member name | Emma |
{salon} |
Your salon name | Luminate Hair Studio |
Token tips:
- In the email subject field, click the small token buttons to insert at the cursor position
- In email builder text blocks, type tokens directly using the
{token_name}format - In the SMS editor, click the token buttons above the text area to insert at your cursor position
- In the Available Tokens card (SMS), click a token to copy it to your clipboard
Step 6: Set a Default Template
Each template type (for each channel) can have one default template. The default is used when no specific template is assigned to a reminder or notification setting.
To make a template the default:
When creating: Toggle the Default switch ON
For existing templates:
- Click Edit on the template
- Toggle the Default switch ON
- Click Save Changes
Note: When you mark a template as default, any previous default for the same type/channel is automatically unmarked.
Step 7: Edit Existing Templates
To modify a template:
- Find it in the Templates list
- Click the template name or click Edit in the Actions column
- Make your changes
- Click Save Changes
Note: You cannot change a template's channel or type after creation. If you need a different channel/type combination, create a new template.
Step 8: Delete Templates
To remove a template:
- Click Delete in the Actions column
- Confirm by clicking Delete in the dialog
Important restrictions:
- You cannot delete a template that is currently assigned to a reminder setting — if you try, Luminate shows an error telling you how many reminder configurations are using it
- You cannot delete system templates — these show a System badge and have no Delete button (only Edit)
- Deleted templates cannot be recovered
If you see an error when trying to delete, check which reminders are using that template and assign a different template first.
Step 9: Organise Your Templates
Use the filter and search tools to manage a growing template library:
- Search - Type any part of the template name or subject
- Type filter - Show only templates of a specific type
- Channel filter - Filter by Email, SMS or WhatsApp (the library only contains the Email and SMS templates you create, so filtering by WhatsApp returns no results)
A well-organised naming convention helps:
- Include the channel: "Reminder - Email" vs "Reminder - SMS"
- Include the timing: "48hr Reminder", "Same-Day Reminder"
- Include the purpose: "Birthday - With Discount", "Birthday - No Offer"
Common Pitfalls
"My tokens aren't being replaced in the email"
Make sure you're using the correct format with curly braces: {first_name} not {{first_name}} or [first_name]. In the email builder, tokens must be typed exactly as shown.
"The SMS is using multiple credits"
SMS messages over 160 characters are split into multiple segments, each costing one credit. For messages with emojis or special characters, the limit is just 70 characters. The editor shows you exactly how many segments your message will use. Keep messages concise and avoid emojis if possible to maximise character count.
"I can't delete a template"
The template is likely assigned to a reminder setting. Go to the Configuration tab, find the reminder using that template, and either delete the reminder or assign a different template.
"My email looks different on mobile"
The email builder creates responsive emails, but complex designs may render differently on various email clients. Keep emails simple and test by sending to yourself on different devices.
Tips and Best Practices
Keep SMS under 160 characters - Single-segment messages are cheaper and display better. Every character counts, so abbreviate thoughtfully.
Front-load important information - Put the key details (date, time, action required) early in the message, especially for SMS where users see a preview.
Include a clear call-to-action - Tell customers what to do: "Reply to confirm", "Click to reschedule", "Call us on...".
Personalise meaningfully - Using
{first_name}makes messages feel personal. "Hi Sarah" beats "Dear Customer".Match your brand voice - Templates should sound like your salon. A luxury spa uses different language than a trendy urban barber.
Test before going live - Create a test appointment for yourself and trigger the notification to see exactly what customers receive.
Create channel-appropriate versions - Email allows more detail and formatting; SMS needs to be brief. Don't just copy the same content.
Include essential information:
- Reminders: Date, time, service, location
- Confirmations: What was booked, when, how to change it
- Receipts: What was purchased, total paid, payment method
Review templates periodically - Phone numbers, addresses, and offers change. Set a reminder to review templates quarterly.
Related Tutorials
- Tutorial 10.1: Setting Up Appointment Reminders - Assign templates (including WhatsApp) to reminders
- Tutorial 10.2: Birthday Notifications and Customer Engagement - Create birthday templates
- Tutorial 10.5: SMS Balance and Usage Tracking - Understand SMS credit usage
- Tutorial 13.1: Salon Profile and Business Information - Upload your salon logo
- Tutorial 13.3: Notification Channel Configuration - Enable and configure the email, SMS and WhatsApp channels
Frequently Asked Questions
Can I create or edit WhatsApp templates here?
No. WhatsApp message templates must be pre-approved by Meta, so they aren't written inside Luminate. The template builder on this page covers Email and SMS only. To use WhatsApp, choose WhatsApp as the channel when adding a reminder, follow-up, birthday or skin-test notification on the Configuration tab, then pick one of the approved WhatsApp templates from the list. See Tutorials 10.1 and 10.2.
Why does the channel filter show WhatsApp if there are no WhatsApp templates in the list?
The library only holds the Email and SMS templates you create. WhatsApp is listed as a filter for consistency, but because WhatsApp templates are managed centrally rather than stored in your library, filtering by WhatsApp returns no results.
Can I include images in SMS messages?
No, SMS is text-only. For rich media, use email or consider future MMS support.
How do I preview my email template?
After saving, you can trigger a test notification by creating an appointment for yourself and setting a reminder to go out soon. Alternatively, the email builder shows a live preview as you design.
Can I duplicate a template?
Currently, there's no one-click duplicate function. To create a similar template, open the original, note its content, then create a new template and recreate the design.
What happens if a token can't be filled in?
If data is missing (e.g., no service name for a general message), the token may be replaced with an empty string or a fallback. Test your templates to ensure they read well even with missing data.
Can different staff members create templates?
Only users with Owner or Admin role can create and edit templates. Manager, Staff, and Receptionist roles cannot access template management.
Is there a limit to how many templates I can create?
No, you can create as many templates as you need to cover different scenarios, campaigns, and seasons.
Can I use HTML code directly in the email builder?
The visual email builder abstracts away HTML code. For advanced customisation, contact support about custom template options.
Last Updated: March 2026
Reviewed and verified against application version: March 2026