Setting Up Appointment Reminders
Tutorial 10.1: Setting Up Appointment Reminders
Introduction
Appointment reminders are one of the most effective tools for reducing no-shows in your salon. Studies show that automated reminders can reduce no-show rates by up to 50%, saving you significant lost revenue and helping your schedule run smoothly.
Luminate's reminder system lets you send automatic messages to customers before their appointments, giving them time to confirm, reschedule if needed, or simply remember their booking. You can also set up follow-up messages that go out after appointments to request feedback, encourage rebooking, or thank customers for visiting.
This tutorial covers everything you need to know about configuring appointment reminders, follow-up messages, and all other notification types on the Configuration page in Luminate.
Who this is for: Salon owners and administrators who want to reduce no-shows and improve customer communication.
What you'll learn:
- How to access the Notifications settings
- Understanding the Configuration page layout and all notification sections
- Adding appointment reminders (sent before appointments)
- Adding follow-up messages (sent after appointments)
- Choosing between Email, SMS, and WhatsApp channels
- Configuring instant notifications (payment receipts, refunds, no-shows, cancellations, reschedules)
- Setting up skin test and skin test expiry reminders
- Configuring outstanding balance reminders
- Enabling, disabling, editing, and deleting notification rules
- Best practices for reminder timing
Time to complete: 15-20 minutes
Prerequisites
Before you begin, make sure you have:
- Owner or Admin role access (Managers, Receptionists, and Staff do not have access to Notifications settings)
- Owner role specifically is required to use the Pause All Messaging kill switch
- At least one notification template created (or use the system defaults)
- For SMS reminders: sufficient SMS credits in your account
- For WhatsApp reminders: a customer's mobile number (WhatsApp is available to all salons — just enable it when setting up your reminders)
Step-by-Step Instructions
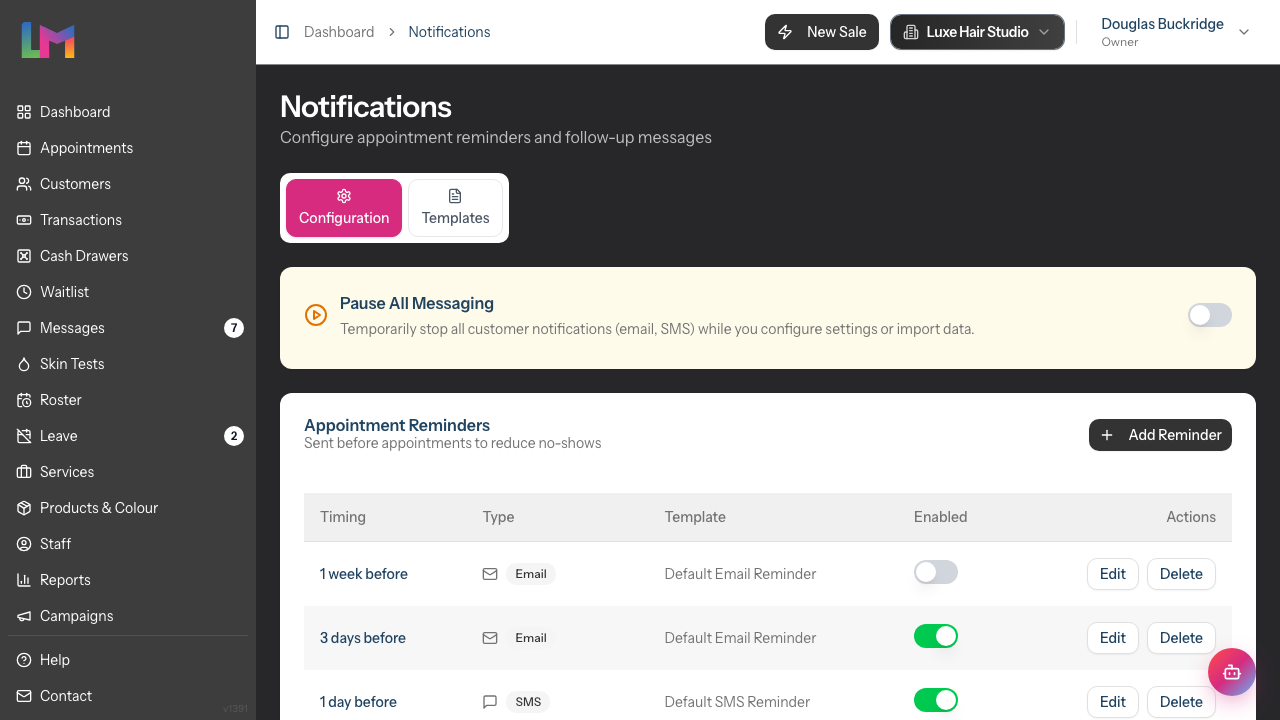
Step 1: Navigate to Notification Settings
- From any page in Luminate, click Notifications in the main sidebar menu
- You'll arrive at the Notifications page with two tabs at the top:
- Configuration - Where you set up reminders and notification rules
- Templates - Where you create and edit message templates
- Make sure the Configuration tab is selected (it's the default)
Step 2: Understand the Configuration Page Layout
The Configuration tab displays several sections:
| Section | Purpose |
|---|---|
| Pause All Messaging | Emergency toggle to pause all automated notifications |
| Appointment Reminders | Messages sent before appointments to reduce no-shows |
| Follow-up Messages | Messages sent after appointments for feedback/rebooking |
| Birthday Notifications | Greetings sent on or around customer birthdays |
| Instant Notifications | Automatic messages for booking confirmations, payments, refunds, no-shows, cancellations, and reschedules |
| Skin Test Reminders | Reminders for customers needing patch tests before colour services |
| Skin Test Expiry Reminders | Reminders when a customer's patch test is about to expire |
| Outstanding Balance Reminders | Follow-ups for unpaid transaction balances |
This tutorial covers each of these sections so you can configure all your notification rules in one place.
Step 3: Add Your First Appointment Reminder
Appointment reminders are sent before the appointment to help customers remember their booking.
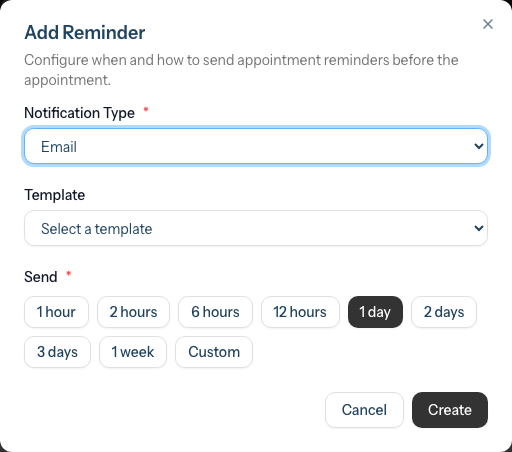
In the Appointment Reminders section, click the Add Reminder button
A dialog appears with three fields:
Notification Type - Choose the notification channel:
- Email - No cost, works for all customers with email addresses
- SMS - Costs credits, but has higher open rates
- WhatsApp - Costs credits, uses pre-approved Meta templates (see note below)
Template - Select which message template to use:
- For Email and SMS, templates are filtered to show only those matching your selected channel
- If no templates appear, you'll need to create one first (see Tutorial 10.3)
- For WhatsApp, you'll see a WhatsApp Template dropdown with pre-approved templates managed by Meta. These cannot be edited within Luminate
Send - Choose when to send the reminder:
- Preset options include: 1 hour, 2 hours, 6 hours, 12 hours, 1 day, 2 days, 3 days, 1 week before
- Click Custom to enter any number of hours for more specific timing
- Most salons use 1 day or 2 days before as the primary reminder
Click Create to save your reminder
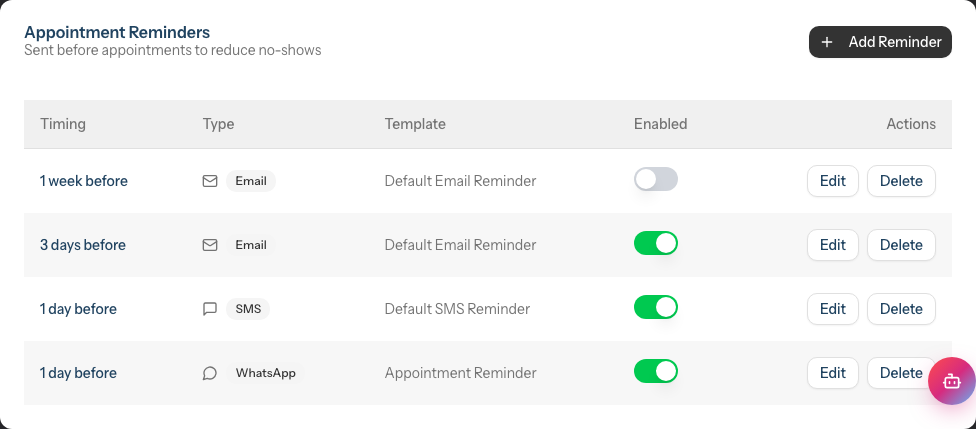
The reminder now appears in the table showing:
- Timing - When it will be sent (e.g., "1 day before")
- Type - Email, SMS, or WhatsApp badge
- Template - The template name being used
- Enabled - Toggle switch to turn reminders on/off
- Actions - Edit and Delete buttons
Step 4: Add Multiple Reminders
Many salons benefit from sending multiple reminders. A common approach:
| Reminder | Channel | Timing | Purpose |
|---|---|---|---|
| First reminder | 2 days before | Give customers time to reschedule if needed | |
| Second reminder | SMS | 1 day before | Higher-visibility reminder closer to appointment |
| Same-day reminder | 2 hours before | Final reminder via a high-visibility channel |
To add additional reminders, simply click Add Reminder again and configure each one separately.
Step 5: Add Follow-up Messages
Follow-up messages are sent after appointments and are great for:
- Thanking customers for their visit
- Requesting feedback or reviews
- Encouraging rebooking
- Sharing aftercare instructions
Scroll down to the Follow-up Messages section
Click Add Follow-up
Configure the follow-up:
Notification Type - Choose Email, SMS, or WhatsApp
Template - Select a follow-up template (these are typically different from reminder templates). For WhatsApp, select from the available pre-approved templates
Send - Choose when to send after the appointment:
- Preset options include: 1 hour, 1 day, 2 days, 1 week, 2 weeks after
- Click Custom to enter any number of hours for more specific timing
- 1 day after is common for thank-you messages
- 1 week after works well for rebooking prompts
Click Create to save
Step 6: Enable or Disable Reminders
Each reminder has a toggle switch in the Enabled column.
- Switch ON (blue) - Reminder is active and will be sent
- Switch OFF (grey) - Reminder is saved but won't be sent
This is useful when you want to:
- Temporarily pause reminders during quiet periods
- Test different reminder strategies
- Keep configurations saved without deleting them
To toggle, simply click the switch. The change saves automatically.
Step 7: Edit an Existing Reminder
To modify a reminder's settings:
- Find the reminder in the table
- Click the Edit button in the Actions column
- The edit dialog opens with the current settings
- Make your changes (channel, template, or timing)
- Click Update to save
Note: You cannot change a reminder from "before" to "after" - instead, delete it and create a new follow-up message.
Step 8: Delete a Reminder
To remove a reminder:
- Find the reminder in the table
- Click the Delete button in the Actions column
- A confirmation dialog appears showing the name of the reminder and warning that the action cannot be undone
- Click Delete to confirm, or Cancel to keep it
Deleted reminders cannot be recovered - you'll need to recreate them if needed.
Step 9: Configure Instant Notifications
The Instant Notifications section controls automatic messages that are sent immediately when certain events occur. Unlike appointment reminders, these have no timing or template-picker controls in this section — each one is simply a row with an Enabled toggle.
Each notification channel appears as its own row. Where a notification type supports more than one channel, you'll see a separate row per channel — for example Cancellation Email, Cancellation SMS, and Cancellation WhatsApp are three independent rows, each with its own toggle.
| Row | Channels available | Default state | Trigger |
|---|---|---|---|
| Booking Confirmation | Email, SMS | Both on | An appointment is created — whether staff book on a customer's behalf or a customer books online |
| Payment Receipt | Email only | On | A payment is completed |
| Refund Confirmation | Email only | On | A refund is processed |
| No-Show Notification | Email only | On | An appointment is marked as no-show |
| Cancellation | Email, SMS, WhatsApp | Email on; SMS and WhatsApp off | An appointment is cancelled |
| Reschedule | Email, SMS, WhatsApp | Email on; SMS and WhatsApp off | An appointment is moved to a new date or time |
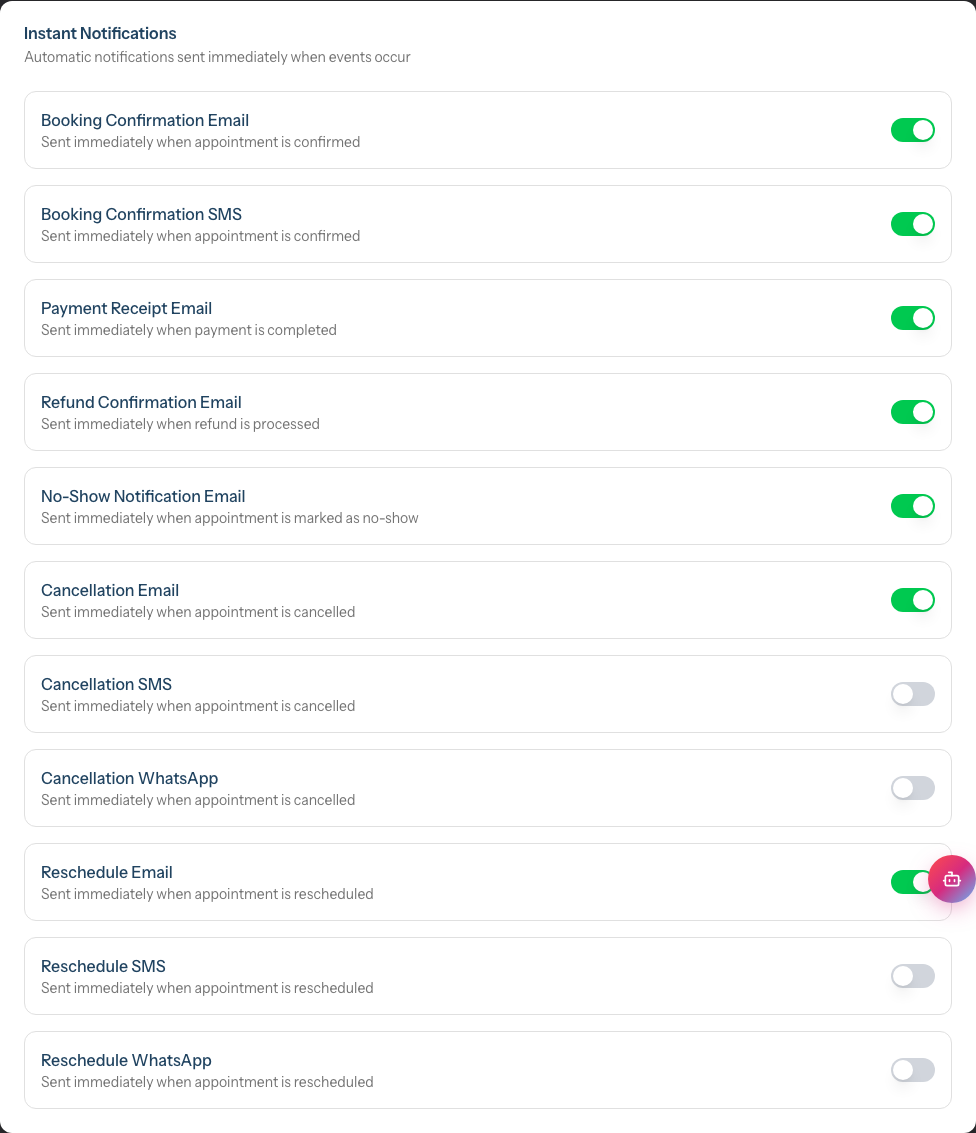
To turn a channel on or off, click its toggle — the change saves automatically.
A note on SMS and WhatsApp credits: the SMS and WhatsApp rows for cancellation and reschedule are off by default to avoid unexpected credit usage. Booking Confirmation SMS is on by default to preserve the historical behaviour where a confirmation always went out — you can switch it off if you'd rather only confirm by email.
These toggles apply to both staff-initiated and customer-initiated changes. If a customer cancels, reschedules, or books their own appointment through the public online booking portal, the same rows govern whether a message is sent — turning the SMS row off skips SMS for online customer-initiated changes too.
Step 10: Set Up Skin Test Reminders
If your salon offers colour services that require a patch test, you can configure two types of skin test reminder:
Skin Test Reminders notify customers who need a patch test before an upcoming colour appointment.
Scroll to the Skin Test Reminders section
Click Add Reminder
Configure the reminder:
Notification Type — Choose Email, SMS, or WhatsApp
Template — Select a skin test reminder template. For WhatsApp, select from the available pre-approved templates
Days Before Appointment — Choose when to send the reminder:
- Options: 2 weeks, 10 days, 1 week, 5 days, 3 days, 2 days, 1 day before
Send Time — Set the time of day the reminder should be sent (in your salon's timezone)
Click Create to save
The reminder table shows: Timing, Send Time, Type (channel badge), Template, Enabled toggle, and Actions (Edit, Delete).
Step 11: Set Up Skin Test Expiry Reminders
Skin Test Expiry Reminders notify customers when their existing patch test is about to expire, prompting them to book a new one.
Scroll to the Skin Test Expiry Reminders section
Click Add Reminder
Configure the reminder:
Notification Type — Choose Email, SMS, or WhatsApp
Template — Select a skin test expiry template. For WhatsApp, select from the available pre-approved templates
Days Before Expiry — Choose how far in advance of expiry to send the reminder:
- Options: 1 month, 3 weeks, 2 weeks, 10 days, 1 week, 5 days, 3 days, 1 day before expiry
Send Time — Set the time of day the reminder should be sent (in your salon's timezone)
Click Create to save
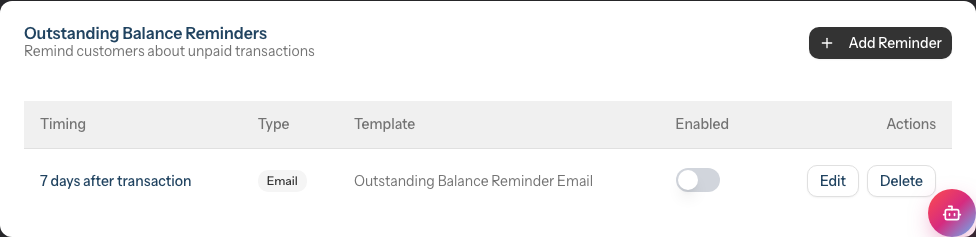
Step 12: Configure Outstanding Balance Reminders
Outstanding balance reminders follow up with customers who have unpaid transactions.
Scroll to the Outstanding Balance Reminders section
Click Add Reminder
Configure the reminder:
Type — Choose Email or SMS (WhatsApp is not available for balance reminders)
Template — Select an outstanding balance template
Send After — Choose when to send the reminder based on how long the balance has been overdue:
- Options: 1 day, 3 days, 1 week, 2 weeks, 3 weeks, 1 month, 2 months, 3 months overdue
Click Create to save
You can create multiple balance reminders at different intervals to escalate the urgency. For example, send a friendly email at 3 days overdue and a follow-up SMS at 2 weeks overdue.
Step 13: Pause All Messaging (Owners Only)
At the very top of the Configuration tab is the Pause All Messaging card — an emergency "kill switch" that stops every automated customer notification at once: reminders, follow-ups, birthday greetings, instant notifications, skin test reminders, and balance reminders.
This control is available to the salon Owner only. Admins, Managers, Receptionists, and Staff cannot pause or resume messaging.

- Scroll to the Pause All Messaging card at the top of the page
- Click the toggle switch to pause all automated messages immediately
- The card heading changes to Automated Messaging Paused (and turns red) to confirm the pause is in effect, showing the date and time it was paused
- Click the toggle again to resume — the heading returns to Pause All Messaging
While messaging is paused, your individual reminder settings keep their configuration — nothing is deleted, and everything resumes exactly as before once you switch it back on. Staff can still message customers manually from the Messaging inbox (see Tutorial 10.4); only the automated sends are held. Use this when something needs checking — for example part-way through a data import or after changing your salon's timezone — and you want to stop all sends while you investigate.
Common Pitfalls
"No templates available for this channel"
If you see a message saying no templates are available when adding a reminder, you need to create a template first. Switch to the Templates tab and create an Appointment Reminder template for your chosen channel (Email or SMS). See Tutorial 10.3 for detailed instructions. Note: WhatsApp templates are managed by Meta and don't require you to create templates within Luminate.
"Customers aren't receiving SMS or WhatsApp reminders"
Check these common causes:
- SMS/WhatsApp credits - Ensure your account has sufficient credits (see Tutorial 10.5)
- Phone numbers - Verify customers have valid mobile numbers in their profiles
- Notification consent - Customers must have transactional notifications enabled
- Reminder is disabled - Check the toggle switch is ON
- WhatsApp requires the app - The customer must have WhatsApp installed on their phone to receive WhatsApp reminders
"Reminders are going out at the wrong time"
Reminder timing is calculated based on your salon's timezone setting. Go to Settings > Salon Profile and verify your timezone is correct. Also note that reminders are scheduled based on appointment start time - a "1 day before" reminder for a 2pm appointment will be sent at 2pm the previous day.
Tips and Best Practices
Start with one reminder - Begin with a single 1-day email reminder, then add more based on your no-show patterns.
Use SMS for same-day reminders - SMS has much higher open rates than email, making it ideal for last-minute reminders.
Don't over-remind - Too many reminders can annoy customers. Two or three total (across all channels) is usually sufficient.
Match timing to your clientele - If you have many busy professionals, 2-day reminders give them time to check calendars. For regular weekly appointments, 1 day is often enough.
Use follow-ups strategically - A thank-you message 1 day after builds loyalty; a rebooking prompt 1 week later drives repeat business.
Test your templates - Create a test appointment for yourself and verify the reminder looks good on both desktop and mobile.
Balance cost and effectiveness - Email is free but SMS and WhatsApp cost credits. Consider email for first contact and SMS or WhatsApp for critical same-day reminders.
Keep messages concise - Reminder messages should be brief and include key information: date, time, service, and how to reschedule if needed.
Consider WhatsApp for high engagement - WhatsApp messages tend to have very high read rates. They work particularly well for same-day reminders where you need customers to see the message quickly. Note that WhatsApp uses pre-approved templates, so the content is fixed.
Stagger balance reminders - Set up multiple outstanding balance reminders at increasing intervals (e.g., 3 days, 2 weeks, 1 month) to give customers several opportunities to pay without overwhelming them.
Send skin test reminders early - Patch tests need to be done well before the colour appointment. A reminder at 1-2 weeks before gives customers enough time to visit the salon for their test.
Related Tutorials
- Tutorial 10.2: Birthday Notifications and Customer Engagement - Set up automated birthday greetings
- Tutorial 10.3: Creating Custom Notification Templates - Design personalised reminder messages
- Tutorial 10.4: Managing the Messaging Inbox - View and manage customer conversations
- Tutorial 10.5: SMS Balance and Usage Tracking - Monitor and top up SMS credits
Frequently Asked Questions
Can I send different reminders to different customers?
Currently, reminders apply to all appointments equally. However, you can create multiple reminders at different times and use templates that work for various customer types.
What happens if a customer has no email or phone number?
Luminate skips sending notifications when the required contact information is missing. For email reminders, the customer needs an email address; for SMS and WhatsApp, they need a mobile phone number.
Are reminders sent for cancelled appointments?
No. Luminate only sends reminders for appointments with "Scheduled" status. Cancelled appointments don't trigger reminders.
Can customers opt out of reminders?
Appointment reminders are considered transactional notifications (not marketing), so they're sent to all customers with valid contact details. Customers can update their communication preferences via the customer preference portal.
What's the difference between SMS and WhatsApp reminders?
Both use the customer's phone number, but they differ in a few ways. SMS works on any mobile phone, while WhatsApp requires the customer to have WhatsApp installed. WhatsApp messages tend to have higher read rates and can include richer formatting. However, WhatsApp templates are pre-approved by Meta and cannot be customised within Luminate, whereas SMS templates can be fully personalised.
Do reminders work with recurring appointments?
Yes. Each appointment in a recurring series is treated as a separate booking, and reminders are sent according to your configured timing for each one.
Why can't I choose WhatsApp for outstanding balance reminders?
Outstanding balance reminders currently only support Email and SMS channels. WhatsApp is available for appointment reminders, follow-ups, skin test reminders, and skin test expiry reminders.
What timezone are reminders based on?
Reminders use your salon's configured timezone. Ensure this is set correctly in Settings > Salon Profile.
Where do I configure online booking confirmations and deposit payment requests?
These two notification types are managed as templates rather than as sections on the Configuration tab. Luminate sends them automatically when a customer books online or when you request a deposit. To customise their wording, edit the relevant template on the Templates tab (see Tutorial 10.3). The online booking confirmation also respects the Booking Confirmation rows in the Instant Notifications section (Step 9), so you can switch confirmation email or SMS on or off from there.
Last Updated: June 2026