Managing Your Online Booking Settings
Tutorial 18.2: Managing Your Online Booking Settings
Introduction
Once you've enabled online booking (see Tutorial 18.1), you can fine-tune how the booking system works. Luminate provides several settings that control when customers can book, how far in advance they can schedule appointments, and whether they can manage their own bookings.
This tutorial covers all the configurable options for your online booking system, helping you create a booking experience that works for both your salon and your customers.
Who this is for: Salon owners and administrators who want to customise their online booking settings.
What you'll learn:
- Choosing which services are available for online booking
- Setting minimum lead time and maximum advance booking
- Configuring buffer time between appointments
- Enabling customer self-service (rescheduling and cancellation)
- Configuring SMS verification for bookings
- Controlling how returning clients rebook previous appointments
- Adding booking terms and conditions
Time to complete: 10-15 minutes
Prerequisites
Before you begin, make sure you have:
- Owner or Admin access to your salon
- Online booking enabled (see Tutorial 18.1)
Step-by-Step Instructions
Step 1: Access Online Booking Settings
- Click your salon name in the header bar
- Select Salon Settings from the dropdown menu
- Click the Online Booking tab
Step 2: Choose Bookable Services
The Bookable Services section lets you control which services appear on your public booking page.
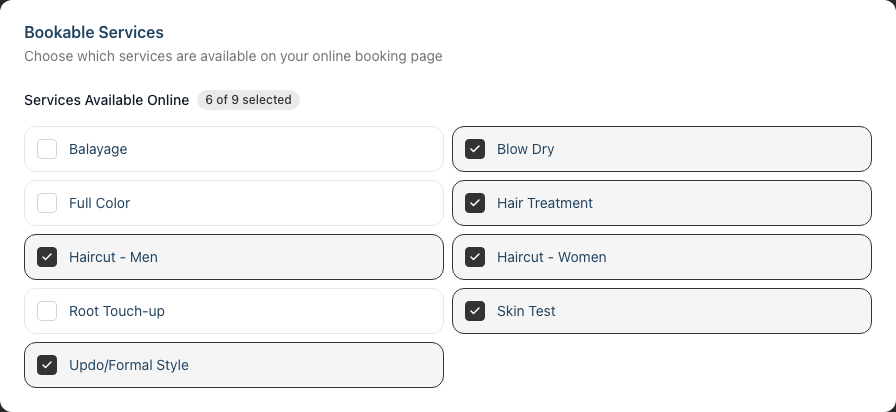
Understanding the Service Grid
- Find the Bookable Services card
- You'll see a grid of all your active services with checkboxes
- A counter shows how many services are currently selected (e.g., "6 of 8 selected")
Toggling Services
- Click a service tile to toggle it on or off
- Checked (with tick icon): Service appears on the booking page
- Unchecked (no tick): Service is hidden from online booking
When to Use This
- Launch gradually: Start with your most popular services and add more over time
- Seasonal services: Disable seasonal services when not offered
- Staff-only services: Keep consultation-only or internal services off the public page
- High-value services: If you prefer to handle complex bookings personally, keep them offline
Note: You can also toggle individual services from the service edit page using the Available for online booking checkbox (see Tutorial 7.1). Changes made here and on the service edit page stay in sync — they control the same setting.
How this works with online booking being enabled: A service only appears on your public booking page when both conditions are met — the service has Available for online booking enabled (here or on its edit page) and your salon has online booking switched on (see Step 1 of Tutorial 18.1). If online booking is disabled for the salon, your public booking page is unavailable entirely, regardless of which services are ticked here. If online booking is enabled but a service is unticked, the rest of your bookable services still appear — just not that one.
Per-Stylist Service Restrictions
The settings on this page apply to the whole salon. To say "Sarah doesn't take colour bookings online" or "only senior stylists offer balayage online" — those choices live on each staff member's edit page, not here.
Open the staff member, scroll to Services Offered Online, and untick the services you don't want them to appear for. The same page also has Services Offered In-Salon, which controls assignment on the internal calendar. See Tutorial 4.1 for the full walkthrough.
Step 3: Configure Booking Constraints
The Booking Constraints section controls when customers can make bookings.

Minimum Lead Time
This setting prevents last-minute bookings by requiring customers to book a minimum number of hours in advance.
- Find the Minimum Lead Time field
- Enter the number of hours (0-168)
- The label shows "hours before"
Examples:
- 0 hours: Customers can book right up to the appointment time
- 2 hours: Customers must book at least 2 hours before the appointment
- 24 hours: Customers must book at least one day in advance
- 48 hours: Customers must book at least two days in advance
Why use this:
- Gives staff time to prepare for appointments
- Prevents no-shows from last-minute bookings
- Ensures you have time to confirm bookings if needed
Maximum Advance Booking
This setting limits how far into the future customers can book.
- Find the Maximum Advance Booking field
- Enter the number of days (1-365)
- The label shows "days ahead"
Examples:
- 30 days: Customers can book up to one month ahead
- 60 days: Customers can book up to two months ahead
- 90 days: Customers can book up to three months ahead
Why use this:
- Matches your roster planning cycle
- Prevents bookings too far ahead when schedules might change
- Keeps availability manageable
Buffer Between Appointments
This adds extra time between online bookings, giving staff breathing room between appointments.
- Find the Buffer Between Appointments field
- Enter the number of minutes (0-120)
- The label shows "minutes"
Examples:
- 0 minutes: No buffer; appointments can be booked back-to-back
- 15 minutes: 15-minute gap between each online booking
- 30 minutes: 30-minute gap for cleaning or preparation
Why use this:
- Allows time for cleaning and sanitisation
- Provides a buffer for appointments that run over
- Gives staff breaks between clients
- Accounts for client check-in and checkout time
Note: This buffer only applies to online bookings. Staff can still book appointments manually without the buffer if needed.
Step 4: Configure Self-Service Options
The Self-Service Options section controls whether customers can manage their own bookings.
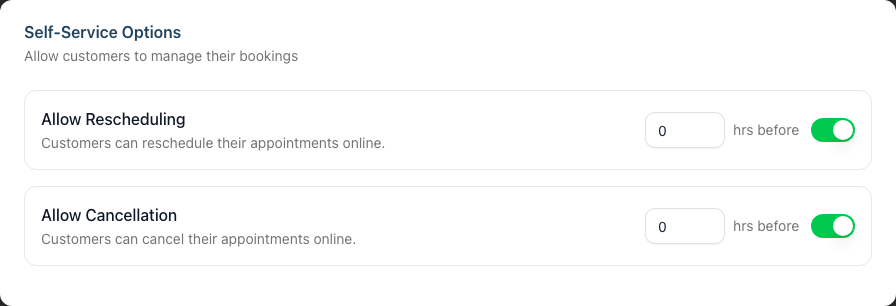
Allow Rescheduling
When enabled, customers can move their appointment to a different time or date.
- Find the Allow Rescheduling row
- Toggle the switch to enable or disable
- If enabled, enter the minimum hours before the appointment when rescheduling is allowed
How the hours limit works:
- If set to 24 hours, customers can reschedule up until 24 hours before their appointment
- After that cutoff, they'll need to contact you directly to make changes
Example: With a 24-hour limit, a customer with a 2:00 PM Friday appointment can reschedule until 2:00 PM Thursday. After that, the reschedule option disappears.
Allow Cancellation
When enabled, customers can cancel their own appointments.
- Find the Allow Cancellation row
- Toggle the switch to enable or disable
- If enabled, enter the minimum hours before the appointment when cancellation is allowed
How the hours limit works:
- If set to 24 hours, customers can cancel up until 24 hours before their appointment
- After that cutoff, they'll need to contact you to cancel
Recommended settings:
| Salon Type | Reschedule Hours | Cancel Hours |
|---|---|---|
| Walk-in friendly | 2-4 hours | 2-4 hours |
| Standard salon | 24 hours | 24 hours |
| High-demand salon | 48 hours | 48 hours |
| Premium/bridal | 72+ hours | 72+ hours |
Step 5: Configure SMS Verification (Optional)
The SMS Verification section allows customers to verify their identity using SMS instead of email when booking.
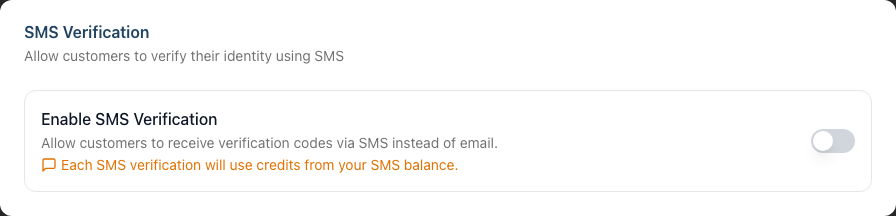
- Find the Enable SMS Verification toggle
- Toggle the switch to enable or disable
How it works:
- When enabled, customers can choose to receive their verification code via SMS instead of email
- This provides an alternative for customers who prefer text messages or have difficulty accessing email
- Each SMS verification uses credits from your salon's SMS balance
Important considerations:
- SMS verification uses credits from your SMS balance (see the SMS tab in Salon Settings)
- If your SMS balance is low, consider keeping this disabled or topping up your credits
- Email verification remains available even when SMS is enabled
When to enable this:
- You have a healthy SMS credit balance
- Many of your customers prefer text messages
- You want to offer a faster verification experience
Step 6: Configure Existing Client Booking Options
The Existing Client Booking section controls how returning clients use the "Book Again" flow, which lets verified customers quickly rebook a previous appointment instead of browsing the full service menu.

Restrict to rebooking only
When enabled, returning clients can only rebook services they've had before — they won't see the option to browse all your services.
- Find the Restrict to rebooking only row
- Toggle the switch to enable or disable
When to use this:
- You want returning clients to repeat their usual appointments rather than try new services online
- You prefer to handle new or changed services for existing clients personally
Note: This only affects returning clients who have a previous appointment on record. First-time clients always see the full list of bookable services.
Carry over previous appointment length
When a client rebooks, this uses the duration from their previous appointment instead of the default service length.
- Find the Carry over previous appointment length row
- Toggle the switch to enable or disable
Why use this: Useful for services like balayage where the time taken varies per client. Rebooking with the previous duration means the new appointment matches how long the service actually takes for that person. This option is on by default.
Carry over previous appointment custom fee
When a client rebooks, this shows the custom fee from their previous appointment.
- Find the Carry over previous appointment custom fee row
- Toggle the switch to enable or disable
Why use this: If you charged a client a custom price last time, rebooking can carry that price across. The fee can still be adjusted at payment time when the client comes in. This option is off by default.
Step 7: Add Terms and Conditions
The Terms & Conditions section lets you display important information that customers must accept before completing their booking.
- Find the Terms Text field
- Enter your booking terms, cancellation policy, and any other important information
- This text appears on the final confirmation step of the booking process
What to include:
- Cancellation policy (e.g., "24-hour notice required")
- Late arrival policy
- Deposit requirements (if applicable)
- Deposit refund policy (if you require online deposits - e.g., "Deposits are non-refundable for cancellations with less than 48 hours notice")
- COVID or health policies
- Contact information for questions
Example terms text:
By booking an appointment, you agree to our cancellation policy.
Please provide at least 24 hours notice if you need to cancel or
reschedule. Late arrivals may result in shortened service time.
Please arrive 5 minutes before your scheduled appointment.
Example terms text (with deposit policy):
By booking an appointment, you agree to our cancellation policy.
A deposit is required at the time of booking for selected services.
Deposits are non-refundable for cancellations with less than 48 hours
notice. Please provide at least 24 hours notice if you need to cancel
or reschedule. Late arrivals may result in shortened service time.
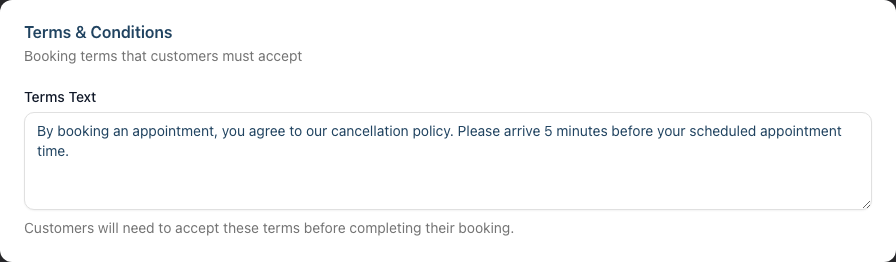
Customers must check a box to accept these terms before completing their booking.
Step 8: Save Your Settings
- Scroll to the bottom of the settings page
- Click Update Salon
- You'll see a confirmation message when the settings are saved
Understanding How Settings Affect Availability
Your booking constraints work together with other factors to determine what slots customers can book:
| Factor | How it affects availability |
|---|---|
| Staff rosters | Customers can only book when staff are rostered on |
| Existing appointments | Slots already booked are unavailable |
| Minimum lead time | Slots within the lead time window are hidden |
| Maximum advance days | Slots beyond this limit are hidden |
| Buffer time | Adds gaps around each available slot |
| Service duration | Slot must fit the service(s) selected |
Example scenario:
- It's Monday at 10:00 AM
- Minimum lead time: 2 hours
- Maximum advance: 30 days
The customer will see slots from:
- Earliest: Monday at 12:00 PM (2 hours from now)
- Latest: 30 days from today
Common Pitfalls
"Customers say there are no available times"
Check these settings:
- Is the minimum lead time too long? A 48-hour lead time means no same-day or next-day bookings.
- Is the maximum advance booking too short? 7 days might not show enough availability.
- Are staff rosters complete? See Tutorial 5.1 for roster setup.
"Customers are booking too close to the appointment time"
Increase your minimum lead time. If you need at least a day's notice, set it to 24 hours.
"We're getting too many cancellations"
Consider:
- Increasing the cancellation hours limit (e.g., from 24 to 48 hours)
- Disabling self-service cancellation entirely and handling requests manually
- Adding clear cancellation policy text in your terms
"Appointments are too back-to-back"
Increase the buffer between appointments. Even 10-15 minutes can help with transitions.
Tips and Best Practices
Match lead time to your workflow - If you need to confirm bookings or check colour history before an appointment, ensure your lead time allows for that.
Set realistic buffer times - Consider how long it actually takes to clean workstations, prepare supplies, and greet the next client.
Review settings seasonally - You might want shorter advance booking during quiet periods and longer during busy seasons.
Keep terms concise - Customers are more likely to read and understand short, clear terms than lengthy legal text.
Test the customer experience - After changing settings, go through the booking process yourself to see how the changes affect available times.
Align reschedule and cancel limits - Using the same hours limit for both (e.g., 24 hours) is easier for customers to understand.
Related Tutorials
- Tutorial 18.1: Setting Up Online Booking for Your Salon - Initial setup
- Tutorial 18.3: The Customer Booking Experience - What customers see
- Tutorial 18.4: Customer Self-Service - How rescheduling and cancellation work
- Tutorial 18.5: Collecting Online Booking Deposits with Stripe - Online deposit collection
- Tutorial 5.1: Setting Up Your Weekly Roster - Ensuring availability
Frequently Asked Questions
What happens if I change settings after customers have booked?
Existing bookings are not affected. Changes only apply to new bookings and future self-service actions. For example, if you increase the cancellation limit from 24 to 48 hours, customers with existing bookings can still cancel within 24 hours until their booking passes.
Can I have different settings for different services?
Booking constraints (lead time, buffer, advance booking) apply to all online bookings. However, you can control which services appear on your booking page using the Bookable Services section. Services you want to handle manually can be unchecked so they don't appear online.
What's the difference between the buffer and the minimum lead time?
- Buffer time adds gaps between sequential bookings (e.g., 15 minutes between appointments)
- Minimum lead time is how far in advance customers must book from now (e.g., at least 2 hours before the appointment)
Can I disable self-service but keep online booking?
Yes. You can:
- Keep Enable Online Booking on
- Turn off Allow Rescheduling
- Turn off Allow Cancellation
Customers can still book online, but they'll need to contact you to make changes.
Do buffer times affect manual bookings?
No, buffer times only apply to online bookings. Staff can book appointments manually without enforced buffers, giving you flexibility when needed.
What if a customer needs to cancel after the cutoff?
They'll need to contact your salon directly. The self-service page will show a message explaining that online cancellation is no longer available for their booking.
Can customers see my terms before starting the booking process?
Terms appear on the final confirmation step. If you want customers to see policies earlier, include a link to your website's terms page on your booking URL or social media.
How do I know what settings other salons use?
A common starting point is:
- Minimum lead time: 2-4 hours
- Maximum advance: 30-60 days
- Buffer: 10-15 minutes
- Reschedule/cancel limit: 24 hours
Adjust based on your salon's specific needs and customer feedback.
Does SMS verification cost extra?
Yes, each SMS verification code sent uses credits from your salon's SMS balance. You can check your balance and top up credits in Salon Settings > SMS tab. If you're concerned about costs, you can keep SMS verification disabled and customers will use email verification instead.
Can customers still use email verification if SMS is enabled?
Yes. When SMS verification is enabled, customers are given a choice between email and SMS verification. Email verification remains available and doesn't use SMS credits.
Should my terms mention deposits?
If you collect online deposits via Stripe Connect (see Tutorial 18.5), it's good practice to include your deposit refund policy in your booking terms. This sets clear expectations for customers about whether deposits are refundable and under what conditions.
Can I quickly enable or disable all services for online booking?
Yes. The Bookable Services grid on the Online Booking tab lets you toggle services individually. There's no "select all" button, but you can click through them quickly. Changes take effect after you click Update Salon.
I changed a service's online booking availability on the service edit page. Do I need to update it here too?
No. The Available for online booking checkbox on the service edit page and the toggles on this Online Booking tab control the same setting. A change in either place is reflected in both.
Can I stop returning clients from booking brand-new services online?
Yes. Turn on Restrict to rebooking only in the Existing Client Booking section. Returning clients (those with a previous appointment on record) will then only be able to rebook services they've had before, rather than browsing your full menu. First-time clients are unaffected and still see all bookable services.
Why does a booked service still show its old length and price when a client rebooks?
That's the Carry over previous appointment length and Carry over previous appointment custom fee options at work. When enabled, the "Book Again" flow reuses the duration (on by default) and custom fee (off by default) from the client's previous appointment instead of the default service values. The fee can still be adjusted at payment time. Turn these off if you'd rather every rebooking use the standard service length and price.
Last Updated: June 2026