Skin Test Management - Patch Tests and Safety
Tutorial 11.1: Skin Test Management - Patch Tests and Safety
Introduction
In the UK, performing a patch test (also called a skin allergy test or skin test) before hair colouring services is an essential safety requirement. These tests help identify allergic reactions to hair dye chemicals like PPD (paraphenylene diamine) before they cause serious harm.
Luminate provides a comprehensive skin test management system that helps you record, track, and manage patch tests for all your clients. The system follows NHBF (National Hair & Beauty Federation) guidelines and helps ensure your salon meets insurance requirements while protecting both you and your clients.
The workflow has two phases:
- Screening — the customer answers your screening questions, signs, and accepts the privacy policy. This can be done on a salon device or remotely (link or QR code).
- Patch test — once screening is complete, a staff member records the physical patch test (test method, brands and locations, signature). After the waiting period the result is recorded.
Who this is for: Salon owners, managers, and stylists who perform colour services.
What you'll learn:
- How to configure skin test settings, screening questions, and consent for your salon
- How to start a screening either in-salon or by sending the customer a link / QR code
- How to apply the patch test and record the final result
- How calendar bookings warn or block when a customer needs a test
- How online booking handles new colour clients who need a screening
- How to track validity, expiry, and customers needing tests from the dashboard
Time to complete: 25-30 minutes
Prerequisites
Before you begin, make sure you have:
- Owner, Admin, or Manager role (to configure settings)
- Access to the salon's services list (to mark services requiring tests)
- Understanding of your insurance requirements for patch testing
Step-by-Step Instructions
Step 1: Configure Skin Test Settings
Before recording any skin tests, configure your salon's settings:
- Click the salon name in the header bar
- Select Edit Salon from the dropdown
- Open the Services tab
- Click the Skin Tests sub-tab (alongside Colour and Gift Vouchers)
The Skin Tests sub-tab is itself split into two sub-tabs: General Settings and Questions & Consent.
General Settings
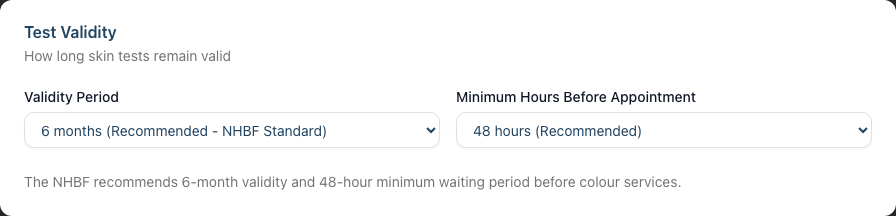
Test Validity:
- Validity Period - How long a negative test result remains valid. Options: 3 months, 6 months (Recommended - NHBF Standard), 9 months, or 12 months
- Minimum Hours Before Appointment - How long before a colour appointment the test must be completed. Options: 24 hours, 48 hours (Recommended), or 72 hours
Enforcement: The Enforcement Level dropdown controls how strictly the system enforces skin test requirements when booking colour services on the calendar:
- Off - No enforcement - No checks performed
- Warn - Show warning but allow booking - Staff see a warning if a test is missing or expired and may proceed
- Block - Prevent booking without valid test - The booking cannot complete without a valid test on file (a staff override is still available for everything except a positive result; see Step 6)
Colour Services: Select which services require a valid skin test. Each service appears as a tickable panel; the count of selected services is shown above the grid. Services not selected can be booked without a test.
Online Booking — Skin Test Appointment Service: Select which service to book when new clients book a colour service online and need a skin test. This should be a short appointment (e.g. 15 minutes) used purely for performing the patch test. Leave it as "Not configured (screening flow disabled)" to disable the new-client screening flow on the booking portal.
Reminders: The actual reminder messages are configured under Notifications in the sidebar — a link to that section is provided. You can set up two types of reminders there:
- Test Expiry - Notify customers when their patch test is about to expire
- Test Required - Remind customers who need a test before their colour appointment
The Expiring Soon Threshold setting on this tab controls when tests are flagged as "expiring soon" in the interface and triggers expiry reminders (7, 14, 21, or 30 days before expiry).
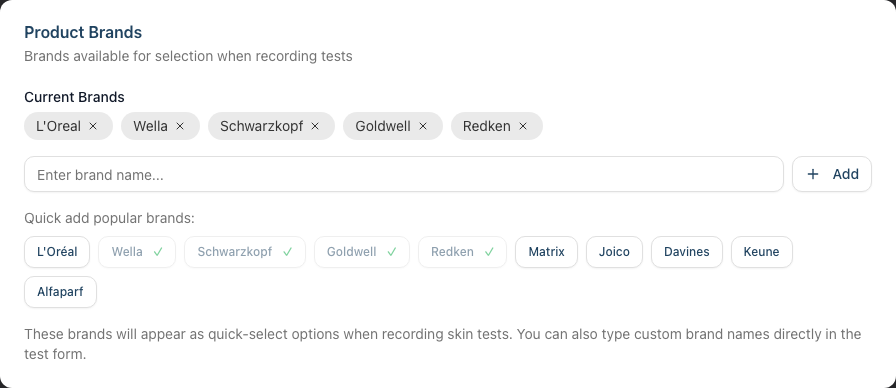
Product Brands: Add the colour brands your salon uses. These appear as quick-select options when a staff member applies the patch test.
- Type a brand name and click Add to add a custom brand
- Or use the Quick add popular brands buttons for: L'Oréal, Wella, Schwarzkopf, Goldwell, Redken, Matrix, Joico, Davines, Keune, Alfaparf
- Click the × on any current brand to remove it
Questions & Consent
Consent Statement: Customise the statement customers agree to when signing. The default statement covers:
- Reactions to hair colour products
- Black henna / PPD disclosure
- Monitoring the test area and contacting the salon about reactions
- Consent to store the record for insurance and regulatory purposes
Leave the Custom Consent Statement field blank to use the default. If you've added custom text, an "Using custom statement" indicator appears with a Reset to Default button.
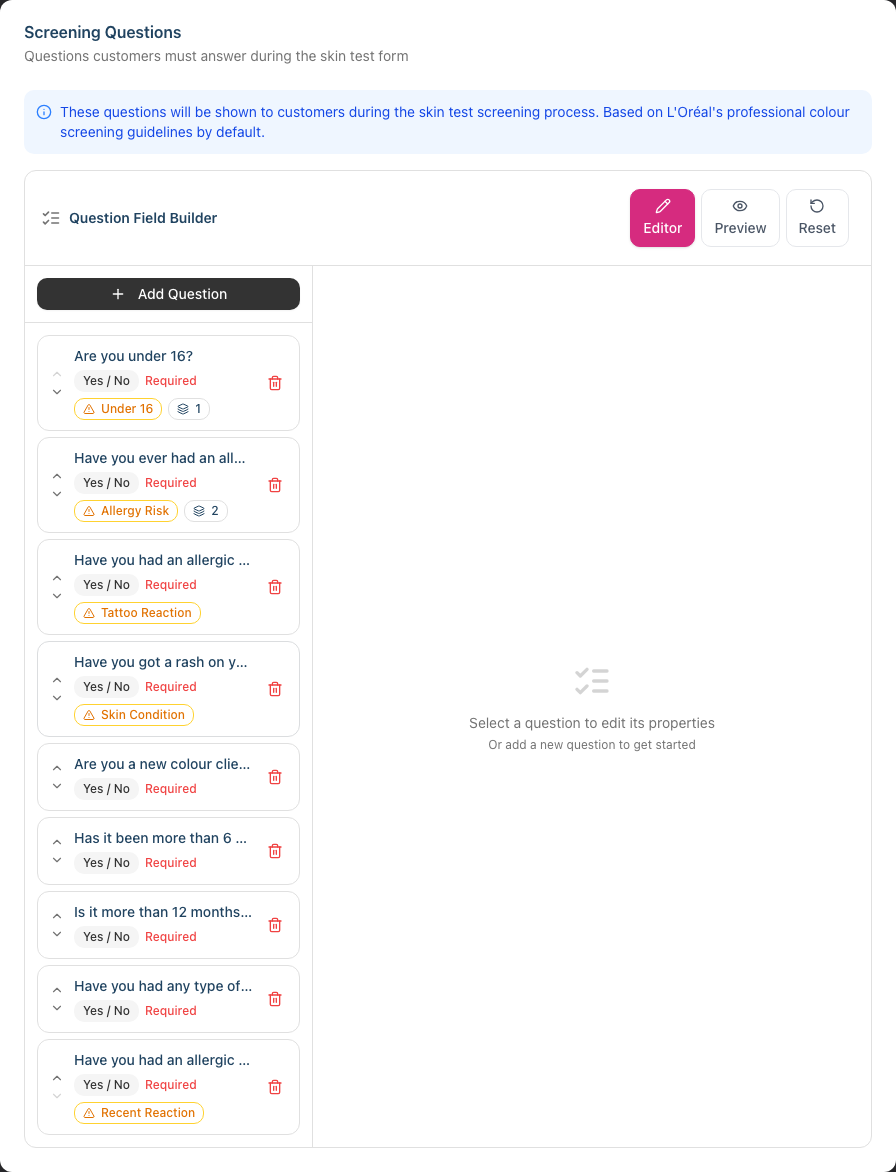
Screening Questions — Question Field Builder: Luminate ships with a starter set of screening questions based on L'Oréal's professional colour screening guidelines. The visual Question Field Builder lets you tailor the questionnaire your customers complete.
The builder has three views:
- Editor - The main editing interface with a question list on the left and the editor on the right
- Preview - A live preview of how customers will see the questions
- Reset - Restore the default starter questions (a destructive action, confirmed by dialog)
Each question supports:
- Question text and answer type (Yes/No or text)
- Required toggle
- Flagging - mark a question so a "Yes" answer raises a risk flag, with a custom flag label that appears on the test record
- Conditional Blocks - extra content shown only when triggered by the customer's answer
Conditional block types:
- Info Required (sub-question) - Ask a follow-up question
- Consent Form - Collect structured fields (text, email, phone) and an optional signature
- Disclaimer - Acknowledgement statement, optionally with a signature
- Info - Display a notice or guidance to the customer
Each block has a trigger condition: When Yes, When No, or Always show.
Use Add Question in the left panel to create a new entry. Reorder questions with the up/down arrows on each item, and delete with the trash icon.
When you're done, click Update Salon at the bottom of the page to save all settings.
Step 2: Mark Services as Requiring Skin Tests
In addition to the salon-wide selection on the Colour Services panel, individual services have their own "requires skin test" flag:
- Click Services in the sidebar
- Click on a colour service (e.g., Full Color) to view it, then click Edit
- Scroll down to the Settings section
- Tick Requires skin test (patch test) — described as "Client must have a valid skin test before booking this service"
- Click Update Service
This flag is the canonical lookup used by the calendar enforcement and reminder commands.
Step 3: Start a Screening (In-Salon or Remote)
Creating a new test record begins with the screening questionnaire. The patch test itself is a separate step.
- Click Skin Tests in the sidebar
- Click New Skin Test in the top-right corner
You'll see a two-step form: Customer then Send Screening.
Step 1 - Customer:
- Use the Customer searchable dropdown to choose the client (or create a new customer first if needed)
- Use the Hairdresser dropdown to choose who will perform the test
- Click Next

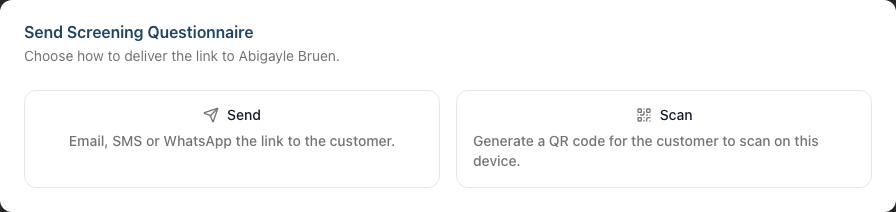
Step 2 - Send Screening:
This step starts with a mode picker — two large radio panels that decide how the screening link gets to the customer:
- Send - Email, SMS or WhatsApp the link to the customer. When you pick this option, a Send via: row appears below the panels with one button per available channel. Only channels matching the customer's contact details and messaging consent are shown — pick one. If the customer has no email or phone on file, the Send panel is disabled.
- Scan - Generate a QR code for the customer to scan on this device — useful when the customer is at reception in front of you.
Once you've picked a mode (and a channel, if sending), click Proceed. There is a single Proceed button — there are no separate "Create & Send" / "Create & Scan" actions any more.
After Proceed, the page changes shape based on the mode you picked:
- Scan - The page immediately shows a QR code for the customer to scan. The link is valid for 24 hours.
- Send - The page stays open with a green "Sent via {channel}" confirmation card. Below the confirmation, a Show QR code instead disclosure lets you reveal the QR code as a fallback if the customer says the message hasn't arrived. Hit View Test to open the test's detail page when you're done.
After creation, the test sits in Awaiting Customer state until the customer submits their answers. From the test's detail page you can:
- View the QR code and copy the link to share elsewhere
- Click Refresh to regenerate the link if it expires
- Click Complete Screening to fill the screening in on the customer's behalf (e.g. on a tablet handed to them at reception)
The "Complete Screening" dialog gives you a Send to Client mode (re-issue the link via email/SMS/WhatsApp) and a Complete Here mode (fill out the questions, capture customer signature and privacy acceptance on this device).
Step 4: Apply the Patch Test
Once the customer has finished the screening (status: Screening Completed), the Apply Patch Test action becomes available on the test's detail page.
- Open the skin test record
- Click Apply Patch Test
- Complete the dialog:
- Test Method - In Salon, At-Home Kit, or Online Screening
- Staff Member - Searchable dropdown
- Test Date - Defaults to today
- Product Brands - Add one or more rows; each row has a brand dropdown (from your configured list) and an application area (Behind left ear, Behind right ear, Inner left elbow, Inner right elbow, Inner left arm, Inner right arm, or Other). Click Add Brand to add another, or the trash icon to remove a row.
- Test Notes (optional) - Free-text notes about the application
- Your Full Name and Your Signature - The staff member confirms by signing on the signature pad
- Click Apply Patch Test
The test record now has a tested date, an expiry date (calculated from your validity setting), and is in Awaiting Result state.
Step 5: Record the Test Result
After the waiting period (48 hours by default):
- Click Skin Tests in the sidebar
- Find the test in Awaiting Result and click View
- Click Record Result
- Select the result:
- Negative - No reaction observed. Customer can proceed with colour services.
- Positive - Reaction observed. Customer should NOT proceed with colour services.
- Enter any Reaction Notes (optional - e.g., "No visible reaction after 48 hours")
- Click Record Result
The test status updates to Valid (for negative results) or Positive Reaction. Positive results are surfaced as a red Allergy Alert banner on the test record, on the customer profile, and on any future colour booking attempt.
Step 6: Calendar Enforcement on Appointments
When a staff member creates or edits an appointment that includes a colour service, Luminate checks the customer's skin test status against your enforcement settings. The Skin Test Warning panel appears in the appointment form with a relevant title:
- Allergy Alert (positive_result — hard block, never overridable)
- Skin Test Required (no test on file)
- Skin Test Expired
- Skin Test Expiring Soon
- Skin Test Pending (awaiting result)
- Skin Test Too Recent (within the minimum hours window)
- Skin Test Awaiting Signature
Quick actions appear inside the panel:
- Record New Test for missing or expired tests (jumps to Step 3 with the customer pre-selected)
- Record Result for pending tests (opens the same dialog as Step 5)
- View Skin Test to open the existing record
Apart from a positive result, every warning can be overridden by ticking I acknowledge this warning and wish to proceed anyway. A textarea appears to capture an optional reason — for example "Test recorded on paper records, Customer has medical documentation". The override and reason are stored on the appointment for audit.
Step 7: Online Booking Screening
If you've selected a Skin Test Appointment Service in salon settings, customers booking a colour service through your online booking portal who don't have a valid test on file are routed through an in-portal screening before they can pick a slot.
The booking wizard adds a Skin Test Required step that explains: "Before your colour appointment, we need to complete a skin test. Let's start with the screening questionnaire now, then we'll book you in for the patch test."
The customer then completes a 3-step mini-wizard inside the booking flow:
- Questions - Health Screening, with a counter of answered questions
- Signature - Their full name and a signed signature
- Confirm - Reviews the consent statement and accepts the privacy policy
When they click Complete Screening, the booking continues — but instead of the original colour service, they're booked into the Skin Test Appointment Service you configured. Their colour booking can then be made afterwards once their patch test result is recorded.
Step 8: Browse and Filter Skin Tests
The Skin Tests page offers two tabs and filtering controls.
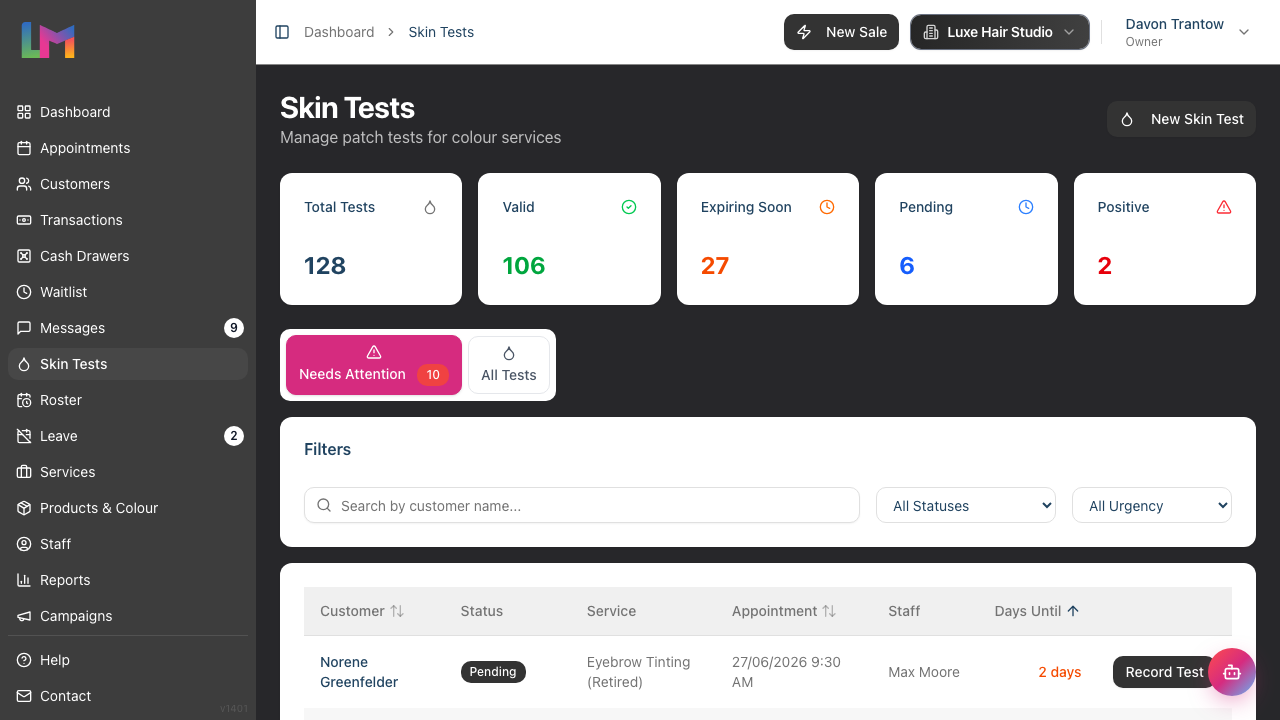
Stats Cards (across the top):
- Total Tests - All recorded tests
- Valid - Tests with negative results still within validity period
- Expiring Soon - Valid tests within your configured threshold
- Pending - Tests awaiting results
- Positive - Tests with positive reactions
Tab 1 - Needs Attention: Lists customers with upcoming colour appointments who don't have a valid test. Filter by Status (Never Tested, Expired, Expiring Soon) and Urgency (Urgent ≤3 days, This Week). Each row has a Record Test button that jumps straight to a new screening for that customer. When everything is in order, you'll see an All caught up! message.
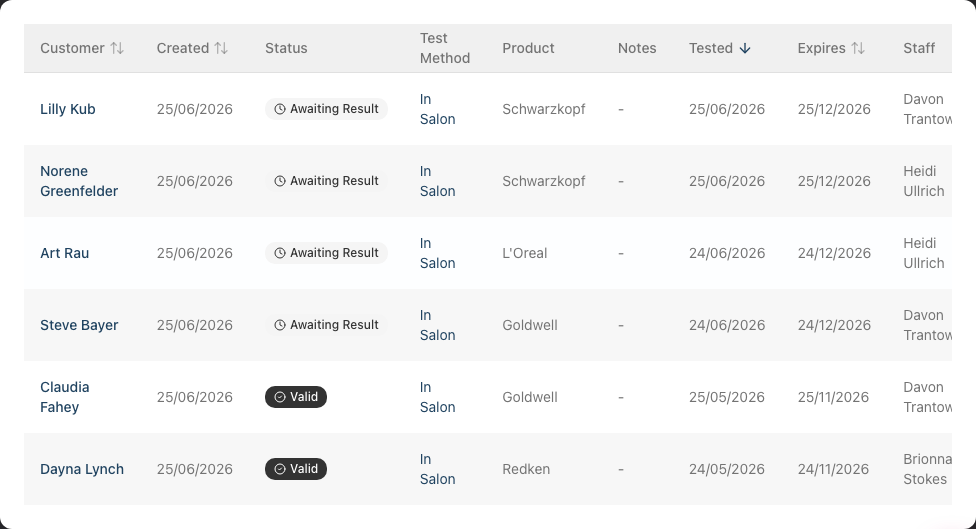
Tab 2 - All Tests:
- Search - Matches customer name or medical notes; placeholder reads "Search by customer name or notes..."
- Result filter - All Results, Pending, Negative, Positive
- Status filter - All Statuses, Valid, Expiring Soon, Expired, Awaiting Result, Screening Completed, Awaiting Customer, Flagged
- The Flagged filter accurately includes any test where one or more screening answers triggered a risk flag
- Tests Table columns: Customer, Created, Status, Test Method, Product, Notes, Tested, Expires, Staff, plus a View action
- The Notes column shows a truncated preview of the medical notes; hover for the full text in a tooltip
- The Status column adds a small flag-count badge (with hover tooltip) for tests that have risk flags
- The Expires cell shows a hyphen (
-) for tests in Awaiting Customer state — these tests don't have an expiry yet because the patch hasn't been applied
Step 9: Skin Tests on Customer Profiles
Each customer profile includes:
Profile Header: A skin test status badge appears next to the customer's name showing their current status (Valid, Expired, Expiring Soon, Positive, or Never Tested).
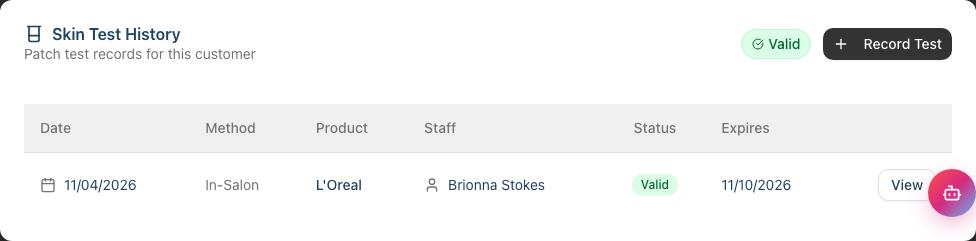
Skin Tests Tab: Click the Skin Tests tab on the customer profile to see:
- All their skin test history with dates, results, and status
- Their current test status and expiry information
- A button to start a new test directly for this customer
In this Skin Test History table, a test that has no expiry yet (still Awaiting Customer) shows an em-dash (—) in the expiry column, and the red "(Expired)" label is only shown when a test's expiry date has actually passed.
Step 10: Monitor the Dashboard
The dashboard's combined alerts panel includes a Skin Tests Due category. When there are upcoming colour appointments without a valid test, the category expands to show:
- The customer's name (links straight to their Skin Tests tab)
- Days until the appointment
- Quick access via the category header to the full Skin Tests page
When all customers have valid tests, the Skin Tests Due category is hidden from the alerts panel.
Common Pitfalls
"A customer's test shows as expired but they just had one done"
Check the validity period in your salon settings. If set to 6 months and the patch was applied more than 6 months ago, it will show as expired. The test date and expiry date are displayed on each test record.
"I can't find the Skin Tests menu item"
Staff members without appropriate permissions may not see this menu item. Contact your salon owner or admin to check your permissions.
"The customer can't access the QR code link"
Screening links are valid for 24 hours. From the test's detail page, click Refresh on the QR panel to regenerate the link.
"I can't record a result yet"
The Record Result action only appears once the patch test has been applied. If the test is still in Screening Completed state, click Apply Patch Test first.
"Apply Patch Test isn't visible"
That action only appears when screening is completed. If the test is Awaiting Customer, the customer hasn't submitted their answers yet — share the QR code or use Complete Screening to fill it in on their behalf.
"I accidentally recorded the wrong result"
Skin test results cannot be changed once recorded. If you made an error, delete the test (allowed within 24 hours of creation) and create a new one with the correct information.
"Online booking isn't asking customers about a skin test"
The online screening flow is only enabled when you've selected a Skin Test Appointment Service in the General Settings sub-tab and the customer doesn't have a valid test on file.
Tips and Best Practices
Follow NHBF guidelines - The default settings (6-month validity, 48-hour minimum) align with NHBF recommendations. Only change these if your insurance provider requires different periods.
Use the dashboard daily - Check the Skin Tests Due category each morning to identify customers needing tests before their upcoming appointments.
Mix Send and Scan - Pick Send when the customer is at home and Scan when they're at reception. The link is the same — only the delivery differs. After a Send, you can still reveal the QR code via the Show QR code instead disclosure on the confirmation card if the message hasn't arrived.
Lean on the question builder - Add conditional blocks to surface follow-up information only when relevant. For example, a "Yes" answer about previous reactions can trigger a follow-up question, a disclaimer to acknowledge, or a structured consent form.
Use flags for triage - Mark sensitive questions with Flag on Yes and a clear Flag label. Flagged tests stand out on the index, on the test record, and in the Flagged filter.
Keep brand lists updated - Add any new colour brands your salon uses so they appear when a staff member applies a patch test.
Train all colour staff - Ensure everyone who performs colour services understands the screening / apply / record three-step workflow and the legal importance of patch testing.
Set enforcement to "Warn" initially - This helps staff learn the system without blocking bookings. Once confident, consider switching to "Block" for maximum safety. Even on Block, all warnings except a positive result can be overridden with a reason for audit.
Review positive results carefully - Customers with a positive test on file are blocked from colour bookings, with no override possible. Refer them to a medical professional before considering future colour treatments.
Related Tutorials
- Tutorial 7.1: Creating and Managing Your Service Menu - Set up services that require skin tests
- Tutorial 3.1: Adding and Managing Customer Profiles - Where skin test status appears
- Tutorial 10.1: Setting Up Appointment Reminders - Configure test expiry and required reminders
- Tutorial 2.2: Booking and Managing Appointments - How skin test warnings appear during booking
Frequently Asked Questions
How long should a patch test be valid?
The NHBF recommends 6 months as the standard validity period. Some insurers may require different periods - check your policy. Luminate allows you to configure 3, 6, 9, or 12 month validity.
Can customers complete the questionnaire at home?
Yes. The Send Screening step at test creation lets you pick Send (Email, SMS or WhatsApp delivery, subject to the customer's contact details and messaging consent) or Scan (a QR code shown on screen for the customer in front of you).
What's the difference between "Screening Completed" and "Valid"?
- Screening Completed means the customer has answered the questionnaire, signed, and accepted the privacy policy — but the physical patch test hasn't been applied yet. Use Apply Patch Test to record it.
- Valid means the patch test has been applied, the result is negative, and the test is within its validity period.
What if a customer had a positive reaction in the past?
Customers with positive test results are blocked from colour services on the calendar with no override available — the Allergy Alert is a hard block. Refer them to a medical professional before considering any future colour treatments.
Can I override the warning on a calendar booking?
Yes — for everything except a positive result. Tick I acknowledge this warning and wish to proceed anyway in the warning panel and add a reason. The override and reason are stored on the appointment for audit.
Does Luminate send automatic reminders about expiring tests?
Yes, when configured under Notifications. The Test Expiry reminder fires before a test expires (driven by the Expiring Soon Threshold setting). The Test Required reminder fires before an upcoming colour appointment when the customer needs a test. Both reminders respect the customer's messaging consent and dedupe to avoid spam.
What happens during online booking when a new client books a colour service?
If you've selected a Skin Test Appointment Service in your settings and the customer doesn't have a valid test, the booking flow inserts a screening step. The customer answers the screening questionnaire, signs, and accepts the privacy policy, then is booked into the skin test service you configured (instead of their original colour service).
Can I customise the screening questions?
Yes. Use the Question Field Builder under Edit Salon → Services → Skin Tests → Questions & Consent. You can add, edit, reorder, and delete questions, mark them required, configure flagging, and add conditional blocks (sub-questions, consent forms, disclaimers, info notices) that only appear based on the customer's answer.
What information is stored in a skin test record?
Each test record includes: customer details, the staff member who administered the test, completion status, test method, product brands and application areas, screening question answers (with risk flags), customer signature, hairdresser signature, consent acceptance, result, reaction notes, and any test notes. Tests created via online booking also store the IP address and user agent of the customer's device.
Are skin test records kept forever?
Yes, skin test records are retained indefinitely for legal and insurance purposes, even if a customer is later deactivated. Tests can only be deleted within 24 hours of creation; after that they are read-only.
What happens if I try to book a colour service for someone without a valid test?
Depending on your enforcement setting:
- Off: No checks
- Warn: A warning panel appears but staff can proceed
- Block: The booking cannot complete unless the staff member ticks the override (with optional reason). A positive result is the only status that cannot be overridden.
Last Updated: May 2026