Customising Your Calendar - Colours, Views, and Filters
Tutorial 12.3: Customising Your Calendar - Colours, Views, and Filters
Introduction
The appointment calendar is the heart of your salon operations. Luminate offers multiple ways to view and customise your calendar to suit your workflow. You can switch between day, week, and list views, colour-code appointments by service type, and access powerful features like the waitlist panel and clipboard.
This guide covers making the calendar work for you - from choosing the right view for your needs to understanding the visual cues that help you manage appointments efficiently.
Who this is for: All staff members who use the appointment calendar daily.
What you'll learn:
- Switching between Day, Week, and List views
- Understanding appointment colour-coding
- Using the sidebar panels (Waitlist and Clipboard)
- Navigating dates and time slots
- Interpreting staff roster and availability indicators
- Using keyboard shortcuts for quick navigation
Time to complete: 10-15 minutes
Prerequisites
Before you begin, make sure you have:
- Access to the Appointments page
- At least some appointments and staff in the system (for visual examples)
- Services set up with colours assigned
Step-by-Step Instructions
Step 1: Choose Your Calendar View
Luminate offers three calendar views, accessible via the button group in the top-right of the Appointments page:
| View | Best For | Features |
|---|---|---|
| Day | Reception desk, daily overview | All staff columns, real-time "now" line, drag-and-drop |
| Week | Individual stylist schedule | Single staff member, weekly overview, shift indicators |
| List | Searching, filtering, bulk review | Table format, filters, pagination |
To switch views:
- Go to Appointments in the sidebar
- Click Day, Week, or List in the button group (on narrow screens these show as icons only)
Your current view is highlighted. The URL updates to preserve your selection (you can bookmark specific views). Note that the Day button corresponds to view=today in the URL.
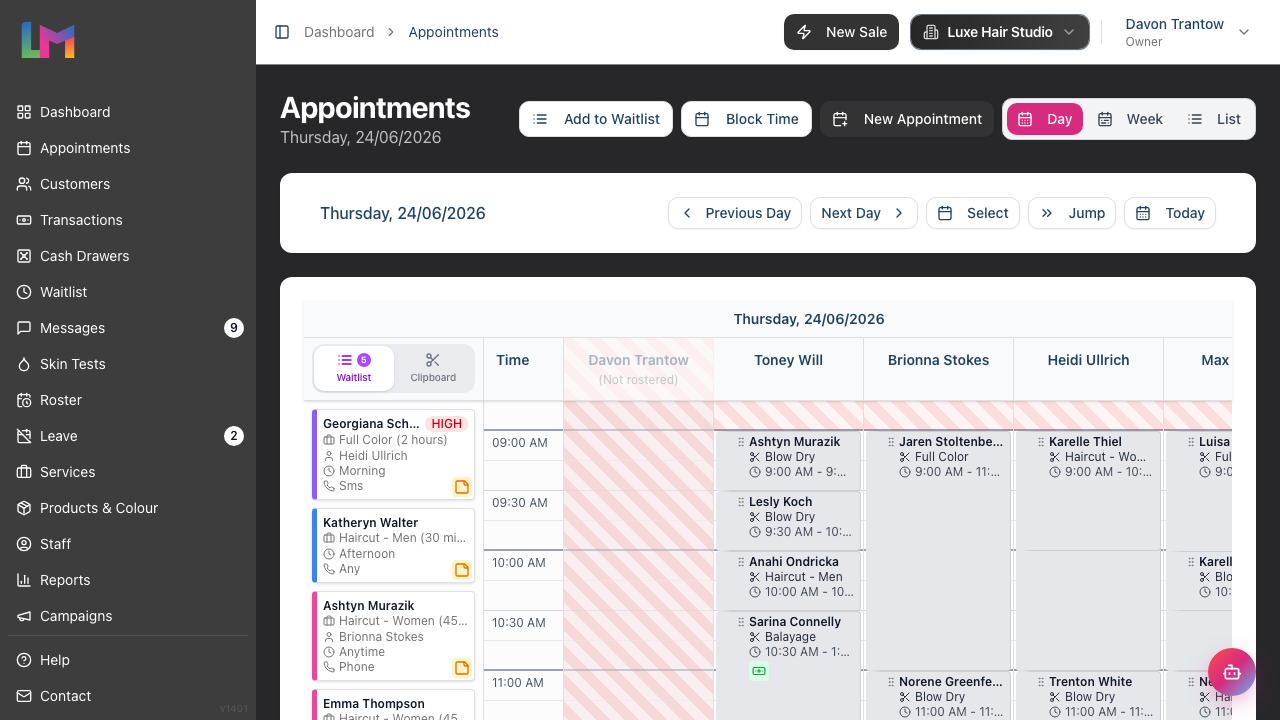
Step 2: Navigate Dates in Day View
In the Day view:
Date navigation:
- Click the left arrow to go to the previous day
- Click the right arrow to go to the next day
- Click Today to jump to the current date
- Click Select (calendar icon) to open a date picker for any date
- Click Jump to skip forward or back by a number of weeks at once (handy for booking several weeks ahead)
Current date display: The selected date appears prominently (e.g., "Friday, 02/01/2026"). The exact date format follows your salon's date-format setting.
Now line: When viewing today's date, a red horizontal line shows the current time, helping you see at a glance what's happening now versus later.
Step 3: Navigate in Week View
The Week view shows a single staff member's schedule for the week:
Staff selection:
- Click the staff selector at the top of the calendar
- Select the staff member whose schedule you want to view
- The calendar updates to show their appointments for the week
Week navigation:
- Click the left arrow to go to the previous week
- Click the right arrow to go to the next week
- Click This Week to return to the current week (this button is disabled when you are already viewing the current week)
Week display: Shows Monday to Sunday with the date range displayed (e.g., "Nov 25 - Dec 1, 2024", or "Dec 30, 2024 - Jan 5, 2025" when the week spans two years).
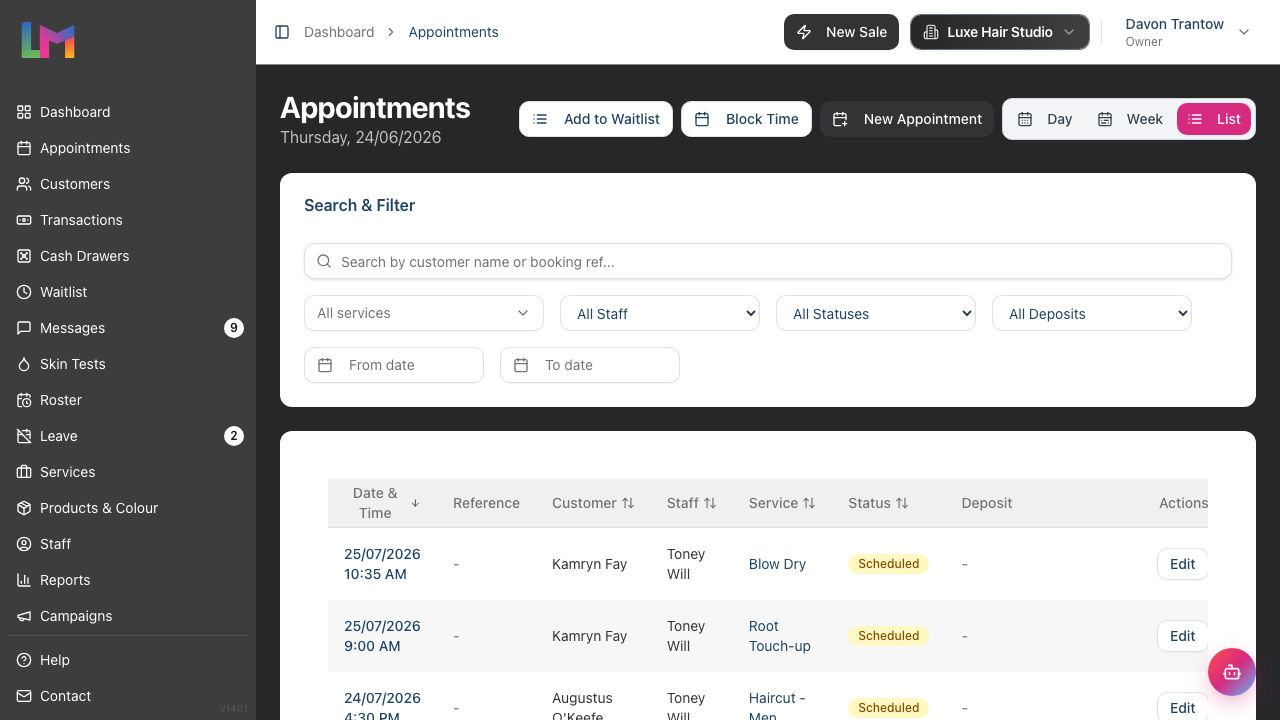
Step 4: Use Filters in List View
The List view presents appointments in a searchable table:
Available filters:
| Filter | What It Does |
|---|---|
| Customer | Search by customer name or booking reference |
| Service | Filter to one or more services (multi-select) |
| Staff | Filter to a specific staff member ("All Staff" by default) |
| Status | Show only certain statuses ("All Statuses" by default) |
| Deposit | Filter by deposit status (Pending Deposits, Paid Deposits, All with Deposits) |
| From date | Filter from a specific date |
| To date | Filter to a specific date |
To apply filters:
- Enter values in the filter fields at the top of the list
- Results update automatically (text searches apply after a brief pause as you type)
- Click Clear Filters to reset all filters (this button appears only when you have active filters)
Sorting: Click the Date & Time or Status column headers to sort by those columns.
Pagination: The list shows 25 appointments per page by default. Use the pagination controls at the bottom to move through results, and the per-page selector to change the page size (10, 25, 50, or 100).
Step 5: Understand Appointment Colours
Appointment cards carry two separate colour cues. It's worth getting these the right way round:
1. Service colour (card background): The fill colour of the card body comes from the service. Each service can be given its own colour, so a glance across the calendar tells you the type of work booked (for example, all colour services in purple, all cuts in blue). Cards with no service colour fall back to grey.
2. Status colour (left border stripe): The thick coloured stripe down the left edge of each card shows the appointment's status:
| Status | Stripe Colour |
|---|---|
| Scheduled | Yellow |
| Confirmed | Green |
| Arrived | Blue |
| Completed | Grey |
| Cancelled | Red |
| No Show | Orange |
Completed appointments are a special case: once an appointment is completed the whole card greys out (background and stripe), so finished work visually recedes and the day's remaining bookings stand out.
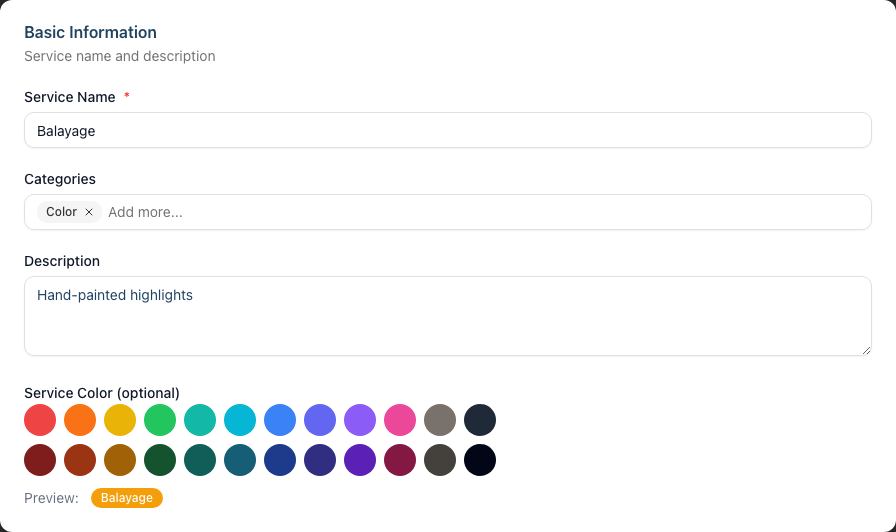
To set service colours:
- Go to Services in the sidebar
- Click Edit on a service
- In the Basic Information section, find the Service Color (optional) field
- Pick a colour from the colour picker
- Save the service
Step 6: Use the Waitlist Panel
The Day and Week views include a Waitlist panel in the left sidebar (on a small screen, open it with the panel button):
- Click the Waitlist tab (it shows the number of waitlist entries)
- The panel displays customers waiting for appointments
- Each entry shows:
- Customer name
- Priority badge (HIGH-priority entries show a red "HIGH" badge)
- Requested service and duration
- Preferred staff (if specified)
- Preferred time range (morning, afternoon, evening, any)
- Contact preference (SMS, email, phone)
- Notes indicator (an amber sticky-note icon appears if notes exist)
Each waitlist card also carries a thin left stripe in the requested service's colour, matching the calendar.
Click to book: Select a waitlist entry, then click an empty calendar slot to convert it into an appointment for that customer. While an entry is selected, the card shows "Click calendar to convert".
Step 7: Use the Clipboard Panel
The Clipboard stores appointments you've cut (or copied) for placing elsewhere:
To cut an appointment:
On desktop: Hover over an appointment card in the calendar and click the scissors icon in the action toolbar that appears.
On mobile: Tap the appointment card. A menu appears with options including View appointment, Edit appointment, Copy appointment, and Cut appointment. Tap Cut appointment.
The appointment is now "cut" and appears in the Clipboard panel.
To paste an appointment:
- Click the Clipboard tab to see cut appointments (the tab shows a count)
- Navigate to the new date/time where you want to move the appointment
- Drag the appointment from the Clipboard panel onto an empty calendar slot
Note: Cut appointments appear greyed out with a dashed border on the calendar until you paste them. Click the X on a clipboard item (its title reads "Cancel cut") to restore it to its original position, or use Clear all to dismiss everything in the panel.
The clipboard is useful for rescheduling appointments without losing them.
Step 8: Understand Staff Columns (Day View)
In the Day view, staff appear as columns:
Rostered staff:
- Staff who have shifts on the selected date appear as normal columns
- Their rostered hours are clearly visible
Non-rostered staff:
- Staff without shifts show "(Not rostered)" below their name
- Their column appears with a diagonal striped pattern and reduced opacity to indicate they're not scheduled to work
Leave indicators:
- Staff on approved leave display "On {leave type}" in purple text below their name (e.g., "On Annual Leave")
- Their column uses the same striped, dimmed treatment as non-rostered staff
Step 9: Dynamic Calendar Hours
The calendar automatically adjusts its time range based on:
- The earliest shift start time
- The latest shift end time
- Existing appointment times
Default hours are 8:00 AM to 6:00 PM, with 15-minute time slots, but the range expands if:
- Staff shifts start earlier or end later
- Appointments exist outside the default range
This ensures you always see all relevant time slots.
Step 10: Keyboard Shortcuts for Quick Navigation
Luminate includes keyboard shortcuts to help you navigate quickly between key areas of the application:
Global shortcuts (work on most pages):
| Key | Action |
|---|---|
| d | Go to Dashboard |
| a | Go to Appointments calendar (Day view) |
| w | Go to Appointments calendar (Week view) |
| t | Open QuickPOS for a new transaction |
Calendar navigation shortcuts (only on the Appointments page):
| Key | Day View | Week View |
|---|---|---|
| ← (Left Arrow) | Previous day | Previous week |
| → (Right Arrow) | Next day | Next week |
| j | Open the "Jump to week" dialog | Open the "Jump to week" dialog |
Important notes:
- Shortcuts only work when you're not typing in a text field, search box, or other form input
- Shortcuts are disabled when holding Ctrl, Cmd, or Alt (so they don't conflict with browser shortcuts), and are suppressed while a dialog, sheet, or a create/edit/settings form is open
- A salon must be selected for the global shortcuts to work
These shortcuts are especially useful when navigating the calendar quickly or switching frequently between the calendar and point of sale during busy periods.
Common Pitfalls
"I can't see all my staff in Week view"
Week view shows one staff member at a time. Use the staff selector to switch between staff. For a multi-staff view, use the Day view.
"Appointment colours all look the same"
You may not have set service colours. Go to Services and assign distinct colours to each service type. Remember: the card background shows the service, while the left border stripe shows the appointment status.
"The calendar hours don't show my early appointments"
The calendar should automatically expand to show appointments outside default hours. If not, the appointment might be on a different date than you're viewing - check the date.
"I can't drag appointments"
Drag-and-drop requires click and hold on the appointment card body (not on the action buttons). Also, the calendar must be in Day or Week view - List view doesn't support dragging.
Tips and Best Practices
- Use distinct service colours - Assign a unique colour to each service category (cuts, colours, treatments) for quick visual identification, since the card background is driven by the service
- Start with Day view - It gives the best overview for a busy salon with multiple staff
- Use Week view for planning - When scheduling a specific stylist's week, switch to Week view
- Use List view for searching - If you need to find specific appointments by customer or date range, List view's filters are most efficient
- Keep the Waitlist visible - Regularly check waitlist priority levels and book high-priority customers first when slots open
- Learn the keyboard shortcuts - Press a for the day view, w for week view, t for transactions, and d for dashboard. On the calendar, use arrow keys to move between days or weeks, and j to jump several weeks at once
Related Tutorials
- Tutorial 2.1: Managing Your Appointment Calendar - Basic calendar navigation
- Tutorial 2.2: Booking and Managing Appointments - Creating and editing appointments
- Tutorial 2.3: Working with the Waitlist - Managing the waitlist queue
- Tutorial 7.1: Creating and Managing Your Service Menu - Setting up service colours
Frequently Asked Questions
Can I change the default calendar view?
The calendar opens to the view specified in the URL, and remembers your last view during a session. Bookmark your preferred view (e.g., /appointments?view=today for Day view, ?view=week, or ?view=list) for quick access.
Can I hide certain staff columns in Day view?
Not directly. All rostered staff appear as columns. However, non-rostered staff are visually de-emphasised with "(Not rostered)" labels and a striped, dimmed column. Use Week view to focus on a single staff member.
Can I customise the time slot intervals?
The calendar uses 15-minute intervals. This is not currently configurable per salon.
Can I print the calendar?
You can use your browser's print function (Ctrl+P or Cmd+P), but a dedicated print layout isn't available. For printed schedules, consider exporting appointment data from List view.
Why don't I see the "now" line?
The now line only appears in Day view when viewing the current date. If you're looking at a past or future date, or using Week or List view, it won't display.
Can I change the calendar colours for status?
Status colours (the left border stripe) are system-wide and not customisable. However, you can customise the service colours that drive each card's background to help distinguish appointment types.
What are the keyboard shortcuts?
Press d for Dashboard, a for the day view, w for Week view, and t for QuickPOS. On the Appointments page, use the arrow keys to navigate (left/right move by day in Day view or by week in Week view) and j to open the jump-to-week dialog. These shortcuts only work when you're not typing in a form field. See Step 10 above for full details.
Last Updated: June 2026