Multi-Salon Management for Owners
Tutorial 12.1: Multi-Salon Management for Owners
Introduction
Own multiple salon locations? Luminate lets you manage them all from one account. This guide shows you how to create additional salons, switch between salon contexts, understand how data is isolated between locations, and view all your locations from the My Salons overview page.
Multi-salon management is designed for salon owners who operate two or more locations. Each salon maintains its own staff, customers, appointments, transactions, and settings - but you access everything through a single login.
Who this is for: Salon owners who manage or plan to manage multiple locations.
What you'll learn:
- How to create additional salons
- Switching between salons using the salon switcher
- Understanding data isolation between salons
- Managing salon settings for each location
- Viewing the "My Salons" overview page
Time to complete: 15-20 minutes
Prerequisites
Before you begin, make sure you have:
- A Luminate account with Owner access
- At least one salon already set up
- Your new salon's basic information (name, address, contact details)
Step-by-Step Instructions
Step 1: Access the Salon Switcher
The salon switcher is the dark badge in the header bar at the top of every page.
- Look for your current salon name displayed next to the building icon in the header, with a small chevron to its right
- Click on the badge to open the dropdown menu
- You'll see options to switch salons and manage settings
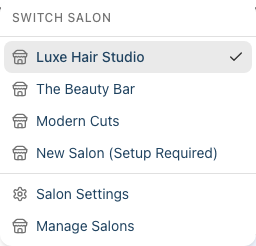
The dropdown displays:
- A Switch Salon heading and a list of all your active salons, with a tick next to the currently selected one (this section only appears if you have more than one salon)
- Salon Settings - Opens the settings page for the current salon
- Manage Salons - Opens the My Salons management page (owners only)
If you only have a single salon and no settings access, the badge is shown as a plain label rather than a dropdown.
Step 2: View Your Salons (My Salons Page)
To see all your salon locations in one view:
- Click your salon name in the header
- Select Manage Salons from the dropdown
- The My Salons page displays a table of all your salons
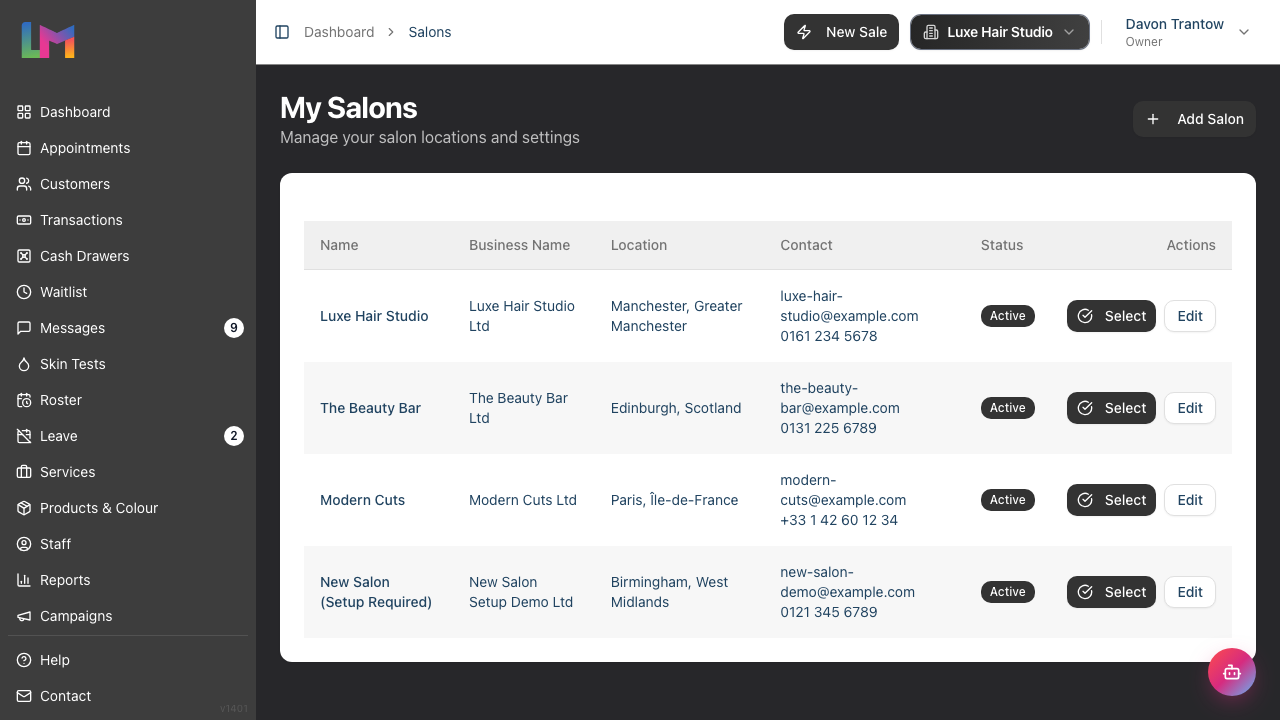
The table shows:
| Column | Description |
|---|---|
| Name | The salon's display name |
| Business Name | The legal business name (if different) |
| Location | City and state/region |
| Contact | Email and phone number |
| Status | Active or Inactive badge |
| Actions | Select button (for active salons) and Edit button to modify settings |
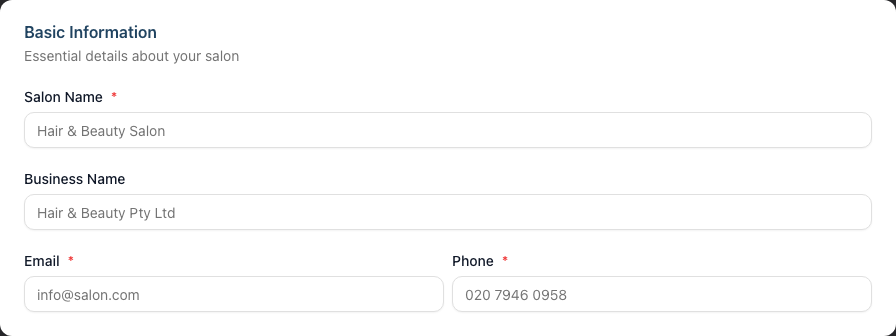
Step 3: Create a New Salon
To add another salon location:
- From the My Salons page, click Add Salon in the top right
- Fill in the salon details across the three sections:
Basic Information:
- Salon Name (required) - The display name customers will see
- Business Name - Your legal business name (if different)
- Email (required) - Contact email for this location
- Phone (required) - Contact phone number
Location:
- Country - Select from the dropdown (this also adjusts the address field labels, e.g. "Postcode" vs "ZIP Code", and "County" vs "State")
- Address (required) - Street address
- City - City or town
- State/County - Region
- Postcode (required) - Postal code
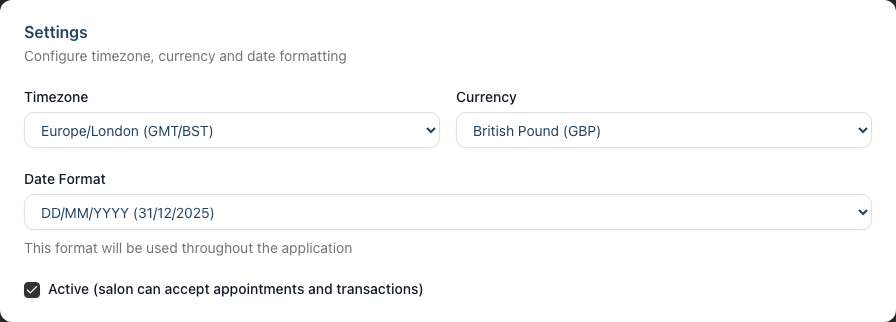
Settings:
- Timezone - Critical for appointment scheduling (e.g., Europe/London, America/New_York)
- Currency - For all pricing and transactions (GBP, USD, EUR, AUD, and others)
- Date Format - How dates display throughout the system (e.g. DD/MM/YYYY)
- Active (salon can accept appointments and transactions) - Tick to make the salon live straight away; leave unticked to set it up first
- Click Create Salon
If you have an active subscription, a Confirm Subscription Change modal appears showing:
- Your current and new total number of salons
- The price per salon and your new monthly cost after adding this location
- Any prorated charge for the remainder of the current billing period
- Trial information if you're still in your free trial (the new salon is included in the trial)
- Review the billing details and click Confirm & Create Salon
Important: After creating a salon, you'll need to complete its setup separately (add staff, services, roster, etc.). Each salon has its own onboarding checklist.
Step 4: Switch Between Salons
To work with a different salon:
- Click the salon name in the header
- Click on the salon you want to switch to
- The page refreshes with that salon's data
All navigation, data, and actions now apply to the selected salon. The salon name in the header updates to show which location you're working with.
Note: Only active salons appear in the salon switcher dropdown. If a salon is marked as inactive, you'll need to access it from the My Salons page to reactivate it.
Step 5: Edit Salon Settings
Each salon has its own configuration. To edit a salon's settings:
- Switch to the salon you want to edit (or stay on current)
- Click the salon name in the header
- Select Salon Settings
Alternatively, from the My Salons page, click Edit next to the salon.
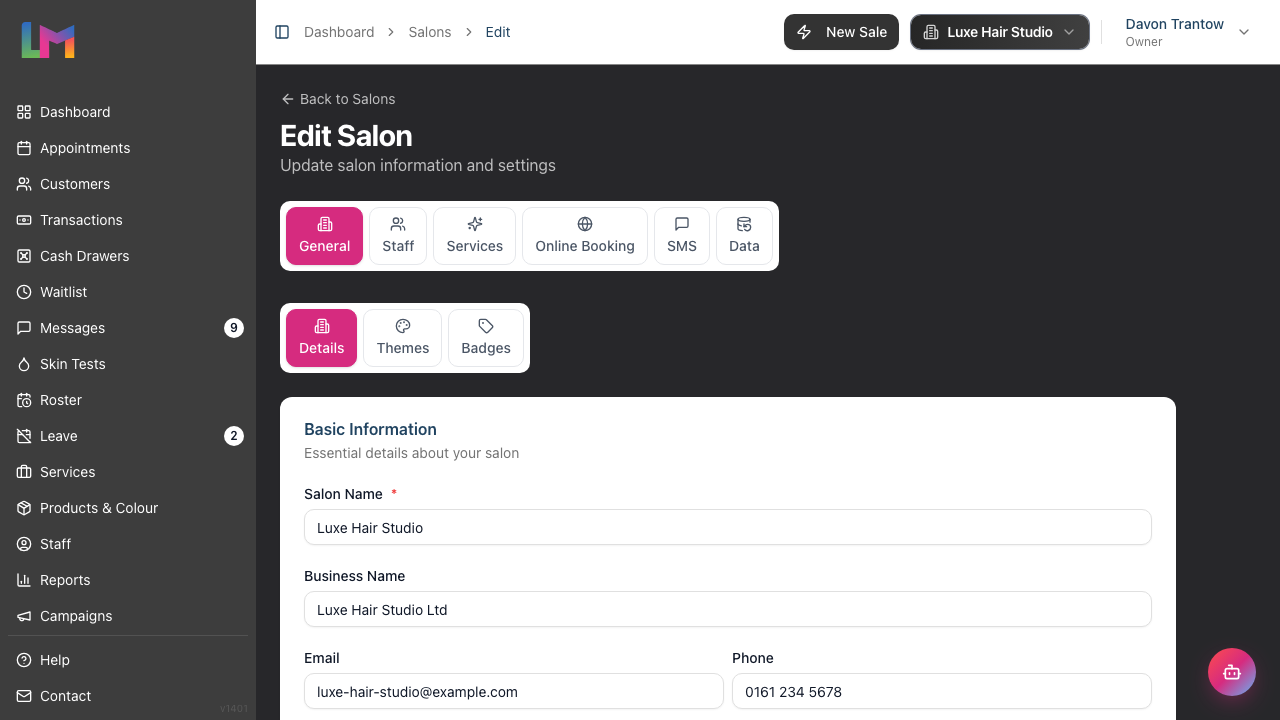
The salon settings page is organised into six top-level tabs along the top. Some of these contain their own sub-tabs:
| Tab | Sub-tabs | What You Can Configure |
|---|---|---|
| General | Details, Themes, Badges | Details: name, contact info, address, timezone, currency, date format, tax settings and logo (plus the option to delete the salon). Themes: the salon's theme colour. Badges: appointment and customer badges (built-in and custom). |
| Staff | Roster, Levels, Display Order, Leave, Payroll, Public Holidays, Time Blocks | Roster defaults, staff experience levels, staff display order, leave allowances and carryover, payroll period, public holidays and time blocks. |
| Services | Colour, Skin Tests, Gift Vouchers | Colour service settings, patch-test (skin test) validity and enforcement, and gift voucher expiry, value ranges and code settings. |
| Online Booking | — | Booking URL, lead times, cancellation policy and other online-booking options. |
| SMS | — | SMS balance and auto top-up settings. |
| Data | — | Data export and backup options for this salon. |
Each top-level tab remembers its own settings per salon, so the same options can be configured differently at each location.
Step 6: Understand Data Isolation
Each salon in Luminate is completely independent:
Separate per salon:
- Customers and their profiles
- Appointments and booking history
- Staff members and their accounts
- Services and pricing
- Products and inventory
- Transactions and payment history
- Reports and analytics
- Notification templates
- Roster and shifts
- Leave requests and allowances
Shared across salons:
- Your owner login credentials
- Your subscription and billing
This means:
- A customer at Salon A is not visible at Salon B
- Staff work schedules are specific to each location
- Revenue reports show only the selected salon's data
- Services can have different prices at different locations
Common Pitfalls
"I created a salon but can't see any staff"
Each salon starts empty. You need to add staff members separately for each location. Staff cannot be shared across salons - if someone works at multiple locations, they need a staff profile at each.
"My timezone is wrong on appointments"
Each salon has its own timezone setting. If appointments appear at wrong times, go to Salon Settings > Details and verify the timezone is correct for that location.
"I can't see another salon in the switcher"
The salon switcher only shows active salons. If a salon is marked as inactive (in its settings), it won't appear in the dropdown. Go to My Salons page to see all salons including inactive ones, where you can edit and reactivate them.
"Changes I made aren't showing"
Make sure you're looking at the correct salon. Check the salon name in the header - it's easy to make changes to the wrong location if you have multiple open tabs.
Tips and Best Practices
- Use consistent naming - Name salons by location (e.g., "Luxe Hair - Manchester", "Luxe Hair - Liverpool") so staff know which they're viewing
- Set timezones immediately - Configure the correct timezone before adding any appointments
- Copy service menus manually - If you want the same services at multiple locations, you'll need to create them at each salon (there's no copy feature)
- Check the header - Always glance at the salon name in the header before making changes
- Complete setup before trading - Use the onboarding checklist for each new salon to ensure everything is configured
Related Tutorials
- Tutorial 1.2: Setting Up Your Salon Profile - Detailed guide to salon configuration
- Tutorial 13.2: Timezone, Currency, and Regional Settings - Critical settings explained
- Tutorial 4.1: Adding New Staff Members - Set up staff at each location
- Tutorial 14.1: Understanding Your Luminate Subscription - How billing works with multiple salons
Frequently Asked Questions
Can staff members work at multiple salons?
Staff accounts are specific to each salon. If someone works at multiple locations, you'll need to create a separate staff profile for them at each salon. However, they can only have one user login - they would need to switch salons to see their schedule at different locations.
Is there a limit to how many salons I can create?
This depends on your subscription plan. Contact support (hello@luminate.salon) if you need to add more locations than your plan allows.
Can I see combined reports across all my salons?
Currently, reports are salon-specific. To see overall business performance, you would need to export reports from each salon and combine them externally. Consolidated multi-salon reporting is on our roadmap.
Do customers see which salon they're booked at?
Yes. When customers book online or receive confirmations, the salon name and address are clearly shown. Each salon has its own booking URL.
Can I transfer customers between salons?
Customers cannot be directly transferred. If a customer wants to switch locations, you would need to create a new customer profile at the other salon. Their appointment and transaction history from the original salon remains there.
What happens if I deactivate a salon?
Deactivating a salon removes it from the salon switcher and prevents new appointments. Existing data is preserved. You can reactivate it later from the My Salons page by editing the salon and ticking Active.
Last Updated: June 2026 Reviewed: June 2026