
Adding and Managing Customer Profiles
Introduction
Your customer database is the foundation of your salon's operations. This tutorial shows you how to create comprehensive customer profiles, record essential contact details, track allergies and preferences, and manage customer information effectively.
Who this is for: Owner, Admin, Manager, Staff, Receptionist What you'll learn:
- Add a new customer to the database
- Complete all profile sections (basic info, address, preferences, settings, communication)
- Record allergies and sensitivities safely
- Search, filter, and manage your customer list
- Edit and update customer information
- Deactivate customers and handle GDPR requests
Time to complete: 15 minutes
Prerequisites
- Logged in with at least Staff permissions
- Access to the Customers section
Step-by-Step Instructions
Step 1: Access the Customer Section
- Click Customers in the sidebar
- The customer list appears showing existing customers
- Click the Add Customer button in the top-right corner
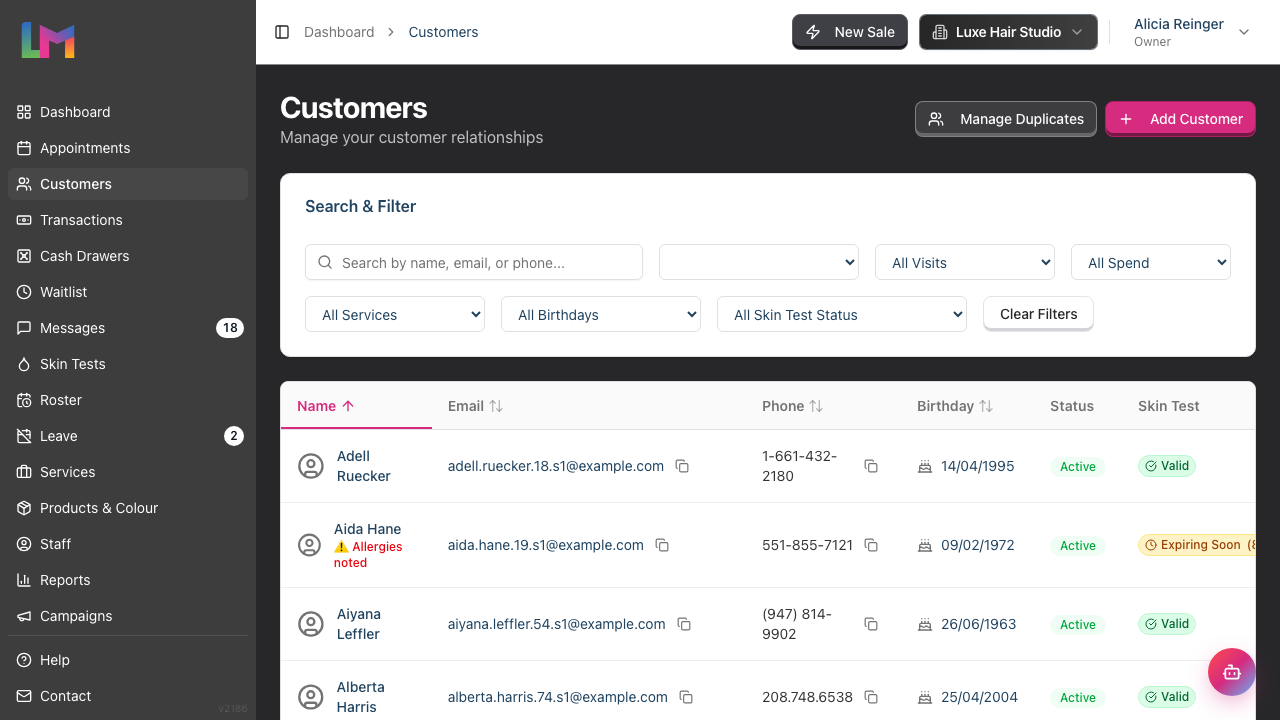
The Create Customer form opens with five sections.
Step 2: Enter Basic Information
The first section captures contact details.
Required Fields:
| Field | Description |
|---|---|
| First Name | Customer's given name |
| Last Name | Customer's surname |
Optional Fields:
| Field | Description |
|---|---|
| For confirmations and receipts | |
| Mobile Number | Phone with country code selector |
| Date of Birth | Chosen from Day, Month and Year dropdowns; used for birthday reminders |
| How did they hear about us? | Free text referral source |
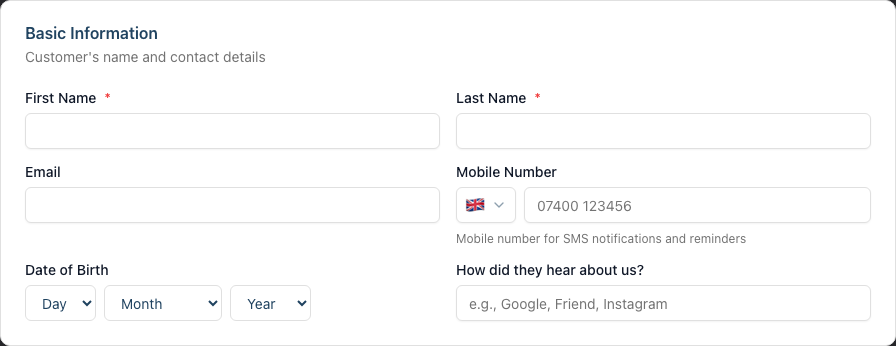
Entering Mobile Numbers:
- The country flag shows the selected country code
- Click the flag to change the country
- Type the local number. You can include the leading zero or leave it out - the field reformats it to the local format when you move on, and shows the international version underneath (for example International format: +44 7400 123456)
- If the number doesn't look right for the selected country, Invalid phone number for selected country appears beneath the field
Example:
First Name: Sarah
Last Name: Thompson
Email: sarah.thompson@example.com
Mobile: 🇬🇧 07400 123456
Date of Birth: 15 March 1985
How did they hear about us?: Instagram recommendation
Step 3: Add Address Information (Optional)
The Address section captures the customer's location.
- Select the Country first (this adjusts field labels appropriately)
- Enter the Street Address
- Complete City, County, and Postcode
Note: Field labels adapt based on the selected country:
- UK: Street Address, City, County, Postcode
- Guernsey and Jersey: Building Name, Road, Parish, Postcode
- Ireland: Street Address, City, County, Postcode
- US: Street Address, City, State, ZIP Code
- Australia: Street Address, City, State, Postcode
Step 4: Record Allergies & Sensitivities
The Allergies & Notes section is where you flag any known allergies or sensitivities.
- Toggle the Allergies & Sensitivities switch on if the customer has any known allergies
- When enabled, a text area appears with the prompt "Describe allergies and sensitivities..."
- Describe the allergies and sensitivities in detail
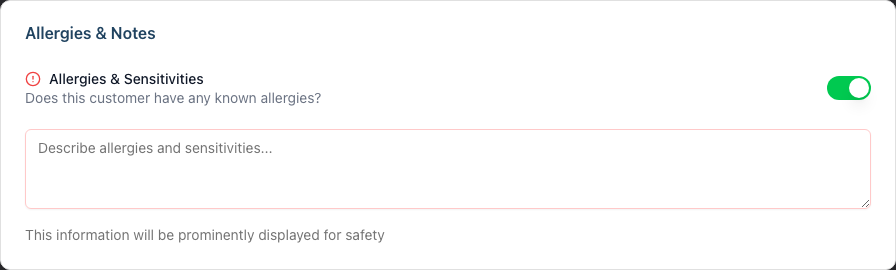
Examples of allergy information:
- "PPD allergy - cannot use permanent colour"
- "Sensitive scalp - patch test required 48 hours before"
- "Allergic to latex gloves"
- "Previous reaction to Brand X colour on 15/01/2024"
Warning: Allergy information appears prominently throughout the system, including during appointment booking. Always record this information accurately.
Recording preferences and other notes: General preferences (preferred stylist, likes a quiet atmosphere, pays by card) are not part of the customer form. Record these from the customer's Notes tab instead, which gives you a dated, filterable timeline of general and colour notes. See Tutorial 3.7: Recording and Managing Notes.
Step 5: Configure Settings
The Settings section has one option:
Active customer checkbox:
- Checked (default): Customer can be picked when you book a new appointment, take a payment, or start a colour test
- Unchecked: Customer is marked inactive. They still appear in the customer list with an Inactive badge, but they can no longer be picked in those places
Leave this checked for new customers. Use deactivation later for customers who no longer visit.
Step 6: Set Communication Preferences
This section controls how the customer receives messages. There are two categories:
Appointment Information: Controls transactional messages like appointment confirmations and reminders.
| Option | Default |
|---|---|
| Enabled | |
| SMS | Enabled |
| Enabled |
Promotions & Offers: Controls marketing messages like special offers and birthday greetings.
| Option | Default |
|---|---|
| Disabled | |
| SMS | Disabled |
| Disabled |
Important: Marketing options default to off. Only enable these if the customer has explicitly consented to receive promotional messages.
Step 7: Review Duplicate Warnings
As you enter an email address or phone number, Luminate automatically checks for existing customers with matching details. If a match is found, an amber warning panel appears below the Basic Information section.
What the warning shows:
- Number of customers with the same email
- Number of customers with the same phone
- Clickable links to view each matching customer's profile
Important: This warning is informational only. You can still save the customer - the warning does not block the form. This helps prevent accidental duplicates while allowing legitimate cases (like family members sharing a phone).
Your options when you see a warning:
- Click a customer link to open their profile in a new tab and verify if it's the same person
- Cancel creating the new customer if you find it's a duplicate
- Continue and save if this is genuinely a new customer
Tip: If you save the customer and later realise they are a duplicate, use the Duplicates page to merge them. See Tutorial 3.6: Merging Duplicate Customer Records.
Step 8: Save the Customer
- Review all entered information
- Click Create Customer
- You're redirected to the customer list
- A success message confirms the customer was created
Managing Existing Customers
Searching for Customers
The customer list includes a search bar:

- Type in the search field
- Search matches against name, email, and phone
- Results filter in real-time
Filter by Status: Use the status dropdown to filter:
- All Customers - Shows everyone
- Active Only - Shows active customers
- Inactive Only - Shows deactivated customers
Filter by Visit History: Use the visit history dropdown to filter by when customers last visited:
- All Visits - No visit filter
- Last 30 Days - Visited in the last 30 days
- Last 90 Days - Visited in the last 90 days
- Not in 6+ Months - Lapsed customers who haven't visited in over 6 months
- Never Visited - Customers with no completed appointments
Filter by Spend: Use the spend dropdown to filter by total spend:
- All Spend - No spend filter
- Over £100 / Over £500 / Over £1000 - Customers who have spent above the threshold
- £0 (No Spend) - Customers with no completed transactions
Filter by Service Booked: Use the service dropdown to find customers who have booked a specific service. The dropdown lists all active services for your salon.
Filter by Birthday: Use the birthday dropdown to find customers with upcoming birthdays:
- All Birthdays - No birthday filter
- Upcoming (7 days) - Shows customers with birthdays in the next week
Filter by Skin Test Status: Use the skin test dropdown to filter by testing status:
- All Skin Test Status - No skin test filter
- Needs Test (Upcoming Appts) - Shows customers who need a skin test before their next appointment
For more advanced filtering strategies, see Tutorial 3.4: Organising Customers.
Viewing a Customer Profile
- Click anywhere on a customer row
- The customer profile opens with six tabs, two of which group related sub-tabs:
- Appointments - Appointment history and visit insights (default tab)
- Details - Contact info, address, communication settings, status, and badges
- Billing - Transactions, Products and Credit sub-tabs
- Colour - Skin Tests and Formulas sub-tabs. If your salon keeps colour information as notes, there are no formulas to show and this tab is named Skin Tests instead
- Notes - General and colour notes timeline
- Messages - Communication history with the customer
Tutorial 3.2 covers these tabs in detail.
On the Details tab, the Contact Information card shows the customer's email, mobile number and date of birth:
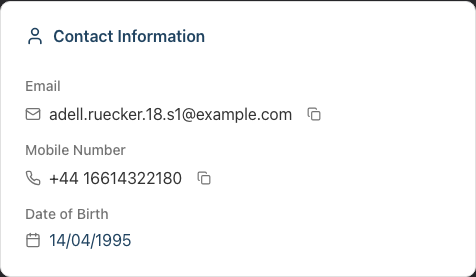
Editing a Customer
- Open the customer profile
- Click the Edit button (top-right)
- Make your changes
- Click Save Changes
Deactivating a Customer
For customers who no longer visit:
- Open the customer profile
- Click the Details tab
- Scroll down to the Customer Status section
- Toggle the switch to the off position
- The customer is marked inactive immediately
To reactivate:
- Open the inactive customer's profile
- Go to the Details tab
- Toggle the switch back to the on position
Note: Deactivated customers stay in the customer list and remain searchable - they simply carry an Inactive badge, and can be hidden with the Inactive Only / Active Only status filter. What deactivation actually stops is new work: an inactive customer no longer appears in the customer picker when you create an appointment, take a payment (Quick POS), or start a colour test, and marketing campaigns skip them. Their history is preserved.
Handling GDPR Data Removal Requests
When a customer requests their personal data be removed:
- Open the customer profile
- Click the Edit button (top-right)
- Scroll down to the Data Privacy section at the bottom of the form
- Click Remove Data
- A confirmation dialog titled Remove Personal Data appears. It lists what will be removed, what will be preserved, and warns that the action cannot be undone
- Click Remove Personal Data to proceed
The same options from the profile: you don't have to open the Edit form. The customer's Details tab has its own Data Privacy card with two buttons:
- Export Data - exports everything held about the customer, including appointments, transactions, skin tests and gift vouchers. This is what you send in response to a subject access request
- Remove Data - opens the same confirmation dialog described above
What is removed:
- Name, email, phone number
- Address and date of birth
- Allergies and any recorded notes
- Skin test (patch test) records
- Badges and referral source
- Communication preferences
- Any secure links you had sent them (profile update and booking links)
What is preserved:
- Transaction history (for financial records)
- Appointment history (for business reporting)
The customer record is anonymised but not deleted, ensuring your financial and appointment records remain intact for accounting and reporting purposes. The record is renamed Deleted Customer and set to inactive.
Warning: This action cannot be undone. Once personal data is removed, it cannot be recovered.
Understanding the Customer List
The customer list displays:
| Column | Description |
|---|---|
| Name | Full name with allergy indicator |
| Email address, with a copy-to-clipboard icon and an email-status pill if delivery has failed | |
| Phone | Clickable phone link, with a copy-to-clipboard icon |
| Birthday | Date of birth (if recorded) |
| Status | Active/Inactive badge |
| Skin Test | Current skin test status |
| Actions | Edit button |
Allergy Indicator: Customers with allergies noted show "⚠️ Allergies noted" text below their name in the list.
Email Status Indicator: If a customer's email address has bounced or they have marked email as spam, an Email bounced (red) or Email marked as spam (amber) pill appears next to their address — here, in the profile header, and on the Details tab. Luminate sets this automatically and stops emailing the customer until the address is corrected. See Tutorial 3.3 (Customer Preferences and Communication Consent) for the full explanation.
Sorting: Click column headers (Name, Email, Phone, Birthday) to sort the list.
Common Pitfalls
"I can't save a customer without an email"
Email is optional. Only First Name and Last Name are required. However, without email or phone, you cannot send the customer appointment reminders.
"The phone number shows an error"
Invalid phone number for selected country means the number doesn't match the country on the flag button. Check the flag first, then the number itself - enter just the local number, without the country code digits.
"I can't find the customer I just added"
Check your filter. If "Active Only" is selected and you somehow created an inactive customer, they won't appear. Select "All Customers" to see everyone.
"Allergies aren't showing when I book"
Ensure the Allergies & Sensitivities toggle is enabled and you've entered text in the allergy field. A customer marked with allergies displays a red "Has Allergies" badge on their profile and in search results.
"I accidentally deactivated the wrong customer"
Open their profile (search for their name), go to the Details tab, and toggle the status switch back on to restore them.
Tips and Best Practices
- Collect information gradually - Get name and phone at first visit; add details over subsequent appointments
- Always record allergies immediately - This is a safety issue; don't wait until later
- Verify email addresses - Read back the email to confirm spelling
- Use the referral field - Ask "How did you hear about us?" to track what marketing works
- Keep notes professional - These are business records; be factual and helpful
- Update after each visit - Add any new preferences or information learned
- Get explicit marketing consent - Never enable marketing options without clear customer agreement
Related Tutorials
- Tutorial 2.2: Booking and Managing Appointments - Book appointments for customers
- Tutorial 3.2: Understanding Customer History and Analytics - View spending and visit patterns
- Tutorial 3.3: Customer Preferences and Communication Consent - Detailed consent management
- Tutorial 3.4: Organising Customers - Advanced filtering and managing your customer database
- Tutorial 3.5: Using Customer Badges - Apply badges like VIP
- Tutorial 3.6: Merging Duplicate Customer Records - Review and merge duplicate profiles
- Tutorial 3.7: Recording and Managing Notes - Record preferences and colour notes via the Notes timeline
- Tutorial 11.2: GDPR Compliance - Data Protection and Privacy - Data exports, removal requests and consent records
- Tutorial 11.3: Managing Customer and Staff Data Retention - Deactivate vs anonymise, and automatic anonymisation of long-inactive customers
Frequently Asked Questions
What's the minimum information needed to create a customer?
Just First Name and Last Name. However, without phone or email, the customer won't receive appointment reminders.
Can I add customers without their permission?
Yes, you can create a record when they book or visit. However, marketing messages require explicit consent - keep those options disabled unless the customer agrees.
What if two customers have the same name?
Each customer record is unique. Use email, phone, or date of birth to distinguish between them. You can also add a note like "Sarah Thompson - Croydon" to help identify them.
How do I handle customers with no email or phone?
Create the profile with name only. Add a note explaining: "Walk-in customer - will call to book". They won't receive reminders but can still have appointments booked.
Can customers update their own information?
Yes. You can send the customer a secure link to update their own contact details, address, allergies, and communication preferences. Open the customer profile, click Request Update, and choose to send the link by email or SMS. For any other changes, staff must update the profile.
Where do I record a customer's preferences or general notes?
Preferences and free-text notes are not part of the customer form. Open the customer's profile, go to the Notes tab, and add a note there. Notes are dated, can be pinned, and can be filtered by type (general or colour). See Tutorial 3.7: Recording and Managing Notes.
How do I merge duplicate customer records?
Luminate includes a dedicated Duplicates page for reviewing and merging duplicate customers. See Tutorial 3.6: Merging Duplicate Customer Records for step-by-step instructions on how to safely combine records without losing appointment or transaction history.
Last Updated: August 2026