
Merging Duplicate Customer Records
Introduction
Duplicate customer records happen in any busy salon. The same customer might book online with their email one time and give their phone number the next, or a receptionist might accidentally create a new profile instead of finding an existing one. Luminate helps you find and merge these duplicates so each customer has one complete profile with all their history.
This tutorial shows you how to review potential duplicate groups, decide which records are genuinely the same person, and merge them into a single consolidated profile.
Who this is for: Owner, Admin, Manager, Receptionist What you'll learn:
- Recognise the duplicate warning panel on customer profiles
- Access the Potential Duplicates page
- Understand match types (email, phone, similar names)
- Understand confidence levels (high, low)
- Review a duplicate group using the two-step dialog
- Resolve field conflicts when merging
- Dismiss false positives (families sharing contact details)
- Restore a group you dismissed by mistake
- What happens to appointments, transactions, and messages when you merge
Time to complete: 15 minutes
Prerequisites
- Logged in with Owner, Admin, Manager, or Receptionist permissions
- Complete Tutorial 3.1 (Adding and Managing Customer Profiles)
- Have existing customer data in your salon
Step-by-Step Instructions
Duplicate Warning on Customer Profiles
When you view a customer's profile, you may see an amber warning panel near the top of the page. It displays the heading "Potential Duplicate" followed by a description such as:
"1 other customer shares the same email address."
The message adapts to the match type (email address, phone number, or name) and the number of matching customers. This panel appears automatically when the customer you're viewing is part of a duplicate group. This is a convenient way to discover and resolve duplicates while you're already working with a customer's record.
If a customer belongs to more than one duplicate group — for example they share an email address with one customer and a name with another — the panel shows one group at a time. Resolve that group, then reload the profile to see the next one. Use the Potential Duplicates page to see every group at once.

Actions from the warning panel:
| Button | What It Does |
|---|---|
| Review & Merge | Opens the same two-step merge dialog described below. You can select which customers to merge and resolve any conflicts. |
| Dismiss | Opens a Dismiss Duplicate Group confirmation dialog that asks "Are you sure these customers are not duplicates? This will hide this warning." Click Dismiss to confirm, or Cancel to keep the warning. |
After completing an action:
- After merging, Luminate takes you to the primary customer's profile. If you merged the customer you were viewing into another record, that means you land on the other customer's profile.
- After dismissing, the warning panel simply disappears and you remain on the same page
This feature means you don't have to visit the Duplicates page to handle a duplicate you've discovered while viewing a customer. However, for a comprehensive review of all potential duplicates in your salon, use the Potential Duplicates page described below.
Real-Time Duplicate Warnings on Create and Edit Forms
Luminate also checks for duplicates as you create or edit customer records, helping you catch potential duplicates before they're saved.
How it works:
- Open the Add Customer or Edit Customer form
- As you type an email address or phone number, Luminate checks for matches in the background (there is a brief delay of about half a second to avoid checking on every keystroke)
- If a match is found, an amber "Potential Duplicate" panel appears on the form
The warning panel shows:
- A message such as "2 customers with same email. You can still save this customer."
- A Same email: or Same phone: list naming each matching customer, shown as a link you can click to open their profile in a new tab
- If there are both email and phone matches, both are listed separately

Key points:
- The warning is informational only -- you can still save the customer. This is useful for families who share a phone number or email address.
- On the Edit form, the current customer is excluded from the duplicate check, so you won't see a warning about the record you're already editing.
- The links open matching customer profiles in a new tab, so you can check whether the customer truly exists before creating a new record.
Tip: Train your team to check the duplicate warning before saving new customers. A quick glance at the matching profile can save you from creating a duplicate that needs to be merged later.
Step 1: Access the Potential Duplicates Page
- Click Customers in the sidebar
- Click the Manage Duplicates button in the top-right header area
- The Potential Duplicates page displays groups of customers that may be the same person
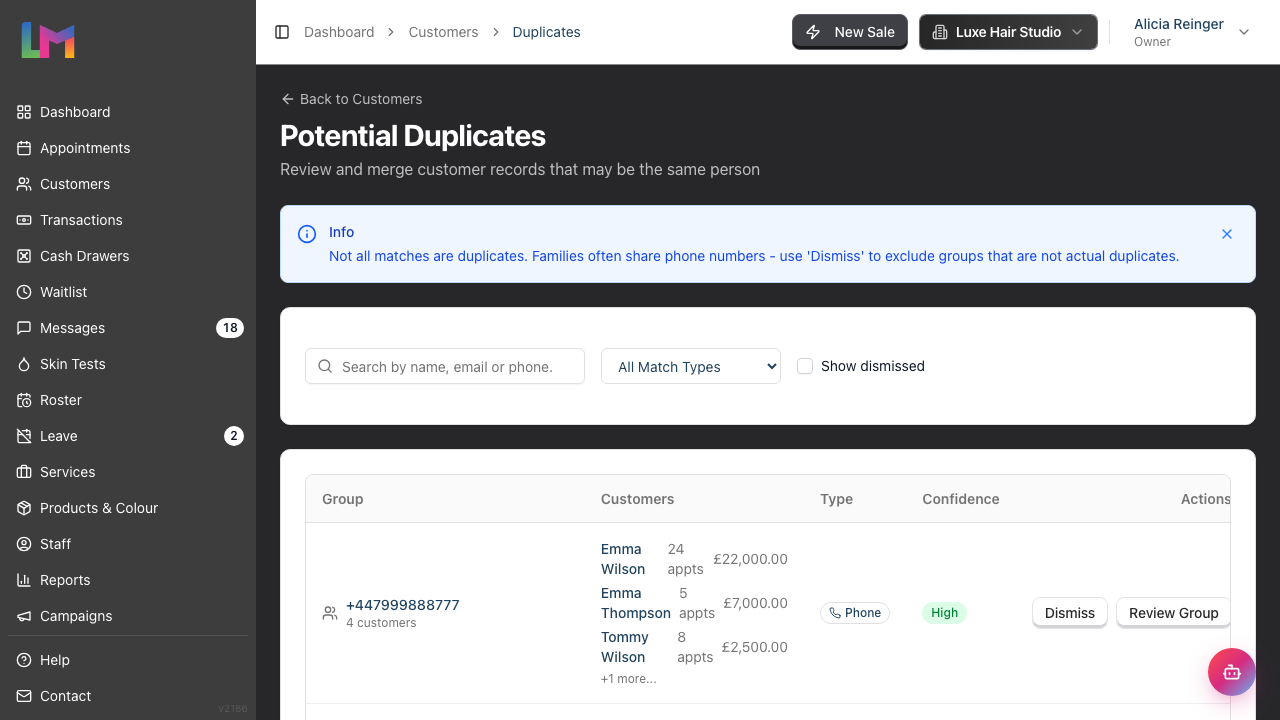
The table shows one row per group, under the headings Group, Customers, Type, Confidence and Actions:
- Group — the shared identifier (email address, phone number, or shared name) and the number of customers in the group
- Customers — the first three customers, each with their appointment count and total spend. Larger groups end with a "+2 more..." line
- Type — the match type
- Confidence — the confidence level. A dismissed group also carries a Dismissed badge here, with a Restore button beside it
- Actions — Dismiss and Review Group
Above the table you also get:
- A Search by name, email or phone... box that narrows the list to groups containing a matching customer. Click the small cross inside the box to clear it.
- The match type filter and the Show dismissed tick box, both described below
Groups are sorted with the highest confidence first, and larger groups before smaller ones, so the most likely duplicates sit at the top of page one.
Step 2: Understanding Match Types
Luminate detects duplicates based on three criteria:
| Match Type | Description |
|---|---|
| Multiple customers share the exact same email address (case-insensitive) | |
| Phone | Multiple customers share the exact same phone number (normalised, ignoring formatting differences) |
| Name | Multiple customers have the exact same first and last name (case-insensitive, e.g., "John Smith" and "john smith") |
The Type column shows the match type as a small badge with an icon and a label — Email with a mail icon, Phone with a phone icon, and Name with a person icon.
Note: Name matching looks for an exact match on the full name. Spelling variations or typos (such as "Sarah" and "Sara") are treated as different names and will not be grouped together. Use the email and phone match types to catch records that belong to the same person but were entered with slightly different names.
Filter by match type: Use the dropdown at the top of the page to filter groups by type:
- All Match Types - Shows everything
- Email Matches - Only email duplicates
- Phone Matches - Only phone duplicates
- Similar Names - Only name-based matches
Step 3: Understanding Confidence Levels
Each duplicate group has a confidence level indicating how likely the records are genuine duplicates:
| Confidence | Badge Colour | When It Appears |
|---|---|---|
| High | Green | Email or phone number matches (exact match on a unique identifier) |
| Low | Grey | Name matches (customers share the same first and last name) |
Email and phone matches are high confidence because these identifiers are typically unique to one person. Name matches are low confidence because shared names are common (e.g., two different customers genuinely called "John Smith").
Priority recommendation: Start with high-confidence matches. These are the most straightforward to merge and give you quick wins for cleaning your database.
Step 4: Reviewing a Duplicate Group
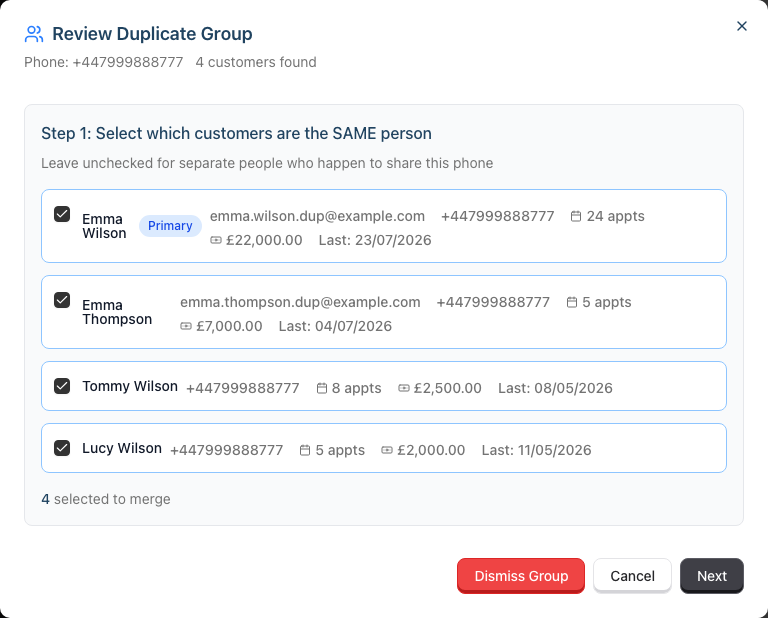
Click Review Group on any row to open the two-step merge dialog. The dialog is titled Review Duplicate Group and its subheading repeats the match type, the shared identifier, and how many customers were found — for example "Phone: +447999888777 4 customers found".
Step 1 of the dialog: Select which customers are the SAME person
You'll see all customers in the group with checkboxes. Each customer card shows:
- Full name (with a Primary badge on the pre-selected customer)
- Email and phone (if recorded)
- Number of appointments (with a calendar icon)
- Total spend (with a banknote icon)
- Last visit date
How to use this step:
- All customers are pre-selected by default
- Uncheck any customer who is a different person (for example, family members sharing a phone)
- The summary at the bottom shows how many will be merged and how many will remain separate
Example: A phone number is shared by a mother and daughter. You would uncheck the daughter to keep her as a separate customer while still merging any other true duplicates.
When you're satisfied with your selection, click Next.
Step 2 of the dialog: Choose the primary record and resolve conflicts
In this step, you decide:
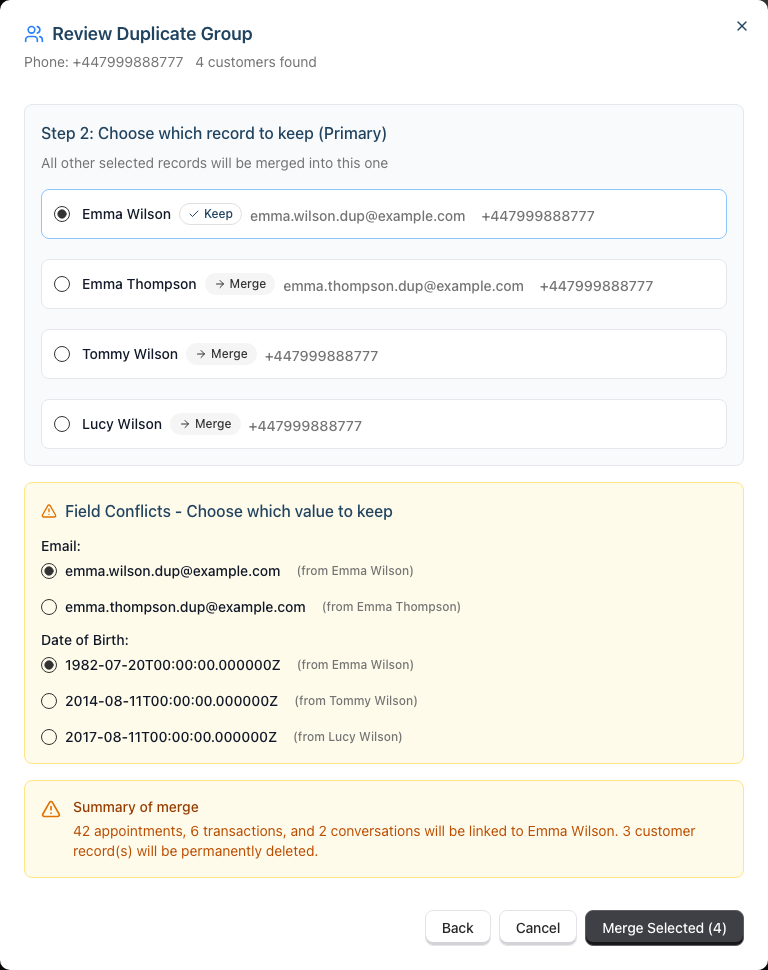
Which record to keep (Primary): Use the radio buttons to select the customer record that will survive. All other selected records will be merged into this one.
- Luminate pre-selects the customer with the most appointments
- The selected customer shows a Keep badge; others show a Merge badge
- You can change this by clicking a different customer's radio button
Resolve field conflicts: If the selected customers have different values for certain fields, you'll see an amber Field Conflicts - Choose which value to keep section. The fields checked for conflicts are: Email, Phone, Date of Birth, Address, City, State, Postcode, and Allergies. For each conflicting field:
- Choose which value to keep (each option shows the value and which customer it came from)
- Date of Birth options use your salon's date format, for example 20/07/1982
- Or select Combine all values where available (offered for Allergies, so you don't lose any recorded sensitivity)
Conflicts only appear for fields where two or more customers hold different non-empty values. If the primary customer has a field left blank, it is filled automatically from the first duplicate that has a value — no conflict is shown.
Step 5: Completing the Merge
After reviewing conflicts, an amber Summary of merge panel tells you what the merge moves, for example:
"15 appointments, 3 transactions and 2 conversations will move to Sarah Johnson. Sarah Johnson will then have 39 appointments in total. 1 customer record will be permanently deleted."
Read the first sentence as the records that move across from the duplicates. The second sentence is what the primary customer holds afterwards, counting the records they already had. Record types with nothing to move are left out. If more than four types move, the smaller ones are grouped as "other records". If you left any customer unticked in Step 1, the panel adds a line confirming how many stay unchanged.
Click Merge Selected to complete the merge. The button also shows the number of customers included (e.g., Merge Selected (2)).
What happens:
- All appointments, transactions, and messages from duplicate records are reassigned to the primary customer
- The duplicate customer records are permanently deleted
- Any customers you unchecked remain as separate profiles
- The group is removed from the duplicates list
Luminate returns you to the Potential Duplicates page with a success message such as "Merged 1 customer(s) into Sarah Johnson". If you started the merge from a customer profile instead, you land on the primary customer's profile.
Step 6: Dismissing False Positives
Not every match is a duplicate. Families often share phone numbers, and some emails (like shared business addresses) are used by multiple people.
To dismiss a group:
- Click Dismiss on the group row, or
- Click Dismiss Group in the review dialog footer
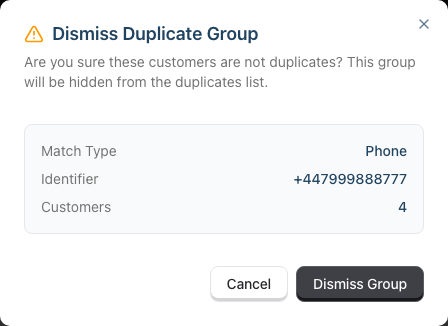
Either route opens a Dismiss Duplicate Group confirmation dialog. It repeats the Match Type, Identifier and number of Customers, so you can check you picked the right row. Click Dismiss Group to confirm, or Cancel to go back.
What happens when you dismiss:
- The group is hidden from the main duplicates list
- A Group dismissed message confirms the action
- The customers remain as separate records
- You can view dismissed groups later by ticking Show dismissed
When you tick Show dismissed, dismissed groups reappear in the table, greyed out and carrying a Dismissed badge next to their confidence level. Their Dismiss button is gone — Review Group remains, so you can still merge a group you dismissed by mistake.
Example: A husband and wife share a phone number. Dismiss this group so it doesn't appear in your duplicates review. Both customers keep their own profiles.
Step 7: Restoring a Dismissed Group
Dismissing is not permanent. If you dismiss a group by mistake, put it back in the active list.
To restore a group:
- Tick Show dismissed to reveal the dismissed groups
- Find the row you want back
- Click Restore, next to the Dismissed badge
Restore takes effect at once. There is no confirmation dialog, because nothing is deleted — the group simply returns to the list.
What happens when you restore:
- A Group restored message confirms the action
- The Dismissed badge disappears and the row is no longer greyed out
- The group counts as an open duplicate again, so it shows in the normal list
- The customer records themselves do not change
You can dismiss the same group again at any time.
What Happens When You Merge
When customer records are merged:
| Data Type | What Happens |
|---|---|
| Appointments | All appointments from duplicates are reassigned to the primary customer, along with any personal time blocks booked against them |
| Transactions | All transactions from duplicates are reassigned to the primary customer. If a duplicate paid for someone else's sale in a combined checkout, that payer link moves too, so refunds still route correctly |
| Account credit | Any remaining credit balance on a duplicate is transferred to the primary customer, and the full credit history moves with it. See Tutorial 3.8 |
| Conversations | All message threads from duplicates are reassigned to the primary customer |
| Waitlist entries | Any waitlist entries from duplicates are reassigned to the primary customer |
| Skin tests | All skin test records from duplicates are reassigned to the primary customer |
| Gift vouchers | Any vouchers purchased by duplicates are reassigned to the primary customer |
| Consultation notes | All notes from duplicates are reassigned to the primary customer |
| Reminders & booking links | Sent message history, online-booking links, and any in-progress online booking sessions are reassigned to the primary customer. Any preferences link previously sent to a duplicate stops working — send a fresh one from the primary customer's profile if you need it |
| Contact details (email, phone, address, date of birth) | You choose which to keep during the merge if they differ; any blank fields on the primary are filled from the duplicates |
| Allergies | You choose which to keep, or combine all values, during the merge |
| Badges | All badges from all merged customers are combined on the primary |
| Marketing preferences | If any merged customer had opted in, the primary customer is opted in |
| Transactional preferences | If any merged customer had opted out, the primary customer is opted out |
| Customer created date | The earliest created date from all merged records is used |
The duplicate records are permanently deleted. Their IDs are no longer valid. Only the primary customer's ID remains.
Audit Trail
All merges are logged for accountability. Each merge log records:
- Who performed the merge
- When the merge occurred
- Which customer was merged and which was kept as primary
- A snapshot of both customer records before the merge
- Which field values were chosen during conflict resolution
- How many records of each type were transferred (appointments, transactions, etc.)
This audit trail helps you track changes and provides accountability for your customer data management. Luminate stores it in the background — there is no screen for reading merge logs. If you need the record of a specific merge, contact hello@luminate.salon.
Common Pitfalls
"I accidentally merged the wrong customers"
Unfortunately, merging cannot be undone. The duplicate records are permanently deleted. This is why the two-step review process asks you to confirm your selection carefully. If you're unsure, dismiss the group instead of merging.
"The same duplicate keeps appearing"
If a group reappears after dismissing, check that you fully dismissed it (confirmation required). If the issue persists, the system may have detected a new match based on updated customer data.
"I can't find the Duplicates page"
Look for the Manage Duplicates button in the header area of the Customers page. Luminate hides that button completely if your role cannot merge customers, so if it isn't there, check your permissions - the Duplicates feature requires the Owner, Admin, Manager, or Receptionist role. Staff members who open the page address directly get an Access denied message.
"All customers are pre-selected but I only want to merge two"
Uncheck the customers who should remain separate before clicking Next. The summary shows how many will be merged.
"I don't see any field conflicts in Step 2"
Conflicts only appear when the selected customers have different values for the same field. If all values match (or are empty), no conflicts need resolving.
"The merge button is disabled"
You need at least 2 customers selected to merge. If you've unchecked everyone except one, there's nothing to merge.
Tips and Best Practices
- Act on profile warnings immediately - If you see the amber duplicate warning when viewing a customer, take a moment to review and resolve it before continuing with your task
- Review high-confidence matches first - These are most likely genuine duplicates and are quick to process
- Don't rush name matches - Identical names don't always mean the same person (e.g., "John Smith" is common)
- Check appointment history - Different service histories often indicate different people
- Use dismiss for families - Shared phone numbers between family members are common; dismiss rather than merge
- Review before deleting - Click through to customer profiles if you're unsure
- Schedule regular reviews - Check the duplicates page weekly or monthly to keep your database clean
- Train your team - Ensure staff know how to search for existing customers before creating new ones
- Keep the primary selection thoughtful - Choose the record with the most complete information as primary
Related Tutorials
- Tutorial 3.1: Adding and Managing Customer Profiles - How to create and search for customers
- Tutorial 3.2: Understanding Customer History and Analytics - View customer appointment and transaction history
- Tutorial 3.4: Organising Customers - Other ways to keep your database clean
- Tutorial 3.8: Client Account Credit - How credit balances work, including after a merge
Frequently Asked Questions
Who can merge customers?
Owners, Admins, Managers, and Receptionists have access to the Duplicates page and can perform merges. Staff members cannot merge customers.
Can I undo a merge?
No. Merging permanently deletes the duplicate records. The data is transferred to the primary customer, but the original records cannot be recovered. This is why careful review is important.
What if I dismiss a group by mistake?
Tick Show dismissed on the Duplicates page to see dismissed groups. Click Restore on the row to put the group back in the active list, or click Review Group to merge it straight away. Dismissing is always reversible.
How often should I review duplicates?
We recommend reviewing the duplicates page at least once a month, or whenever you notice your customer count seems unusually high. Some salons make it part of their weekly management routine.
Will merging affect reports?
Yes, positively. After merging, the customer's total spend, visit count, and history will be accurate because all their appointments and transactions are consolidated.
What happens to gift vouchers?
Gift vouchers are tied to customer records. When merging, any vouchers from duplicate customers will be associated with the primary customer.
What happens to account credit?
Any credit balance sitting on a duplicate record moves to the primary customer, so nothing is lost. The transfer is written into both customers' credit histories, and the full history follows the balance across. Tutorial 3.8 covers account credit in detail.
Can customers share an email address legitimately?
Yes, though it's uncommon. Some couples share an email account. In this case, dismiss the group to keep them as separate customers. However, reminders and confirmations will all go to the shared email.
Why would I ever choose a record with fewer appointments as primary?
The customer with fewer appointments might have more complete profile information (address, allergies, preferences). You can always choose which field values to keep during conflict resolution.
Why do I see a duplicate warning on a customer's profile?
Luminate automatically checks if the customer you're viewing is part of a potential duplicate group. If they share an email address, phone number, or have a similar name to another customer, the amber warning panel appears. This helps you discover and resolve duplicates while working with customer records, without needing to visit the Duplicates page separately.
Can I dismiss the duplicate warning without going to the Duplicates page?
Yes. Click Dismiss directly on the warning panel, then confirm in the dialog. The warning will disappear and you'll stay on the customer's profile. The group will also be marked as dismissed on the main Duplicates page.
I dismissed a duplicate from the customer profile, but now I changed my mind
Open the Potential Duplicates page and tick Show dismissed to see all dismissed groups. Click Restore on the row to bring the group back, or Review Group to merge it from there.
Can I prevent duplicate customers from being created?
Luminate shows a real-time warning on the Add Customer and Edit Customer forms when the email or phone you enter matches an existing customer. The warning includes links to matching profiles so you can check before saving. However, the warning does not block saving -- this is intentional, because families and couples sometimes share contact details. The best prevention is training your team to search for existing customers before creating new ones, and to check the duplicate warning when it appears.
Last Updated: August 2026