
Organising Customers
Introduction
Luminate provides several ways to organise and categorise your customers: status (active/inactive), badges for quick identification, and search and filtering tools. This tutorial covers how to use these features to keep your customer database organised and easy to navigate.
Who this is for: Owner, Admin, Manager, Staff, Receptionist What you'll learn:
- Filter customers by status, visit history, spending, and services booked
- Use search to find customers quickly
- Understand how badges help identify customers
- Use the customer list effectively
- Identify and re-engage lapsed customers
- Keep your customer database organised
Time to complete: 12 minutes
Prerequisites
- Logged in with at least Staff permissions
- Complete Tutorial 3.1 (Adding and Managing Customer Profiles)
- Some customer profiles in the system
Step-by-Step Instructions
Step 1: Understanding Customer Organisation Tools
Luminate offers these methods for organising customers:
| Tool | Purpose |
|---|---|
| Active/Inactive Status | Archive customers who no longer visit |
| Badges | Visual indicators for quick identification (VIP, allergies, etc.) |
| Search | Find customers by name, email, or phone |
| Filters | Filter by status, visit history, spending, services booked, birthdays, or skin test requirements |
| Notes | Record information against the customer on the Notes tab (see Tutorial 3.7) |
Step 2: Using Customer List Filters
The customer list includes several filters to help you find customers:
- Navigate to Customers in the sidebar
- Use the filter dropdowns to narrow results:
Status Filter:
- All Customers - Shows everyone, both active and inactive (default)
- Active Only - Shows active customers only
- Inactive Only - Shows deactivated customers only
Visit History Filter:
- All Visits - No visit filtering
- Last 30 Days - Customers who visited in the past month
- Last 90 Days - Customers who visited in the past three months
- Not in 6+ Months - Lapsed customers who haven't visited recently
- Never Visited - Customers with no appointment history
Spend Filter:
- All Spend - No spend filtering
- Over £100 - Customers with total spend exceeding £100
- Over £500 - Customers with total spend exceeding £500
- Over £1000 - Customers with total spend exceeding £1000
- £0 (No Spend) - Customers with no transaction history
Service Booked Filter:
- All Services - No service filtering
- [Service Name] - Filter to customers who have booked a specific service
Birthday Filter:
- All Birthdays - No birthday filtering
- Upcoming (7 days) - Customers with birthdays in the next week
Skin Test Filter:
- All Skin Test Status - No skin test filtering
- Needs Test (Upcoming Appts) - Customers with colour appointments who need testing

When to deactivate customers:
- Customer has moved away
- Customer hasn't visited in over 12 months
- Customer requests removal from your system
To deactivate a customer:
- Navigate to Customers
- Click on the customer's name to open their profile
- Click the Details tab
- Scroll to the Customer Status card near the bottom, just above Data Privacy
- Toggle the switch from Active to Inactive

The card tells you which state you're in: Active reads "This customer appears in the pickers for a new appointment, a new sale, and a new colour test. Marketing campaigns include them", and Inactive reads "This customer no longer appears in the pickers for a new appointment, a new sale, or a new colour test. Marketing campaigns skip them. They stay in the customer list with an Inactive badge, and their history is preserved." Toggling the switch saves immediately — there's no separate Save button. Toggle it back to reactivate the customer.
You can also change this from the customer's Edit form, using the Active customer checkbox in the Settings card.
Inactive customers:
- Still appear in the customer list by default (which shows All Customers) — use the Active Only status filter to hide them
- Show an Inactive pill in the Status column, and appear on their own under the Inactive Only filter
- Don't appear in the customer picker when booking a new appointment, taking payment (Quick POS), or starting a new colour test. They remain selectable when editing an existing appointment, so a booking already in the diary isn't broken
- Are excluded from marketing campaign audiences
- Retain all their history
Customers whose personal data has been removed (see Tutorial 3.3) are different again — they're hidden from the customer list entirely, not just filtered out by status.
Step 3: Use Search Effectively
The customer list search bar matches against:
- First name
- Last name
- Full name (first and last combined)
- Email address
- Phone number (with or without formatting)
The box is labelled Search by name, email, or phone... and filters as you type, so partial values are enough.
Search tips:
- Search by partial name: "Thom" finds "Thompson"
- Search by phone to find customers quickly at check-in — a formatted or unformatted number both work
- Search by email to find customers who book online
Note: The search does not match against notes recorded on the customer's Notes tab. To organise customers by custom categories, use badges instead (see Tutorial 3.5).
Step 4: Understanding Customer Badges
Badges provide visual identification on customer profiles. See Tutorial 3.5 for full details.
Built-in badges:
- VIP - High-value customer
- Prefers Silence - Prefers quiet during appointments
- Often Late - Pattern of late arrivals
- Often Early - Pattern of early arrivals
- Frequent Visitor - Regular customer
- New Customer - Recent first visit
To apply them, open the customer, click the Details tab and click a badge in the Badges card to toggle it on or off.
Badges appear on:
- The Badges card on the customer's Details tab
- The appointment sidebar that opens when you click an appointment on the calendar
- The appointment detail page
- The dashboard's today's and upcoming appointment cards
Note: Badges are not shown in the customer list or on the customer profile header — open the Details tab to see them. Tutorial 3.5 has the full list of locations.
Note: Allergies are displayed separately as a warning indicator, not as a badge. When a customer has allergies recorded, you'll see "⚠️ Allergies noted" in the customer list and a red Has Allergies indicator on their profile header.
Step 5: Using Notes for Organisation
Free-text information about a customer lives on their Notes tab, as dated notes you add one at a time. Tutorial 3.7 covers the Notes timeline in full.
Examples of what to record:
- "Corporate account" for business clients
- "Referred by Sarah" for tracking referrals
- Styling preferences or observations from a consultation
Two other places hold customer information:
- Allergies & Sensitivities — the toggle and text box on the customer's Edit form, which drives the Has Allergies warning
- How did they hear about us? — the referral source recorded when the customer is created
Note: Notes are for reference when viewing an individual customer. The customer list search does not match against note content, and the Notes tab itself filters by note type rather than offering a text search. For categorising customers that you can identify at a glance, use badges instead (see Tutorial 3.5).
Step 6: Keeping Your Database Organised
Regular maintenance tasks:
Monthly:
- Review recent customers - are profiles complete?
- Check for duplicate records
Quarterly:
- Review customers who haven't visited - consider outreach
- Deactivate customers who have moved or churned
- Update outdated notes
Annually:
- Full database review
- Verify contact details are current
- Archive long-inactive customers
Step 7: Finding Inactive or At-Risk Customers
To identify customers who may need attention, use the Visit History filter:
- Navigate to Customers in the sidebar
- Set the Visit History filter to Not in 6+ Months to find lapsed customers
- Review the filtered list and consider outreach campaigns
Alternative method using Visit Insights:
- Open individual customer profiles
- Check the Visit Insights card on the Appointments tab
- Look at the Next Visit tile
The card shows four tiles — Last Visit, Frequency, Next Visit and Total (total appointments) — followed by a Services booked row listing each service, how many times it's been booked and how often.
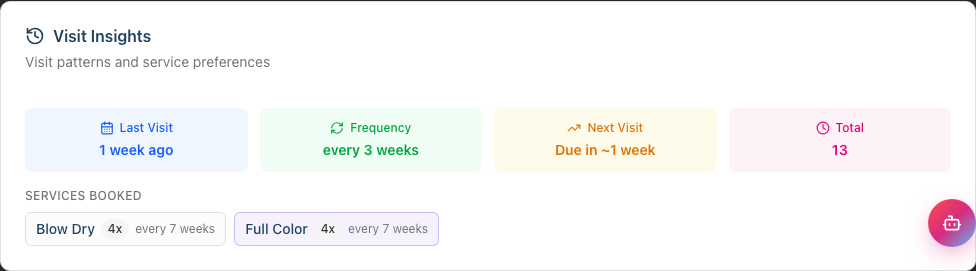
The Next Visit tile is the one to watch. It reads:
- Overdue by 9 weeks (in red) when the customer is past their usual interval
- Due for visit or Due in ~2 days when a visit is coming up
- On track when there's nothing due
- No visits yet when there's no history to work from
When a customer is overdue, a warning also appears just below the card: "This customer typically visits every 3 weeks but hasn't been in for 12 weeks. Consider reaching out to schedule their next appointment." You can dismiss it.
Note: Visit Insights only appears once the customer has completed appointments to measure — a brand-new profile won't show the card at all.
Re-engagement workflow:
- Use the Not in 6+ Months filter to identify lapsed customers
- Review their profiles and transaction history
- Consider a re-engagement message or special offer
- If they've permanently churned, deactivate their record
Common Pitfalls
"I can't find a customer in search"
Check the status filter. If set to Active Only, inactive customers won't appear. Switch to All Customers and try again.
"I have duplicate customer records"
Use the Manage Duplicates button on the Customers page to review and merge duplicate records. Luminate automatically detects customers sharing email addresses, phone numbers, or similar names. See Tutorial 3.6: Merging Duplicate Customer Records for the full process.
The button only appears for roles that can merge customers (Owner, Admin, Manager and Receptionist) — if you're signed in as Staff, ask a manager to run the merge.
"The customer list is too long to browse"
Always use search instead of scrolling. Type the customer's name, email, or phone to filter instantly.
"I want to segment customers for marketing"
Use the customer list filters to segment your audience:
- Spend Filter - Target high-value customers (Over £500, Over £1000)
- Visit History Filter - Re-engage lapsed customers (Not in 6+ Months) or reward recent visitors
- Service Booked Filter - Target customers who use specific services
Combine with Promotions & Offers communication preferences to ensure you only contact customers who have opted in to marketing.
Tips and Best Practices
- Keep profiles complete - Full profiles with phone and email enable better communication
- Use notes consistently - If you add organisational keywords to the Notes tab, use the same terms across all relevant customers
- Deactivate, don't delete - Deactivated customers retain their history for reporting
- Search by phone at check-in - Fastest way to pull up a customer profile
- Review badges regularly - Ensure badges like VIP are still accurate
- Clean up quarterly - Regular maintenance prevents database bloat
Related Tutorials
- Tutorial 3.1: Adding and Managing Customer Profiles - Creating customer records
- Tutorial 3.2: Understanding Customer History and Analytics - Using visit insights
- Tutorial 3.3: Customer Preferences and Communication Consent - Managing preferences
- Tutorial 3.5: Using Customer Badges - Visual customer identification
- Tutorial 3.6: Merging Duplicate Customer Records - Cleaning up duplicates
- Tutorial 3.7: Recording and Managing Notes - Keeping notes against a customer
Frequently Asked Questions
Can I create custom categories for customers?
Luminate uses badges (not tags) for customer categorisation. Badges include built-in options (VIP, Often Late, etc.) plus custom badges you can configure. See Tutorial 3.5.
How do I find all VIP customers?
VIP is a badge applied to individual customers. To identify high-value customers systematically, use the Spend Filter (Over £500 or Over £1000) on the customer list, or use the Top Customers report in the Reports section.
Can I bulk-update customer status?
Currently, status changes are made one customer at a time. For large-scale updates, consider using the data export/import features.
What's the difference between inactive and deleted?
- Inactive: Customer hidden from default views but history preserved
- Deleted/Anonymised: Personal data removed (GDPR compliance), but transaction/appointment history preserved
Can I search by notes content?
No, the main search bar searches name, email, and phone only. Note content is not included in search. To categorise customers for quick identification, use badges instead (see Tutorial 3.5). To find customers by note content, you would need to use data export to search externally.
How do I identify customers from a specific referral source?
When creating customers, record their referral source in the "How did they hear about us?" field. You can then export customer data and filter by this field.
How do I find customers who haven't visited recently?
Use the Visit History filter on the customer list:
- Not in 6+ Months shows customers who may have lapsed
- Never Visited shows customers with profiles but no appointment history
This is useful for re-engagement campaigns or database cleanup.
Can I find customers who book a specific service?
Yes, use the Service Booked filter dropdown to select any service. The list will show only customers who have booked that service at least once. This is helpful for targeted promotions or when a service is being discontinued.
Last Updated: August 2026