
Customer Preferences and Communication Consent
Introduction
Managing customer preferences and communication consent is essential for excellent service and legal compliance. This tutorial explains the communication preference system in Luminate, how to record customer preferences, and how to ensure you're communicating appropriately.
Who this is for: Owner, Admin, Manager, Staff, Receptionist What you'll learn:
- Understand the two communication categories (appointment information vs. marketing)
- Configure channel preferences (Email, SMS, WhatsApp)
- Record allergies and sensitivities
- Handle opt-out and data removal requests
- Understand GDPR requirements for consent
- Request customers to update their own profile information
Time to complete: 15 minutes
Prerequisites
- Logged in with at least Staff permissions
- Complete Tutorial 3.1 (Adding and Managing Customer Profiles)
Step-by-Step Instructions
Step 1: Understanding Communication Categories
Luminate divides customer communications into two categories:
Appointment Information (Transactional): These are service-related messages:
- Appointment confirmations
- Appointment reminders
- Cancellation notifications
- Rescheduling confirmations
Promotions & Offers (Marketing): These require explicit consent:
- Special offers and discounts
- New service announcements
- Birthday greetings with offers
- Seasonal promotions
- Newsletter content
Step 2: Access Communication Preferences
Communication preferences are set per customer:
- Navigate to Customers in the sidebar
- Select a customer or click Add Customer
- Scroll to the Communication Preferences section
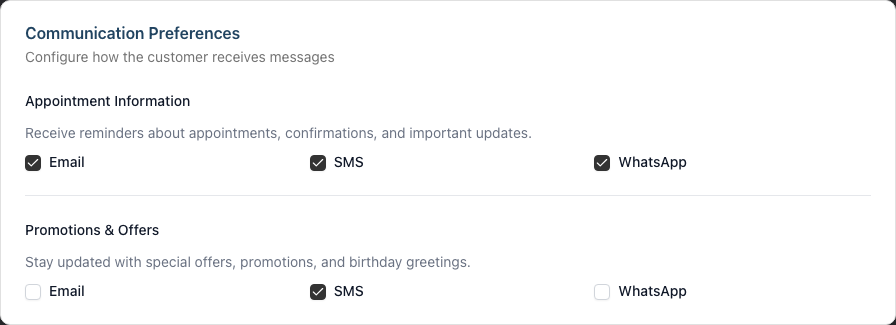
The section is split into two groups of checkboxes — Appointment Information and Promotions & Offers — each with an Email, SMS, and WhatsApp checkbox.
Step 3: Configure Appointment Information
The Appointment Information group controls transactional messages:
| Channel | Default | Purpose |
|---|---|---|
| Enabled | Confirmation emails, reminder emails | |
| SMS | Enabled | Text message reminders |
| Enabled | WhatsApp message reminders |
To change a setting:
- Tick a checkbox to enable that channel, or untick it to disable
- A ticked box means the customer receives messages on that channel
- An unticked box means that channel is off
When to disable:
- Customer requests no reminders
- Customer doesn't have that channel (no phone = disable SMS)
- Customer prefers one channel over others
Note: Even with all reminders disabled, the customer can still be booked for appointments. They simply won't receive automated notifications.
Step 4: Configure Promotions & Offers
The Promotions & Offers group controls marketing messages:
| Channel | Default | Purpose |
|---|---|---|
| Disabled | Marketing emails | |
| SMS | Disabled | Promotional text messages |
| Disabled | Promotional WhatsApp messages |
Important: All marketing options default to disabled (unticked). Only enable them with explicit customer consent.
To enable marketing:
- Obtain verbal or written consent from the customer
- Tick the checkbox for their preferred channel(s)
- Save the customer profile
GDPR Requirement: Never assume consent. The customer must actively agree to receive marketing communications.
How opt-outs are enforced when staff send messages: Opt-outs are honoured at compose time, not just at delivery. When a staff member opens New Message in the inbox (Tutorial 10.4), shares a deposit link, sends a profile-update link, or triggers any other send flow, a channel the customer has disabled here is not shown as a selectable button in the channel picker at all — it simply disappears from the row of channel buttons. In its place, a one-line notice with the channel icon appears beneath the picker reading "Customer has opted out of Email." (or SMS, etc.). There is no greyed-out button, no tooltip, and no "send anyway" override.
If the customer has opted out of every channel that's available, the picker is replaced entirely by "This customer has opted out of all available messaging channels. Update their preferences to send them a message."
The server enforces the same rule independently, so nothing slips through: a queued message aimed at an opted-out channel is marked failed with the reason "Customer opted out" rather than being sent.
Three ways a channel can be restored:
| Route | How it works |
|---|---|
| Email footer link | Every email Luminate sends carries a Manage your communication preferences link in its footer, which opens the customer's own preferences page. Note the catch: once email is off, no further emails go out, so this only works from an email they already have. |
| SMS reply keyword | A customer who replies START, SUBSCRIBE, YES, OPTIN or UNSTOP to a text is opted back in automatically. |
| Staff update | You tick the box again on this page, with the customer's consent on record. |
Step 5: Record Allergies and Sensitivities
Safety information goes in the dedicated Allergies & Notes section:
- Toggle the Allergies & Sensitivities switch on
- Enter details in the text area that appears
Examples:
- "PPD allergy - no permanent colour"
- "Sensitive scalp - patch test required"
- "Latex allergy - use nitrile gloves"
This information displays prominently throughout the system, including during appointment booking. Service-specific preferences (timing preferences, staff requests, conversation cues) and consultation detail are best captured in the unified Notes store on the customer's profile rather than the allergy field — see Tutorial 3.7 (Recording and Managing Notes) for how those work.
Step 6: Handle Opt-Out Requests
When a customer asks to stop receiving marketing:
- Open their profile → Edit
- Untick the relevant marketing checkboxes in Promotions & Offers
- Save immediately
- Add a note: "Opted out of marketing [date] via [method]"
You must:
- Process opt-out requests immediately (same day)
- Stop all marketing to that channel
- Continue transactional messages (unless specifically requested)
- Keep a record of when they opted out
When a customer opts out by replying to a text:
Luminate also processes opt-outs the customer sends themselves. If they reply STOP, UNSUBSCRIBE, QUIT, CANCEL, END, OPTOUT or OPT-OUT to any text message, both boxes for that channel are unticked automatically — Appointment Information and Promotions & Offers. A reply of START, SUBSCRIBE, YES, OPTIN, OPT-IN or UNSTOP turns both back on.
This matters because the customer is usually trying to stop marketing, not appointment reminders. If someone stops receiving reminders unexpectedly, check whether they replied STOP to a promotional text — and ask before you re-enable anything on their behalf.
Step 7: When Luminate Disables a Customer's Email Automatically
The settings above are choices you make. Separately, Luminate watches what actually happens when a confirmation or reminder email is sent, and will automatically stop emailing a customer when their address proves undeliverable or they object to receiving email. You don't configure this — it happens in the background — but you can see it, and you may need to act on it.
What triggers an automatic disable:
| Trigger | What it means |
|---|---|
| Permanent bounce | The address rejected the email outright (e.g. the mailbox doesn't exist). Email is disabled on the first occurrence. |
| Repeated soft bounces | The address kept failing temporarily — 3 bounces within 30 days. This catches dead domains that never recover but don't reject outright. A single soft bounce is ignored, since most are genuinely temporary. |
| Spam complaint | The recipient marked one of your emails as spam. Email is disabled immediately to protect your sending reputation. |
How you'll see it:
A coloured status pill appears wherever the customer is shown — in the Email column on the Customers list, in the header of the customer's profile, and on the email row of the Details tab:
- Email bounced (red) — the address is undeliverable
- Email marked as spam (amber) — the recipient complained
Hover over the pill to see a tooltip with the reason and the date it happened.
What it affects:
- Only email is stopped. The customer can still receive SMS and WhatsApp as normal (subject to their preferences).
- This is independent of the marketing/transactional checkboxes above — even a customer who is opted in to everything will stop receiving email once their address bounces or they complain.
What to do about it:
- Open the customer profile and read the tooltip to confirm the reason.
- If the email simply has a typo or is out of date, correct it on the Edit page. Saving a corrected address clears the bounced state, so Luminate will try emailing again.
- If the recipient marked email as spam, do not keep emailing them — use SMS, WhatsApp, or phone instead.
Step 8: Handle Data Removal Requests
Under GDPR, customers can request their personal data be removed:
Open the customer profile
Click the Edit button (top-right)
Scroll down to the Data Privacy section at the bottom of the form
Click Remove Data
A confirmation dialog titled Remove Personal Data appears. It names the customer and states that the removal meets GDPR data protection requirements. This is the same dialog you get from the Details tab.
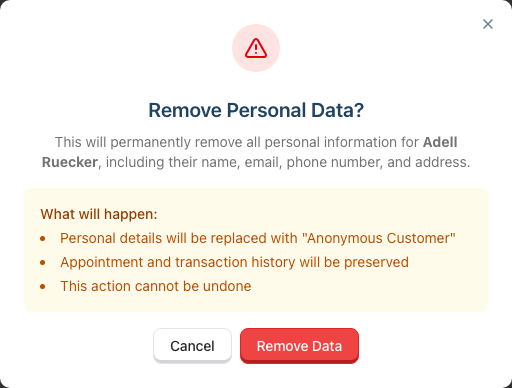
Review What will be removed:
- Name, email, phone number
- Address and date of birth
- Allergies, badges, and referral source
- Communication preferences, reset to off on every channel
- Every skin test for this customer, deleted permanently
- Every note for this customer, deleted permanently, including consultation and appointment notes
- Personal details will be replaced with "Deleted Customer"
Review What will be preserved: transaction history, appointment history, and account balance information. The dialog also tells you where to export the customer first if you need to keep the skin tests and notes.
Click Remove Personal Data to confirm
What is replaced with placeholder values or cleared:
- Name — the record reads Deleted Customer afterwards
- Email, phone number, country code
- Address, city, county, postcode, country
- Date of birth
- Allergies (toggle and description)
- Badges, referral source, and preferred staff member
- All six communication preference settings (transactional and marketing, all channels) — reset to off, since consent cannot persist past anonymisation
- Any recorded email bounce or spam-complaint state (see Step 7)
- Profile-update tokens, identity-verification PINs, and booking-access tokens (all deleted)
- Personal data redacted from any merge log entries
What is permanently deleted (not just anonymised):
- Skin tests (Tutorial 11.1) — every patch test record for this customer is deleted outright
- Notes (Tutorial 3.7) — every consultation and appointment note attached to this customer is deleted outright
Warning: Skin tests and notes cannot be recovered. If you need the allergy or patch-test history for service safety, or the consultation record behind past colour work, export it before you remove the data. Go to Salon Settings > Data > Exports, choose the customer, and start the export (see Tutorial 11.2). Consider whether the erasure request genuinely extends to clinical records, and take your own legal advice where a safety obligation may conflict with an erasure request.
What is preserved (for business records):
- Transaction history
- Appointment history
The customer record is anonymised but not deleted, ensuring your financial and appointment records remain intact. The customer is also automatically deactivated, and switching them back on from the Customer Status card is refused — you'll see the error "Cannot activate an anonymized customer". The Edit page no longer shows the Active customer checkbox for an anonymised customer. The Settings card explains that the record stays inactive permanently.
Luminate writes an internal audit entry each time this runs, recording when it happened, who triggered it, and how many skin tests and notes were deleted — no personal data, just proof of the action. Anonymisation can also happen automatically under a retention policy; see Tutorial 11.3 (Managing Customer and Staff Data Retention).
Warning: This action cannot be undone. Ensure the request is legitimate before proceeding.
Understanding Consent Requirements
Valid Consent Must Be:
| Requirement | What It Means |
|---|---|
| Freely given | Not a condition of service |
| Specific | Clear what they're consenting to |
| Informed | They understand how data will be used |
| Unambiguous | Active opt-in, not silence or pre-checked boxes |
How to Obtain Consent
Verbally at first visit: "May we send you occasional updates about special offers and new services? You can unsubscribe anytime."
On a registration form:
☐ Yes, I'd like to receive special offers and news from [Salon Name]
Note: This box should NOT be pre-checked.
What Doesn't Count as Consent
- Providing contact details for appointments
- Pre-checked boxes on forms
- Silence or non-response
- Assumed consent from existing relationship
Customer Self-Service
When a customer opens a profile update link (see Requesting Profile Updates below), they land on a self-service preferences page where they can update their information directly.
The page is headed Update Your Profile and greets them by first name.
What's Available Without Verification
Customers can immediately view and update:
- Personal Information — First Name and Last Name
- Communication Preferences — every channel toggle, grouped under Appointment Reminders and Promotions & Offers
These are the same six settings you see on the staff Edit form, so a change the customer makes here is the change you'd have made for them. Note the customer-facing group is headed Appointment Reminders where the staff form says Appointment Information — same setting, friendlier wording.
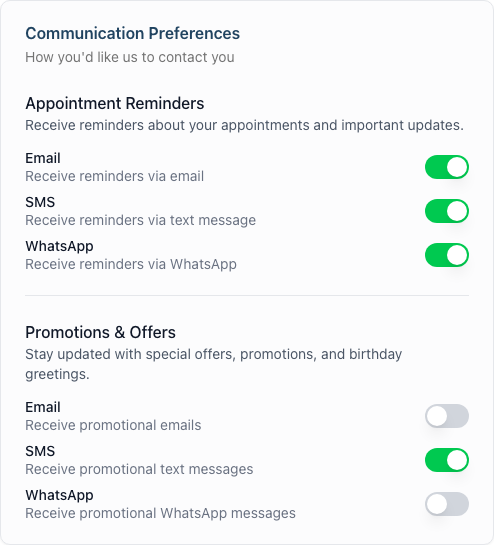
Their email and phone number are shown in masked form for reference — the first character of the email plus the domain (a*****@example.com), and the last four digits of the phone (***2180).
Accessing Sensitive Information
Contact details, address, and allergy information sit behind an identity check. Until it's passed, the Contact Details card carries a Protected badge and the notice "Your email, phone, address and allergy information are protected. Verify your identity to view or edit these details."
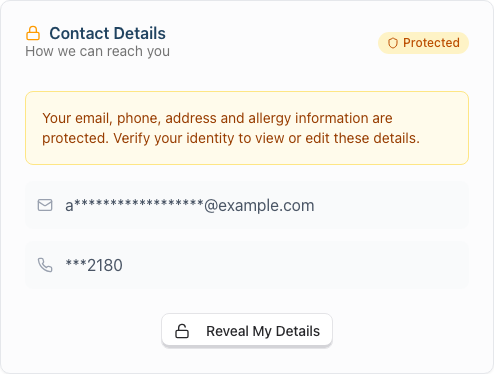
- The customer clicks Reveal My Details
- The Verify Your Identity dialog opens; they choose Email or SMS (each option names the masked destination) and click Send Code
- A 6-digit code is sent to their contact details on file
- They enter it and click Verify
The code is valid for 10 minutes and allows 5 attempts. Once verified, the Contact Details, Address, and Allergies & Sensitivities cards all switch to a Verified badge and become editable:
- Email address — via Change Email, which sends a separate verification code to the new address
- Phone number — via Change Phone, which sends a separate verification code to the new number
- Address — Street Address, City, County/State, Postcode, Country
- Allergies & Sensitivities — the I have allergies or sensitivities toggle and description
Verification lasts 30 minutes, after which the customer must verify again. It is also tied to the browser session that passed the check, not to the link — so if the customer forwards their link to someone else, that person sees only the name and preference toggles and has to pass their own PIN check to get any further.
How Changes Are Saved
The customer clicks Save Changes and sees a Changes Saved Successfully confirmation. Updates are saved immediately to the customer record in Luminate, so staff see the new information next time they view the profile.
Requesting Profile Updates
Staff can request customers to update their profile information directly. This is useful for verifying contact details, collecting address information, or updating allergy records.
How to Request a Profile Update
- Navigate to the customer's profile page
- Click the Request Update button in the header
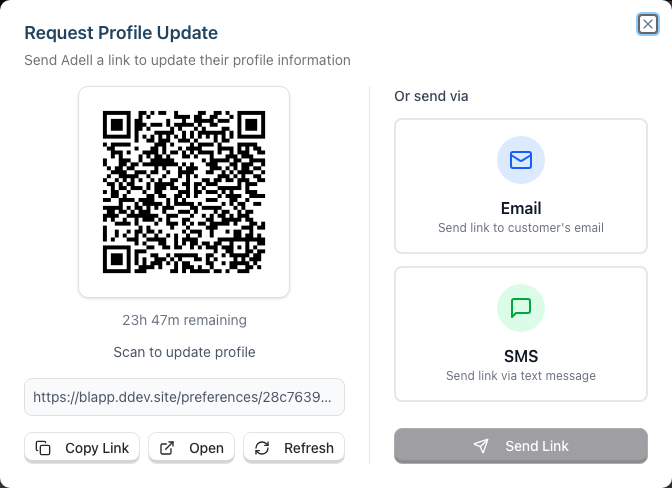
- The Request Profile Update modal opens with the QR code and countdown on the left ("23h 59m remaining") and the send options on the right
QR Code (In-Salon)
The quickest method when the customer is physically present:
- The modal displays a QR code that the customer can scan
- Customer scans with their phone camera
- The profile update page opens directly on their device
- They can update their information and submit
Tip: This is ideal during checkout or while waiting for their appointment.
Copy Link
Share the link via your preferred method:
- Click the Copy Link button
- The link is copied to your clipboard (the button briefly reads Copied!)
- Paste it in any messaging app, email, or text
You can also click Open to preview the profile update page yourself, or Refresh to generate a new link. Each customer has one live link at a time, so generating a new one stops the previous link working.
Send via Email or SMS
If the customer has contact details on file, the right-hand column is headed Or send via:
- Select Email or SMS
- Click Send Link
- A Message Sent confirmation appears; click Done to close
- The customer can open the link on any device to update their details
Note: The send options only appear if the customer has the corresponding contact details on file and has not opted out of that channel. If they have opted out, the modal shows a "Customer has opted out of Email." message instead (naming both channels if both are off) — fall back to the QR code or copy-link options, or update their preferences (with their consent) on the Edit page first. With no usable channel at all, the whole send column is replaced by a warning telling you to use the QR code or copy the link.
What Customers Can Update
The profile update page allows customers to modify:
| Section | Fields | Verification Required? |
|---|---|---|
| Personal Information | First Name, Last Name | No |
| Communication Preferences | All transactional and marketing channel settings | No |
| Contact Details | Email address, phone number | Yes — PIN verification + new contact verification |
| Address | Street Address, City, County/State, Postcode, Country | Yes — PIN verification |
| Allergies & Sensitivities | Toggle on/off, allergy description | Yes — PIN verification |
See Customer Self-Service above for details on the verification process.
Link Expiry
Profile update links are valid for 24 hours by default. After expiry:
- The customer sees an "expired link" message
- They need to contact the salon for a new link
- This protects customer data from old links being accessed
Tip: Send the link when the customer is ready to update promptly, as the 24-hour window is intentionally short for security.
When to Use This Feature
| Scenario | Recommended Approach |
|---|---|
| Customer at the till | Show QR code for immediate scan |
| Follow-up after visit | Send via email or SMS |
| Address collection | Send link with request note |
| Annual data refresh | Send to update/verify details |
| Allergy confirmation | Send before patch test appointments |
Common Pitfalls
"Can I pre-enable marketing to save time?"
No. Pre-checked marketing options violate GDPR. Customers must actively opt in.
"A customer gave me their email, so can I add them to marketing?"
Not unless they explicitly consented to marketing. An email for appointments is not marketing consent.
"A customer opted out but this offer is really good"
Respect opt-out requests always. Sending marketing after opt-out is a GDPR violation.
"I accidentally enabled marketing for everyone"
Disable marketing immediately for those who haven't consented. Document the error and take corrective action.
"A customer is opted in to email but isn't receiving anything"
Check their profile for an Email bounced or Email marked as spam pill. If their address has bounced, Luminate has stopped emailing them automatically — correct the address on the Edit page to resume. See Step 7.
Tips and Best Practices
- Ask at the right time - After a great service experience, customers are more likely to opt in
- Explain benefits - "Birthday treats, early access to offers, seasonal tips"
- Keep consent separate - Don't bundle marketing with service terms
- Make opting out easy - Honour requests immediately
- Review preferences regularly - Update after each visit with new information
- Train all staff - Everyone needs to understand consent requirements
Related Tutorials
- Tutorial 3.1: Adding and Managing Customer Profiles - Creating customer records
- Tutorial 3.2: Understanding Customer History and Analytics - Viewing customer data
- Tutorial 3.7: Recording and Managing Notes - Capturing service preferences and consultation detail in the unified Notes store
- Tutorial 10.4: Managing the Messaging Inbox - How channel opt-outs are enforced when staff send messages
- Tutorial 11.1: Skin Test Management - The patch-test records that removing personal data deletes
- Tutorial 11.2: GDPR Compliance - Wider data-protection responsibilities
- Tutorial 11.3: Managing Customer and Staff Data Retention - Automatic anonymisation under a retention policy
Frequently Asked Questions
What's the penalty for sending marketing without consent?
Under UK GDPR, fines can reach millions of pounds. More commonly, you risk customer complaints and reputation damage.
Can I email a customer who opted out about their appointment?
Yes - appointment reminders are transactional, not marketing. Respect channel preferences though.
What does the "Email bounced" pill on a customer mean?
Their email address proved undeliverable — either it rejected an email outright, or it failed repeatedly over 30 days. Luminate has automatically stopped emailing them. Correct the address on the Edit page to resume email, or reach them by SMS, WhatsApp, or phone. See Step 7.
A customer marked an email as spam — what happens?
Luminate disables their email immediately and shows an Email marked as spam pill. Do not keep emailing them; it harms your sending reputation. Use another channel instead.
A customer replied STOP to a promotional text and now gets no reminders either — why?
Reply keywords act on the whole channel, not just marketing. STOP (and UNSUBSCRIBE, QUIT, CANCEL, END, OPTOUT, OPT-OUT) unticks both the Appointment Information and Promotions & Offers boxes for that channel. Ask them whether they want reminders back, then either have them reply START or tick the box for them on the Edit page. See Step 6.
Does removing personal data delete consultation notes and skin tests?
Yes. Both are deleted permanently, not anonymised — every note (consultation and appointment) and every skin test for that customer goes. Only appointment and transaction history survives. Capture anything you need for service safety before you run it. See Step 8.
How long do I keep consent records?
Keep consent records while active, plus 2 years after they stop being a customer.
Do I need separate consent for email and SMS marketing?
Luminate treats each channel separately. A customer might consent to email marketing but not SMS.
What if a customer says "I never opted in"?
Apologise, remove them from marketing immediately, and review your records. When in doubt, err on the customer's side.
Can I transfer consent from my old system?
Only if the original consent met GDPR standards. If uncertain, re-request consent.
What about customers under 16?
For marketing to under-16s in the UK, obtain parental consent. Transactional messages don't require this.
How long are profile update links valid?
Profile update links expire after 24 hours by default. After expiry, the customer will see an "expired link" page and will need to request a new link from the salon. The short expiry window is a security measure to protect customer data.
Can I send a profile update link to a customer without contact details?
You can still use the QR code or copy the link directly. The email/SMS send options only appear if the customer has those contact details on file.
What happens when a customer updates their profile?
Their changes are saved immediately to their customer record in Luminate. You'll see the updated information next time you view their profile.
Why does the customer need to verify their identity?
Sensitive information like contact details, address, and allergy records sits behind a PIN check, reached via the Reveal My Details button. Because the check is tied to the browser session rather than the link, a forwarded link doesn't carry someone else's verification with it — whoever opens it sees only the name and preference toggles until they pass their own PIN check.
Can I see when a customer last updated their profile?
The profile update link tracks when it was last accessed. This helps you know if a customer has opened the link but not completed the update.
Last Updated: August 2026