
Understanding Customer History and Analytics
Introduction
Every customer interaction tells a story. This tutorial shows you how to view a customer's complete history including appointments, transactions, visit patterns, and spending. You'll learn to understand customer behaviour and use insights to improve service and retention.
Who this is for: Owner, Admin, Manager, Staff, Receptionist What you'll learn:
- View account summary cards (spending, balance, visits)
- Navigate customer profile tabs
- Understand visit insights and service frequencies
- Filter and search appointment and transaction history
- View product purchase history
- Review skin test records and the notes timeline
- Identify overdue customers and outstanding balances
- Use dashboard skin test alerts to proactively contact customers
Time to complete: 10 minutes
Prerequisites
- Logged in with at least Staff permissions
- Complete Tutorial 3.1 (Adding and Managing Customer Profiles)
- Customer data in the system to view
Step-by-Step Instructions
Step 1: Access a Customer Profile
- Click Customers in the sidebar
- Search for or select a customer
- Click on the customer row to open their profile
Step 2: Understanding the Account Summary Cards
At the top of the customer profile, five summary cards display key metrics:
| Card | What It Shows |
|---|---|
| Total Spend | Lifetime spend across completed and refunded transactions, less any deposit already credited against them |
| Outstanding Balance | Amount owed across unpaid and partial transactions |
| Total Visits | Count of completed transactions |
| Last Visit | Date of the most recent completed or pending transaction |
| Account Credit | Prepaid balance held on the account (see Tutorial 3.8) |
The cards only appear once the customer has some account activity — a transaction, an outstanding balance, or account credit. A brand-new customer's profile goes straight from the header to the tabs.
Outstanding Balance Alert: If a customer has an outstanding balance, the card is highlighted with an orange ring. A warning alert below the cards shows the total owed and the number of transactions, for example "This customer has an outstanding balance of £363.60 across 4 transactions." You can Dismiss the alert for the current visit to the page.
Potential Duplicate Warning: If this customer shares an email address, phone number, or similar name with another customer, an amber warning panel appears below the summary cards. You can click Review & Merge to open the merge dialog, or Dismiss if they are genuinely separate people (e.g., family members sharing a phone). See Tutorial 3.6 for full details on merging duplicates.
Example:
Total Spend: £1,440.00
Outstanding Balance: £60.00
Total Visits: 24
Last Visit: 15 Dec 2025
Account Credit: £0.00
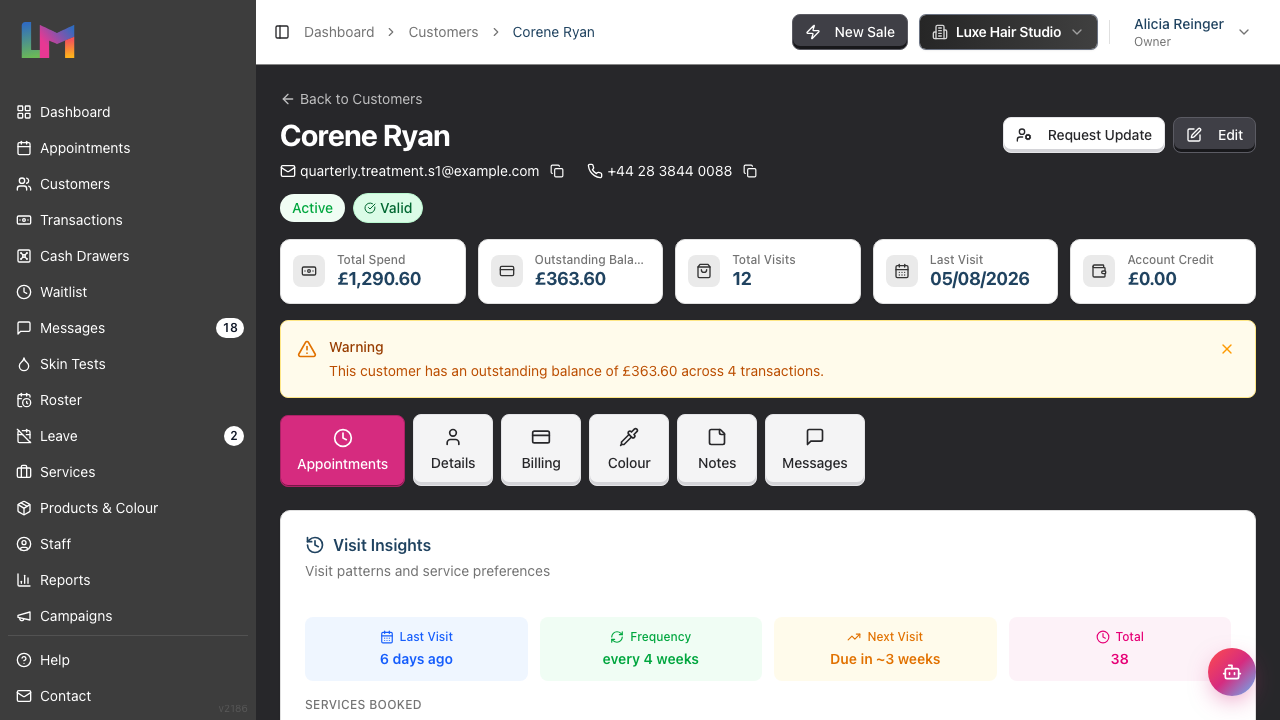
Step 3: Navigate the Profile Tabs
The customer profile has six tabs. Billing and Colour each group related sub-tabs:
| Tab | Content |
|---|---|
| Appointments (default) | Appointment history, waitlist, visit insights |
| Details | Contact info, address, preferences, communication settings, badges |
| Billing | Sub-tabs: Transactions (history with search and filters), Products (purchases with dates and quantities), Credit (account credit balance and movement history) |
| Colour | Sub-tabs: Skin Tests (records and status) and Formulas (saved colour formulas) |
| Notes | General and colour notes timeline |
| Messages | Communication history |
The Formulas sub-tab only appears when your salon records colour formulas in the structured format rather than as free-text notes. If your salon keeps colour information as notes, there are no formulas to show, so the sub-tabs disappear and the parent tab is named Skin Tests rather than Colour — colour formulas live in the Notes tab instead.
Step 4: View Appointment History and Visit Insights
Click the Appointments tab (selected by default).
Waitlist Requests: If the customer has active waitlist entries, they appear at the top in a purple card showing:
- Requested service
- Preferred staff
- Preferred date and time range
- Priority level
Visit Insights Section: A compact grid shows visit patterns:
| Metric | Description |
|---|---|
| Last Visit | How long ago (e.g., "3 weeks ago") |
| Frequency | Average visit interval (e.g., "every 6 weeks") |
| Next Visit | Prediction based on pattern (e.g., "Due in ~3 weeks", or "Overdue by 2 weeks") |
| Total | Number of appointments currently listed below — if you filter the appointment history, this count follows the filter |
Services booked: Below the metrics, badges show which services this customer books:
- Service name
- Count (e.g., "12x")
- Frequency (e.g., "every 8 weeks")
Overdue Alert: If the customer hasn't visited within their typical interval, a warning appears:
"This customer typically visits every 6 weeks but hasn't been in for 10 weeks. Consider reaching out to schedule their next appointment."
Appointment History Table: Below the insights, the appointment history table displays all appointments (both upcoming and past) sorted by date. The table columns are:
| Column | Description |
|---|---|
| Date & Time | Appointment date and time slot |
| Reference | Booking reference (if generated from online booking) |
| When | Relative date (e.g., "Today", "Tomorrow", "In 1 week", "2 weeks ago") |
| Gap | Time since previous appointment |
| Service | Service name |
| Staff | Staff member assigned |
| Status | Scheduled, Confirmed, Arrived, Completed, Cancelled, or No Show |
| Deposit | Deposit payment status (if applicable) |
Each row ends with a View button that opens the full appointment. The search box also matches appointment notes and internal notes, even though notes aren't shown as their own column.
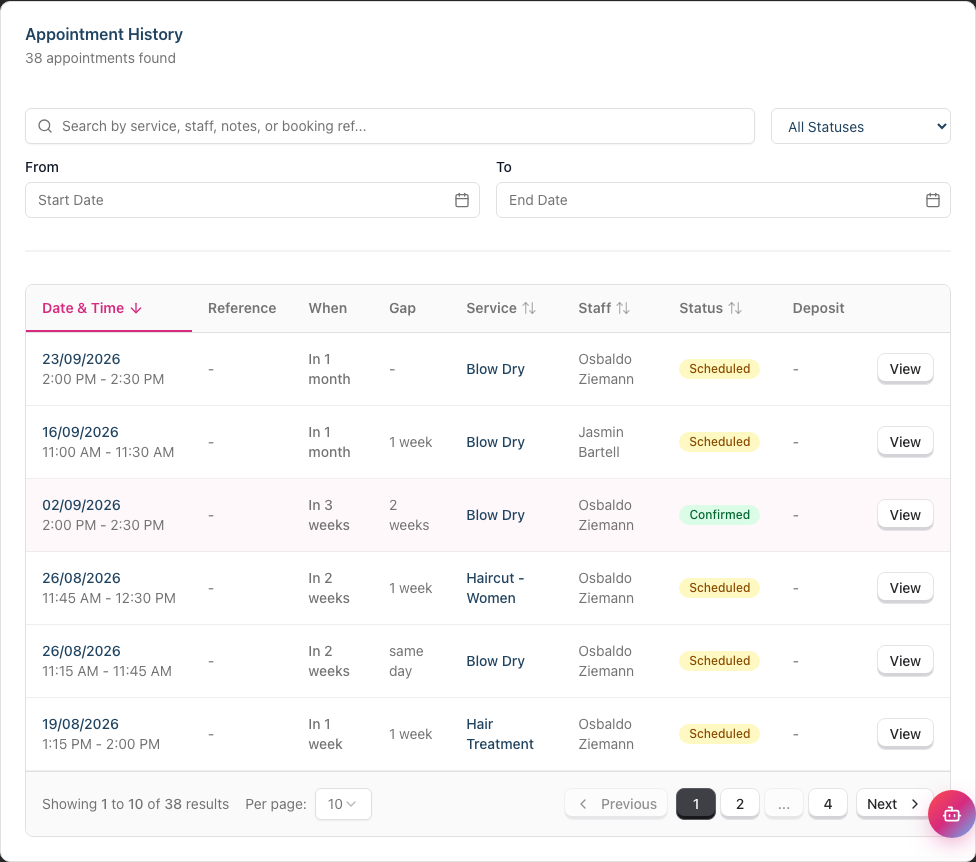
Filtering Appointments:
- Search: Filter by service, staff, notes, or booking reference
- Status dropdown: All Statuses, Scheduled, Confirmed, Arrived, Completed, Cancelled, No Show
- Date range: From/To date pickers
- Clear Filters: Reset all filters
Step 5: View Transaction History
Click the Billing tab, then the Transactions sub-tab (it opens on Transactions by default).
Transaction History Table: Each transaction shows:
- Date
- Transaction #
- Items summary
- Total amount
- Paid amount
- Outstanding balance
- Status (Paid, Partial, Unpaid)
- View button
If someone else settled a bill for this customer in a combined checkout, the transaction number carries a Paid by {name} badge.
Paid on Behalf of Others: Where this customer was the payer in a combined checkout, a Paid on behalf of others card appears below the table listing each bill they settled for someone else, with the other customer's name, the date, the transaction number, its status, the amount, and a View button.
Filtering Transactions:
- Search: Filter by transaction number or items
- Payment Status: All Statuses, Paid, Partial, Unpaid
- Date range: From/To date pickers
Finding Outstanding Balances: Use the Payment Status filter set to "Partial" or "Unpaid" to quickly find transactions that need follow-up.
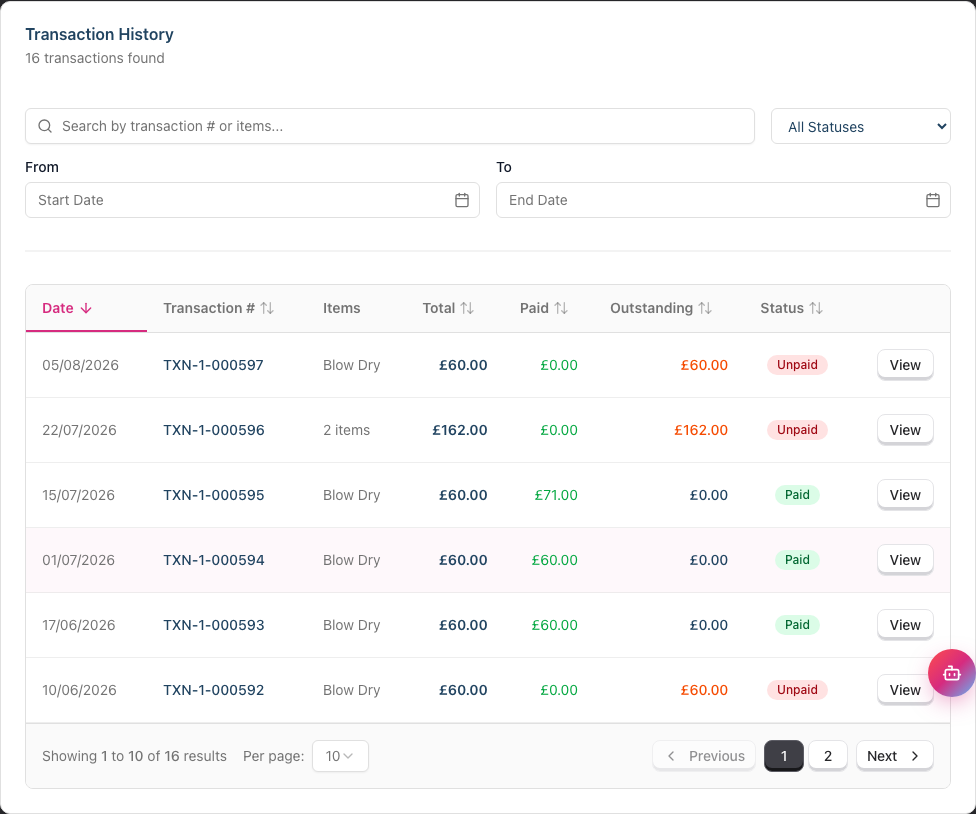
Step 6: View Product Purchase History
Click the Billing tab, then the Products sub-tab.
A Search & Filter card sits above the Product Purchase History table, which shows all products the customer has purchased:
| Column | Description |
|---|---|
| Date | When purchased |
| Product | Product name and SKU |
| Quantity | Number purchased |
| Unit Price | Price per item |
| Total | Line total |
| Sold By | Staff member |
| Transaction | Link to transaction |
Filtering Products:
- Search: Filter by product name
- Date range: From/To date pickers
Use this to:
- See what products they've tried
- Identify repurchase opportunities
- Recommend new products based on history
Step 7: View Skin Tests
Click the Colour tab, then the Skin Tests sub-tab. (In notes-only salons the tab is named Skin Tests and takes you straight there.)
This shows the customer's skin test history in a Skin Test History card. The card header repeats their current status badge and offers a Record Test button for starting a new test.
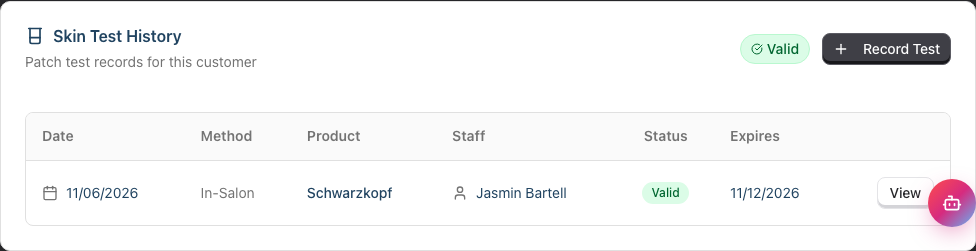
| Column | Description |
|---|---|
| Date | When the patch test was applied. The cell reads Not yet applied if the customer finished the screening but nobody applied the patch test |
| Method | How the test was done (In-Salon, At-Home Kit, Consumer Screening) |
| Product | Brand and product name tested |
| Staff | Staff member who performed the test (or "Self-administered" for at-home tests) |
| Status | Current status of the test (Valid, Expiring Soon, Expired, Awaiting Customer, Screening Completed, Awaiting Result, Allergic Reaction, or Inconclusive) |
| Expires | When the test expires (with an "(Expired)" label if past the expiry date) |
Each row is clickable and ends with a View button that opens the full test record. Expired rows are dimmed. Where the customer's screening answers raised concerns, an amber warning badge with a count sits next to the status — hover it to see which questions were flagged.
Allergy Alert: If the customer has a positive (allergic) reaction on record, a red Allergy Alert panel appears above the table warning that colour services should not proceed without medical clearance.
Skin Test Status: A badge on the customer profile header indicates their current skin test status:
- Valid (green) - Has a current, valid negative test
- Expiring Soon (amber) - Test expires within the reminder period, shows the days remaining in brackets (e.g. "(8d)")
- Expired (grey) - Test has expired
- Never Tested (grey) - No test on record
- Allergic Reaction (red) - Previous positive reaction (colour services should not proceed)
- Awaiting Result (blue) - Patch test applied, result not yet recorded
- Awaiting Customer (amber) - Screening sent to the customer, not yet completed
- Awaiting Patch Test (amber) - Screening done, patch test not yet applied
- Inconclusive (orange) - Test result was inconclusive
Dashboard Skin Test Alerts:
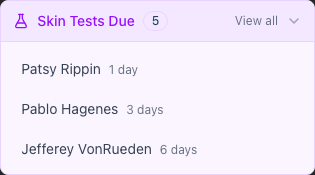
The dashboard includes a Skin Tests Due panel in the Today section that shows how many customers need a skin test. This helps you proactively contact customers before their appointments.
Click the panel to expand it and see the three most urgent cases:
- Customer name (click to view their Skin Tests tab)
- Urgency indicator showing when the test is needed (e.g., "Today", "1 day", "2 days")
Click View all to see the full list on the Skin Tests page.
Finding Customers Needing Tests:
- On the Customer Index, select "Needs Test (Upcoming Appts)" from the Skin Test filter dropdown
- Two additional columns appear: Next Appointment and Days Until
- Contact customers in order of urgency (fewest days first)
The same alerts panel appears on the Skin Tests Index page for quick access when managing skin test records
Step 8: View Notes
Click the Notes tab.
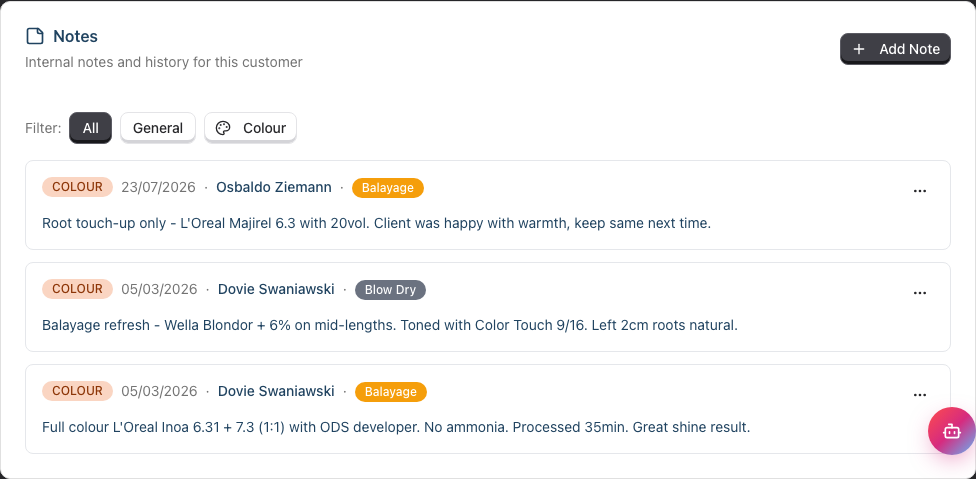
This shows a timeline of all notes recorded for the customer, with two types:
- General - preferences, allergies discussed, client requests
- Colour - colour formulas, mixing ratios, processing times, application techniques
Pinned notes appear in a highlighted Pinned Notes section at the top. Filter buttons (All, General, Colour) sit above the list, followed by a count such as 3 of 8 notes. The first number is how many notes match the filter. The second is every note this customer has, pinned notes included. Notes recorded against an appointment show a clickable chip with that appointment's service, so you can jump straight to the appointment. Use the three-dot (⋯) menu on any note to edit, pin/unpin, or delete it.
For full details on adding, editing, pinning, and deleting notes, see Tutorial 3.7: Recording and Managing Notes.
Step 9: View Messages
Click the Messages tab.
This shows communication history with the customer including:
- Appointment reminders sent
- SMS and email messages
- Customer replies (if two-way messaging is enabled)
Using History for Better Service
Before an Appointment
- Open the customer profile
- Check their Visit Insights: When did they last visit? What services do they typically book?
- Review the Services Booked section: What's their most frequent service?
- Check for allergies (a Has Allergies badge in the header, with the details in a red panel above the tabs)
- Read any notes in the Notes tab
Identifying High-Value Customers
Use the Total Spend metric to identify your best customers. Consider:
- Adding VIP badge (Tutorial 3.5)
- Prioritising their booking requests
- Personal follow-up for retention
Finding At-Risk Customers
Look for customers who:
- Show "Overdue" in their Visit Insights
- Haven't visited in longer than their typical frequency
- Have outstanding balances
Consider reaching out with a reminder or special offer.
Common Pitfalls
"The spending totals look wrong"
Total Spend only counts transactions that have been completed (or later refunded). Draft, pending, and cancelled transactions aren't included, and any deposit already credited against a bill is deducted so it isn't counted twice. Check for unbilled appointments or incomplete transactions.
"I can't see old appointments"
Use the date range filters or pagination controls. By default, recent appointments appear first. Scroll down or expand the date range to see older records.
"A customer's history is blank but I know they've visited"
Check for duplicate customer records. Search by phone or email to find if history exists under a different record.
"The visit frequency seems incorrect"
Frequency is calculated from completed appointments. If appointments were cancelled or marked as no-show, they may affect the calculation.
Tips and Best Practices
- Check history before appointments - Spend a minute reviewing to personalise service
- Reference past services - "Last time we did X, how did that work?"
- Track service intervals - Use frequency data for proactive rebooking
- Follow up on outstanding balances - Filter transactions by "Unpaid" weekly
- Identify at-risk customers - Monitor the "Overdue" warning and reach out
- Use product history for recommendations - "You've been using X, have you tried Y?"
- Celebrate milestones - Note customer tenure and visit counts
Related Tutorials
- Tutorial 3.1: Adding and Managing Customer Profiles - Create and manage records
- Tutorial 2.4: Processing Transactions - Bill appointments
- Tutorial 3.5: Using Customer Badges - Mark VIP customers
- Tutorial 3.7: Recording and Managing Notes - Track consultation details and colour formulas via the Notes timeline
Frequently Asked Questions
How far back does customer history go?
All appointment and transaction history is preserved indefinitely.
What's the difference between Total Visits and appointment count?
- Total Visits (in summary cards): Count of completed transactions
- Total (in Visit Insights): Count of all appointments currently listed, including cancelled ones — it follows whatever appointment filters you have applied
How is the visit frequency calculated?
The system calculates the average interval between completed appointments. If a customer has had 12 appointments over the past year, their frequency might show as "every 4 weeks".
Can I export customer history?
Individual transaction receipts can be downloaded as PDFs. For bulk exports, use the Reports section.
What if the "Next Visit" prediction is wrong?
The prediction is based on historical patterns. If a customer's habits have changed, the prediction may not reflect their current schedule. Use your judgement for outreach.
How do I see which staff member a customer prefers?
Look at the appointment history - note which staff members appear most frequently. You can also add this to their Preferences field.
Does Total Spend include tips?
Yes, if tips are recorded in transactions. The total is the sum of each completed or refunded transaction's total, less any deposit already credited against it.
How do I see which customers need skin tests before their appointments?
Check the Skin Tests Due panel on the dashboard. It shows customers with upcoming colour service appointments who don't have a valid test. Click the panel to expand and see the customer list with reasons. You can also use the "Needs Test (Upcoming Appts)" filter on the Customer Index page to see the full list with appointment dates.
Last Updated: August 2026