
Recording and Managing Notes
Introduction
Notes help you maintain a detailed record of every client interaction. Whether it's a colour formula, a mixing ratio, a preference, or something raised during a consultation, notes keep everything in one place so your team always has the information they need.
Notes can be added against a customer directly, or against a specific appointment. Either way they share a single underlying timeline — a note added from the appointment sidebar appears on the customer profile (and vice versa), with the linked appointment surfaced as a service pill so the context is preserved. There is no separate "customer notes" field on the customer form; every note flows through the same timeline.
Using structured colour formulas instead? If your salon's colour formula mode is set to Formulas or Full (see Tutorial 20.2), structured colour formulas — a separate tool with bowls, grams, and (in Full mode) automatic overage billing — are the recommended way to record colour work. The Colour note type remains available in every mode, so existing notes keep working and nothing is forced on you, but on Formulas or Full you should record new colour work via Tutorial 20.6 (Creating a Colour Formula) and keep Colour notes for freeform detail only.
Who this is for: Owner, Admin, Manager, Staff, Receptionist What you'll learn:
- Understand the two note types (General and Colour)
- Add notes from the customer profile
- Add notes from the appointment sidebar and detail page
- Link notes to specific appointments
- Pin important notes for quick access
- Filter, edit, and delete notes
Time to complete: 10 minutes
Prerequisites
- Logged in with at least Staff permissions
- Complete Tutorial 3.1 (Adding and Managing Customer Profiles)
- Customer records in the system
Step-by-Step Instructions
Step 1: Access Notes from a Customer Profile
- Click Customers in the sidebar
- Search for or select a customer
- Click on the customer row to open their profile
- Click the Notes tab
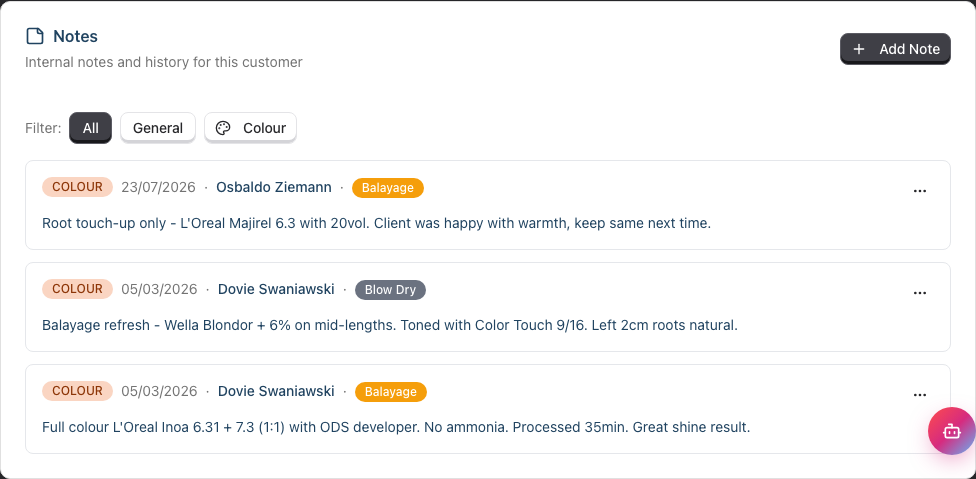
The Notes tab shows:
- A Pinned Notes card at the top (highlighted in amber) when any notes are pinned
- A Filter: row with All, General, and Colour (with palette icon) buttons, shown once at least one note exists. A count follows the buttons, for example 3 of 8 notes. The first number is how many notes match the filter. The second is every note this customer has, pinned notes included
- An Add Note button on the right that opens the add-note dialog
- A timeline of notes below, in reverse chronological order
Each note displays:
- A type badge (General in blue, Colour in orange)
- The date the note was created
- The staff member who wrote it
- A linked appointment service pill (if linked to an appointment)
- A pin icon if the note is pinned
- A three-dot menu (the
...icon) for actions: Edit, Pin / Unpin, Delete
If the customer has no notes yet, the tab shows No appointment notes yet with the prompt Add notes to track colour formulas, client preferences, and appointment details. The Add Note button is always available.
Step 2: Add a New Note
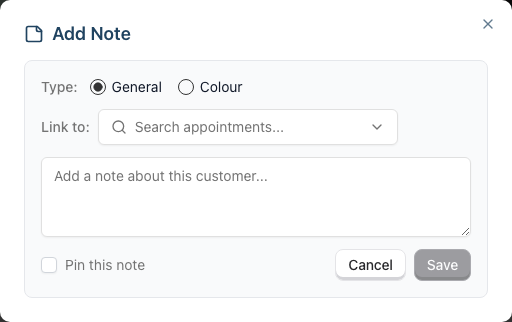
- Click Add Note — the Add Note dialog opens
- Select the Type: General or Colour
- General — for preferences, allergies discussed, client requests, or any consultation detail
- Colour — for colour formulas, mixing ratios, processing times, and application techniques
- Optionally choose Link to: to connect the note to a recent appointment — start typing in the searchable dropdown (placeholder: Search appointments...)
- Enter the note content in the text area
- Optionally tick Pin this note to keep it at the top of the timeline
- Click Save (or Cancel to discard)
Save stays greyed out until you type something, so you cannot save an empty note. A note holds up to 5,000 characters.
The dialog closes after saving and the new note appears in the timeline.
Colour notes show a tailored placeholder in the text area: Describe the colour formula, mixing ratios, processing time, application technique... — General notes show Add a note about this customer...
Step 3: Filter Notes by Type
When a customer has at least one note, a Filter: row appears above the timeline:
- Click All to see every note
- Click General to show only general notes
- Click Colour (with palette icon) to show only colour notes
The filter applies to the timeline only. The Pinned Notes card at the top always shows every pinned note, whatever its type, so key information stays in view.
If no notes match the active filter, the timeline shows No general notes match your filter (or No colour notes...) with the prompt Try changing the filter to see more notes. and a Clear Filter button that resets the filter to All.
Step 4: Pin and Unpin Important Notes
Pinned notes appear in a highlighted amber section at the top of the timeline, making them easy to find.
- Find the note you want to pin
- Click the three-dot menu (the "..." icon on the right)
- Click Pin
The note moves to the Pinned Notes section at the top.
To unpin a note:
- Find the note in the Pinned Notes section
- Click the three-dot menu
- Click Unpin
The note returns to its chronological position in the main timeline.
Step 5: Edit a Note
- Find the note you want to edit
- Click the three-dot menu
- Click Edit
- The note content becomes editable inline with a text area
- Make your changes
- Click Save to confirm, or Cancel to discard
Only the note content can be edited. The type, linked appointment, and staff member remain unchanged.
Step 6: Delete a Note
- Find the note you want to delete
- Click the three-dot menu
- Click Delete
- The Delete Note dialog appears with the message Are you sure you want to delete this note? This action cannot be undone. and a preview showing the note's type, date, staff member, and content
- Click Delete to confirm, or Cancel to keep the note
Deleted notes are permanently removed and cannot be recovered.
Step 7: Access Notes from the Calendar Sidebar
When viewing the appointment calendar:
- Click on an appointment to open the sidebar
- Find the Notes row (with the sticky-note icon; a count badge is shown if any notes exist)
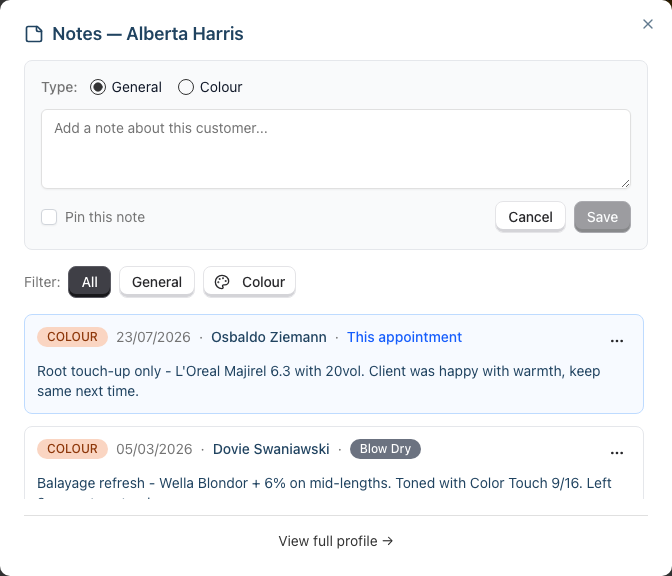
- Click the row to open the Notes — [Customer Name] dialog
The dialog provides full note management:
- An add-note form at the top, already open and fixed to this appointment. There is no Link to selector here — anything you save from this dialog links to the appointment you opened it from. Use the customer's Notes tab if you need to link a note to a different appointment.
- A Filter: row with All, General, and Colour buttons
- A scrollable list of all notes for this customer, pinned notes first
- Notes linked to the current appointment show This appointment in blue text instead of a service pill
- Notes linked to other appointments show that service as a pill. In this dialog the pill is a label only — it does not navigate. Open the customer profile or the appointment page to follow the link.
- The same three-dot menu for Edit, Pin / Unpin, and Delete
- A View full profile → link at the bottom that opens the customer's Notes tab
Step 8: View and Add Notes from the Appointment Detail Page
- With the sidebar open, click the eye icon in the sidebar header (tooltip: View full appointment page) to open the appointment's full detail page
- Scroll down to the Notes for [Customer Name] card
- This section shows all notes for the customer
Key features on the appointment detail page:
- A Pinned Notes card at the top when any notes are pinned, the same as on the customer profile
- The same Filter: row as the customer profile, with an Add Note button on the right of that row
- Add Note opens the same dialog, with Link to already set to this appointment. You can clear or change it before saving.
- Notes linked to the current appointment are highlighted with a blue border and background, and show This appointment in blue text
- Notes linked to other appointments show the service name as a clickable pill that opens that appointment
- A View full profile → link to the customer's full Notes tab
![The Notes for [Customer Name] card on an appointment detail page, with the note linked to the current appointment highlighted in blue and labelled This appointment](/docs-image/section-3-customer-management/screenshots/3.7-03-appointment-notes.webp)
Common Pitfalls
"I can't see the Notes tab"
You need the view-customers permission. Check with your salon owner that your role has this permission. All roles (Owner, Admin, Manager, Staff, Receptionist) should have it by default.
"I can't add or edit notes"
Creating, editing, and deleting notes requires the manage-customers permission. Contact your salon owner if you need this enabled.
"My note disappeared"
Check which filter is active. If you created a Colour note but the filter is set to General, your note won't be visible. Click All to see every note.
"I linked a note to the wrong appointment"
The linked appointment cannot be changed after creation. Delete the note and create a new one linked to the correct appointment.
"I can't change a note's type"
A note's type (General or Colour) is set at creation and cannot be changed afterwards. Delete the note and recreate it with the correct type.
"I added a note in the appointment sidebar but it isn't on the customer profile"
It is — refresh the customer profile or open the Notes tab. Appointment-sidebar and customer-profile notes share one store, so anything saved in one shows up in the other.
Tips and Best Practices
- Use Colour type for formulas and ratios - this makes it easy to filter and find colour history before appointments
- Pin key information like important preferences or allergy discussions so staff always see it first
- Link notes to appointments to create a clear history of what was discussed or applied during each visit
- Review notes before appointments - check the Notes section in the appointment sidebar to prepare for personalised service
- Use the Colour filter before colour appointments to quickly review previous formulas and processing times
- Keep notes concise but detailed - include specific measurements, times, and techniques so any team member can replicate the result
Related Tutorials
- Tutorial 3.1: Adding and Managing Customer Profiles - Create and manage customer records
- Tutorial 3.2: Understanding Customer History and Analytics - Navigate all customer profile tabs
- Tutorial 2.2: Booking and Managing Appointments - Book and manage appointments
- Tutorial 20.1: Getting Started with Colour Management - Choose between freeform notes and structured formulas
- Tutorial 20.6: Creating a Colour Formula - Structured replacement for the Colour note type (Formulas/Full mode)
Frequently Asked Questions
How many notes can a customer have?
There is no limit. Add as many notes as needed.
Who can see notes?
Anyone with the view-customers permission, which includes all roles by default.
Can I search note content?
Not currently. Use the type filters (General / Colour) to narrow down notes.
Is there a length limit on a note?
Yes, 5,000 characters. That is far more than a formula or a consultation summary needs, but split very long records across several notes rather than one long one — dated notes are easier to scan.
Can I change a note's type after creation?
No. Delete the note and recreate it with the correct type.
Are notes visible to customers?
No. Notes are internal and only visible to salon staff within Luminate.
What happens to notes if I delete a customer?
If a customer record is deleted or anonymised, their notes are also removed.
Can I see which appointment a note was linked to?
Yes. If a note is linked to an appointment, the service name appears as a coloured pill next to the note. On the customer profile and the appointment detail page, click the pill to open that appointment. In the calendar sidebar dialog the pill is a label only — open the customer profile to follow it.
My colour team uses structured formulas — should we still use Colour notes?
If your salon's colour formula mode is Formulas or Full, the recommended path is structured formulas (Tutorial 20.6) rather than Colour notes. Structured formulas track exact grams per product, link to the appointment, feed the Colour Bar tablet flow, and (in Full mode) handle overage billing automatically. The Colour note type still appears in the add-note dialog so existing workflows keep working, but new colour work should go into a formula. Use General notes for non-formula consultation detail (preferences, allergies, concerns raised).
What happens to my existing Colour notes if we switch to Formulas mode?
Existing Colour notes stay on the customer profile and remain visible — switching modes is non-destructive. New colour work should be recorded as structured formulas from that point on. There is no automatic conversion of historical Colour notes into formulas.
Last Updated: August 2026