
Mixing Colour at Appointments
Introduction
This tutorial is the appointment's eye view of colour formulas — how formulas appear alongside the booking, how the mixing flow feels in practice, and how a finalised formula cleanly reaches the till. It's short, practical, and geared at colourists and receptionists.
For the deep dive on the formula dialog itself see Tutorial 20.6. For the tablet-based Colour Bar flow see Tutorials 20.9–20.13.
Who this is for: Staff, Receptionist, Manager, Admin, Owner What you'll learn:
- When and where Colour Formulas panels appear around an appointment
- The mid-service mixing workflow
- How the finalised formula stages overage billing automatically
- What to do when things change mid-appointment (add a bowl, revert, swap a product)
Time to complete: 10 minutes
Prerequisites
- Salon colour formula mode set to Formulas or Full (Tutorial 20.2)
- Service flagged as a colour service with Colour grams included set (Tutorial 7.1)
- Complete Tutorial 20.6 so you know the dialog
Where the Colour Formulas panel appears
Three appointment-centric surfaces show formulas for the booking:
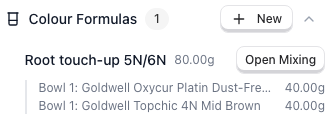
Calendar → appointment sidebar — click the appointment in the calendar. On colour services the sidebar shows a collapsible Colour Formulas section (with a count badge and a New button) above the Notes and Badges sections. It starts collapsed; click the heading or the chevron to expand it. It's an extra section, not a replacement — the Notes summary and Badges still appear in their own sections below.
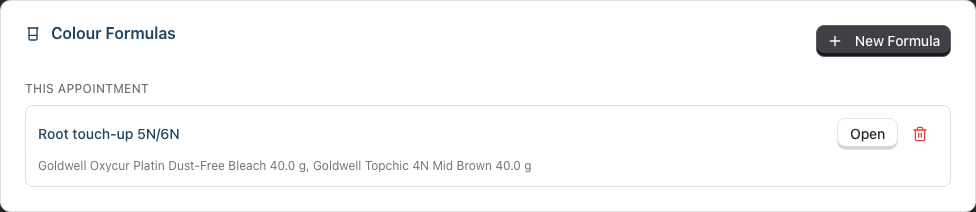
Appointment detail page → Colour Formulas panel — the full-page version, with a New Formula button and a card for each formula on this booking plus a Previous formulas list to duplicate one in.
Customer profile → Colour tab → Formulas — same customer, all formulas across all appointments. (Formulas sits alongside Skin Tests under the profile's Colour tab.)
The two appointment surfaces gate the same way: the salon must be in Formulas or Full mode, the appointment must have a customer, and the service must be flagged as a colour service. The customer profile tab is broader — it only needs the salon to be out of Notes mode, because it isn't tied to a booking at all. Any of the three can spawn the same formula dialog — the data is identical.
Once the appointment is completed, cancelled or marked a no-show, both appointment surfaces switch to read-only and no new formula can be added to that booking. On the detail page the New Formula button, the trash button (for the Admins and Owners who see it) and the Previous formulas list all disappear; in the calendar sidebar the New button and the Previous line with its Use This shortcut disappear too. Existing formulas stay visible and open with View. Capture the formula while the appointment is still live.
If you realise afterwards that a formula was never recorded, you can still save it against the customer from Customer profile → Colour tab → Formulas — it just won't be tied to that finished booking, and it won't trigger any overage billing for it.
Step-by-Step Instructions
Step 1: Before the appointment — pre-plan (optional)
If you know what the customer wants:
- Open the appointment in the calendar (or the customer profile if no appointment yet)
- Click New Formula — the dialog opens in plan mode (titled Plan Colour Formula, with a single target-weight column and no Finalise button)
- Fill in the products, target grams, developer, and notes
- Click Save plan
Nothing is billed, nothing is removed from stock — you're just laying down the recipe. When the customer arrives, reopening the plan from the appointment switches the dialog into mixing mode automatically. (Reopening it from the customer profile keeps it in planning mode — see Tutorial 20.6.)
Step 2: At the station — weigh as you mix
If you're inventing the formula as you go:
- Open the appointment (calendar sidebar or detail page), click New Formula and add your products
- Click Save plan — plan mode has no Finalise button, so this just stores the recipe (nothing is billed or decremented yet)
- Reopen the formula from the appointment — Open on the detail page, Open Mixing in the sidebar — to switch into mixing mode, enter your actuals, then click Finalise (the Finalise and commit? dialog precedes the commit)
- In Full mode, the overage charge (if any) is worked out the moment you finalise
Finalising always happens in mixing mode — the plan-then-mix split is the same whether you planned ahead or built the recipe at the chair (see Tutorial 20.6).
Where that charge goes depends on whether a bill exists yet. If the appointment already has a draft transaction, the line appears on it immediately. If it doesn't — the usual case, because you finalise at the chair before the customer reaches the desk — the charge waits, and lands on the next draft created for that appointment. Either way nobody has to key it in (Tutorial 20.8 covers the full lifecycle).
Step 3: Mid-appointment — switching to mixing mode
If a plan exists already:
- Reopen the plan from the appointment
- The dialog is now in mixing mode with two columns (Target, Actual)
- Enter actuals as you weigh
- Save actuals to pause; Finalise to commit
Step 4: Mid-mix changes
In mixing mode you can:
- Edit products — opens the plan dialog on top of the mixing dialog so you can swap products, move a row to another bowl, adjust targets, or click Add bowl if the client decides on a pop of colour last minute. Save and you're back in mixing mode with the new rows. (Add bowl lives in the plan dialog only, so Edit products is how you reach it mid-mix.)
- Save actuals — parks your progress without committing
- Revert (after finalising) — returns stock and reopens the formula for edits, as long as the transaction is still a draft
You don't have to Revert just to fix a number. While the charge is still on a draft, a finalised formula stays editable: the dialog reads Formula Finalised — {name} and tells you "Finalised. You can still correct actuals or edit the formula — the draft charge will update." Correct the actuals or the products and the overage line follows in step. Revert is for when you want the stock back and the formula reopened properly.
None of these require the receptionist to touch the till — the overage line reconciles itself.
Step 5: After the appointment — billing
When the customer heads to the front desk:
- Receptionist opens the appointment's transaction (Tutorial 2.4)
- Any finalised formula that exceeded Colour grams included has already put an emerald Extra colour used line in the cart, with a beaker icon and the calculated amount
- Review the rest of the sale and take payment as normal
The overage line is locked in the cart. Where every other line has a trash button, this one shows a small padlock, and clicking its price does nothing — hover the padlock and you get "Colour overage is calculated from the weighed formulas and cannot be edited here." That's deliberate: the figure belongs to the formula and the charge rule, not to the till operator, so there's nothing for the receptionist to check or correct.
To change what's charged, change the formula. While the transaction is still a draft, ask the colourist to Revert the formula (the line disappears and the formula reopens for edits) or to correct the actuals and re-finalise — the line rebuilds at the new amount. Once the transaction is completed the formula locks too, and the only route to a different figure is a refund and a fresh sale (Tutorials 8.2 and 20.8).
What the panel shows
Each formula card on the appointment detail page's Colour Formulas panel shows:
- Name (or "Unnamed formula")
- Developer volume badge (e.g.
20 Vol) when a volume was set without a developer product on the formula - Finalised lock badge once the formula is locked
- Charged £X.XX badge (green) once the overage has actually landed on a transaction
- An Open button (or View when finalised), and — for Admins and Owners only — a destructive trash icon to remove the formula while it's still a draft (Tutorial 20.6). Managers, Receptionists and Stylists don't see the trash icon at all.
- A short preview of the first three product/gram pairs
The calendar sidebar's compact version shows the same formula list — name, target total, Finalised badge, the bowl-by-bowl breakdown — plus a Previous line at the bottom offering a Use This one-click duplicate of the customer's most recent formula. On a completed, cancelled or no-show appointment the New button and that Previous line are both hidden, and every formula button reads View.
The sidebar labels the charge slightly differently, because it tells you where the money is rather than just how much:
| Sidebar badge | Meaning |
|---|---|
| Pending | Finalised, but no bill exists yet — the charge lands on the next draft |
| In draft £X.XX | The line is sitting on the appointment's open draft |
| Billed £X.XX | The transaction is done; the formula is now read-only |
Common Pitfalls
"I created the formula on the wrong appointment"
Deleting a formula is restricted to Admin and Owner, so if you don't see the trash icon on the card, ask one of them to remove it, then create a new one on the correct appointment. If the charge has already reached a completed transaction the formula can't be deleted at all; refund the transaction (Tutorial 8.2) first.
"The charge badge never appears"
Four conditions must all be true: the salon is in Full mode, the service is flagged as a colour service with Colour grams included set, the formula is Finalised, and a transaction exists to carry the line. Check in that order — a finalised formula on an appointment nobody has billed yet shows Pending in the sidebar and no green badge on the detail page.
"I Reverted but the POS line is still there"
Reverting strips the line server-side straight away, but a POS tab that was already open won't know. Refresh it. If it's still there, check the formula's status on the appointment — it may have been re-finalised, or you may be looking at a different transaction.
"The colourist finalised and wasted product — how do I waive the charge?"
While the transaction is still a draft, ask the colourist to Revert the formula and re-finalise without the wasted amount in the actuals. That's the only route — the line is locked in the cart, so there's no price to edit down and no trash button to press.
Tips and Best Practices
- Keep pre-plans light — capture the intent, not every gram, so the colourist has flexibility at the station.
- Finalise before the customer reaches the till — receptionists should see the overage line already staged, not have to wait.
- Reach for Revert, not Delete — Revert preserves history; Delete loses it, and only an Admin or Owner can do it. Only delete if the formula was created in error.
- Use the customer profile view for history — Colour → Formulas on the customer profile is the fastest way to see "what did we do last time".
Related Tutorials
- Tutorial 2.2: Booking and Managing Appointments — the appointment sidebar covered at a higher level
- Tutorial 2.4: Processing Transactions — how the overage line behaves in POS
- Tutorial 12.5: Colour Formulas — quick-reference companion
- Tutorial 20.2: Configuring Colour Settings and Charge Rules — the mode and the charge rule that decide whether anything is billed
- Tutorial 20.6: Creating a Colour Formula — deep dive on the dialog
- Tutorial 20.8: Overage Billing Explained — lifecycle of the charge across draft → completed
Frequently Asked Questions
What if the service isn't flagged as a colour service?
Then no Colour Formulas panel appears on the appointment. Either re-flag the service (Tutorial 7.1) or duplicate the formula onto a different appointment that uses a colour service.
Can I mix for two customers simultaneously?
Each formula is customer-scoped — open one dialog per customer. You can have dialogs open on two devices at once if you have two stations going.
Where's the formula if I closed the dialog without saving?
It's gone. The dialog doesn't auto-save — you must click Save plan (plan mode) or Save actuals / Finalise (mixing mode) to keep your work.
Does deleting the appointment delete its formulas?
No. Cancelling an appointment leaves its formulas untouched — they're clinical history, not booking data — and if an appointment is ever deleted outright its formulas survive too, simply losing the link to the booking. Either way they stay on the customer profile and can be duplicated onto a new appointment if the customer rebooks. What cancelling does change is the detail page's panel: it becomes read-only, so you can view the formulas but not add or remove any.
Last Updated: August 2026