
Creating a Colour Formula
Introduction
Structured colour formulas replace freeform Colour consultation notes with recipes you can reproduce. Every formula is tied to a customer (and optionally to an appointment), lists the products and grams used per bowl, and — in Full mode — stages an overage charge on the till automatically if it exceeds the service's included grams.
This tutorial is the deep dive on the unified formula dialog used across the main web app. For the tablet-based Colour Bar flow see Tutorials 20.9–20.15.
Who this is for: Staff and above What you'll learn:
- Where the formula dialog opens from
- Plan a formula: bowls, products and the developer line
- Save a plan for a future appointment
- Record actuals later in mixing mode
- Finalise, Revert, and duplicate
- Permissions for each action
Time to complete: 15 minutes
Prerequisites
- Salon colour formula mode set to Structured formulas or Full (formulas + stock + billing) (Tutorial 20.2)
- At least one colour product in your catalogue (Tutorial 20.4)
- Logged in as Staff, Receptionist, Manager, Admin, or Owner
Where the dialog opens
The same dialog serves three places, so you can start wherever you are. Each place labels its buttons a little differently, and the button you press decides which mode the dialog opens in:
| Entry point | Button | Opens in | Tied to |
|---|---|---|---|
| Customer profile → Colour tab → Formulas | New Formula | Blank (planning) | Customer only |
| Customer profile → formula card | Edit | Blank (editing a saved plan) | Customer only |
| Appointment detail page → Colour Formulas panel | New Formula | Blank (planning) | Customer + appointment |
| Appointment detail page → Colour Formulas panel | Open (or View once finalised) | Mixing | Customer + appointment |
| Calendar → Appointment sidebar → Colour Formulas | New, then Open Mixing (or View) | Blank, then Mixing | Customer + appointment |
One more way in comes from inside the dialog itself: Edit products in mixing mode opens the same formula again in blank mode, on top of the mixing dialog (Step 5).
A formula saved on a customer profile (no appointment) can later be attached to a booking — open the appointment's Colour Formulas panel, find the formula under Previous formulas, and click Use this to create an appointment-linked duplicate. The calendar sidebar offers the customer's most recent formula the same way, under Previous with a Use This button.
Step-by-Step Instructions
Step 1: Open the dialog in blank (planning) mode
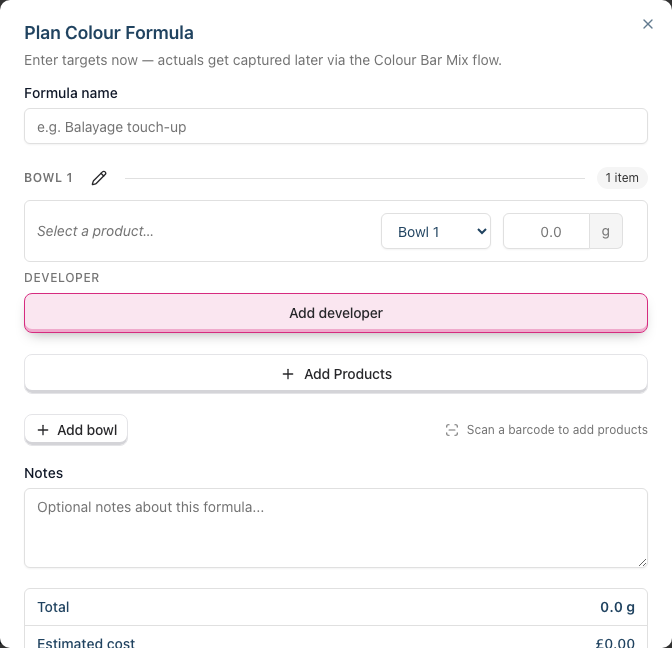
Click New Formula on any entry point above. The dialog opens titled Plan Colour Formula with:
- A Formula name field
- One empty bowl (Bowl 1) with a single target weight column and an Add developer line. Each bowl header carries a pencil icon for naming the bowl and a count of the products in it
- An Add Products button and an Add bowl button
- A Notes field and a totals panel showing the running Total in grams
- Footer buttons — Cancel and Save plan
If you can see product costs, the totals panel also runs an Estimated cost alongside the gram total.
Blank mode is plan-only: there is no Finalise button here. You build the recipe and save the targets; actuals are recorded later in mixing mode (Step 5) or weighed live on the Colour Bar. When you reopen an existing formula to edit it the title reads Edit Colour Formula and the action button becomes Update — but it is still the same single-column planning layout.
Step 2: Add products to bowls
- Click Add Products to open the full-screen catalogue browser (see "Browsing the catalogue" below)
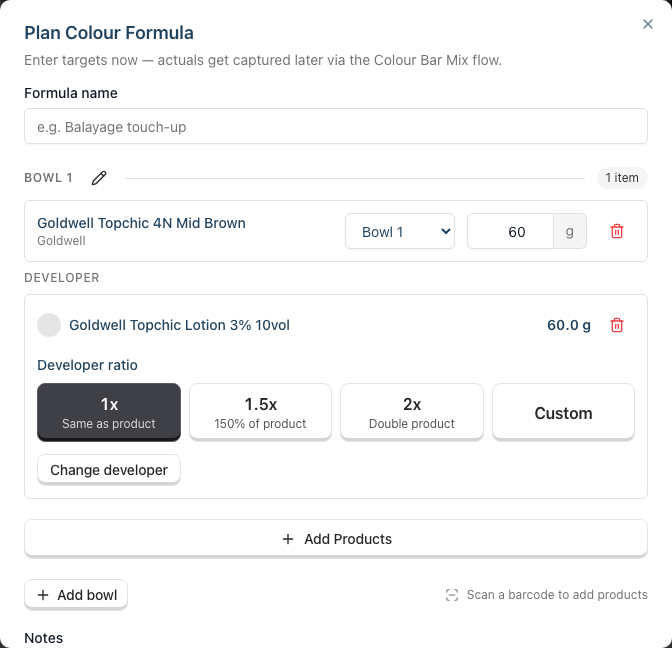
- Pick one or more shades and click Add To Formula — a row appears for each, with a weight input. New rows land in the newest bowl, so add your bowls in the order you plan to mix them
- Enter the weight as you pour
- Repeat Add Products, or click Add bowl for a second bowl (maximum six)
- To move a product to a different bowl, change the bowl number on its row
- To remove a product, click the trash icon on its row
- To name a bowl, click the pencil beside its header, type the name, and press Enter. Leave it blank and the bowl stays "Bowl 1", "Bowl 2", and so on
A product can only appear once in a formula. To split one shade across two bowls, add it to one bowl and weigh the rest as a second bowl's own mix.
You can still scan a barcode to add a single known product instantly — scanning works in blank mode without opening the catalogue.
Each bowl also has an Add developer line. Click Add developer to pick the developer (the catalogue shows only your developer products), then choose the ratio — 1x, 1.5x, 2x, or Custom — and the app works out the developer grams (ratio × the bowl's product total) automatically. The grams re-calculate as you change the colour weights, so the ratio stays true. Use Change developer to swap it. One developer per bowl; it's stocked and costed exactly like a colour.
Browsing the catalogue
The Add Products button opens a full-screen catalogue browser — the same browser used on the Colour Bar tablet, so it feels identical everywhere:
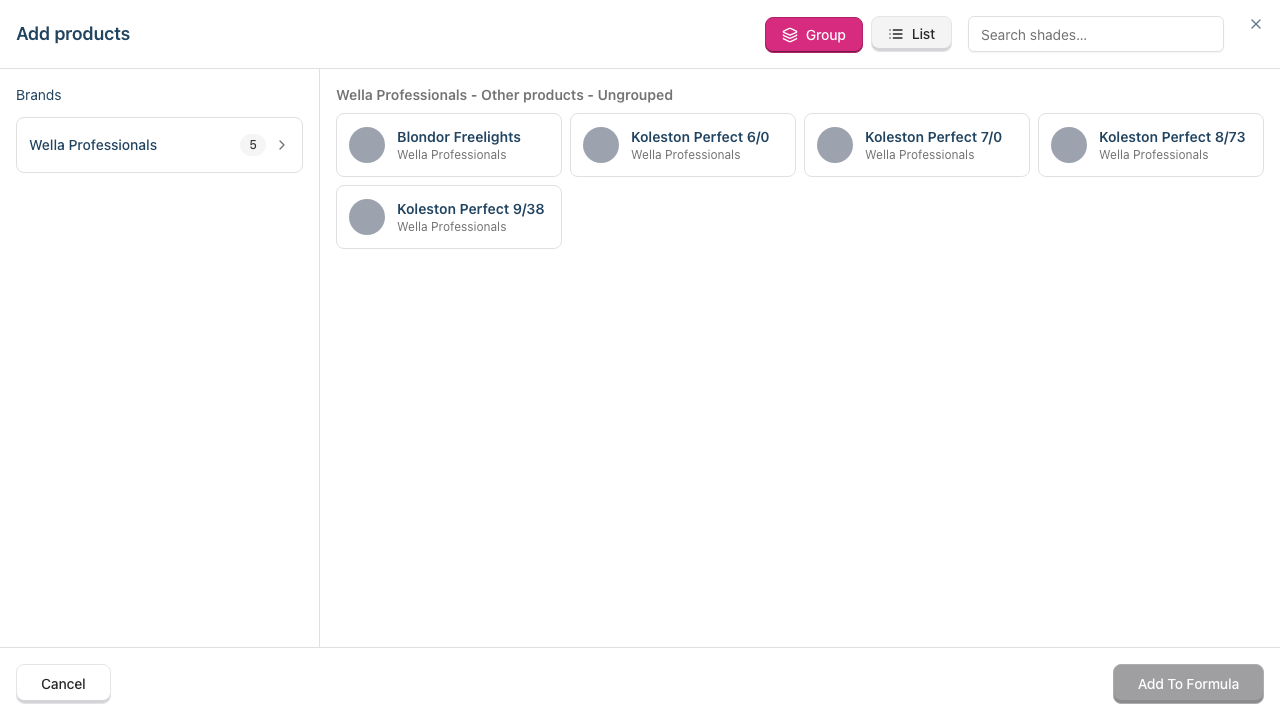
- Group view (default) — the left column drills down Brand → Product Line → Shade Family; tap a row to go deeper, or use the breadcrumb at the top to step back. The right pane shows the shades in the area you've drilled into, each as a large tile with a colour swatch, shade name, and brand - code.
- List view — flip the Group / List toggle to see every shade in one flat, searchable grid (handy when you know the shade name).
- Search — type in the search box to filter by shade name, brand, code, or family across both views.
- Selecting — tap a tile to select it (the whole tile is the button; a tick appears). Tap again to deselect. The footer shows a running "N selected" count.
- Already in the formula — shades already added show ticked and disabled with "Already in this bowl", so you can't add a duplicate.
- Click Add To Formula to add everything you selected, or Cancel (or Esc) to close without changing anything.
The same browser opens for the developer line, headed Add products to Bowl N developer. There it lists only your developer products and takes one pick at a time.
Products that haven't been organised into a line or family still appear — under "Other products" / "Ungrouped" — so nothing is ever hidden. Organise your catalogue into brands, product lines, and shade families (Tutorial 20.4) to make this browser easier to navigate.
Step 3: Fill in the rest
- Formula name (optional) — helpful for "Rachael root touch-up" style labels that travel between appointments. Leave it blank and the app names the formula for you: Service - Customer when you started from an appointment, or just the customer's name when you started from their profile
- Notes (optional) — processing time, technique, customer preferences
Step 4: Save the plan
Blank mode has a single save action: Save plan (or Update when you reopened an existing formula to edit it). It stores the target grams as a draft — nothing is decremented and nothing is billed. Saving closes the dialog; the formula then appears on the customer's record and, if it was opened from an appointment, under This appointment on that appointment's Colour Formulas panel.
Finalising — the step that decrements stock and, in Full mode, stages any overage charge — happens later, in mixing mode (Step 5). This two-stage split (plan now, mix later) is deliberate: it lets you prepare a recipe ahead of a visit and capture what you actually weighed when you come to mix it.
Step 5: Record actuals later (mixing mode)
On the appointment detail page each saved formula is listed under This appointment with an Open button (or View once it's finalised). In the calendar sidebar the same formula carries an Open Mixing button (or View). Clicking either reopens the formula in mixing mode, titled Mix Colour followed by the formula's name. Two weight columns appear:
- Target column is read-only (the plan)
- Actual column is editable (what you weighed)
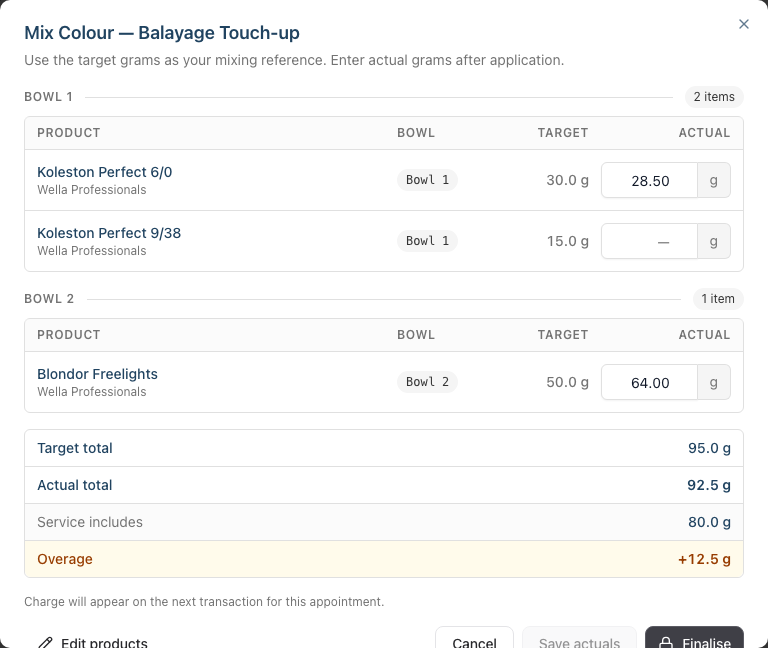
When a colour service is attached to the appointment, a totals panel also previews the overage: Target total, Actual total, Service includes, and (if you've gone over) an Overage figure that turns amber at small overages and red once you've crossed about 50% over the included grams.
Work through every row typing actual grams as you weigh. Fill them all in — Finalise commits the whole formula, so it needs an actual figure against each product and developer line. Then:
- Save actuals — preserves progress, no commit (useful if you step away). Disabled until you've entered at least one actual and changed something
- Finalise — commits after a confirmation dialog. The dialog spells out what it does: decrement product stock for the recorded actuals, and stage any overage charge onto the appointment's draft transaction
Reopen the formula after finalising and the title reads Formula Finalised, followed by the formula's name and a Finalised pill. Save actuals stays available there, so you can still correct a figure you mistyped.
Additional mixing-mode actions:
- Edit products — opens the formula back in blank mode so you can swap products, change bowl numbers, or adjust targets. The mixing dialog stays open behind it and refreshes when you save. On a finalised formula the dialog says so: saving reverses the original stock movement, re-decrements for the new items, and refreshes any draft overage charge
- Revert (only after finalising) — returns stock, strips the overage line, and reopens the formula for edits. Available while the overage charge is still on a draft transaction, or when no charge was ever staged (Formulas mode, or the formula isn't linked to an appointment). Once the appointment's transaction is completed or refunded the formula locks and Revert disappears
Note on entry points. Reopening a plan or draft from the customer profile (Colour tab → Formulas) opens in blank/edit mode — use the appointment detail page or calendar sidebar when you want to capture actuals against the plan. Once a formula is finalised, the customer profile drops the Edit button entirely and offers only Duplicate.
Step 6: Watch the charge badge
In Full mode, once a formula is finalised and a draft transaction exists for the appointment, a green Charged £X.XX badge appears on the formula card (and in the mixing dialog's title) whenever the actual grams exceeded the service's Colour grams included threshold. The amount on the badge matches the emerald colour overage line staged on the appointment's transaction (Tutorial 2.4).
Editing the formula, or clicking Revert, updates the badge and the POS line in step. Once the transaction is completed, both lock and the formula becomes read-only — reopening it then shows "This formula has been finalised and the charge is billed." and a single Close button.
Between finalising and the charge landing there is a waiting state. If no draft transaction exists yet, the mixing dialog says "Charge will appear on the next transaction for this appointment." The calendar sidebar names the same three stages on each formula row — Pending, In draft £X.XX, then Billed £X.XX.
The badge is never shown in Structured formulas mode — that mode doesn't run billing, so no charge is staged and the only effect of finalising is the gram-level stock decrement.
Step 7: Duplicate from history
When a returning customer wants the same formula there are two ways to copy it — pick the one that matches where you're working:
- From the customer profile's Colour tab → Formulas sub-tab — click Duplicate on a historical formula. The new formula stays at the customer level (no appointment linked) and carries the same products and target grams, ready to adjust
- From an appointment — open the appointment's Colour Formulas panel and look under Previous formulas. Click Use this on the relevant row to create a duplicate that's tied to this appointment from the start
Both paths link the new formula back to the original, so the lineage is recorded. Edits to the new formula don't propagate back to the source.
Permissions matrix
| Action | Staff | Receptionist | Manager | Admin | Owner |
|---|---|---|---|---|---|
| View formulas | Yes | Yes | Yes | Yes | Yes |
| Create / edit formulas | Yes | Yes | Yes | Yes | Yes |
| Revert (while draft is open) | Yes | Yes | Yes | Yes | Yes |
| Delete a formula | No | No | No | Yes | Yes |
| Colour stock take | No | Yes | Yes | Yes | Yes |
| Change colour settings / charge rules | No | No | No | Yes | Yes |
View, create/edit, finalise and revert all use the manage customers permission (every role above has it). Delete is restricted to Admin and Owner. The colour stock take uses the manage products permission — Staff are the only role without it. Colour settings and charge rules use manage salon settings, which only Admin and Owner hold.
Admins and Owners see the delete control in two places, and they behave differently. On the customer profile's formula card it removes any formula, finalised or not. On the appointment's Colour Formulas panel it appears only while the formula is still unfinalised, and the dialog calls it Remove. A formula whose charge has already landed on a completed transaction cannot be deleted at all — refund or modify that transaction first (Tutorial 8.2).
Common Pitfalls
"The New Formula button isn't showing"
Your salon is in Notes only mode. Change the mode via Salon Settings → Services → Colour (Tutorial 20.2).
"Stock didn't decrement"
Save plan never commits stock — it only stores the targets. Open the formula from its appointment to enter mixing mode, then Finalise to commit.
"Revert has disappeared"
Revert only shows after a formula is finalised. If the appointment's overage has already landed on a completed or refunded transaction, the formula is locked — refund or modify the transaction (Tutorial 8.2) to free it. In Structured formulas mode, or when no appointment is linked, Revert stays available because nothing was ever billed.
"The dialog won't let me add a seventh bowl"
Six bowls is the maximum. If you need more, split across two formulas — unusual, but fine.
"I scanned a product but nothing happened"
Barcode scanning feeds the formula in blank mode only. In mixing mode the app-wide scanner takes over, and a scan sends you to Quick POS with that product — so save your actuals before you pick up the scanner. Add products via Add Products instead.
"The formula I saved on the customer profile isn't on the appointment"
A formula saved from the customer profile carries no appointment. Open the appointment's Colour Formulas panel, find it under Previous formulas, and click Use this — that makes an appointment-linked copy you can mix and finalise.
Tips and Best Practices
- Finalise at the station, not later — the fresher the capture, the more accurate the charge and stock log.
- Use the formula name for the client-visible label — "Sarah root colour 5N/5G" travels cleanly between visits; "bowl mix" doesn't.
- Let stylists Revert, not delete — Revert preserves the audit trail; delete only if the formula was created in error.
- Train receptionists to recognise the emerald POS line — they shouldn't delete it from the draft "to be helpful".
- Duplicate rather than retype — even "same as last time" formulas benefit from a lineage you can trace.
Related Tutorials
- Tutorial 3.7: Recording and Managing Notes — for the freeform Colour note type in Notes mode
- Tutorial 12.5: Colour Formulas — a quick-reference companion to this deep dive
- Tutorial 20.1: Getting Started with Colour Management — mode overview
- Tutorial 20.7: Mixing Colour at Appointments — how a formula lives alongside the appointment
- Tutorial 20.8: Overage Billing Explained — what the charge badge and POS line mean
- Tutorial 20.9–20.15: Colour Bar tablet flow — the station-oriented alternative to this dialog
Frequently Asked Questions
Can two colourists work on the same formula at once?
Avoid it — last save wins. If you both open the dialog, the second to Finalise overwrites the first's actuals.
Does saving a plan decrement stock?
No. Save plan stores target grams only. Stock moves only when you Finalise in mixing mode.
Can I change the customer on an existing formula?
No — the customer is set at creation and Duplicate always keeps the same customer. If you created a formula on the wrong customer, an Admin or Owner needs to delete it and recreate it on the right profile.
Does a duplicate stay tied to the formula it came from?
The record keeps a link back to the source formula, so the lineage is traceable. It is purely informational — edits to the new formula don't propagate to the original, and neither one changes when the other does.
Can I attach a customer-level formula to an appointment later?
Yes. Open the appointment's Colour Formulas panel, find the formula under Previous formulas, and click Use this. This creates an appointment-linked duplicate; the original customer-level formula is left untouched.
Last Updated: August 2026