
Payroll Processing and Reports
Introduction
Processing payroll? Luminate calculates base pay, commission, and tips for your team. This guide covers running payroll reports, viewing the full pay breakdown for each staff member, verifying calculations, finalising payroll periods, and exporting data for your payroll provider.
Who this is for: Salon owners and admins responsible for paying staff.
What you'll learn:
- Navigating the payroll report
- Understanding pay type calculations
- Reading the payroll breakdown (hours, revenue, base pay, commission, tips)
- Verifying payroll entries
- Recalculating payroll when needed
- Finalising payroll, and reopening a period you finalised by mistake
- Exporting payroll data as CSV or PDF
Time to complete: 20-25 minutes
Prerequisites
Before you begin, make sure you have:
- A Luminate account with Owner or Admin role
- Staff members set up with compensation types and rates (see Tutorial 4.1)
- Commission rates configured for service and product sales
- Completed transactions for the payroll period
Step-by-Step Instructions
Step 1: Navigate to the Payroll Report
- Log in to Luminate
- Click Reports in the sidebar menu
- In the Staff Reports category, click Payroll
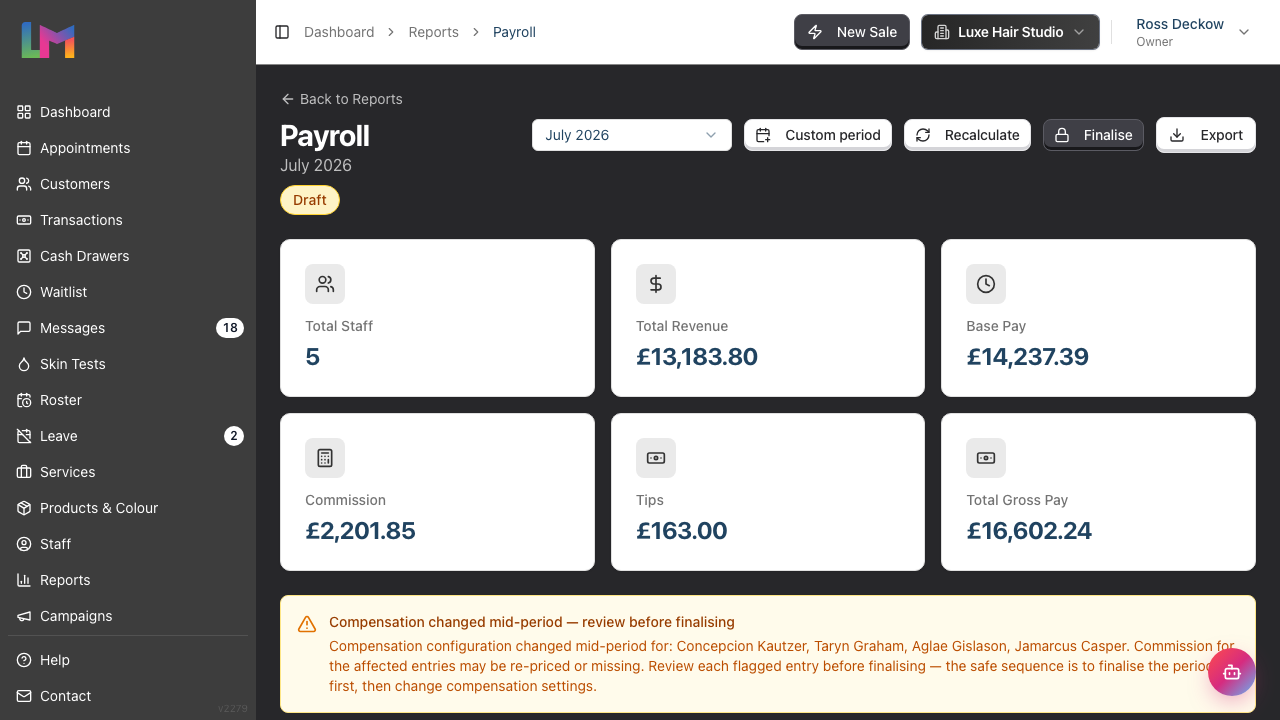
- The report loads showing the selected payroll period
Step 2: Understanding Payroll Periods
Payroll in Luminate works on a monthly basis. Each month is a separate payroll period, and you view past periods using the month selector.
Where the month starts and ends is your choice, set in Salon Settings → Staff → Payroll:
| Setting | How periods run |
|---|---|
| Calendar month | The 1st to the last day of each calendar month. This is the default. |
| Custom monthly | A start day you choose, from the 2nd to the 28th. A start day of 26 gives you 26 July to 25 August. |
Custom monthly suits salons that pay staff for work done up to a set day each month. Luminate labels every period by the month it ends in, so 26 July to 25 August is "August 2026". Periods that span two months show their dates as well: August 2026 (26 Jul – 25 Aug).
See Tutorial 4.7: Configuring Your Payroll Period for how to change this setting and how to bridge the gap when you switch.
Period Status:
| Status | Meaning |
|---|---|
| Draft | Period is open, figures recalculate automatically each time you open it, and can still change |
| Finalised | Period is closed and its figures are a locked snapshot. An Owner or Admin can reopen it — see Step 9 |
| Paid | Period is settled. Figures are locked and the period cannot be reopened |
A period stays in Draft until you finalise it at month end.
Step 3: Selecting a Payroll Period
To change which period you're viewing:
- Click the period selector (the dropdown at the top right of the report, showing the period you're on, or "Select month" if none is chosen)
- Choose the period you want to view
- The report updates to show that period
The selector lists your 12 most recent payroll periods — it shows periods that already exist, not every possible month.
If the period you want hasn't been created yet: when the report opens on a month that has no period, a Generate [Month] button appears next to the selector. Click it to create that period and populate its figures. The report opens on the current month, so this button creates the current month.
To create a period for an earlier month, use the Custom period button. Enter the first and last day of the month you need, then click Generate period. The dialog describes itself as a tool for bridging a gap after you change your payroll period settings, and it does that job too, but it is also how you create any period the Generate [Month] button doesn't offer. Custom periods are capped at 92 days and cannot overlap a period you have already finalised.
Commission tiers are calibrated for a monthly period. If your custom period spans fewer than 28 days or more than 31 days and active Salary + Commission staff use tiers, Luminate names the affected staff and asks you to confirm. It creates nothing until you click Create it anyway. Review those entries after creation. Correct any difference in the Adjustments column before you finalise or pay.
If two draft periods share days, Luminate shows a "This draft overlaps another draft period" warning above the table. Both drafts count the shared days in full and both can be exported, so paying from both files would pay your staff twice for the overlap.
Check the dates on the Custom period dialog before you create one. If you do end up with an overlap, use Discard draft to remove whichever period you don't want, then recalculate the one you're keeping (see Step 8).
Tip: When processing payroll, select the previous month (which should now be complete) rather than the current month.
Step 4: Understanding the Summary Cards
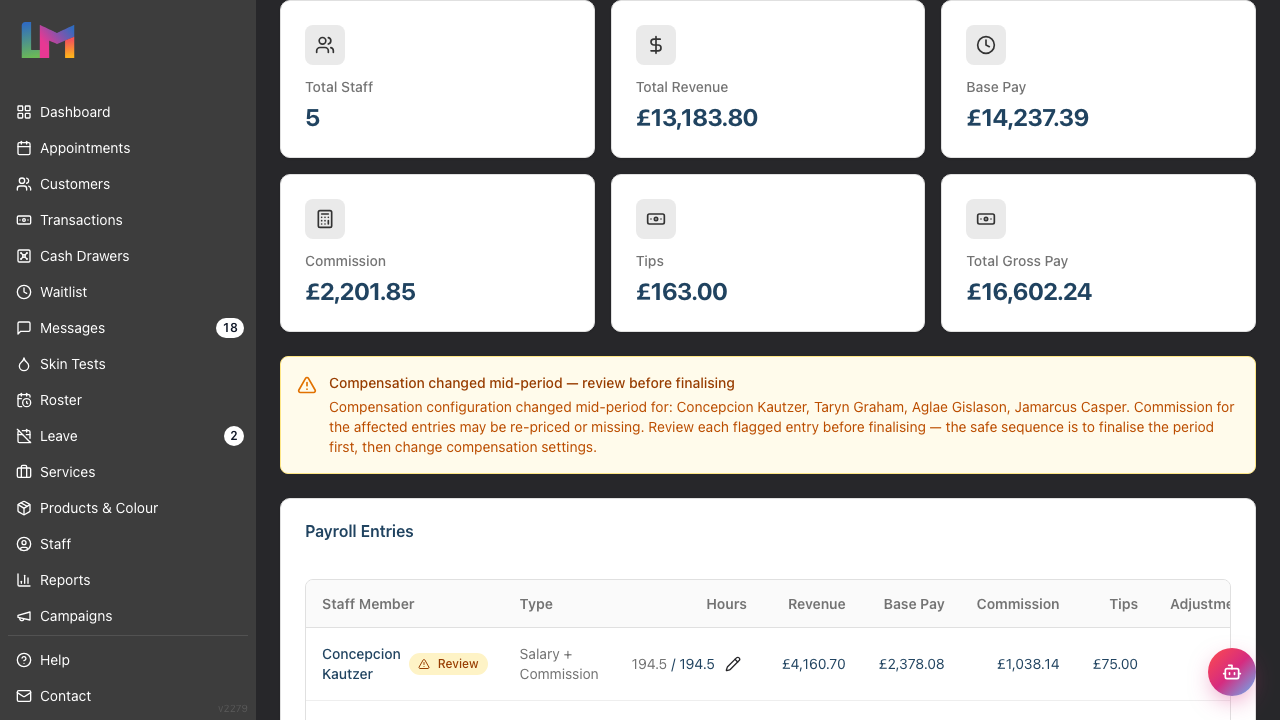
The summary cards show totals for the selected period:
| Card | What It Shows |
|---|---|
| Total Staff | Number of staff with payroll entries |
| Total Revenue | Combined revenue generated by all staff |
| Base Pay | Sum of base salaries and hourly wages |
| Commission | Sum of all commission earned |
| Tips | Sum of all tips attributed to staff |
| Total Gross Pay | Combined gross pay for all staff (base + commission + tips) |
Step 5: Understanding Pay Types
Luminate supports different pay structures:
| Pay Type | How It Works |
|---|---|
| Hourly | Base pay = Hours worked × Hourly rate |
| Salary | Annual salary prorated for the monthly period |
| Commission Only | No base pay, 100% commission |
| Salary + Commission | Base salary plus commission on top |
Each staff member's pay type is set in their profile (see Tutorial 4.1).
Step 6: Reading the Payroll Table
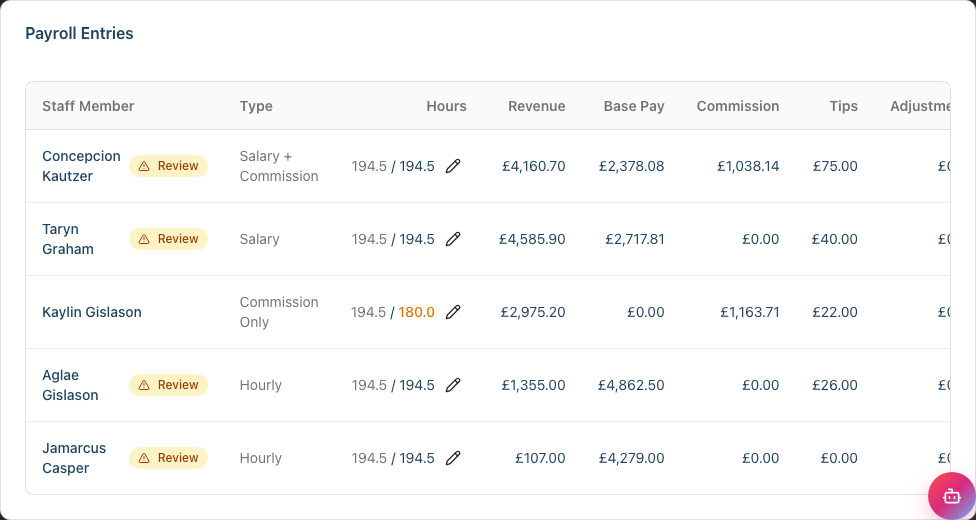
The main table shows each staff member's pay breakdown:
| Column | Description |
|---|---|
| Staff Member | The team member's name |
| Type | Their compensation structure (Hourly, Salary, Commission Only, Salary + Commission) |
| Hours | Scheduled hours / Actual hours worked (displayed as "X.X / Y.Y") |
| Revenue | Total revenue generated by this staff member |
| Base Pay | Salary or hourly earnings before commission |
| Commission | Combined commission earned on services and products |
| Tips | Tips attributed to this staff member |
| Adjustments | Manual corrections you enter against this staff member's pay, shown in green when positive and red when negative |
| Gross Pay | Total earnings: Base pay + Commission + Tips. Adjustments are not included in this figure |
| Net Pay | What the staff member is actually owed: Gross Pay + Adjustments |
Note on Gross Pay vs Net Pay: Gross Pay is Base pay + Commission + Tips only. Net Pay is that figure plus any adjustment, and it is what you pay. Both columns appear on screen and in the CSV export (see Step 10).
Making an adjustment: On a Draft period, click the pencil icon next to a staff member's Adjustments figure. Enter the amount and a short reason, then click Save adjustment. Use a negative figure to take money off — for example, to claw back commission paid on a sale that was later refunded. The dialog shows the resulting Net Pay before you save.
Your reason is stored with the entry and appears when you hover over the figure in the table. To remove an adjustment, open the same dialog and click Clear adjustment.
An adjustment stays on the entry when payroll recalculates, so recalculating or reopening the report will not wipe it. Adjustments can only be made while the period is a Draft — once you finalise, the figures are locked.
Recording an adjustment: Luminate does not yet give you a way to type an adjustment into this screen. Until it does, record corrections in your own payroll system and keep a note of what you changed and why. The Adjustments and Net Pay columns still appear on screen and in the export, so the figures line up once the control ships.
Note on hours: The Hours column shows both scheduled and actual hours in "scheduled / actual" format. Scheduled hours are calculated from the roster, and actual hours default to the scheduled value.
Correcting actual hours: On a Draft period, click the pencil icon next to a staff member's hours to record the hours they actually worked (for example, if someone left early or covered an extra shift). Your correction is highlighted in amber and is kept — it survives reopening the report, recalculating and finalising. To return to the rostered hours, open the same dialog and click Reset to roster hours.
Step 7: Verifying Payroll Calculations
Before finalising payroll, verify the figures are correct:
For Hourly Staff:
- Check hours match the Hours Worked report (Tutorial 9.7)
- Verify: Base Pay = Actual Hours × Hourly Rate
- Confirm commission matches the Staff Performance report
For Salaried Staff:
- Verify the base salary is correct (prorated for the month)
- Check commission calculations
- Account for any unpaid leave (which may reduce salary)
For Commission-Only Staff:
- Verify service commission against the Staff Performance report
- If the staff member earns product commission, check product revenue and commission separately
- Ensure all their transactions are included
For Tips: Tips are distributed proportionally based on each staff member's service revenue on transactions. Check the Staff Performance report (Tutorial 9.3) for detailed tip breakdowns.
Where to look when a figure doesn't add up: the payroll table gives you one row per staff member and doesn't expand — there's no per-person breakdown on this screen. To see how someone's commission was built up, item by item, with the service and product split and their tier progression, open the Staff Commission report (Tutorial 9.11) and select that staff member for the same dates.
Step 8: Recalculating Payroll
Draft payroll periods automatically recalculate each time you open the report, so figures are always up to date with the latest transaction data.
If you want to manually trigger a recalculation (for example, after making changes in another tab):
- Click the Recalculate button (top right of the report)
- Luminate recalculates all figures based on current transaction data
- Review the updated totals
When recalculation matters:
- After recording late transactions
- After processing refunds
- After correcting transaction errors
- After adjusting staff commission rates
Note: You can only recalculate Draft periods. Once a period is finalised its figures are locked and the Recalculate button disappears. To recalculate it anyway, click Unfinalise first (see Step 9).
Changing compensation settings mid-period
Draft periods always recalculate using each staff member's current compensation settings. If you change someone's pay type (for example from Salary + Commission to Commission Only), edit their commission tiers, or toggle product commission part-way through a month, the whole open period is re-priced under the new settings — including work completed before the change. Depending on the direction of the change, commission already earned can drop to zero.
When Luminate detects this situation, the payroll report shows a prominent "Compensation changed mid-period — review before finalising" warning above the table, and each affected staff member gets an amber Review badge next to their name. Treat flagged entries as suspect: check their commission against the Staff Performance report and correct any shortfall in your own payroll system before you pay.
The safe sequence for changing compensation:
- Wait until the end of the current payroll period
- Verify and finalise the period first
- Then change the staff member's compensation settings
- The new settings apply cleanly from the next period onwards
Step 9: Finalising the Payroll Period
When you're satisfied the figures are correct:
- Ensure you're viewing the correct month
- Verify all figures have been checked
- Click the Finalise button
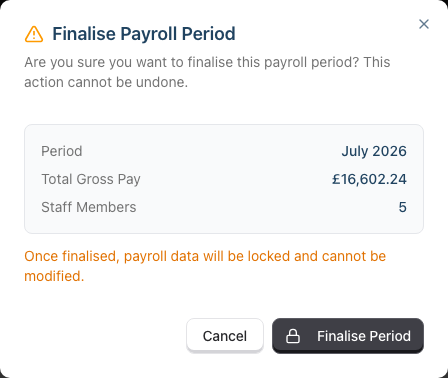
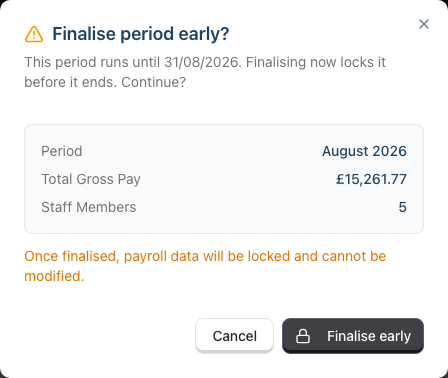
- Review the confirmation dialog showing the period, total gross pay, and staff count
- Click Finalise Period to confirm
What happens when you finalise:
- Figures are recalculated one final time as part of finalising, so a sale completed moments earlier is included (any manual hours corrections are kept)
- The period status changes from "Draft" to "Finalised"
- Figures are locked as a snapshot and stop recalculating
- The Recalculate and Finalise buttons disappear, and the pencil icon beside each staff member's hours disappears with them
- An Unfinalise button appears in their place
- You can still view and export the data
- To start the next month, select or Generate that period from the selector — finalising one period does not automatically create the next
Reaching a month you never generated: the period selector lists the last twelve months, not just the ones that already have a payroll period. A month with no period yet is marked (not generated) — pick it and you get the Generate button for that month. This is how you go back and produce payroll for a month that was missed at the time.
Discarding a draft period: a Draft period shows a Discard draft button in the header. It removes the period and its entries, including any manual adjustments or hours corrections you made on them. Use it when a period was generated with the wrong dates, or when two drafts overlap and you need to clear one. A finalised period cannot be discarded — unfinalise it first if you really need to.
If two drafts overlap: Luminate warns you, because both count the shared days in full and both can be exported — paying from both would pay staff twice for the overlap. Discard whichever period you do not want, then recalculate the one you are keeping.
Important: The payroll report is only accessible to Owners and Admins. Managers, Receptionists, and Staff cannot open the payroll report at all, so finalising is restricted to Owners and Admins by extension.
Finalising before the period has ended
Luminate checks the period's dates against today before it locks anything:
- The period has not started yet. The Finalise button is disabled. Hover it and Luminate explains why.
- The period is still running. The dialog changes to "Finalise period early?" and tells you the date the period runs until. The confirm button reads Finalise early. Only do this if you are sure no more shifts, sales or tips will land in the period — anything recorded after you finalise is not counted.
- The period has ended. You get the standard Finalise Payroll Period dialog.
Reopening a finalised period
Finalising is not the end of the road. If you finalise the wrong month, or finalise early and then need the last few days' takings, click Unfinalise:
- Click the Unfinalise button in the report header
- Read the confirmation dialog, which names the period being reopened
- Click Unfinalise Period
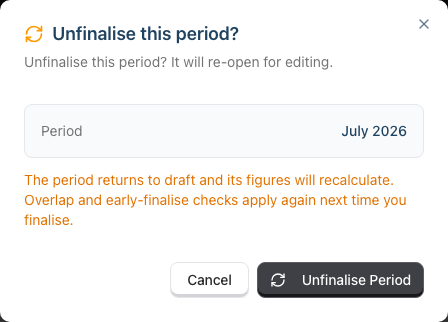
The period returns to Draft and its figures start recalculating again. Any actual-hours corrections you made are kept. The overlap and early-finalise checks apply again the next time you finalise.
Two limits apply:
- Only Owners and Admins can unfinalise, the same people who can finalise
- A period marked Paid is a settled record and cannot be reopened
Warning: Check the figures before you finalise. If you have already paid from a period, reopening it and letting the figures move means your records no longer match what went out, and any figure you had already sent to your payroll provider may change. In that case it is usually better to leave the period alone and correct the difference with an adjustment in the next open period — see Step 6.
When money moves after a period is finalised
A finalised period is a frozen snapshot — its figures are captured at the moment you finalise and stay exactly as they were. But the transactions underneath a finalised period can still change: a client might be refunded, or a same-day sale might be edited, after the period was locked. When that happens, the money has moved but the frozen payroll figures deliberately have not — so a staff member could have been paid on revenue, commission, or tips that later went back to the client.
Luminate now catches this. When a refund or edit affects a transaction that falls inside an already-finalised period, the payroll report shows a prominent "This finalised period needs review — money moved after it was locked" warning above the table, describing what changed. The figures shown remain the frozen snapshot; the banner is your prompt to reconcile the difference — for example, to claw back commission paid on a sale that was later refunded.
The banner asks you to make that correction as a manual adjustment in the next open period. You cannot type an adjustment into Luminate yet (see Step 6), so make the correction in your own payroll system and keep a note of it against the period.
Late-completed sales: a sale that was left as pending in one month and only completed (paid off) in a later month is treated as belonging to the month it was completed in, not the month the work was done. Pay follows the cash — the revenue and commission land in the payroll period that was open when payment completed. This is intentional, but worth knowing if a sale seems to appear in a later period than you expected.
Step 10: Exporting Payroll Data
To export payroll for your payroll provider or accountant:
- Select the period you want to export
- Click the Export button, then choose Export as CSV or Export as PDF from the menu
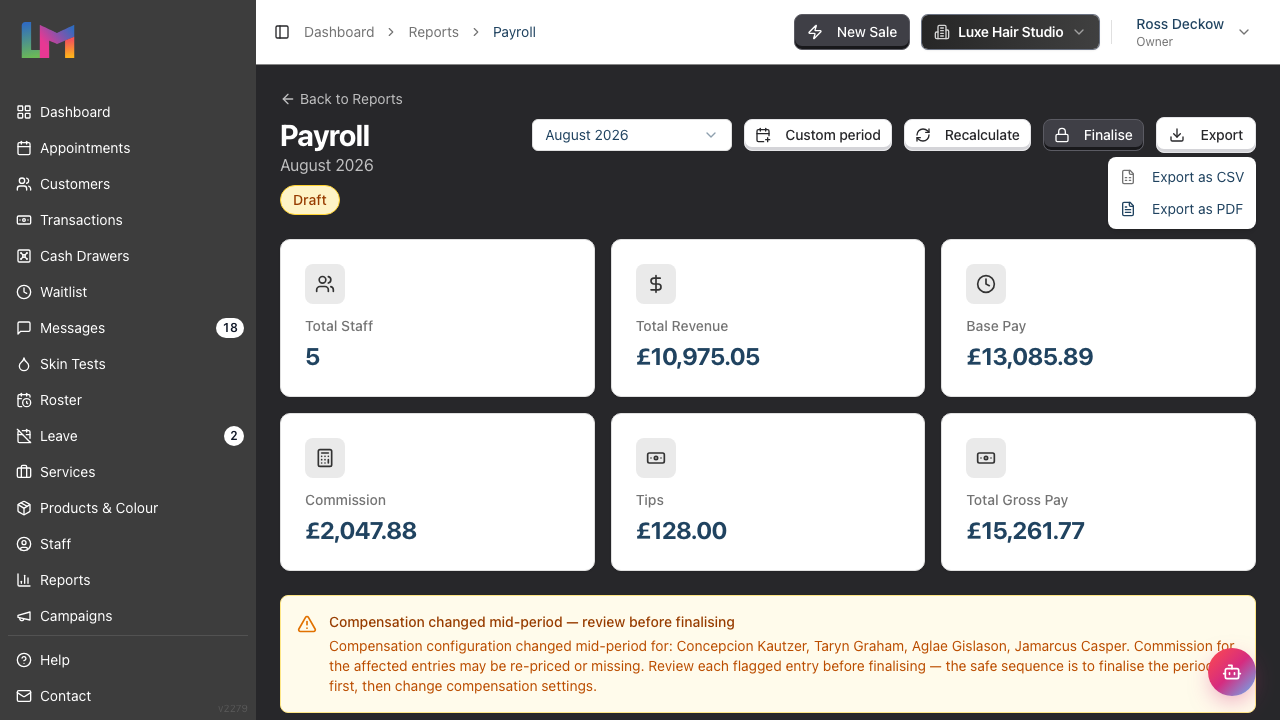
- The file downloads containing one row per staff member:
- Staff Member name
- Compensation Type
- Scheduled Hours
- Actual Hours
- Service Revenue
- Product Revenue
- Total Revenue
- Base Pay
- Commission
- Tips
- Gross Pay
- Adjustments
- Net Pay
- Status
Choose CSV for importing into payroll software or a spreadsheet, and PDF for a printable landscape summary to file or hand to your accountant. Both contain the same figures.
Check the Status column before you pay anyone. Every row carries the period's status, and a draft export also says so in its filename — payroll-2026-07-DRAFT.csv rather than payroll-2026-07.csv. Draft figures are still moving, so a CSV marked DRAFT is a preview, not a payment instruction. Export again after you finalise to get the settled figures.
Using the export:
- Import into your payroll software
- Send to your accountant
- Keep as records for tax purposes
- Use for HMRC reporting
Common Pitfalls
"Commission figures don't match the Staff Performance report"
The Payroll report only includes transactions from the payroll period you're viewing. The Staff Performance report may show different dates if you've changed the filter. Ensure you're comparing the same date range — and remember that if you run a custom monthly cycle, "August" on the payroll report is not the same span as August on the other reports.
"A custom period warns that commission tiers may not match"
Tier thresholds are calibrated for a monthly period. A shorter or longer custom period can move staff into the wrong tiers. Check the named staff before you continue. If you create the period, review each affected entry and correct any difference in the Adjustments column before you finalise or pay.
"A staff member's hours seem wrong"
Hours come from the roster (scheduled) and actual hours default to that same value. If hours look incorrect, check:
- Their shifts in the Roster
- Any leave taken during the period
- Break times recorded (breaks are deducted from scheduled hours)
If the roster itself is wrong, fix the roster and recalculate the period — that keeps the roster and payroll in step. If the roster is right but the person worked different hours (they left early, or covered an extra shift), use the pencil icon beside their hours to record the actual figure, as described in Step 6. See Tutorial 9.7: Staff Hours Worked Report for detailed hour tracking.
"I finalised the wrong month"
Click Unfinalise in the report header. The period returns to Draft, its figures recalculate, and your actual-hours corrections are kept. Then finalise the month you actually meant to. Only Owners and Admins can unfinalise, and a period marked Paid cannot be reopened.
If you have already paid staff from that period, think twice — see "Reopening a finalised period" above. The safer route is to leave it locked and correct the difference with an adjustment on the next open period, noting what you corrected in the reason field. If you have already sent the wrong month's figures to your payroll provider, tell them the figures have changed — reopening the period does not notify anyone.
"Commission rates changed mid-month"
For Commission Only staff, commission is calculated using the rate that was stored when each transaction was completed — if you changed rates mid-month, some transactions use the old rate and some use the new rate. Tiered commission (Salary + Commission) is different: it always uses the current tier table for the whole period. And changing a staff member's pay type mid-month re-prices the entire open period under the new type — look for the amber Review badge and the mid-period change warning, and see "Changing compensation settings mid-period" above for the safe sequence.
"A staff member has no payroll entry"
Every active staff member gets an entry, whether or not they took any bookings — a new starter with no clients yet still appears, with zero revenue. Two groups are missing by design:
- Owners. Owners never appear in payroll. Pay yourself outside Luminate.
- Former staff who have no claim on the period. A staff member you have deactivated still appears if they were salaried and employed during part of the period, or if they worked a rostered shift or made a sale in it. If none of those apply, they are left out.
If someone active is still missing, check they belong to the salon you're viewing and that the period covers the dates you expect.
"The Adjustments column is stuck at £0.00"
It will be. Luminate does not yet provide a way to enter an adjustment, so the column and the Net Pay figure in the export always match Gross Pay. Record corrections in your own payroll system for now. See Step 6.
"Base pay shows as zero, or looks low, for a salaried staff member"
Check that their compensation type is set correctly in their staff profile, and that their base salary amount is entered correctly.
If the figure is low rather than zero, check their employment dates. Luminate prorates salary to the days someone was actually employed inside the period, so a member of staff who joined on the 10th is paid from the 10th, and a leaver is paid up to their last working day. A staff member whose employment doesn't overlap the period at all gets no salary.
"Tips aren't showing for a staff member"
Tips are distributed proportionally based on service revenue. If a staff member has no service revenue for the period, they won't receive any tips. Product sales don't contribute to tip allocation.
Tips and Best Practices
- Process payroll in the first week of the new month - This gives time to catch and correct errors before payment deadlines
- Run the Hours Worked report first - Verify hours before processing payroll
- Keep a payroll checklist - Check the same things each month systematically
- Export before finalising - Keep a copy of draft figures in case you need to reference them
- Set calendar reminders - Schedule payroll processing for the same time each month
- Communicate with staff - Let them know when to expect pay calculations to be complete
Related Tutorials
- Tutorial 9.7: Staff Hours Worked Report - Verify hours before payroll processing
- Tutorial 9.3: Staff Performance and Commission Reports - Detailed commission and tips breakdown
- Tutorial 9.11: Staff Commission Report - Drill into one staff member's commission, item by item, when a payroll figure looks wrong
- Tutorial 4.1: Adding New Staff Members - Setting up compensation types and rates
- Tutorial 4.7: Configuring Your Payroll Period - Switch between calendar months and a custom cycle
- Tutorial 6.1: Understanding Staff Leave Allowances - How leave affects pay calculations
Frequently Asked Questions
When should I finalise each month's payroll?
Finalise after all transactions for the month are recorded, typically in the first few days of the following month. Don't finalise until you've verified all figures.
Can I edit finalised payroll?
Not while it stays finalised — the figures are a frozen snapshot and the editing controls disappear. But an Owner or Admin can click Unfinalise to return the period to Draft, make the correction, and finalise it again. A period marked Paid is the exception: it cannot be reopened. If you have already paid from the period, prefer an adjustment on the next open period, recording why in the reason field.
If a refund or same-day edit later touches a transaction inside a finalised period, Luminate shows a "needs review" banner on that period so you know the frozen figures no longer match reality. See "When money moves after a period is finalised" above for how to handle it.
How is commission calculated?
Commission depends on the staff member's compensation type. Commission-only staff earn commission based on the rate stored on each transaction item. Salary + Commission staff can use tiered commission rates, where the percentage increases as revenue thresholds are reached. Product commission is calculated separately and only applies to staff who have product commission enabled. Rates are set in each staff member's profile.
Does Luminate handle tax calculations?
Luminate calculates gross pay (before tax). Actual tax withholding, National Insurance, and pension contributions should be handled by your payroll provider or accountant.
What about tips?
Tips are included in the payroll calculations and appear as a separate column. Tips are distributed proportionally to staff based on their service revenue on each transaction. Tips are added to gross pay but are not included in commission calculations.
Can staff see their own payroll information?
Staff can see their own performance metrics (revenue, commission earned) in the Staff Performance report but cannot access the full payroll report. The payroll report is only visible to Owners and Admins.
What's the difference between scheduled and actual hours?
Scheduled hours are calculated automatically from the roster (with break time deducted). Actual hours default to the scheduled value. The Hours column shows both values in "scheduled / actual" format.
How far back can I view payroll periods?
The month selector shows the 12 most recent payroll periods. All payroll data is retained, but the dropdown provides quick access to the most recent months.
Last Updated: August 2026