
Deposits and Pre-Payments
Introduction
Taking deposits for appointments protects your salon from no-shows and last-minute cancellations, particularly for high-value services like bridal hair, colour corrections, or group bookings. Luminate allows you to set deposit amounts when booking appointments and track their payment status. This tutorial covers setting deposit requirements and collecting deposit payments.
Who this is for: All staff who take bookings and process payments.
What you'll learn:
- When to require deposits
- Setting deposit amounts on appointments
- Collecting deposit payments (in-salon and via payment links)
- Tracking deposit status
- Applying deposits to final bills
Time to complete: 10 minutes
Prerequisites
Before you begin:
- Complete Tutorial 2.2 (Booking and Managing Appointments)
- Complete Tutorial 8.1 (Understanding Transactions and Payment Status)
- Familiarity with Quick POS
Step-by-Step Instructions
Note: This tutorial covers manual deposits collected in-salon through the Point of Sale, as well as deposit payment links you can send to customers for remote payment via Stripe. If you want to collect deposits automatically when customers book online, see Tutorial 18.5: Collecting Online Booking Deposits with Stripe. All deposit types are tracked on the appointment and work with the same final billing flow.
Step 1: Understanding Deposits in Luminate
A deposit is a partial payment taken in advance to secure a booking.
| Characteristic | Details |
|---|---|
| Manual POS Deposits | Collected in-salon via Quick POS (this tutorial) |
| Deposit Payment Links | Sent to customers via email/SMS for remote Stripe payment (this tutorial) |
| Online Stripe Deposits | Collected automatically during online booking (Tutorial 18.5) |
| Set on | Individual appointments |
| Amount | Any value you choose (manual), auto-calculated from service settings, or configured per service (online) |
| Tracking | Deposit Paid (yes/no) on appointment |
| Applied to final bill | Deposit amount shown in payment history |
Why use deposits:
- Reduce no-shows
- Secure high-value bookings
- Cover material costs upfront
- Filter out uncommitted bookings
Step 2: When to Require Deposits
Common deposit scenarios:
| Scenario | Suggested Deposit | Reason |
|---|---|---|
| Bridal/Wedding Hair | £50 or 50% | High-value, hard to rebook |
| Colour Corrections | £30-£50 | Expensive materials, long duration |
| Group Bookings | £10-£20 per person | Multiple staff blocked out |
| New Customers (High-Value) | 30-50% | No relationship history |
| Previous No-Show | Full amount | Risk management |
When deposits aren't necessary:
- Regular, loyal customers
- Quick services (cuts under £50)
- Walk-ins paying immediately
- Same-day bookings
Step 3: Setting a Deposit Amount When Booking
When creating or editing an appointment:
- Navigate to Appointments in the sidebar
- Click Add Appointment (or edit existing)
- Fill in customer, staff, service, date/time as normal
- Scroll down to the Deposit section
- Find the Deposit Amount field
- Enter the deposit amount (e.g., 50.00)
- Save the appointment

On the edit page: when you edit an existing appointment, the Deposit Amount field sits in a Deposit card of its own ("Payment details"). See Step 7 for what else that card offers.
The appointment now shows:
- Deposit required: £50.00
- Deposit status: Not Paid
Auto-calculated deposits: If a service has deposit settings configured (either a fixed amount or a percentage of the service price), Luminate will automatically populate the deposit amount when you select that service. A helper message beneath the field confirms this, showing the deposit type (e.g., "Auto-calculated from service deposit settings (20%)"). You can still adjust this amount manually for individual appointments.
Booking several services at once: when you pick more than one service, the Deposit Amount field takes one figure for the whole booking and splits it across the appointments for you. A Deposit distribution panel appears under the field showing exactly what each service will carry, so you can check the split before you save.
The split follows what each service needs:
- Some services require a deposit — the amount is shared in proportion to what each one requires. Enter more than the total required and each service gets its requirement plus a share of the extra. A service that requires nothing carries nothing.
- No service requires a deposit — the amount is shared in proportion to each service's price, so the more expensive service carries the larger share. This is how you take a deposit on services that are not normally configured to need one.
Your figure always wins over the services' own settings, whether it is higher or lower. Enter 0 to take no deposit at all. The split is exact to the penny, so the shares always add up to the amount you typed.
Multi-service bookings: When creating linked appointments with multiple services, the deposit amounts are combined. A distribution preview shows how the total deposit breaks down across each service.
Collecting the deposit straight after saving: When you save an appointment that requires a deposit, the Collect Deposit dialog opens automatically on the calendar. From there you can:
- Take at Till — go straight to Quick POS with the deposit pre-loaded (always available).
- Send Payment Link — email or text the customer a secure Stripe payment link (only shown when Stripe Connect is set up and the customer has a usable email/SMS channel — see Step 5).
If you'd rather deal with it later, click Cancel — the deposit stays on the appointment and you can collect it any time from the appointment page (Step 4).
Step 4: Taking a Deposit Payment in Quick POS
Once an appointment has a deposit requirement:
From the appointment page:
- Open the appointment details
- Look for the Take Deposit button (visible when deposit unpaid)
- Click Take Deposit
- You're taken to Quick POS with the deposit pre-filled in cart
- The deposit item shows:
- The line name Deposit: [service name] — e.g. "Deposit: Full Colour"
- Amount: £50.00 (the required amount)
- A tax-exempt marker (labelled with your salon's tax name, e.g. VAT Exempt) — deposits are not taxed; tax is charged on the service itself at the final bill
- Linked to the appointment
- Process payment (Cash, Card, Voucher, or Other)
- Transaction completes automatically when paid
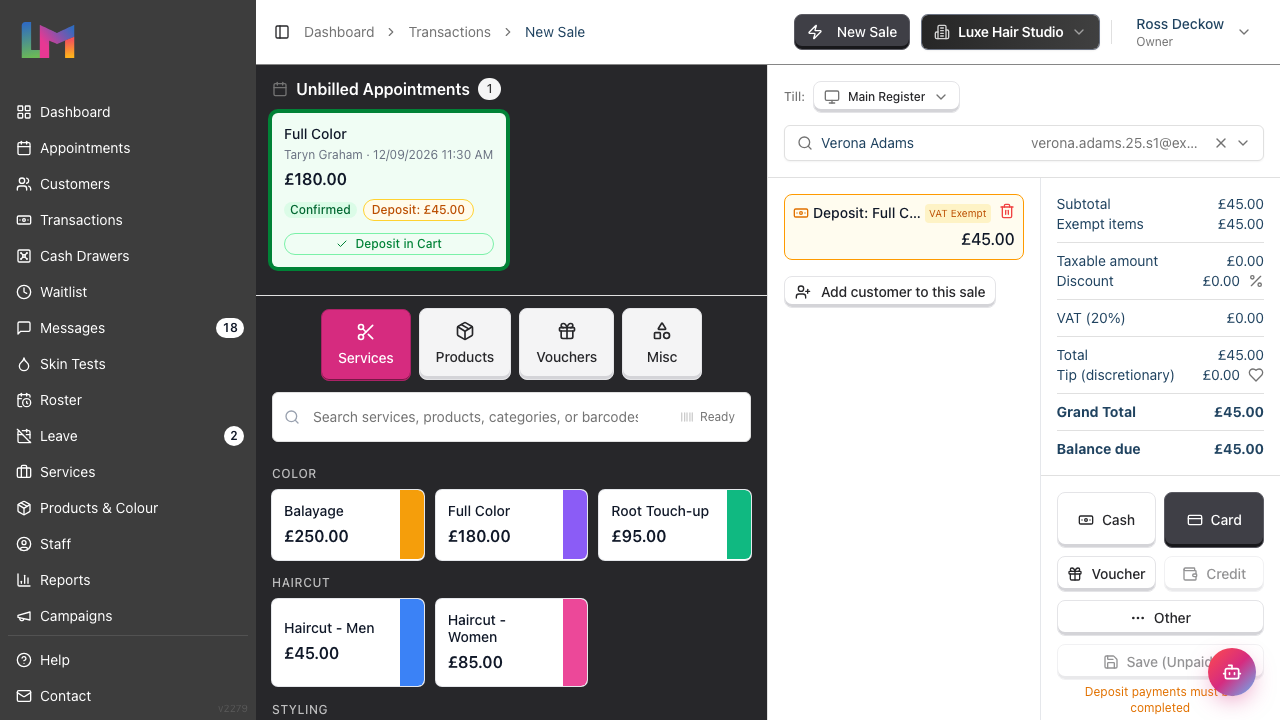
What happens:
- Transaction created with deposit item
- Appointment deposit status changes to "Paid"
- Payment recorded and linked to appointment
Step 5: Sending a Deposit Payment Link
You can send customers a secure payment link to collect deposits remotely via Stripe, without the customer needing to visit the salon.
Requirements:
- Your salon must have Stripe Connect configured (see Tutorial 18.5)
- The customer must have an email address and/or phone number on file
From the appointment detail page:
- Open the appointment with an unpaid deposit
- Click the Send Payment Link button (below the Take Deposit button)
- The Collect Deposit dialog opens, showing:
- The deposit amount (which you can edit inline before sending)
- Channel options: Email, SMS, or Email & SMS
- A Take at Till button if you'd rather collect it in person instead
- Select how to send the link
- Click Send Payment Link
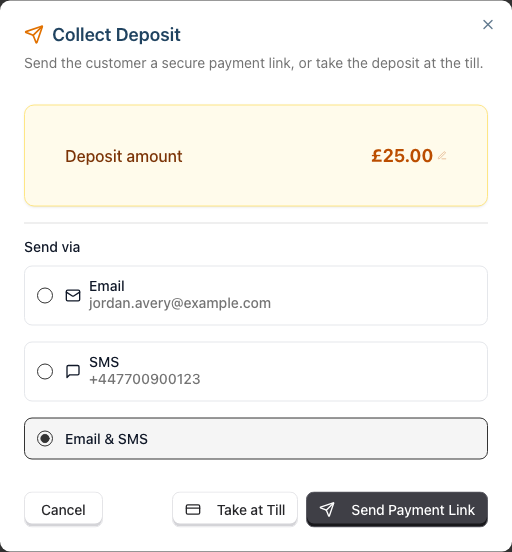
Overriding the deposit amount: Before sending, you can click the deposit amount to edit it inline. This allows you to adjust the amount without changing the appointment's deposit setting. A Reset link appears if you've changed the amount, letting you revert to the original.
For linked bookings (multi-service): The dialog shows all unpaid deposits in the booking group. You can edit each deposit amount individually. The total is displayed at the bottom. Only deposits that are still collectable are counted — a service in the group that has already been paid, or one marked as a no-show, is left out of the total and is never listed as "due" on the customer's payment page, so the amount shown always matches what the link will actually collect.
What the customer receives: An email and/or SMS containing a link to a secure Stripe Checkout page. The message includes the salon name, appointment date, service, and deposit amount.
What happens after the customer pays:
- The deposit is recorded automatically against the appointment
- The appointment's deposit status changes to "Paid"
- A deposit transaction is created and linked to the appointment
- No further action is required from staff
Note: The Send Payment Link button only appears when Stripe Connect is configured for your salon and the customer has contact details for at least one channel (email or phone).
Step 6: Deposit Items in Quick POS
Deposits appear as a special item type in the cart:
Deposit item characteristics:
- Amber/orange border and background to distinguish from regular services
- Banknote icon indicator next to the item name
- Named Deposit: [service name]
- Cannot be saved as unpaid (must complete payment)
- Quantity controls hidden (always 1)
- Not taxable — the line carries a tax-exempt marker (e.g. "VAT Exempt")
- Staff is automatically assigned from the appointment
- Linked to specific appointment
Important: When deposits are in the cart, the "Save (Unpaid)" button is disabled with a message "Deposit payments must be completed". You must process payment before completing the transaction.
Deposits and discounts don't mix: a deposit can't be added to a sale that carries a discount. Discounting the sale would mean recording the full deposit against less money taken, so Quick POS refuses it with "A deposit cannot be collected on a discounted sale — remove the discount first, or take it separately." Either clear the discount and take the deposit, or ring the deposit up on its own transaction.
One line per appointment: an appointment can only be on the ticket once. If its service is already in the cart (you're billing it in full), the Take Deposit option isn't offered for it — and once a deposit is in the cart, you can't also add the service to the same sale.
Step 7: Viewing Deposit Status on Appointments
On the appointment calendar:
- Appointments with deposits show a small deposit indicator icon:
- Amber banknote icon — Deposit required, not yet paid
- Green banknote icon — Deposit collected
On the appointment detail page:
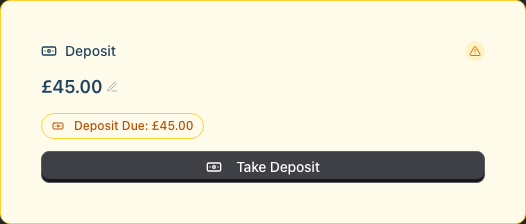
- A Deposit card displays prominently when a deposit is set:
- Shows the deposit amount (click the amount to edit it inline; press Enter to save or Escape to cancel)
- A Reset link appears if you've overridden the default amount, letting you revert to the service's configured deposit
- Amber styling with warning icon when deposit is pending
- Green styling with checkmark when deposit is paid
- Take Deposit button appears when deposit is unpaid and the appointment isn't cancelled (navigates to Quick POS)
- Send Payment Link button appears when deposit is unpaid, Stripe Connect is configured, and the appointment is still scheduled, confirmed, or arrived (opens the payment link dialog)
- A deposit status badge shows "Deposit Due: [amount]" (amber) or "Deposit Paid: [amount]" (green)
Which amount the badge shows: once a deposit is paid, the badge and the deposit figure above it show the amount actually collected, not the amount currently required. These are normally the same. They differ when a deposit is taken and the requirement changes afterwards — swapping to a pricier service, say — in which case the badge keeps showing the sum the customer really paid, matching their receipt. Any shortfall against the new requirement is simply collected with the rest of the bill.
- The Payments tab shows all transactions linked to the appointment, including deposit payments
On the appointment edit page:
- A Deposit card (subtitled "Payment details") holds everything below
- Deposit Amount field shows the set amount
- Deposit Status checkbox labelled "Deposit has been paid" — check this if the deposit was collected outside the POS (e.g., cash in hand)
- A status indicator card shows "Deposit Paid" (green with checkmark icon) or "Deposit Pending" (amber with clock icon) along with the amount
- A Take Deposit button appears on the status card when the deposit is unpaid
Changing the price after a deposit is paid: if you edit the price of an appointment whose deposit has already been collected, a Deposit Already Paid warning appears before the change is applied. It shows the deposit paid and explains that the deposit payment stays as it is — any difference is settled against the new price at the final bill. Confirm to continue, or cancel to leave the price alone.
Step 8: Taking Deposits from Quick POS Unbilled Appointments
When a customer is selected in Quick POS:
- The Unbilled Appointments panel automatically appears showing their appointments
- Each appointment card displays:
- Service name and date/time
- Staff member assigned
- Deposit badge (amber: "Deposit: £50.00" or green: "Deposit Paid")
- If an appointment has an unpaid deposit, a Take Deposit button appears
- Click Take Deposit to add the deposit item to your cart
- Process payment as normal
The button is replaced once the appointment is on the ticket. In its place you'll see either a green Deposit in Cart chip (the deposit is queued for payment) or a green Paying in Full chip (you've added the service itself, so the whole amount is being billed and there's no deposit left to take).
Cancelled appointments in this panel: cancelled appointments still appear here so you can bill a cancellation fee, but they don't offer Take Deposit — there's no appointment left to secure. Charge a cancellation fee as a normal line item instead. No-shows do still offer it, since collecting a booked deposit after a no-show is a legitimate salon policy.
For linked appointments (multi-service bookings):
- When you click Take Deposit on a linked appointment, a modal appears
- You can select which deposits to collect (one or all linked services)
- Selected deposits are added to the cart together
This is a convenient alternative to navigating to the appointment page first.
Step 9: Applying Deposits to Final Bills
When the appointment takes place and you bill the full service:
Appointment flow:
- Customer arrives, service completed
- Open appointment and click Create Transaction (or add from Unbilled Appointments in Quick POS)
- Service items added to cart
- If a deposit was previously paid:
- The deposit credit is automatically applied
- The amount due is reduced by the deposit amount
- The payment breakdown shows "Less: Deposit" in the totals
Example in Quick POS:
Service: Bridal Hair & Makeup       £150.00
-----------------------------------------
Subtotal:                          £150.00
Less: Deposit                       -£50.00
Amount Due:                        £100.00
On the completed transaction:
- The full service price is recorded (£150.00)
- The payment section shows the deposit deduction
- The customer only paid £100.00 on the day
The deposit transaction remains a separate record linked to the appointment, providing a complete audit trail.
Step 10: Deposit Permissions by Role
| Action | Owner | Admin | Manager | Staff | Receptionist |
|---|---|---|---|---|---|
| Set deposit amount | ✓ | ✓ | ✓ | ✓ | ✓ |
| Collect deposit payment | ✓ | ✓ | ✓ | ✓ | ✓ |
| Send deposit payment link | ✓ | ✓ | ✓ | ✓ | ✓ |
| Mark deposit as paid | ✓ | ✓ | ✓ | ✓ | ✓ |
| Refund deposit | ✓ | ✓ | ✓ | ✗ | ✓ |
Note: Sending a deposit payment link requires permission to update the appointment and permission to create conversations (since it sends a notification to the customer). All roles listed above have these permissions by default.
Common Pitfalls
"I can't find the Take Deposit button"
The button only appears when:
- Appointment has a deposit amount set (greater than £0)
- Deposit is not already paid
- The appointment has not been cancelled
Check the appointment's deposit amount field. If the appointment was cancelled, the button is gone from every surface — the appointment page, the calendar sidebar, and the Quick POS unbilled panel — and the server refuses the deposit even if the request is forced. Bill a cancellation fee as an ordinary line item instead.
"I can't see the Send Payment Link button"
The Send Payment Link button only appears when:
- The appointment has an unpaid deposit
- Your salon has Stripe Connect configured
- The customer has an email address or phone number on file
- The appointment is scheduled, confirmed, or arrived
If Stripe Connect is not set up, only the Take Deposit button (for in-salon POS payment) is available.
The status rule is stricter here than for Take Deposit: a payment link asks a customer to pay towards an appointment that is still going ahead, so cancelled, no-show, and completed appointments don't offer one. A no-show's deposit can still be taken at the till if that's your policy.
"Take Deposit says something about a discount"
Quick POS won't put a deposit on a sale that has a discount applied: "A deposit cannot be collected on a discounted sale — remove the discount first, or take it separately." A discount reduces the money actually taken while the deposit would still be recorded in full, so the two can't share a ticket. Remove the discount and take the deposit, or ring the deposit up as its own transaction and discount the final bill later.
"Take Deposit isn't offered for an appointment that clearly has one"
Check whether the appointment is already on the ticket. If the service line is in the cart you'll see a Paying in Full chip instead of the button — you're billing the whole amount, so there's no deposit to take. If you've already clicked Take Deposit, the chip reads Deposit in Cart.
"Deposit not showing as paid after payment"
Ensure the transaction completed successfully. The deposit payment must be processed through Quick POS with the deposit item linked to the appointment. If a deposit payment link was sent, the customer must complete the Stripe Checkout — check with the customer that they finished the payment process.
"Customer paid deposit but wants to cancel"
Refer to your salon's cancellation policy. If a refund is warranted, simply cancel the appointment — the cancellation dialog asks whether to Refund or Retain the paid deposit and processes the refund for you (Owner/Admin/Manager/Receptionist). This works from the appointment page, the calendar sidebar, and the mobile action sheet alike.
To refund a deposit without cancelling (e.g. as a goodwill gesture), use the Refund Deposit button on any of those surfaces (Tutorial 18.5), or refund the deposit transaction itself (Tutorial 8.2).
For a linked (multi-service) booking whose deposits were paid in one payment, the deposit can only be refunded for the whole group — cancel all linked appointments together and choose Refund. Cancelling a single linked appointment retains the deposit and the dialog explains why (see Tutorial 18.5).
"The deposit badge shows a different amount to what the customer paid"
It shouldn't — the badge shows the amount collected, taken from the payment itself. If the appointment's deposit requirement changed after payment (a service swap, for instance), the badge still shows what was actually paid and the difference is settled with the final bill. Check the Payments tab to see the deposit transaction and confirm the figure.
"Deposit is more than the service costs on the day"
If service price changed or was different than expected:
- Customer has overpaid via deposit
- They may receive a refund or credit
- Or apply as payment toward products/additional services
Tips and Best Practices
Communicate deposit requirements upfront — Tell customers about deposits when booking.
Be consistent — Apply deposit requirements consistently across similar booking types.
Collect deposits promptly — Don't wait until the day before the appointment. Use deposit payment links to collect straight away after booking.
Higher deposits for repeat no-shows — If a customer has no-show history, require full pre-payment.
Record deposits immediately — When customer pays, process the deposit transaction right away.
State your policy — Consider displaying your deposit and cancellation policy at reception.
Use payment links for remote bookings — For phone or social media bookings, send a deposit payment link so the customer can pay without visiting the salon.
Related Tutorials
- Tutorial 2.2: Booking and Managing Appointments — Creating appointments with deposits
- Tutorial 8.1: Understanding Transactions and Payment Status — How deposit transactions work
- Tutorial 8.2: Handling Refunds and Cancellations — Refunding deposits
- Tutorial 18.5: Collecting Online Booking Deposits with Stripe — Automatic online deposit collection
Frequently Asked Questions
Can I set a default deposit for certain services?
Yes! Services can be configured with default deposit requirements. When creating an appointment, if the selected service has a deposit configured (either a fixed amount or percentage), Luminate will automatically populate the deposit amount field. You can still adjust this amount if needed for individual appointments.
What if customer pays more than the deposit amount?
The deposit amount is a guideline. If they pay more, it's recorded as a larger deposit payment. The full amount shows on their payment history.
Can deposits be transferred to a different appointment?
Deposits are linked to specific appointments. If rebooking, you may need to refund the original deposit and take a new one for the rescheduled appointment.
Do deposits affect staff commission?
Deposits are payments on account, not service commissions. Staff commission is calculated when the actual service is billed and completed.
Can I take multiple deposits for one appointment?
Each appointment tracks one deposit amount and paid/unpaid status. For instalment payments, consider using partial payments on the final transaction instead.
What happens to the deposit if customer doesn't show?
Depends on your policy. Options:
- Keep deposit as cancellation fee (common)
- Refund if extenuating circumstances
- Convert to gift voucher for future use
What is the difference between manual deposits and online Stripe deposits?
Manual deposits (covered in this tutorial) are collected in-salon through Quick POS when a customer visits or calls. You can also send deposit payment links for remote Stripe payment. Online Stripe deposits (covered in Tutorial 18.5) are collected automatically during the online booking process via a Stripe Checkout page. All deposit types appear on the appointment's deposit tracking and reduce the amount due at the final bill. The main difference is how the payment is initiated — in person, via a staff-sent link, or automatically during online booking.
How do deposits work with linked bookings (multi-service appointments)?
When an appointment is part of a linked booking group, Luminate tracks deposits for each service individually. On the appointment detail page, the Send Payment Link dialog shows all unpaid deposits in the group and lets you send a single payment link covering all of them. In Quick POS, clicking Take Deposit on a linked appointment opens a modal where you can select which deposits to collect.
I added a service to a booking that already had a saved till draft — why isn't it on the bill?
When you save a Quick POS ticket as a draft and later add another service to the same booking, the new service is not added to the existing draft automatically (adding charges to a saved bill without you seeing them could over-charge the customer). Instead, when you re-open the draft, Quick POS shows a "Booking group changed since this draft" notice listing the service that joined the booking. Add it from the services list if it should be billed on the same ticket. The reverse also holds: if you remove a service from the booking after it has already been added to a draft, its line stays on the draft — remove the line at the till if it should not be charged.
Last Updated: August 2026