
Handling Refunds and Cancellations
Introduction
Even in the best-run salons, situations arise requiring refunds - unhappy customers, service errors, incorrect charges, or cancellations after payment. Processing refunds correctly protects your financial records, maintains customer trust, and ensures accurate reporting. This tutorial covers the complete refund process, permissions required, and the crucial difference between refunds and cancellations.
Who this is for: Owners, Admins, Managers, and Receptionists who handle customer complaints and financial corrections.
What you'll learn:
- When to issue refunds vs cancellations
- Processing refunds
- Permission requirements for refunds
- How refunds affect stock and reports
- Cancelling pending transactions
Time to complete: 10 minutes
Prerequisites
Before you begin:
- You must be logged in as an Owner, Admin, Manager, or Receptionist — these roles hold the
refund-transactionspermission. Staff members cannot process refunds. - Complete Tutorial 8.1 (Understanding Transactions and Payment Status)
- The transaction you want to refund must be completed
Step-by-Step Instructions
Step 1: Understanding Refunds vs Cancellations
Refund: Reversing a completed transaction after money has been exchanged.
| Characteristic | Details |
|---|---|
| Original transaction | Completed and counted in revenue |
| Timing | After payment processed |
| Financial impact | Revenue recorded then subtracted |
| Stock impact | Products returned to inventory |
| Who can do it | Owners, Admins, Managers, and Receptionists |
Cancellation: Voiding a pending transaction before completion.
| Characteristic | Details |
|---|---|
| Original transaction | Never completed, no revenue recorded |
| Timing | Before payment finalised |
| Financial impact | No revenue impact |
| Stock impact | No stock change (never decremented) |
| Who can do it | Most roles can cancel pending transactions |
Decision tree:
Transaction completed?
    ├─ No → Cancel the transaction (Step 2)
    └─ Yes → Process refund (Step 3+)
Step 2: Cancelling a Pending Transaction
If the transaction hasn't been completed yet:
- Navigate to Transactions in the sidebar
- Find the pending transaction in the list (use status filter: Pending if needed)
- Click the transaction row to open its details page
- Click the Cancel button (with X icon) in the header — it only appears on pending transactions
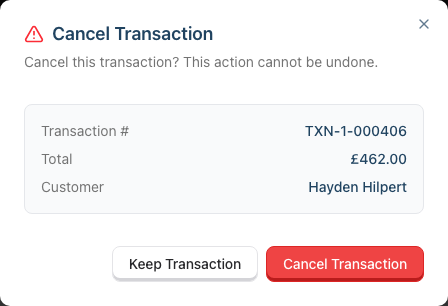
- A confirmation dialog appears - review the transaction number, total, and customer shown
- If cash was taken on the sale (for example a part-payment on a Save (Unpaid) sale), the dialog shows how much cash was taken and asks what you'd like to do with it:
- Hand it back to the customer now — the till records the cash going back out, so the drawer stays balanced
- Keep it in the till — the cash stays on the till record; if you hand it back later, record a payout from the till screen
- Click Cancel Transaction to confirm (or Keep Transaction to back out)
- You return to the Transactions list and see the message Transaction cancelled successfully.
What happens:
- Transaction preserved for audit trail with "Cancelled" status
- Never counted in revenue (was never completed)
- Any appointment the sale was billing is released — it returns to Arrived status and can be re-billed on a fresh sale, or cancelled
- Cash part-payments are handled per your choice in the dialog (handed back and recorded, or left in the till)
- Cannot be uncancelled (create new transaction if needed)
Note on part-paid sales and the till: cash shows on the till record from the moment it's taken — including part-payments on sales saved as unpaid — not only when the sale completes. A mid-day drawer count therefore includes cash held against unfinished sales.
Common scenarios:
- Duplicate transaction created by mistake
- Customer changed mind before payment
- Abandoned Quick POS session
- Incorrect customer selected
Step 3: Checking Refund Permissions
Owners, Admins, Managers, and Receptionists can process refunds. Only Staff members cannot.
If you're a Staff member:
- Note the transaction number
- Note the refund reason
- Contact your Manager, Admin, Receptionist, or Owner
- They'll process the refund
Permission check:
- The Refund button only appears on a completed transaction if you hold the
refund-transactionspermission. Owners, Admins, Managers and Receptionists hold it. - If you're a Staff member, the button is not shown at all — the action is hidden rather than offered and then refused.
- Luminate checks the same permission again on the server when you confirm, so the rule still applies however you reach the page.
Step 4: Locating the Transaction to Refund
From the Transactions page:
- Navigate to Transactions in the sidebar
- Use the filters to find the transaction:
- Search by transaction number (e.g., "TXN-20260120-0001")
- Filter by Customer
- Filter by Staff
- Filter by Status: Completed
- Filter by Payment Status
- Filter by date range (Start Date / End Date)
- Click on the transaction row to open the transaction details page
- Verify it's the correct transaction before proceeding
Before refunding - verify:
- Correct customer name
- Correct transaction amount
- Correct items on transaction
- Refunds cannot be undone
Step 5: Processing a Refund
To refund a completed transaction:
- Open the transaction details page
- Click the Refund button in the header (it appears on completed transactions)
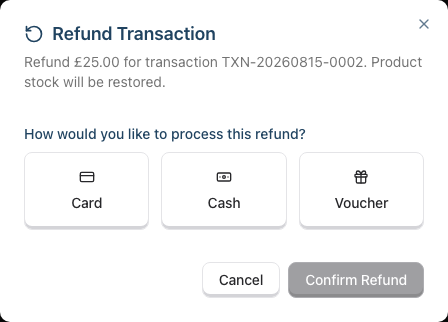
- The Refund Transaction dialog appears, showing the amount of money that will be returned and a note that product stock will be restored. This is the money the customer actually paid on the transaction (cash and card payments, including any tip) — amounts covered by a gift voucher, account credit, or a booking deposit are listed separately because they are not returned as money (see "Mixed payments, vouchers and deposits" below).
- If the sale was paid for by someone else on a combined checkout, an amber note names the payer and tells you to process the refund against their original card or cash payment. Luminate also writes that instruction into the transaction notes.
- Choose how the refund will be given by selecting one of the three method tiles:
- Card - Records the refund against the card. If the original payment was an online (Stripe) deposit, the money is automatically returned to the customer's card. For in-salon card payments, Luminate only marks the transaction refunded — you must process the actual refund on your own card terminal (see the pitfall below).
- Cash - Records a cash refund. A note confirms exactly how much will be recorded as cash out of the drawer.
- Voucher - Coming soon. The tile can be selected but a message asks you to choose Card or Cash, and Confirm Refund stays disabled until you do.
- Click Confirm Refund
- Transaction status changes to "Refunded"
What happens automatically:
- Transaction status changes to "Refunded"
- Revenue subtracted from reports
- Product stock restored (for regular product items)
- Cash drawer updated with the money portion of the refund (if cash refund selected and a drawer is open)
- Refund confirmation email sent to the customer, if the Refund Confirmation notification is switched on for your salon — it states the amount of money actually returned, plus a note about any gift-voucher, account-credit or deposit portions. On a combined checkout the email goes to the person who paid.
- Refund timestamp recorded
Important notes:
- Refunds always reverse the whole transaction — partial refunds are not currently supported. To part-refund a customer, refund the whole transaction and re-bill the items they are keeping as a new transaction.
- Refunds cannot be undone
- Original transaction preserved for records
Mixed payments, vouchers and deposits
A bill can be settled with a mix of cash, card, gift voucher, account credit, and a booking deposit paid in advance. When you refund such a transaction, only the money portion (cash and card payments, including any tip) is treated as returned:
- Gift voucher portion - Not returned as money — instead the redeemed amount is credited back onto the gift voucher, which becomes spendable again. The refund dialog and the customer's confirmation email both state the voucher amount separately.
- Account credit portion - Also not returned as money. The amount goes back onto the customer's account credit balance, ready to spend on their next visit. The refund dialog names the amount so you can tell the customer what to expect.
- Deposit portion - A booking deposit lives in its own deposit transaction, so refunding the final bill does not refund the deposit — it is retained, and the customer's email says so. If the customer should get the deposit back too, you have two routes:
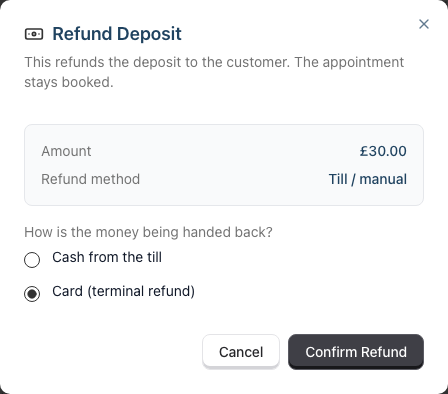
While the deposit is still held on the appointment, click Refund Deposit on the appointment page, in the calendar sidebar's green Deposit Paid alert, or in the action sheet that opens when you tap an appointment on a touch device. The dialog shows the amount and the refund method — Stripe (card) for deposits paid online, or Till / manual for deposits taken at the till, where you also choose Cash from the till or Card (terminal refund). The appointment stays booked. See Tutorial 18.5.
Otherwise, open the original deposit transaction and refund it there.
Group bookings share one deposit transaction, so refunding it refunds all deposits in that transaction. Luminate blocks a single-appointment refund in that case and tells you to cancel all the linked appointments with a refund instead.
- Combined checkout - If someone else paid this bill as part of a combined checkout, the money must go back to them, not to the customer named on the transaction. The refund dialog names the payer, Luminate records the instruction in the transaction notes, and the refund confirmation email goes to the payer.
- Cash drawer - Only the money portion is recorded as cash leaving the drawer. Example: a £100 bill paid £30 voucher + £50 deposit credit + £20 cash records just £20 cash out when refunded.
When a refund is blocked
Luminate refuses a refund outright in three cases, rather than let the salon lose money twice. Nothing changes and no money moves — the reason appears on screen:
- The deposit is already credited to a live bill. You'll see "This deposit has already been applied as credit to bill TXN-… — refund that bill instead." Refunding the bill releases the deposit, which you can then refund on its own. The appointment-level Refund Deposit dialog explains the same thing and offers only Close.
- Account credit the sale added has already been spent. Luminate names the shortfall. Adjust the customer's account credit balance first, then retry the refund.
- The sale was migrated in from another system and its account credit has no ledger entry behind it. Adjust the customer's account credit balance manually instead.
Step 6: Understanding Stock Restoration
When refunding transactions with products:
Automatic stock restoration:
- Refund processed
- System identifies product items in transaction
- Quantities added back to inventory
- Stock levels update immediately
Example:
Original transaction:
- Sold 2x Shampoo bottles (stock decreased from 10 to 8)

After refund:
- 2x Shampoo bottles restored (stock increased from 8 to 10)
Exceptions (no stock restoration):
- Misc products (custom/ad-hoc items) - These don't have inventory tracking
- Service items - Services don't have stock to restore
- Deposit items - Deposits don't involve physical inventory
- Gift vouchers sold - No stock involved. Note: refunding a sale that included a gift voucher purchase automatically voids the sold voucher (while it is still active), so it can no longer be redeemed
Step 7: After Processing the Refund
Customer communication:
- Explain refund processed
- Set expectations for payment return:
- Cash: Immediate (hand cash to customer)
- Card: 3-5 business days (depends on card issuer)
- Apologise if appropriate
- Offer solution if service-related (rebook, different stylist, etc.)
Reporting:
- Refunds appear in financial reports
- Marked clearly as refunded transactions
- Net revenue calculated automatically
Step 8: Viewing Refund History
From the transaction details page:
- Open any refunded transaction
- The status badge next to the transaction number shows Refunded
- The Transaction Information card at the bottom of the Details tab shows a Refunded row with the date and time
- Switch to the Invoice or Receipt tab to see the large REFUNDED stamp with the same date and time — this is what prints and what the downloaded PDF carries
Filtering for refunded transactions:
- Navigate to Transactions in the sidebar
- Use the Status filter dropdown and select Refunded
- All refunded transactions are displayed
- Click column headers to sort (e.g., by Date & Time to see recent refunds)
Common Pitfalls
"I can't see the Refund button"
Only Owners, Admins, Managers, and Receptionists can process refunds, and the Refund button is hidden from everyone else. If you're a Staff member you won't see it at all — ask a Manager, Admin, Receptionist, or Owner to process the refund for you. Check the transaction is Completed as well: a pending sale shows Take Payment and Cancel instead.
"The Refund button is there but Luminate refuses the refund"
Some refunds are blocked on purpose. See "When a refund is blocked" above for the three cases and what to do about each.
"I chose Card but the money hasn't gone back to the customer"
It depends on how the original payment was taken. Online (Stripe) deposit payments are refunded to the card automatically and take 3-5 business days to appear in the customer's account — that's the card issuer's processing time, not Luminate. In-salon card payments are manual in Luminate: choosing Card only marks the transaction refunded, so you must still complete the actual refund on your card terminal. For cash refunds: hand the cash to the customer; the cash drawer is updated automatically.
"Stock wasn't restored after refund"
Check:
- Was the item a regular product? (Misc products don't track stock)
- Did the refund complete successfully?
- Check product stock levels to confirm
"I refunded the wrong transaction"
Refunds cannot be undone. Options:
- If customer should have been charged: Create new transaction for correct amount
- Document the error in notes
- If accidentally refunded wrong customer: Contact customer, explain, request payment
Tips and Best Practices
Always verify before refunding - Double-check customer, amount, and items. Refunds cannot be undone.
Offer alternatives first - Before refunding, consider: Can service be redone? Is a discount more appropriate?
Refund to original payment method - Cash for cash, card for card. Reduces confusion.
Process refunds promptly - Don't leave unhappy customers waiting.
Track refund rate - If refunds exceed 2-3% of revenue, investigate causes.
Use cancellation for mistakes - If transaction not completed yet, cancel rather than complete then refund. Cleaner records.
Related Tutorials
- Tutorial 8.1: Understanding Transactions and Payment Status - Transaction lifecycle basics
- Tutorial 8.3: Gift Vouchers - Selling and Redeeming
- Tutorial 8.4: Deposits and Pre-Payments - Taking and applying deposits
- Tutorial 8.5: Managing Outstanding Balances
- Tutorial 18.5: Collecting Online Booking Deposits with Stripe - Refunding a deposit from the appointment
Frequently Asked Questions
Can I undo a refund?
No. Refunds are permanent once processed. If refunded in error, create a new transaction for the amount.
Do refunds affect staff commission?
Yes. Once a transaction is refunded it no longer counts towards revenue, so any commission earned on the original sale drops out of reports. The exception is a payroll period that has already been finalised or paid — its figures are a frozen snapshot and won't roll back. Luminate flags that period for review, so the payroll report shows a banner, and you make a manual adjustment for the refunded amount in the next open period.
Can I do a partial refund?
No — a refund always reverses the whole transaction. For partial compensation, consider issuing a gift voucher for the difference instead, or refund the whole transaction and re-bill the items the customer is keeping.
The customer paid with a voucher, account credit and/or a deposit — what gets refunded?
Only the money they actually paid on the transaction (cash and card, including any tip). The voucher portion goes back onto the voucher, the account-credit portion goes back onto their account balance, and a booking deposit is retained because it lives in its own deposit transaction — refund that deposit separately if the customer should get it back. See "Mixed payments, vouchers and deposits" above.
How do I refund a transaction from months ago?
Same process as recent transactions. Find the transaction, verify details, process refund. Older refunds work the same way.
What about tax on refunds?
Tax is automatically recalculated. If original transaction included tax, refund reverses the tax as well.
Do refunded transactions disappear from reports?
No. Refunded transactions appear in reports showing the original sale and the refund, with net revenue calculated.
Last Updated: August 2026