
Booking and Managing Appointments
Introduction
Learn how to book appointments for customers, assign staff and services, handle multi-service bookings, and manage appointment status. This tutorial covers creating, editing, and rescheduling appointments using Luminate's appointment system.
Who this is for: Owner, Admin, Manager, Staff, Receptionist What you'll learn:
- Create new appointments from the calendar
- Select customers, staff, and services
- Book multi-service appointments
- Override service prices
- Handle skin test warnings for colour services
- Reschedule using drag-and-drop, cut-and-paste, and copy-and-paste
- Collect a deposit after saving
- Edit, cancel, and delete appointments
- Understand appointment statuses
- Group existing appointments together (or split them apart)
Time to complete: 15 minutes
Prerequisites
- Complete Tutorial 2.1 (understanding the calendar)
- At least one active staff member in your salon
- Services configured in the system
- Customers added to the system (or you can create a new customer on the fly while booking — see Step 2)
Step-by-Step Instructions
Step 1: Access the New Appointment Form
There are several ways to start booking an appointment:
Method 1: Click the New Appointment button
- Navigate to Appointments in the sidebar
- Click the New Appointment button in the top-right corner
- The appointment creation form opens
Method 2: Drag on the calendar
- In Day or Week view, click and drag on an empty time slot
- A What would you like to create? dialog appears offering Appointment ("Length set by the service") and Time Block ("Blocks the time you chose")
- Select Appointment
- The form opens with the date, start time, and staff pre-filled
Note: the length you dragged isn't carried over to an appointment — an appointment's duration comes from the service you pick. Only the start time is used. (Dragging for a Time Block does keep the span you dragged.)
Method 3: From the waitlist
- Navigate to Waitlist and select an entry
- Click Convert to Appointment
- The customer, preferred service, and staff are pre-selected in the form
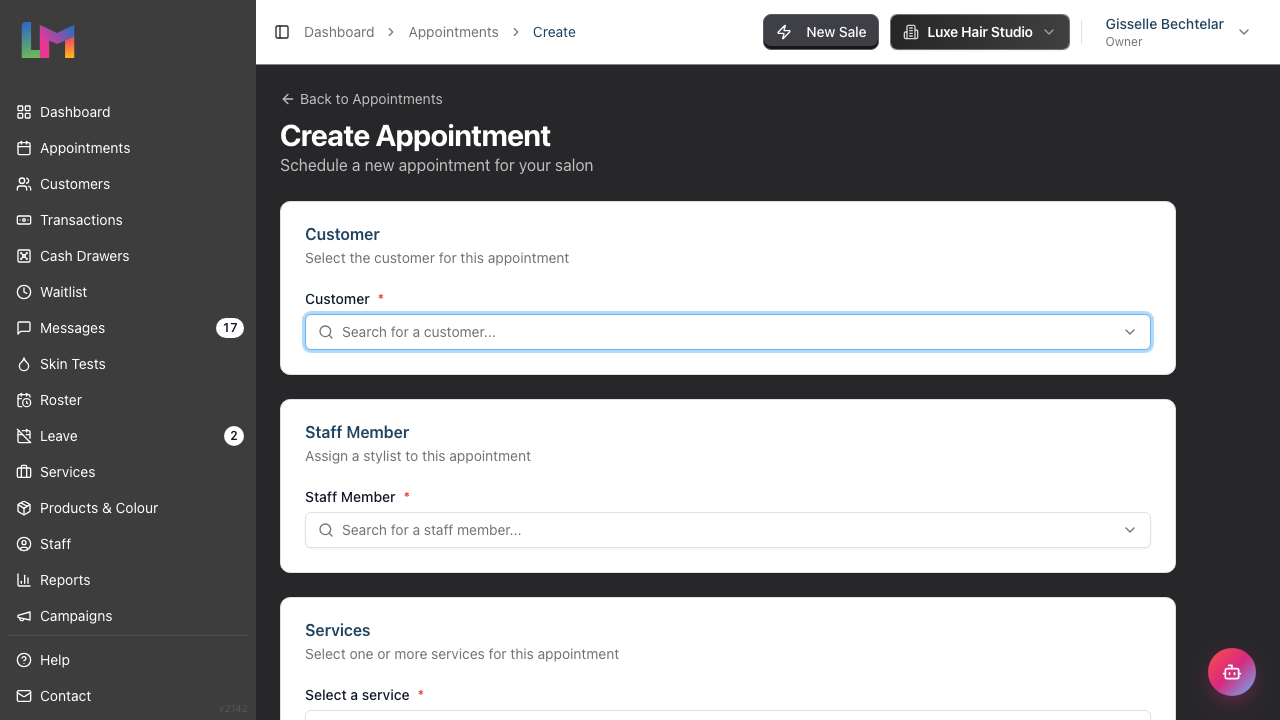
Step 2: Select a Customer
The Customer card appears at the top of the form:
- Click the Customer search field
- Start typing the customer's name
- Select the customer from the dropdown results (showing name and email)
Customer doesn't exist yet? If the typed name doesn't match anyone in your salon, the dropdown shows a Create: "..." option at the bottom. Click it to open a quick-add dialog — enter the customer's first and last name (the only required fields). Phone and email are optional but recommended so the customer can receive appointment reminders. The new customer is selected automatically as soon as you save, and you can fill in their full profile later from Customers > [name].
If the email or phone you enter already matches an existing customer, an amber Possible existing customer panel will appear with a Use this customer button so you can pick the existing record instead of creating a duplicate.
Visit Insights: Once you select a customer, a Visit Insights panel appears below showing four stat cards:
- Last Visit — how long since the customer's last appointment
- Frequency — their average booking frequency (e.g., "every 4 weeks")
- Next Visit — whether a visit is due or overdue
- Total — total number of completed appointments
Services Booked: Below the insights, coloured pills show which services the customer books most often, how many times, and how frequently (e.g., "Balayage 3x every 2 months"). Click a pill to filter the appointment history by that service.
Appointments: A collapsible list of the customer's appointments with an Upcoming / Past toggle to switch direction.
Step 3: Select a Staff Member
The Staff Member card allows you to assign who will perform the service:
- Click the Staff Member search field
- Select from the list of active staff
Roster Indicators:
- Staff who are rostered on the selected date appear normally
- Staff who are not rostered are marked with "(Not rostered)"
Slot availability at a glance: Once a date and time are selected, the stylist list shows each staff member's availability for that exact slot, and re-checks automatically whenever you change the date, time, or services (which change the duration):
- Booked — staff with an overlapping appointment or time block are greyed out and can't be selected, so you never dead-end against the conflicting-time block at save time
- (Not working) — the slot falls outside their rostered shifts; they stay selectable, and picking one shows the roster coverage banner with the override flow described below
- (On leave) — they have approved leave that day; also selectable via the same override flow
Staff who don't offer one of the selected services stay greyed out with "Doesn't offer selected service" as before. When editing an existing appointment, the appointment you're editing doesn't count against its own stylist's availability, and the currently assigned stylist always remains selectable.
If nobody at all is rostered for the time you've chosen, a short amber note appears under the field: "No staff are rostered for this time. You can still create the appointment."
Booking outside a shift (warn-and-confirm): When the slot you've picked falls outside the staff member's rostered shift — or onto a day they have approved leave — a Roster coverage banner appears at the bottom of the Services card explaining what's wrong (e.g. "Sarah is not rostered until 10:00 on this day" or "Jamie is on Annual Leave on this day"). You can adjust the time, date, or staff member to clear the banner, or save anyway — submitting the form will trigger a Roster override dialog asking you to confirm. Cancel returns to the form unchanged; Create anyway saves the appointment and the override is recorded against it.
The same dialog appears when you drag, resize, paste from the clipboard, or rebook into an unrostered slot from the calendar (Tutorial 2.1). Online customer bookings have no override — they're hard-blocked at the public booking step (Tutorial 18.3).
Step 4: Select Services
The Services card lets you choose one or more services:
For a single service:
- Click the Select a service search field
- Search or browse for the service (each option shows duration, processing time, and price)
- Click to add it
For multiple services (multi-service booking):
- Add the first service as above
- Use the Add another service field to add additional services
- Services stack sequentially with processing times automatically applied
- A Booking Timeline appears in the Date & Time card showing how the services are arranged (see Step 5)
Service stack: When you select multiple services, the selector lists them in order, each numbered, with its duration and price on the row. Where a service has processing time, the row underneath reads "+X min processing time before next service". A grey summary bar at the bottom of the list shows the number of services, the total duration, and the total price for the booking. Use the drag handle on a row to reorder services, or the ✕ to remove one.
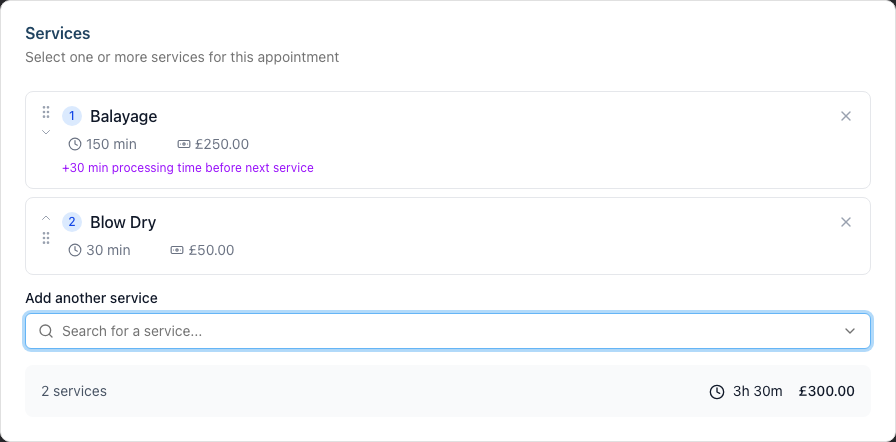
Custom Duration: You can adjust the duration of individual services if needed (e.g., for a more complex cut that needs extra time). When you change a service duration manually, it's flagged as a manual override and is preserved when the appointment is later moved or copied — Luminate won't recompute it from staff-level settings unless you reset the duration.
Staff-level durations: If a service has a per-staff-level duration configured (see Tutorial 4.3), the appointment automatically uses the duration matching the staff member you select. Changing the staff member on the form recalculates the duration unless you've manually overridden it.
Step 5: Set Date and Time
- Use the Start Date picker to select the appointment date
- Use the Start Time picker to set when the appointment begins
- The End Time is calculated automatically based on:
- Service duration(s)
- Processing times between services
The End Time picker is only shown for single-service bookings, where you can type over it to set the end yourself. For multi-service bookings the end is always derived, and the helper text reads "End times are auto-calculated based on service durations and processing times".
Booking Timeline: As soon as you have a start time and at least one service, a Booking Timeline panel appears in this card. It lists each service in order with its start and end time, marks the processing gaps between them, and shows the overall finish time — so you can sanity-check a stacked booking before saving.
Note: If you dragged on the calendar to create the appointment, the date, start time, and staff member are pre-filled.
Step 6: Override Price (Optional)
Back in the Services card (Step 4), each service row shows its price inline, right next to the duration. This works the same whether you booked one service or several:
- Click the price on the service row to edit it
- Enter a custom price to override the default
- When a custom price is set, it shows in blue to mark it as an override
- Click Reset in the price editor to revert to the standard service price
The deposit amount auto-recalculates when you set a custom price.
Remembered prices carry over to the next visit
When you adjust the price for a customer and that price is confirmed — either at checkout or by saving it on the appointment — Luminate remembers it for that customer and service. The next time you book the same service for that customer, the adjusted price is filled in automatically and shown in blue (the same styling as a manual override), so you don't have to re-enter it every visit. It appears blue in the booking form, on the calendar's Service card, and in the edit view.
If the standard price for that service no longer matches what the customer was last charged, the remembered price doesn't silently fall out of step. The next time it would be applied, a Choose a price for this visit prompt appears and offers the same three choices:
- Last price — keep the remembered price (e.g. keep charging £45)
- Standard price — drop the remembered price and charge your current standard price
- Custom price — type a fresh amount
The prompt explains why the standard price differs, so you know what you're deciding:
- You changed your standard price. If you've edited the service's price in settings since the customer was last charged, the prompt tells you the standard price has changed from the old amount to the new one.
- A different-level stylist. If the service is priced differently per staff level and this appointment is with a stylist on a different level than last time (for example, the price was set with a Director and you're now booking a Senior), the prompt explains that the standard price for that level is different and asks whether you still want to apply the customer's usual price. Nothing about your prices has actually changed — it's simply that this stylist's level has its own price for the service.
Whatever you choose becomes the customer's new remembered price going forward. To stop remembering a price entirely, just reset it to default — that clears the memory for that customer and service.
Remembered prices also apply at the till. If an appointment was booked before the customer had a remembered price for that service — so it carries no price of its own — Luminate applies the remembered price as the appointment is sent to the till, rather than charging the standard price. The same Choose a price for this visit prompt appears at checkout if the remembered price differs from the current standard, so you confirm the amount before the transaction is built. (A price you set directly on the appointment always wins; the remembered price only fills the gap when none was set.) Where several services are sent to the till at once, the prompts appear one at a time so each line is decided on its own.
Step 7: Add Notes (After You Save)
The booking form does not take notes. Save the appointment first, then open it and add the note there:
- Open the appointment from the calendar or the appointments list
- Find the Notes card
- Click Add Note
- Type the note and save it
The note is then attached to both the appointment and the customer, so anyone who opens either one can see it. Tutorial 3.7 covers the full notes workflow, including pinning and note types.
Step 8: Configure Deposit (Optional)
If the service requires a deposit:
- Enter the Deposit Amount
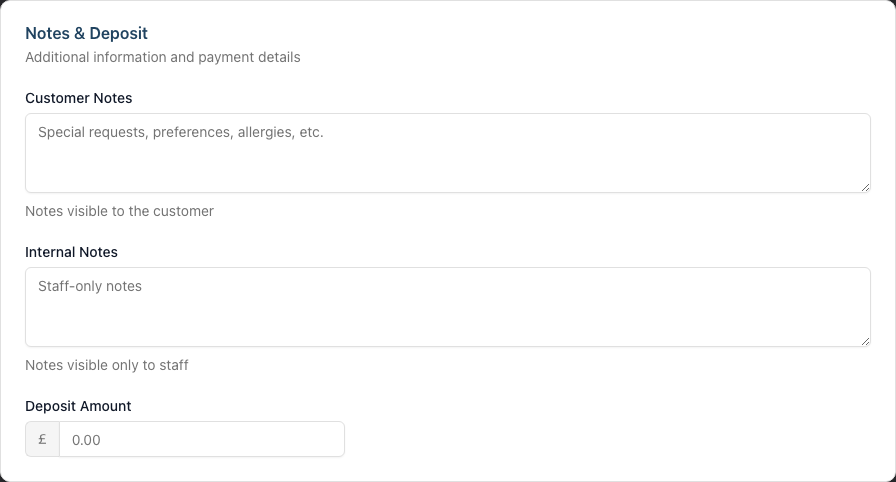
Deposits help reduce no-shows for high-value appointments like colour services. When a service has deposit settings configured, the deposit amount is auto-calculated (either a fixed amount or a percentage of the service price) and the helper text tells you which setting it came from.
For a multi-service booking, the field holds the combined deposit for the whole set, and a Deposit distribution panel underneath shows how that total is split across the individual services.
Note: There is no Deposit Paid checkbox on the create form — you record payment either through the Collect Deposit prompt that appears after saving (see Step 9) or by ticking Deposit Paid when editing an existing appointment.
Step 9: Save the Appointment
- Review all details are correct
- Click Create Appointment (or Create X Linked Appointments for multi-service bookings)
- The appointment appears on the calendar and you're returned to the calendar view
Collecting the deposit: If the appointment needs a deposit, you don't take it on the booking form. As soon as you land back on the calendar, a Collect Deposit dialog opens against the appointment you just saved, offering:
- Send Payment Link — emails or texts the customer a secure payment link. You can adjust each deposit amount in the dialog before sending
- Take at Till — jumps into Quick POS with the deposit ready to charge
- Cancel — closes the dialog and leaves the deposit outstanding; you can come back to it from the appointment's Send Payment Link or Take Deposit buttons at any time
If your salon hasn't set up online payments (Stripe Connect), or the customer has no contactable email/phone, the dialog explains why the link option isn't available and offers Take at Till on its own.
Resolving Multi-Service Booking Conflicts
When you stack multiple services for one customer (e.g. colour + cut + blow-dry), the second and third services land at fixed times after the first. If another customer's appointment (or a time block) occupies any of those windows, Luminate opens a Booking conflict dialog instead of rejecting the whole booking.
The dialog shows the Stacked plan — each service listed in order, with a green tick next to clean slots and an amber warning next to clashing ones. Each clash names the appointment it collides with.
You have two choices in the dialog footer:
- Move to clipboard — moves all the services to your clipboard as amber dashed cards labelled "Awaiting placement". Nothing is booked until you place them: click a card to pick it up, then click a time slot on the calendar to drop it. Each card you place joins the same booking group, so deposit, billing, and reminders behave as if the services had been booked together. (Selected pending cards show the hint "Click calendar to place".)
- Cancel — closes the dialog and leaves the form as it was, so you can change the time, staff member, or services yourself and try again.
Tip: Pending clipboard items behave the same as cut appointments — click one to pick it up, then click anywhere on the calendar to drop it into that slot. Remember to place every parked service; they aren't booked until you do.
Skin Test Warnings
When you book a service that requires a skin test (e.g., colour services), Luminate checks the customer's test history. Depending on your salon's enforcement settings, you may see a warning:
- No valid test / Expired test — An amber warning appears. You can override this with a reason (if your salon allows it) or click Record New Test to add one first
- Test too recent / Awaiting signature — An amber warning explains the issue
- Pending test — An info notice appears with a Record Result button
- Positive allergy result — A red alert blocks the booking entirely. The appointment cannot be created for this customer and service combination
- Expiring soon — A blue info notice lets you know the test will expire before the appointment date
Your salon administrator configures whether these warnings are advisory (can be overridden) or enforced (must be resolved before booking). See Tutorial 11.1 for skin test management details.
Managing Existing Appointments
View Appointment Details
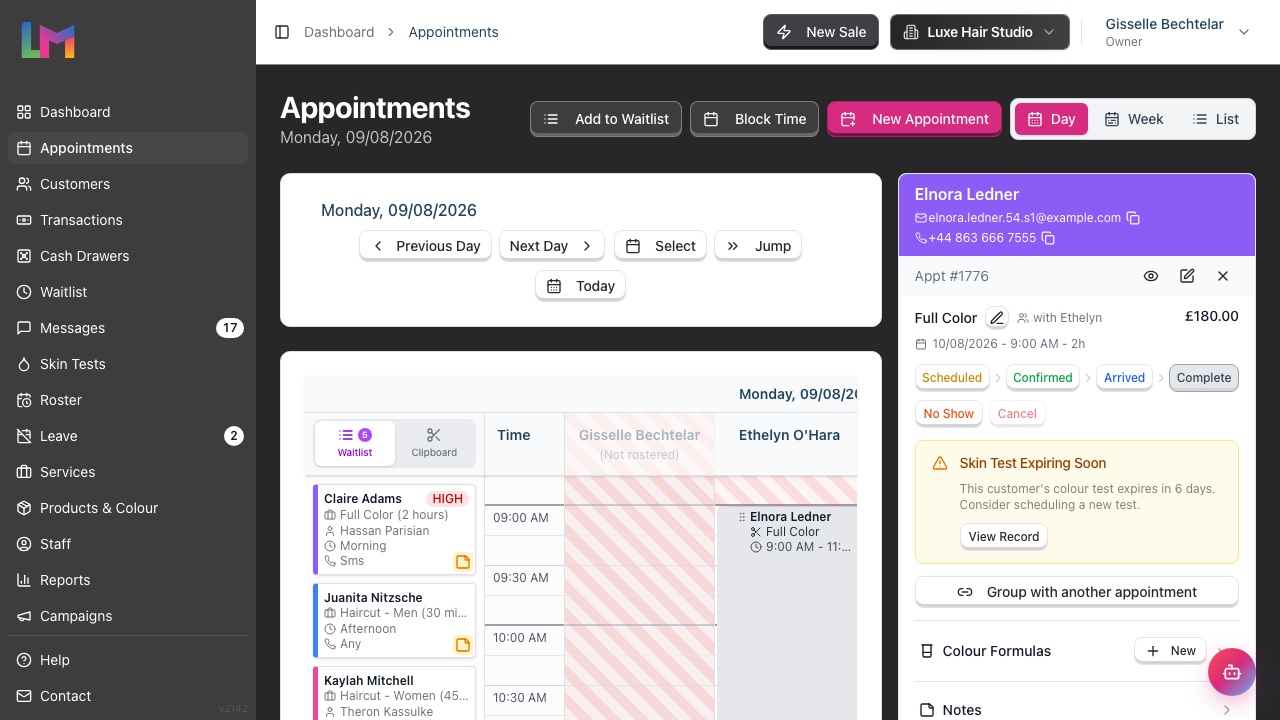
On desktop, clicking an appointment on the calendar opens the right-hand sidebar with a summary and inline actions. To see the full record, click the appointment title in the sidebar (or tap the appointment on mobile) to open the appointment detail page.
The calendar sidebar shows:
- Service card — Service name, staff, date/time, duration, and price. For unbilled appointments, click the pencil icon next to the price to override it inline; click Reset to default to revert to the standard service price.
- Status stepper — Move the appointment through Scheduled → Confirmed → Arrived → Complete (or No Show / Cancel) without leaving the calendar.
- Continue Transaction / Create Transaction — Jumps straight into billing for this appointment.
- Group with another appointment — Tie this appointment to others for the same customer that day so they share status, billing, and rescheduling. Once grouped, the button reads Manage group (N).
- Colour Formulas — Appears when the service is a colour service and your salon's colour mode is Formulas or Full. Shows recent formulas for this customer with a New Formula action. See Tutorials 12.5 and 20.6 for the formula dialog, or Tutorial 20.9 for the tablet-based Colour Bar flow.
- Notes — A condensed view of notes for this customer with a count badge. Click to view, edit, or add notes. Notes are stored in a single Notes table that's shared between the customer profile and the appointment, so anything you record here is also discoverable from the customer's profile, and vice versa.
- Badges — Toggle customer badges (e.g., VIP, Prefers Silence) and appointment badges (e.g., First Visit, Running Late, Special Occasion, Requires Follow-up).
- Payments — Lists transactions linked to the appointment.
The sidebar header shows the customer's name (a link to their profile) with their email address and phone number beneath it — each has a small copy button so you can lift the address or number without opening the customer record. Below that sit three small icons: an eye (view the full appointment detail page), a pencil (open the edit form), and a currency icon (open or continue the transaction). The eye and pencil icons are real links — Cmd-click (macOS) or Ctrl-click (Windows / Linux) opens them in a new tab if you'd rather not lose your place on the calendar.
The appointment detail page header: The header has a row of action buttons, grouped left-to-right by purpose: financial actions first (Take Deposit and Send Payment Link while a deposit is outstanding, Refund Deposit once one has been paid, then Create Transaction / Continue Transaction), then Edit, Group (or Manage group (N) when the appointment is already linked), View on Calendar, then destructive actions (Cancel) last. View on Calendar jumps to the calendar's day view focused on the appointment's date in the salon's timezone, which is useful when you've opened the page from a search result, a customer profile, or the dashboard and want to see what's happening around it.
Buttons appear only where they apply: Cancel is hidden once the appointment is completed or already cancelled, and a cancelled appointment gains a Delete Permanently button instead (see "Delete an Appointment" below).
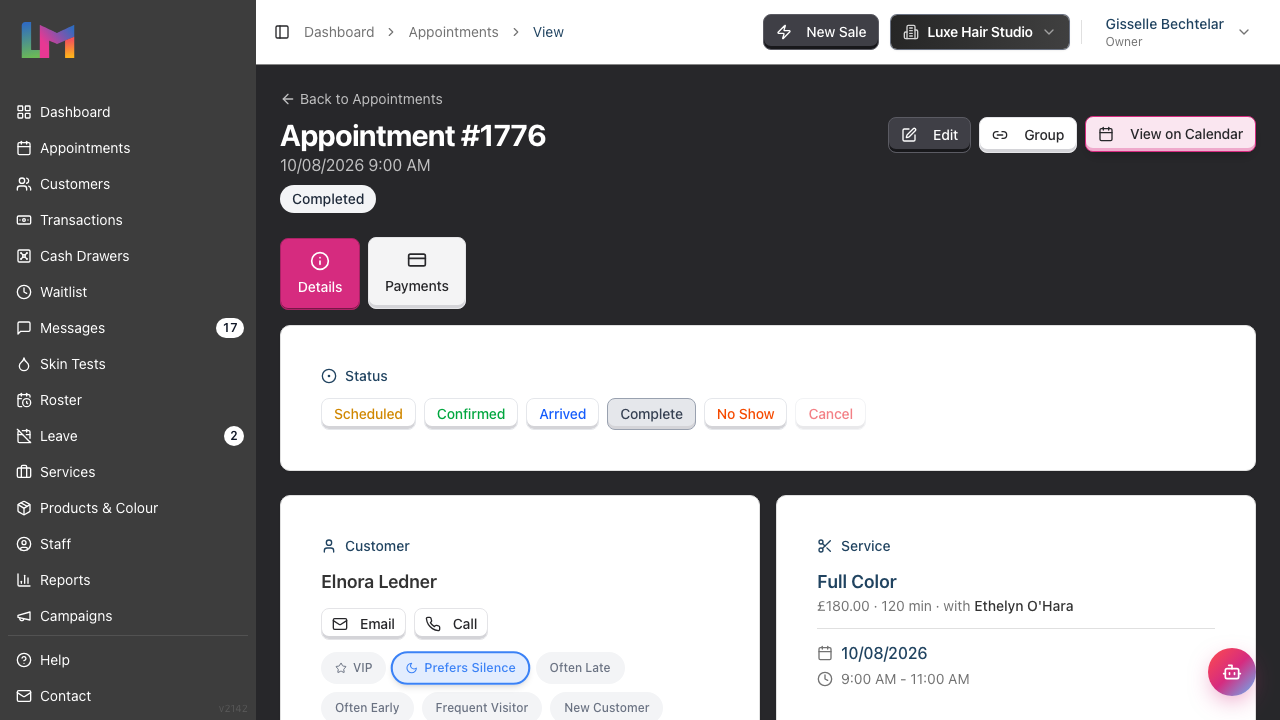
The appointment detail page shows:
- Status card — Clickable buttons to update: Scheduled, Confirmed, Arrived, Complete, No Show, Cancel
- Customer card — Name, Email and Call buttons, customer badges
- Service card — Service name, price (with a Custom badge when overridden), duration, staff member, date, and time range
- Deposit card — Deposit amount and paid status; for overridden deposits a Reset link reverts to the service default
- Appointment Badges — Toggle badges like First Visit, Running Late, Special Occasion, Requires Follow-up
- Colour Formulas — Same panel as above, with a New Formula action
- Notes for [Customer Name] — Notes recorded against this customer, including any pinned to previous appointments, with a General / Colour filter. The Notes panel and the calendar sidebar's Notes panel are the same underlying store.
- Booking Details — Collapsible section with booking reference and timestamps
Editing the price on the calendar sidebar: For unbilled appointments, the price field in the sidebar's Service card is editable. Click it, type the new value, and confirm. A Reset to default link appears whenever a custom price is set, reverting it to the standard service price. This saves you from opening the full edit form for a simple price adjustment.
Edit an Appointment
- Click the appointment to open the detail page
- Click the Edit button (top-right corner)
- Modify the fields as needed
- Click Update Appointment
Reschedule Using Drag-and-Drop
For quick rescheduling:
- Click and hold on the appointment card
- Drag it to a new time slot or staff column. As you hover, the ghost preview shows where the appointment will land — and if the destination staff member has a different level-specific duration, the ghost live-resizes to match
- Release to drop it in the new position
- The appointment updates automatically. The duration adopts the destination staff's level-specific override if one is configured; manually resized appointments keep their custom duration
For linked appointments (multi-service bookings): Dragging one appointment in a linked group moves only that appointment — its linked siblings stay where they are. If the move would break the timing between the linked services (for example, dragging the colour away from the blow-dry that depends on its processing time), a Linked Appointment Constraint dialog appears. It shows the group's timeline with the appointment you're moving marked "(moving)" and explains the clash. Click Move Anyway to proceed regardless, or Cancel Move to leave everything where it was.
On mobile devices: Tap an appointment to open a sheet showing the customer's phone and email (each with a copy button) above the actions View appointment, Edit appointment, Copy appointment, and Cut appointment. Use Edit appointment to change the date, time, or staff member directly. Use Cut appointment to move it via the clipboard (see Cut and Paste below). Drag-and-drop rescheduling is available on desktop and tablet devices.
Cancel an Appointment
- Click the appointment to open the detail page
- Click the Cancel status button
- Confirm the cancellation
What happens when cancelled:
- The appointment status changes to "Cancelled"
- The time slot becomes available for new bookings
- The appointment record is preserved for reporting
Delete an Appointment
Deleting removes the appointment permanently — unlike cancelling, no record is kept.
You have to cancel first. Deleting is deliberately hard to reach: the Delete Permanently button only appears in the header of the appointment detail page once the appointment's status is Cancelled. Cancel the appointment, then use Delete Permanently and confirm in the dialog. In everyday use you should almost never need this — cancelling is the normal way to clear a booking, and it keeps the record for reporting.
Deletion is blocked when money is involved. If the appointment has a paid deposit, has been billed (fully or partially), sits on a draft bill, or is linked to a payment, Luminate refuses the delete and tells you why. Cancel the appointment instead — cancelling keeps the record so deposits stay credited to the customer and billing history stays intact.
Linked appointments: Deleting one appointment from a multi-service booking tidies up the rest of the group automatically — the remaining appointments are renumbered, and if only one is left it becomes a normal standalone booking. Reminders are adjusted so the customer still receives a single reminder for the group.
Cut and Paste Appointments
The clipboard holds items that can be placed on the calendar by clicking a time slot. There are two types of clipboard item:
- Cut items (amber) — existing appointments you've cut for rescheduling
- Rebook items (blue) — new appointments created from the rebook prompt after completing a transaction (see "Rebooking from a Transaction" below)
Cut-and-paste lets you move appointments to a different date, time, or staff member. Unlike drag-and-drop, cut-and-paste lets you navigate to a different day or week before choosing where to place the appointment.
Cutting an appointment:
On desktop: Hover over an appointment card on the calendar and click the Cut appointment (scissors) button that appears on the card.
On mobile: Tap the appointment card. A sheet appears with View appointment, Edit appointment, Copy appointment, and Cut appointment. Tap Cut appointment.
The appointment moves to the Clipboard panel in the left sidebar.
Linked appointments: If the appointment is part of a multi-service booking, a dialog appears asking whether to cut all linked appointments or just the one you clicked. Choose Cut All [N] Appointments to move them together, or Cut Only This One to move a single appointment.
Pasting from the clipboard:
- Open the Clipboard tab in the left sidebar to see your cut items
- Click a clipboard item to select it -- the card highlights with an amber border and shows "Click calendar to paste"
- Move your mouse over the calendar -- a ghost preview appears showing where the appointment would land. If you hover over a different staff column with a different level-specific duration for the service, the preview live-resizes to match
- Click the desired time slot and staff column to paste the appointment there
- The appointment moves to the new position. If the destination staff member has a level-specific duration override for the service, the pasted appointment adopts that duration. If you'd manually resized the appointment before cutting, that custom duration is kept regardless of who you paste it onto
Overlap is blocked: If the slot you click is already occupied, the paste is refused and a message appears ("Can't paste here — overlaps with [name]."). Pick an empty slot instead — pasted appointments can't be double-booked on top of an existing one. (If the gap is only slightly too small for the appointment, Luminate instead offers to shrink the appointment to fit the space.)
Cancelling a cut: To cancel a cut and return the appointment to its original position, hover over the clipboard card and click the X button (on desktop), or tap the clipboard card and tap the X button (on mobile).
Copy and Paste Appointments
Copy is the non-destructive sibling to Cut. Use it when you want to duplicate an appointment elsewhere — for example, the customer wants the same combination next month — without disturbing the original. The copied card sits on the clipboard alongside any cut items and is also amber; what tells them apart is the badge icon (a copy icon rather than the scissors used for cut items) and the small COPY label on the card.
Copying an appointment:
On desktop: Hover over an appointment card on the calendar and click the Copy appointment button (paired with the existing scissors icon).
On mobile: Tap the appointment card. The popup menu includes Copy appointment alongside View / Edit / Cut. Tap it.
The original appointment stays exactly where it was. A new entry appears in the Clipboard panel.
Pasting from a copy:
- Open the Clipboard tab in the left sidebar — copied items carry the copy icon and a COPY label, distinct from cut items (scissors icon) and rebook items (calendar icon, blue)
- Click a copied clipboard item to select it — the card highlights and shows "Click calendar to paste copy"
- Click the desired time slot and staff column — a new appointment is created at that slot carrying the original's customer, service, duration, notes, custom price, deposit amount, and badges; the original is untouched
- Pasting uses the copy up. The clipboard entry is removed once the new appointment is created, so copy the appointment again if you want a second duplicate. To abandon a copy without pasting it, click the X button on the clipboard card.
Linked appointments: As with Cut, copying a multi-service booking prompts you to choose between Copy All [N] Appointments and Copy Only This One. Note that copying all of them puts each one on the clipboard as its own separate card, and the appointments you paste are standalone bookings — they do not come out linked to each other the way the original set was. If you need the copies to behave as one visit, group them afterwards (see "Grouping Existing Appointments" below).
Roster override: Pasting a copy into an unrostered slot triggers the same Roster override dialog as Cut and Rebook — the override applies to the new appointment, not the original.
Rebooking from a Transaction
After completing a transaction in Quick POS, you're prompted to rebook the customer's next appointment (see Tutorial 2.4, Step 12). When you choose a rebook date, you're taken to the calendar with rebook items on the clipboard. Here's how to use them.
How rebook items appear:
- Rebook items appear as blue cards on the Clipboard tab (the tab opens automatically)
- Each service from the transaction becomes a separate rebook item
- The first item is auto-selected, ready for booking
Rebook items vs cut items:
| Cut Items | Rebook Items | |
|---|---|---|
| Colour | Amber border | Blue border |
| Icon | Scissors | Calendar |
| Hint text | "Click calendar to paste" | "Click calendar to book" |
| Action | Moves an existing appointment | Creates a new appointment |
| Overlap check | Warns about conflicts | No overlap warning |
Choosing where to start: the "Book from" date
You decide when the next visit should fall in the Rebook Appointment dialog — the prompt that opens from the completed transaction (see Tutorial 2.4, Step 12), before you reach the calendar. That dialog has a Book from date picker (set to today by default, but changeable to any date — e.g. the customer's preferred next-visit date) and a row of week quick-buttons: 1, 2, 3, 4, 6, 8, 10, 12, 14 and 16 weeks.
The week buttons count forward from the chosen "Book from" date, not from today. So if you set "Book from" to 1 June, the 8 weeks button targets late July. Once you pick a button, the dialog confirms the result under Selected date. This is much faster than navigating week-by-week when the next visit is far ahead, or when you're rebooking several customers in a row each with different intervals.
If none of the intervals fit, use the Or pick a date picker beneath them to name the target date outright — choosing a date there clears any selected week button, and vice versa. Click Proceed to calendar to go through to the right week with the rebook items waiting on the clipboard, or No thanks to dismiss the prompt without rebooking.
Reviewing existing future appointments before placing one:
The same Rebook Appointment dialog lists the customer's existing upcoming appointments, grouped by day under each date heading (with a count beside the section), so you can see at a glance whether they already have something around your target date before you commit.
Booking a rebook item:
- The clipboard opens with the first rebook item selected (blue highlight with "Click calendar to book")
- The calendar is already on the week you chose in the Rebook Appointment dialog — navigate to a different day or week first if you need to
- Click a time slot on the calendar — the appointment is created directly, no form needed
- The calendar updates in place — you don't need to refresh the page to see the new appointment. The card appears in the slot you clicked, and the clipboard advances to the next item automatically
- Repeat until all services are booked
Multi-service rebooking:
- Each service is booked as a separate appointment
- All appointments from the same rebook are linked together (via a booking group) so they move as a set if rescheduled later
- A "+X more services" indicator appears on the clipboard card when multiple services are queued
Dismissing a rebook item: If you don't want to book a particular service, hover over the rebook card and click the X button to dismiss it.
Roster override on rebook: If the slot you click falls outside the staff member's roster, the Roster override dialog appears just as it does for new bookings (see Step 3 above). Confirm to place the appointment with an override recorded, or cancel and pick a different slot.
On mobile: A blue indicator bar appears at the bottom of the screen showing "Tap calendar to book [Customer Name]". Tap any time slot to create the appointment.
Tip: After completing a transaction in Quick POS, the rebook flow makes scheduling the next visit fast — in the Rebook Appointment dialog set "Book from" to the date the customer is targeting and hit the relevant week button, then click a slot on the calendar. No form, no manual refresh.
Understanding Appointment Statuses
Appointments move through these statuses:
| Status | Description |
|---|---|
| Scheduled | Default status when created |
| Confirmed | Appointment has been confirmed by the customer |
| Arrived | Customer has arrived at the salon |
| Complete | Service has been finished |
| Cancelled | Appointment was cancelled |
| No Show | Customer didn't arrive |
Billing Status: Appointments also track billing status:
- Unbilled - Not yet invoiced
- Partial - Partially billed
- Billed - Fully invoiced
Status change rules:
Most status changes are open — staff correct honest mistakes all the time — but a few are guarded:
- A completed appointment can never be cancelled. If the customer needs their money back, process a refund through the till instead.
- A billed appointment keeps its status until it's removed from the transaction (or refunded). Un-completing an appointment that's already been billed would leave the books claiming a service that's no longer marked as delivered.
- Un-cancelling re-checks the diary. Cancelling frees the slot, so another booking may have taken it. If you move a cancelled appointment back to Scheduled (or any live status) and the slot is now occupied, you'll see the usual conflict error; if the staff member is no longer rostered at that time, the Roster override dialog appears, just like when booking.
- Group status changes leave cancelled appointments alone. Marking a linked group as Arrived (or any other status) skips members that were individually cancelled — they stay cancelled. Likewise, cancelling a group skips any member already completed.
Grouping Existing Appointments
Sometimes you only realise after booking that two or three of a customer's appointments today should be treated as one visit — for example, they added a service mid-chair, or you booked a colour and a cut as separate appointments by accident. Grouping ties them together so they share status, billing, and rescheduling.
What grouping changes
When two or more of the same customer's appointments are in a group:
- Marking one as Arrived/Completed/etc. offers to move the whole group at once
- Creating a transaction can bill the whole group on one invoice
- Dragging one to a new time can move the others with it
- Cutting/copying offers an "all or just this one" choice on the clipboard
The customer sees no change — they still see one booking with multiple services in their account and confirmation emails.
Group two appointments together
- On the calendar, click the appointment you want to group from. The sidebar opens on the right.
- Below the status stepper, click Group with another appointment.
- The dialog lists the customer's other appointments today. Tick the one(s) you want to group with.
- Click Group together (or Add to group if this appointment is already grouped).
If you tick an appointment that's already part of a different group (e.g., the customer's friend already booked them as a multi-service), the dialog warns you it will merge two groups into one before you confirm.
Manage an existing group
If the appointment you opened is already part of a group, the button reads Manage group (N) and the dialog opens on a list of all members. From there you can:
- Add another appointment — surfaces the same picker so you can grow the group
- Remove this from group — detaches the current appointment only, leaving the rest grouped (if only one is left, it also becomes standalone — a "group of one" doesn't make sense)
Where to find it
The same Group button is on:
- The calendar's right-hand sidebar when an appointment is selected, labelled Group with another appointment
- The appointment detail page header (between Edit and View on Calendar), labelled just Group
On both surfaces the label changes to Manage group (N) once the appointment is part of a group.
Limits
- Only same-customer appointments can be grouped — to combine two customers' bookings (e.g., a parent and child arriving together) book them as a multi-service from the start
- Only same-day appointments are offered as candidates — for cross-day pairings (a colour test today, the colour service next week) keep them as separate appointments
- Cancelled appointments are hidden from the picker
Common Pitfalls
"The customer I want isn't appearing in the search"
Check your spelling and try a partial match (first name, last name, phone, or email). If they really aren't on file yet, click the Create: "..." option at the bottom of the dropdown to add them inline without leaving the booking flow — first and last name are the only required fields. You can also add them up front from Customers > Add Customer if you'd rather capture their full profile first.
"The staff member shows (Not rostered)"
The staff member doesn't have a shift on the selected date. You can still book them, but consider checking the roster or selecting a different date.
"My multi-service booking times don't look right"
Processing times are automatically added between services. Check the service stack and the Booking Timeline in the Date & Time card — the selector lists each chosen service with its duration, price, and any processing-time note, and the totals bar at the bottom shows the overall duration. Adjust individual service durations if needed.
"I moved an appointment but the linked services didn't move"
That's expected — dragging one appointment in a linked group moves only that appointment; the linked services stay where they are. Move each one individually. If the timing between them ends up wrong, you'll see a Linked Appointment Constraint warning — choose Cancel Move to undo it and reschedule the whole set instead.
"A skin test warning is blocking my booking"
If a colour service requires a skin test and the customer doesn't have a valid one, Luminate may warn or block the booking depending on your salon's enforcement settings. You can record a new test, override the warning (if permitted), or choose a non-colour service.
Tips and Best Practices
- Check Visit Insights - The stat cards show the customer's booking frequency and whether they're overdue for a visit
- Use service frequency pills - Click a pill in the customer history to quickly see when they last had that specific service
- Use processing times wisely - For colour services, processing time allows you to book another client in between
- Add internal notes for allergies - Record any sensitivities or preferences staff need to know
- Take deposits for colour appointments - Reduces no-shows on high-value services
- Override prices when needed - Click the price on a service row to adjust it for special promotions or complex services without changing the service catalogue
- Use the clipboard for complex rescheduling - Cut the appointment, navigate to the target date, select the clipboard item, then click on the calendar to paste
- Keyboard shortcuts pause on forms - Global nav shortcuts (
d,a,w,t) are automatically suppressed on Create/Edit/Settings pages and when any dialog or sheet is open, so typing into an appointment form won't accidentally jump you to another screen. They re-enable as soon as you close the form.
Related Tutorials
- Tutorial 2.1: Managing Your Appointment Calendar - Understanding the calendar views
- Tutorial 2.3: Working with the Waitlist - Managing customers waiting for appointments
- Tutorial 2.4: Processing Transactions - Billing completed appointments (including the colour overage line)
- Tutorial 4.3: Staff Levels and Experience Tiers - Where per-level durations and prices are configured
- Tutorial 5.1: Setting Up Your Weekly Roster - See "Booking Outside a Shift" for the override rules
- Tutorial 11.1: Colour Test Management - Recording and interpreting skin tests
- Tutorial 12.5: Colour Formulas - Record a formula from the appointment detail page
- Tutorial 18.3: The Customer Booking Experience - Why online bookings are hard-blocked outside a roster
- Tutorial 20.6: Creating a Colour Formula - The formula dialog in detail
- Tutorial 20.9: Colour Bar Overview and Setup - The tablet-based flow for colour appointments
Frequently Asked Questions
Can I create a customer while booking an appointment?
Yes. If the customer search doesn't return a match, the dropdown shows a Create: "..." option that opens a quick-add dialog — enter first and last name (the only required fields), optionally add phone and email, and the new customer is selected automatically when you save. You can fill in the rest of their profile later from Customers > [name].
How do I book the same staff member for the whole multi-service appointment?
When you select a staff member, they are assigned to all services in the appointment. You cannot assign different staff to different services within the same appointment.
What happens if I book during a time someone else is already booked?
You mostly won't get that far — once you've chosen a date and time, any stylist with an overlapping appointment or time block is greyed out in the Staff Member list. If a clash does slip through (for example the slot was taken while you were filling in the form), a Scheduling Conflict dialog appears with a Choose a Different Time button. Luminate won't double-book a stylist, so you'll need to move the appointment or pick someone else. For a multi-service booking where only some of the services clash, you get the Booking conflict dialog instead — see "Resolving Multi-Service Booking Conflicts".
Can I resize an appointment to change its duration?
Yes, in the calendar view you can drag the bottom edge of an appointment card to extend or shorten its duration.
How do processing times work?
Processing times (e.g., for colour development) are set on each service. When booking multiple services, processing time is automatically added between services where the previous service has processing time configured.
Can I change the price of an appointment after it's been created?
Yes, for unbilled appointments you can edit the price directly from the appointment detail page. Once an appointment has been billed (linked to a transaction), the price can no longer be changed.
What happens if a customer has a positive skin test result?
If a customer has recorded a positive allergic reaction to a skin test, Luminate blocks the booking entirely for any service that requires a skin test. This cannot be overridden — the customer should be offered alternative services that don't require a skin test.
Last Updated: August 2026 Verified against Luminate codebase: August 2026 (form card order corrected to Customer → Staff Member → Services → Date & Time; post-save Collect Deposit dialog replaces the old "Save & Take Deposit" button; delete is now Delete Permanently on a cancelled appointment only; copy-paste no longer claimed to be repeatable or to keep the booking-group link; per-slot stylist availability, Booking Timeline, level-aware durations, multi-service conflict resolution and the rebook dialog re-checked against the live components)