
Processing Transactions
Introduction
The Point of Sale (POS) system lets you process payments for services and products. This tutorial covers creating transactions from appointments, processing walk-in sales, accepting different payment methods, and completing transactions.
Who this is for: Owner, Admin, Manager, Staff, Receptionist What you'll learn:
- Access the Point of Sale
- Create transactions from appointments
- Add services and products to a sale
- Apply discounts and tips
- Process payments (cash, card, gift voucher, account credit)
- Handle split payments
- Select the correct till for cash payments
- Understand the automatically staged colour overage line
- Swap or remove appointment services at the till and sync the calendar
- View gift voucher details after purchase
- Rebook the customer's next appointment after payment
Time to complete: 15 minutes
Note: Transactions are created and edited in Quick POS only (no separate create/edit screen).
Prerequisites
- Services configured in the system
- Products configured (if selling retail)
- Cash drawer opened (if accepting cash payments - see Tutorial 2.5)
- Staff assigned to the transaction items
Step-by-Step Instructions
Step 1: Access the Point of Sale
Using the keyboard shortcut (quickest):
- Press t on your keyboard from any page (when not typing in a form field)
- The Quick POS interface opens immediately
From the header:
- Click the New Sale button in the top-right corner of the app header (visible on every page)
- The Quick POS interface opens immediately
From the navigation:
- Click Transactions in the sidebar
- The transaction list appears
- Click New Sale in the top-right corner
- The Quick POS interface opens
From an appointment:
- Click on an appointment in the calendar
- Click Create Transaction on the appointment detail page. The same button appears in the calendar sidebar once you've marked the customer as Arrived
- Quick POS opens with the customer and service pre-filled
From a linked appointment (multi-service booking): If the appointment is part of a linked group (e.g., a cut and colour booked together), a Linked Appointments dialog appears when you click Create Transaction:
- The dialog tells you the appointment is part of a group of X linked appointments
- Choose one of two options:
- All X Appointments — loads all linked services into the cart at once
- This Appointment Only — loads just the single service you clicked on
- Quick POS opens with the selected appointments pre-filled, including correct staff assignments and any level-based pricing
Remembered prices apply as the appointment enters the cart. If the customer has a remembered price for a service but the appointment carries no price of its own (for example, it was booked before that price was remembered), Luminate fills in the remembered price here rather than the standard one. If it differs from the current standard price, a Choose a price for this visit prompt asks you to confirm the amount before the line is added — see Tutorial 2.2 for how remembered prices work.
If a draft transaction already exists for the linked group (e.g., someone started but didn't finish), the dialog buttons change to Continue Transaction (All X) and Continue Transaction (This Only), so you can pick up where you left off.
Tip: For multi-service bookings, choosing "All Appointments" saves time — all services, staff, and prices are loaded into one transaction automatically.
Step 2: Select a Customer
- Click the Customer search field at the top of the POS
- Start typing the customer's name
- Select from the dropdown results
- Their name appears in the customer field
What happens when you select a customer:
- Their unbilled appointments appear in the Unbilled Appointments panel above the item tabs
- You can click an appointment to add it to the cart, or click Add All to Cart to add all unbilled appointments at once
- You can click Take Deposit on an appointment to process a deposit payment
- Their contact details are available for receipts
Step 3: Add Items to the Cart
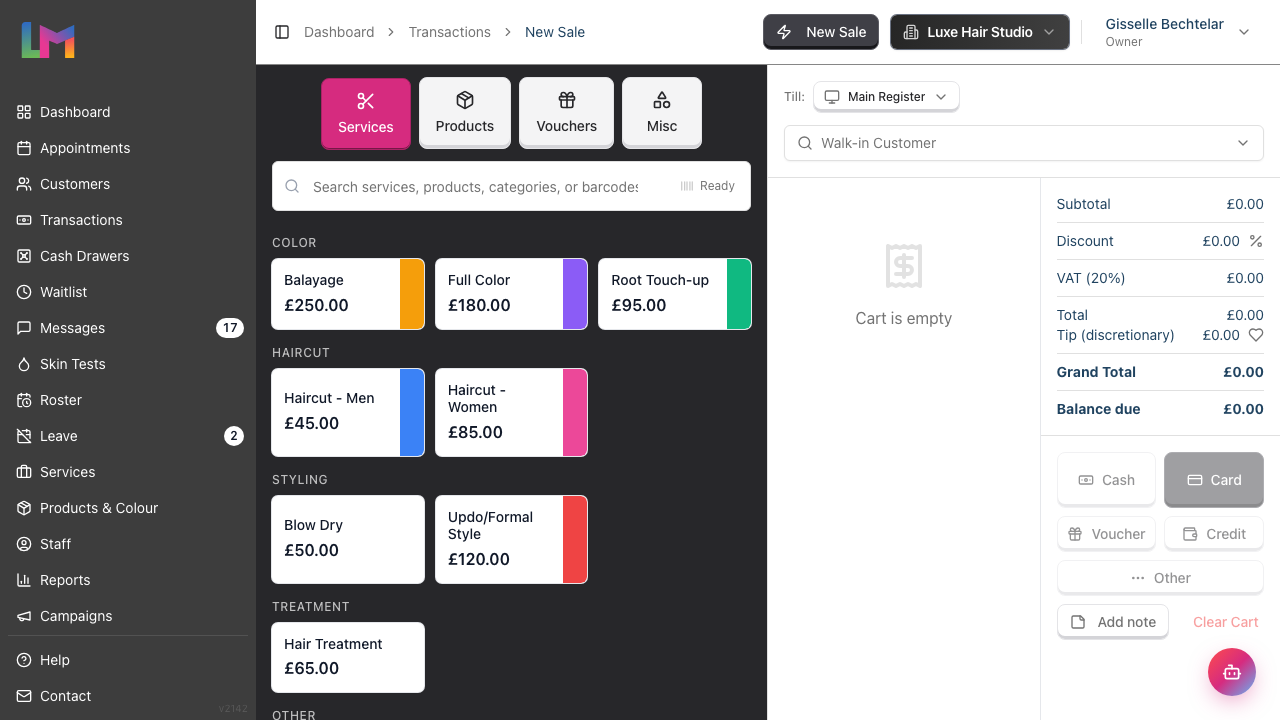
The POS has four tabs for adding items — Services, Products, Vouchers and Misc:
Services Tab:
- Services are organised by tag (e.g., Color, Haircut, Styling, Treatment)
- Click a tag to expand and see services in that category
- Use the search field to find specific services
- Click a service to add it to the cart
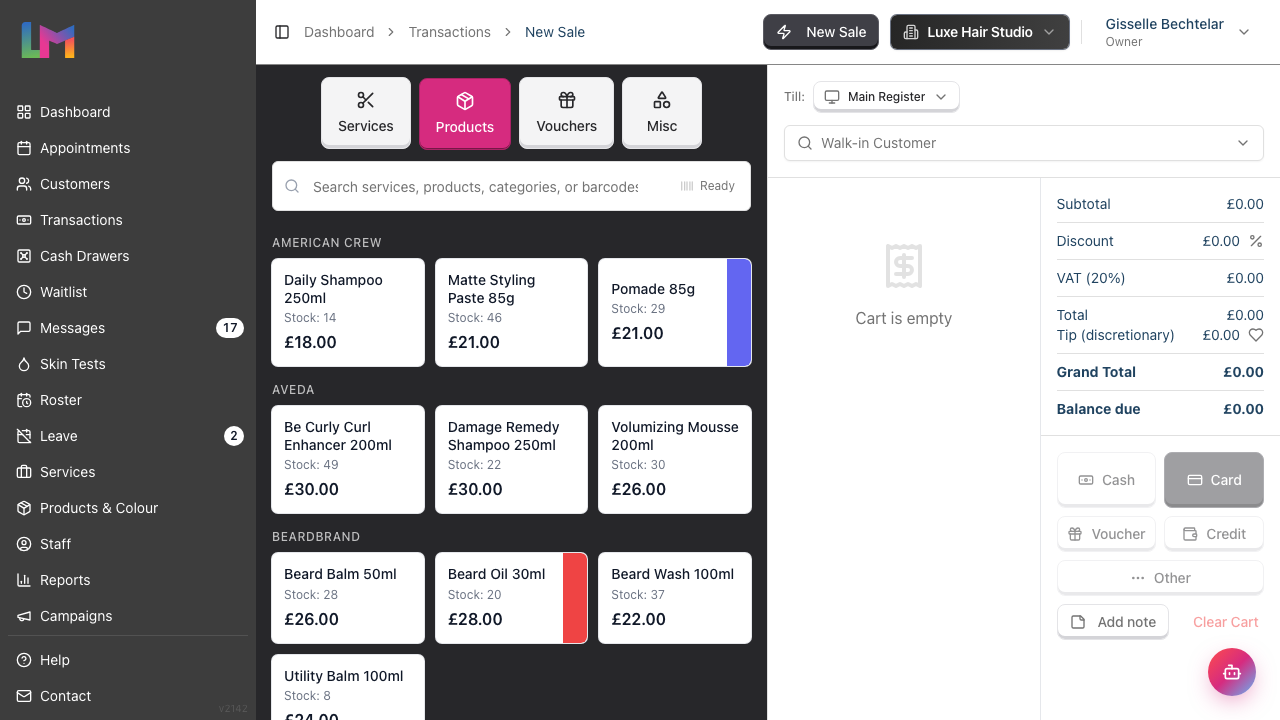
Products Tab:
- Products are organised by brand
- Each product shows the available stock count
- Use the search field to find specific products
- Click a product to add it (quantity 1)
- Use + and - buttons to adjust quantity
Vouchers Tab:
- Sell gift vouchers to customers
- Choose from preset amounts (£25, £50, £100, £150, £200, £250) or enter a custom amount
- The valid value range is displayed (e.g., £5 - £500)
- Enter recipient details (if required by your settings)
Misc Tab:
- Add miscellaneous products with custom names and prices
- Useful for one-off items not in the system
- An Account Credit section at the bottom of this tab holds the Account Credit Top-up card. Select a customer first, then click it to sell them credit that lands on their balance for future visits. The card is unavailable while you're editing an existing sale, on a combined sale, when a discount is applied, or when account credit is already being used to pay — the card's subtitle tells you which of these is blocking it.
Adding from Unbilled Appointments: When a customer has unbilled appointments:
- Select the customer
- Their unbilled appointments appear in the Unbilled Appointments panel above the tabs
- Click an appointment to add it to the cart, or click Add All to Cart
- The service and staff are automatically assigned
Step 4: Review the Cart
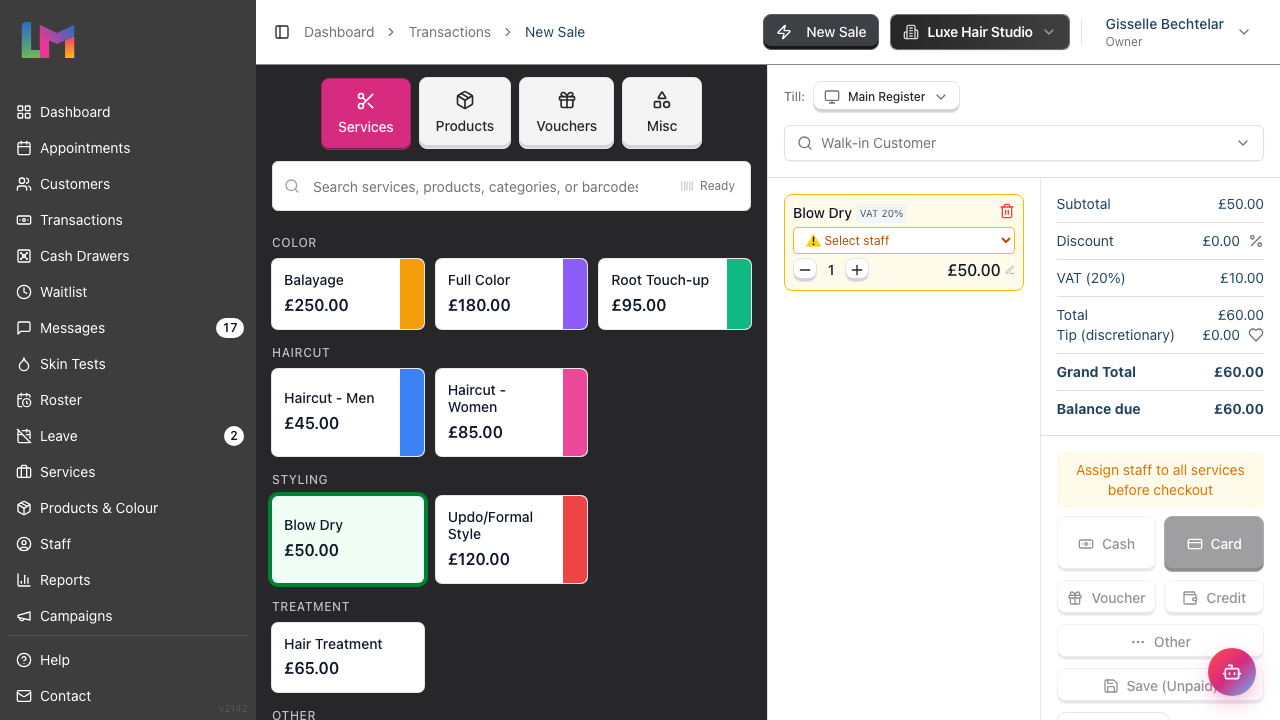
The cart panel on the right shows:
- All items added to the sale
- Staff assignment for each service
- Quantities for products
- Line item prices
For each item you can:
- Adjust quantity (products)
- Assign/change staff member (services)
- Change the price (click the price to edit it inline)
- Remove the item (click the trash icon)
Every service needs a staff member before you can take payment. A service line with nobody assigned is highlighted in amber and its staff dropdown reads ⚠️ Select staff. While any service is unassigned, the message Assign staff to all services before checkout appears above the payment buttons and every payment method stays greyed out.
Swapping or removing an appointment service:
When a cart line came in from an appointment, a faint pencil appears next to the service name and hovering it shows Click to swap service. You can update what's actually being billed without breaking the link to the original calendar entry:
- Swap the service — Click the service name to open an inline Search services… box. Type to filter and click the replacement service. The line is updated in place — the price refreshes to the new service's price for the assigned stylist's level — and stays linked to the same appointment, so the change can be confirmed against the calendar at finalise time.
- Remove the service — Click the trash icon on the line. The line comes off the cart, but the original appointment isn't cancelled yet — that's also confirmed at finalise.
Services the assigned stylist doesn't offer are listed but greyed out, with Not offered by selected stylist on hover. Swapping to a service that requires a skin test is also blocked at finalise if the customer has no valid test on file — see Tutorial 11.1.
When you finish the sale, if the cart no longer matches the calendar (because of swaps or removals), a Calendar Sync confirmation dialog appears so you can choose whether to update the calendar in line with the till. See Step 11 for the full flow.
Colour overage lines (Full mode only): If the appointment has a finalised colour formula that used more than the service's included colour grams, an emerald-tinted Colour overage line appears in the cart with a beaker icon. This line is staged automatically by the colour formula — you don't add it manually.
You can't edit or remove it at the till. In place of the usual trash icon the line shows a padlock, and hovering it explains why: "Colour overage is calculated from the weighed formulas and cannot be edited here." The price isn't editable either. This is deliberate — the amount is derived from what was actually weighed out, and a change made here would never reach the server, leaving the till's total disagreeing with the recorded sale.
To change the amount, change the thing that produces it:
- Ask the colourist to adjust or Revert the formula (see Tutorial 12.5). The cart line follows along and updates in real time, or disappears entirely if the formula is reverted
- To take the charge off a single visit, reverting the formula is the route — there's no waive button on the line
- If you click Abandon on the draft, a message confirms that any colour overage will re-apply to the next transaction for that appointment. Abandoning is not a way to drop the charge
- Once the transaction is completed, the charge is committed and the formula becomes read-only. Correcting it then means refunding the sale and re-billing (Tutorial 8.2)
See Tutorial 20.8 for how overage pricing is calculated and why a formula might or might not produce a line item.
Totals displayed:
- Subtotal
- Exempt items and Taxable amount (shown only when the cart mixes taxable and exempt items)
- Discount (click to apply, update, or remove)
- Net (after discount) — shown only when a discount is applied
- Tax — labelled with your salon's tax name and rate (e.g., "VAT 20%")
- Total — running total before tip
- Tip (discretionary) — click the heart icon to add or update
- Grand Total
Once payments are recorded, additional lines appear:
- Less: Deposit (if appointments had deposits paid)
- Less: [Payment method] for each payment applied
- Balance due (remaining amount owed)
- Change due (if cash tendered exceeds the balance)
Step 5: Apply Discounts
To apply a discount:
- Click the discount amount (shows £0.00 by default) in the totals section
- A discount modal opens with two tabs:
- Percentage (%) — Enter a percentage discount
- Fixed (£) — Enter a fixed amount discount
- Use a quick percentage button (5%, 10%, 15%, 20%) or enter a custom value
- Click Apply (or Update if changing an existing discount)
- The cart total recalculates automatically
To remove a discount, open the discount modal and click Remove.
Discount is applied to the entire transaction, not individual items.
Step 6: Add a Tip
If the customer wants to add a tip:
- Click the tip amount (shows £0.00 with a heart icon) in the totals section
- A tip modal opens with:
- Quick percentage buttons: 10%, 15%, 20%, 25%
- A field to enter a custom amount
- Select a quick percentage or enter a custom amount, then click Add Tip
- The tip appears in the cart totals
To change a tip you've already added, click the amount again — the button now reads Update Tip, and a Remove button appears alongside it to clear the tip entirely.
Tips are tracked separately from service revenue and attributed to the staff member(s) on the transaction.
Step 7: Add Notes
To add notes to the transaction:
- Click the Add note button below the totals
- Enter any relevant information in the Add Note modal
- Click Save Note
- Notes appear on the transaction record
Step 8: Select Your Till (If Applicable)
If your salon has multiple cash drawers with open sessions:
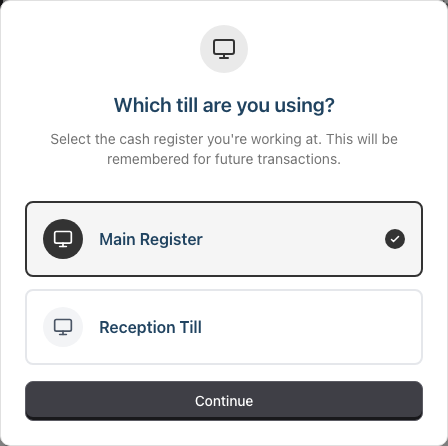
- A modal appears asking "Which till are you using?" when you open the POS
- Click a till to select it (the selected till is highlighted)
- Click Continue to confirm
- Your selection is remembered for future transactions
The selected till also appears in a small selector in the POS header, so you can switch tills mid-session if needed.
If only one till is open, it's selected automatically and no modal appears.
Step 9: Process Payment
When ready to take payment:
Single Payment Method:
- View the total amount due
- Click the payment method button:
- Cash — Opens cash tendering
- Card — Records card payment
- Voucher — Redeem a gift voucher
- Credit — Spend the customer's account credit balance
- Other — For alternative payment methods
- Enter the amount (defaults to amount due)
- Click Complete Payment
Cash Payments:
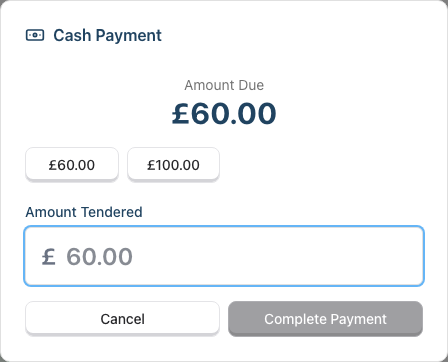
- Click Cash — the Cash Payment panel opens showing Amount Due
- Enter what the customer hands you in the Amount Tendered field, or use the quick buttons (the exact amount due, plus handy round-ups such as £100)
- If they give more than due, the change is calculated and shown as Change due in the cart totals
- Click Complete Payment
- Give the customer their change
Gift Voucher Payments:
- Click Voucher
- Type the code into the Voucher Code field
- Click Check
- If valid, the voucher's balance appears
- Click Complete Payment to apply it
Account Credit Payments:
- Click Credit — available only once a customer is selected and they have a balance to spend
- Enter how much of their balance to use in the Amount to Apply field (it defaults to the most that can be applied)
- Click Complete Payment
The Credit button stays greyed out when there's no customer selected, when the balance is zero, when the cart contains an Account Credit Top-up (you can't buy credit with credit), or on a combined sale — hover it and the tooltip tells you which. Account credit is per-customer, so on a combined checkout each customer has to be rung up separately to spend theirs.
Step 10: Split Payments
When a customer pays with multiple methods:
- Accept the first payment (e.g., £50 cash)
- The Amount Due updates to show remaining balance
- Accept the second payment (e.g., £30 card)
- Continue until the balance is zero
Example: £80 total
- Pay £50 cash → Amount due shows £30
- Pay £30 card → Amount due shows £0
- Transaction is fully paid
Step 11: Complete the Transaction
Once fully paid:
- Review the transaction summary
- The transaction is automatically saved and completed when fully paid
- For unpaid transactions, click Save (Unpaid) to save without payment — this takes you to the transaction detail page so you can take the balance later
- If the customer pays part of the bill, take that payment first. The same button then reads Complete — £X owing, naming the balance that will remain. Clicking it records only what you took and leaves the rest outstanding
Full-mode colour appointments must be weighed first. If the appointment's formula has been applied but its leftovers decision is still outstanding, the till stops before recording payment. Ask the stylist to open the appointment in Colour Bar and choose Weigh leftovers, or No leftovers — used it all if there is nothing to weigh. Retry the payment after they save that choice; the overage line will then be based on the recorded used grams.
What happens next depends on the transaction:
- If the cart's services differ from what was booked — A Calendar Sync confirmation dialog appears first (see below)
- If gift vouchers were sold — A Gift Voucher Purchased modal appears (see further below)
- Named customer — You're returned to the dashboard, and a Rebook Appointment modal opens on top of it to book the customer's next appointment (see Step 12)
- Walk-in (no customer) — You're returned to the dashboard with no further prompt
A fully-paid sale doesn't drop you on the transaction's detail page — you land back on the dashboard, ready for the next customer. To see the finished sale, open it from the Transactions list (Step 13).
If the cart no longer matches the calendar:
If you swapped a service or removed an appointment-linked line during the sale, an Update calendar to match till? dialog appears at finalise time. It lists the changes per appointment so you can confirm them in one place:
- A Swap badge with the old service struck through and the new service alongside it
- A Removed — will be cancelled badge for any appointment service you took off the cart
- An Unchanged badge for any other services in the same booking group, for context
Two buttons at the bottom:
- Complete sale — Finishes the transaction and leaves the calendar untouched. The sale is recorded but the original appointments stay as booked.
- Update calendar & complete — Finishes the transaction and applies the calendar changes: removed services are cancelled, swapped services have their service updated. Both happen as part of the same save, so either everything succeeds or nothing does.
No customer-facing notifications go out when you update the calendar this way — the customer is right in front of you at the till, so the system doesn't email or text them about the cancellation or change, and any pending reminders for a cancelled appointment are quietly dropped. The assigned stylist is still notified internally that their booked service was cancelled, and reception and managers see the updated appointment in the calendar afterwards. A cancellation made this way is recorded with the reason Updated at point of sale, so it's clear later why it changed.
If the cart matches what was booked (the usual case), this dialog doesn't appear at all and the sale completes straight away.
If the transaction includes gift voucher sales:
A Gift Voucher Purchased modal appears showing:
- The voucher code(s) in monospace text with a Copy button for each
- The value of each voucher
- Recipient name (if provided)
Click Continue to dismiss the modal and proceed to the rebook prompt (or the dashboard for walk-in customers).
Tip: Use the Copy button to quickly share voucher codes with the customer or paste them into a message.
Transaction Status:
- Completed — Transaction finished (auto-completes when fully paid)
- Paid — Full payment received
- Linked appointments marked as "Billed"
Note: Transactions are auto-saved as drafts while you work, so you won't lose your progress. A Draft badge above the cart shows the time of the last save. To throw a draft away and start again, click Abandon next to it — if the draft included a colour overage line, a message confirms the charge will re-apply to the next transaction for that appointment.
Step 12: Rebook the Customer's Next Appointment
After completing a transaction for a named customer, a Rebook Appointment modal appears automatically. This is a prompt to schedule their next visit while they're still in the salon.
What you'll see:
- A success banner confirming the payment amount and customer name
- Service badges for the services they just had
- The staff member who performed the services
- A Book from anchor date picker — defaults to today, but you can change it (e.g., the customer's holiday return date)
- Quick timeframe buttons: 1 week, 2 weeks, 3 weeks, 4 weeks, 6 weeks, 8 weeks, 10 weeks, 12 weeks, 14 weeks, 16 weeks
- A custom Or pick a date picker for choosing a specific date instead
- A collapsible Upcoming appointments section showing the customer's future appointments — expand this to check for existing bookings and avoid double-booking
To rebook using a quick timeframe:
- (Optional) Set a different Book from date if the customer wants to count from somewhere other than today
- Click a timeframe button (e.g., 4 weeks) — a preview appears below the buttons reading Selected date: [date]
- Click Proceed to calendar
- You're taken to the appointment calendar on the target date
- The customer's services appear as rebook items on the calendar clipboard (blue cards with a calendar icon)
- Click a time slot on the calendar to book the appointment directly — no form needed
To rebook using a custom date:
- Select a date in the Or pick a date picker
- Click Proceed to calendar
- The same clipboard flow applies — click a time slot to book
What happens on the calendar:
- Each service from the transaction becomes a separate rebook item on the clipboard
- The clipboard auto-selects the first item, ready for booking
- Click a time slot to create the appointment instantly
- If there are multiple services, the clipboard advances to the next one after each booking
- Multi-service rebookings are linked together automatically
For full details on using rebook items on the calendar, see Tutorial 2.2: Booking and Managing Appointments.
If you don't want to rebook right now:
- Click No thanks to dismiss the rebook prompt and return to the dashboard
Tip: Use the rebook prompt to encourage regular visits — suggest 4–6 weeks for colour clients or 6–8 weeks for cuts.
Step 13: View Receipt or Invoice
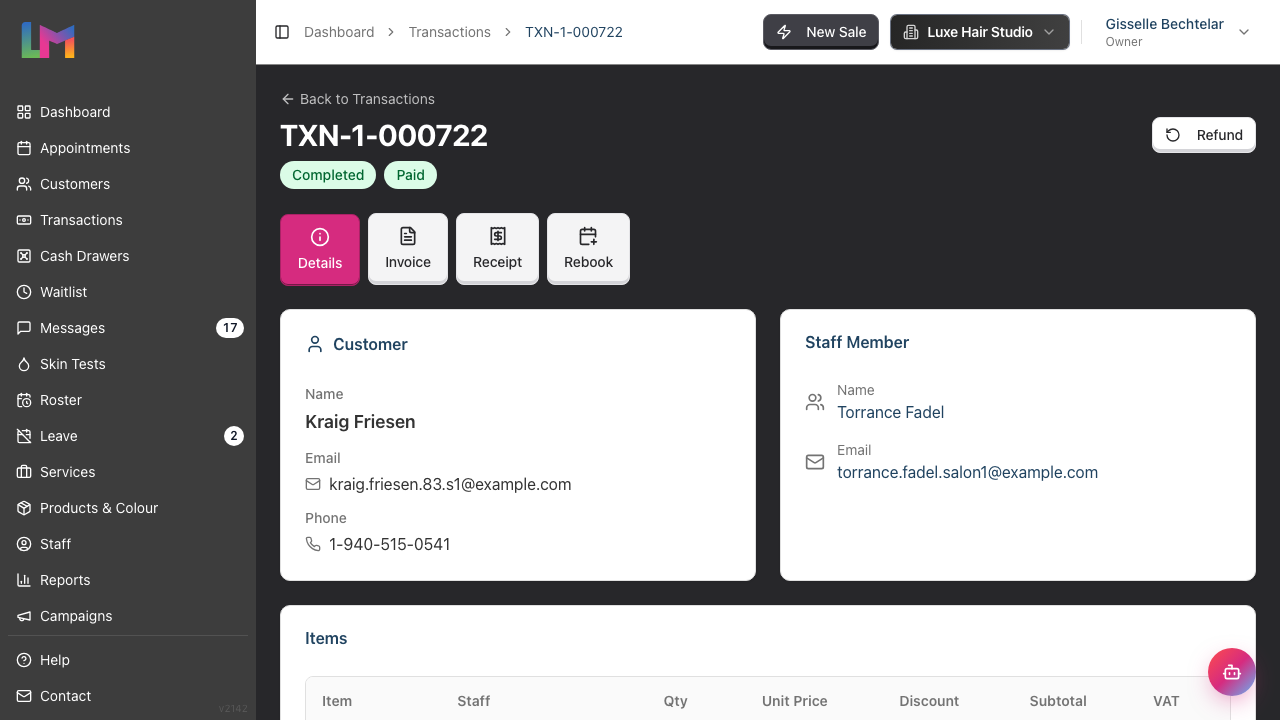
To view a receipt or invoice, open the transaction from the Transactions list:
- Click on a transaction row to open the detail page
- The page opens on the Details tab; use the tabs to switch between views:
- Details — Line-by-line breakdown of items, staff, discounts, tips, and payments
- Invoice — Formal invoice format with full salon details, customer information, and tax breakdown
- Receipt — Compact thermal-printer-style format showing items, totals, and payment methods
- Rebook — Schedule the customer's next visit (the same flow as the post-payment rebook prompt in Step 12). This tab appears only on a completed transaction for a named customer, so walk-in sales show three tabs rather than four
- On the Invoice and Receipt tabs, click Download to save the current view as a PDF, or Print to send it straight to a printer. These buttons don't appear on the Details or Rebook tabs
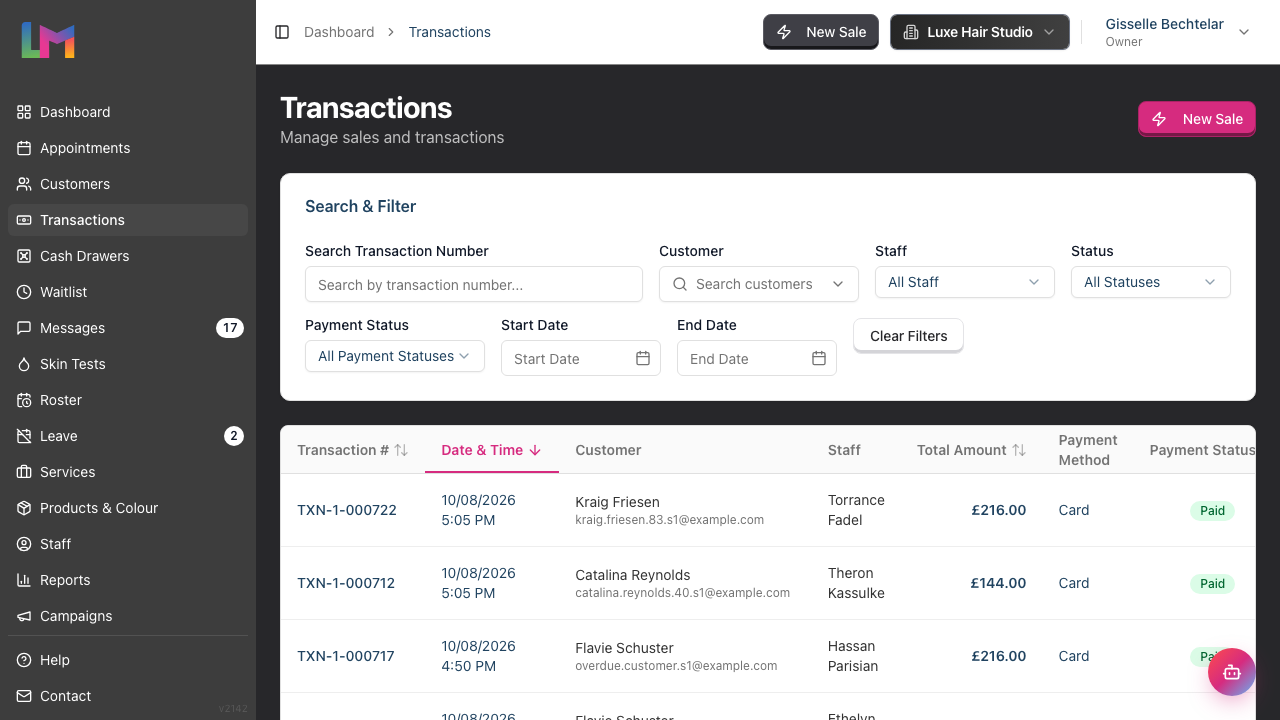
Reading the Transactions list: The Transactions list includes a Payment Method column (between Total Amount and Payment Status) that shows how each transaction was settled — Cash, Card, Gift Voucher, Account Credit, or Other. If a transaction was paid with multiple methods (e.g., a split payment), all methods are listed comma-separated (e.g., "Cash, Card"). An em dash ("—") indicates no payments have been recorded yet. This makes it quick to scan the day's takings without opening each transaction.
You can also filter the list by Payment Status — including an Outstanding option that combines Unpaid and Partial so you can see every transaction with a balance due in one view.
Understanding Transaction Status
| Status | Description |
|---|---|
| Draft | Transaction being created in Quick POS (auto-saved) |
| Pending | Transaction saved but not completed |
| Completed | Transaction finished |
| Refunded | Transaction was refunded |
| Cancelled | Transaction was cancelled |
| Payment Status | Description |
|---|---|
| Unpaid | No payment recorded |
| Partial | Some payment received, balance outstanding |
| Outstanding | Filter option combining Unpaid + Partial — shows all transactions with balances due |
| Paid | Fully paid |
| Overpaid | More than the total amount was paid |
Common Pitfalls
"I can't find the customer's appointment"
Make sure you've selected the customer first. Unbilled appointments only appear after a customer is selected.
"The service shows a different price than expected"
Staff members can have different pricing levels. The price adjusts based on who is assigned to perform the service.
"All the payment buttons are greyed out"
Every service in the cart needs a staff member. Look for a line highlighted in amber with ⚠️ Select staff in its dropdown, and the message Assign staff to all services before checkout above the payment buttons. Assign the stylist and the payment methods become available.
"The till says the customer's colour has not been weighed"
The appointment has an applied Full-mode colour formula without a leftovers decision. Ask the stylist to use Weigh leftovers, or No leftovers — used it all when nothing remains, then retry the payment. Nothing is charged while the till is waiting.
"The Credit button is greyed out"
Account credit needs a named customer with a balance to spend. It's also unavailable when the cart contains an Account Credit Top-up and on a combined sale, where each customer has to be checked out separately to use their own credit. Hover the button to see which of these applies.
"I processed the wrong payment method"
Contact an Admin or Owner who can help process a refund and create a new transaction with the correct method.
"The cash drawer didn't open"
Cash drawers require a hardware connection. Check that your drawer is connected and the session is open.
"Gift voucher shows as invalid"
Check that the voucher code is entered correctly and hasn't expired. The voucher must have a positive balance.
"I removed the appointment service from the cart but the calendar still shows it"
Removing a service from the cart doesn't cancel the appointment on its own. At finalise time, choose Update calendar & complete in the Update calendar to match till? dialog so the calendar reflects what actually happened. If you've already chosen Complete sale, you can still cancel the appointment from the calendar in the usual way.
Tips and Best Practices
- Confirm the total with the customer before processing payment
- Check staff assignment to ensure commission is recorded correctly
- Add products before checkout - "Would you like any products to take home?"
- Use barcode scanning if available for faster product entry - the scanner status indicator shows Ready or Scanning
- Select the correct till if your salon has multiple cash drawers
- Review the cart before completing to avoid errors
- Use quick tip percentages (10%, 15%, 20%, 25%) for faster tip entry
- Assign staff as you go - the payment buttons stay locked until every service has a stylist, so doing it when you add the line saves a scramble at payment time
- Rebook before they leave - Use the rebook prompt after payment to schedule the customer's next visit while they're still in the salon
Related Tutorials
- Tutorial 2.2: Booking and Managing Appointments - Rebooking from the calendar clipboard after a transaction
- Tutorial 2.5: Using the Cash Drawer - Managing cash sessions and reconciliation
- Tutorial 8.2: Handling Refunds and Cancellations - Correcting a completed sale
- Tutorial 11.1: Skin Test Management - Why a swap to a colour service can be blocked at the till
- Tutorial 12.5: Colour Formulas - How a finalised formula stages an overage line in the cart
- Tutorial 20.8: Overage Billing Explained - Calculation of the colour overage amount
Frequently Asked Questions
Can I edit a transaction after completing it?
No — once a transaction is completed, the only action on its detail page is Refund. To correct a completed sale, process a refund (Owner or Admin) and create a new transaction with the right details.
A transaction that was only saved as unpaid is different: its detail page shows a Take Payment button, which reopens it in Quick POS so you can adjust items, staff assignments, or take the outstanding payment.
How do refunds work?
Refunds require Owner or Admin permission. Open the transaction and click Refund to process.
Can I take partial payment?
Yes, accept the amount the customer pays. The transaction will show "Partial" payment status with an outstanding balance.
What if the card machine fails?
Don't complete the transaction. Wait for successful payment confirmation, or select a different payment method.
How are tips handled?
Tips are added to the transaction total and attributed to the staff member(s). They're tracked separately in reporting.
Can I scan barcodes?
Yes, if your products have barcodes set up. Use a barcode scanner and scan directly - products are added automatically.
What's the difference between "Other" payment and "Card"?
"Card" is for standard card payments. "Other" is for alternative methods like bank transfer, account credit, or payment apps.
What if I don't want to rebook right away?
You can skip the rebook step entirely. Click No thanks to dismiss the rebook prompt. It's optional — just a convenient shortcut to encourage regular bookings.
Why don't I see the rebook prompt?
The rebook prompt only appears when the transaction has a named customer and the transaction is completed. Walk-in transactions (with no customer selected) skip the rebook step entirely.
Why is there an emerald "Colour overage" line I didn't add?
Your salon is in Full colour mode and the appointment's colour formula used more than the grams included in the service price. The line is staged automatically from what was actually weighed out.
Can I change or remove the "Colour overage" line?
Not at the till — the line shows a padlock instead of a trash icon, and its price can't be edited. The amount comes from the weighed formula, so change it at the source: ask the colourist to adjust or Revert the formula and the cart line follows immediately. Abandoning the draft doesn't help either — the charge simply re-applies to the next transaction for that appointment. Once the sale is completed the charge is committed, and correcting it means refunding and re-billing. See Tutorials 12.5 and 20.8.
Can I change the service the customer actually had at the till?
Yes — click the service name on the appointment-linked cart line to swap it for another service. The link to the original appointment is preserved. When you finish the sale, the Update calendar to match till? dialog asks whether to apply the swap to the calendar entry too. If a finalised Full-mode colour formula is already charged and the new service changes whether it is a colour service or changes its included colour grams, Luminate refuses that calendar update. Leave the calendar unchanged and make the service correction from the calendar instead, where the colour allowance can be reviewed before another payment attempt.
Why didn't the Update calendar to match till? dialog appear?
The dialog only appears when the cart's billed services differ from what was originally booked — for example, you swapped a Cut & Blow Dry for a Blow Dry, or you removed one of the linked services from the cart. If the cart matches the appointment, there's nothing to confirm and the sale completes straight away.
Will the customer be notified when I update the calendar from the till?
No. Because the customer is at the till with you, no email or text goes out when you choose Update calendar & complete. The calendar change is silent on the customer side.
Last Updated: August 2026