
Working with the Waitlist
Introduction
When your salon is fully booked, the waitlist helps you track customers who want appointments. This tutorial shows you how to add customers to the waitlist, record their preferences, and convert waitlist entries into confirmed appointments when slots become available.
Who this is for: Owner, Admin, Manager, Staff, Receptionist What you'll learn:
- Navigate the dedicated waitlist page
- Add customers to the waitlist
- Record service and staff preferences
- Set priority levels
- View, filter, and manage waitlist entries
- Convert waitlist entries to appointments
- Update entry status and notes
Time to complete: 10 minutes
Prerequisites
- Complete Tutorial 2.2 (booking appointments)
- Customer must exist in the system before adding to the waitlist
- Understanding of your salon's services and staff
Step-by-Step Instructions
Step 1: Access the Waitlist
The waitlist has its own dedicated section in the sidebar:
- Click Waitlist in the sidebar navigation (it sits between Cash Drawers and Messages)
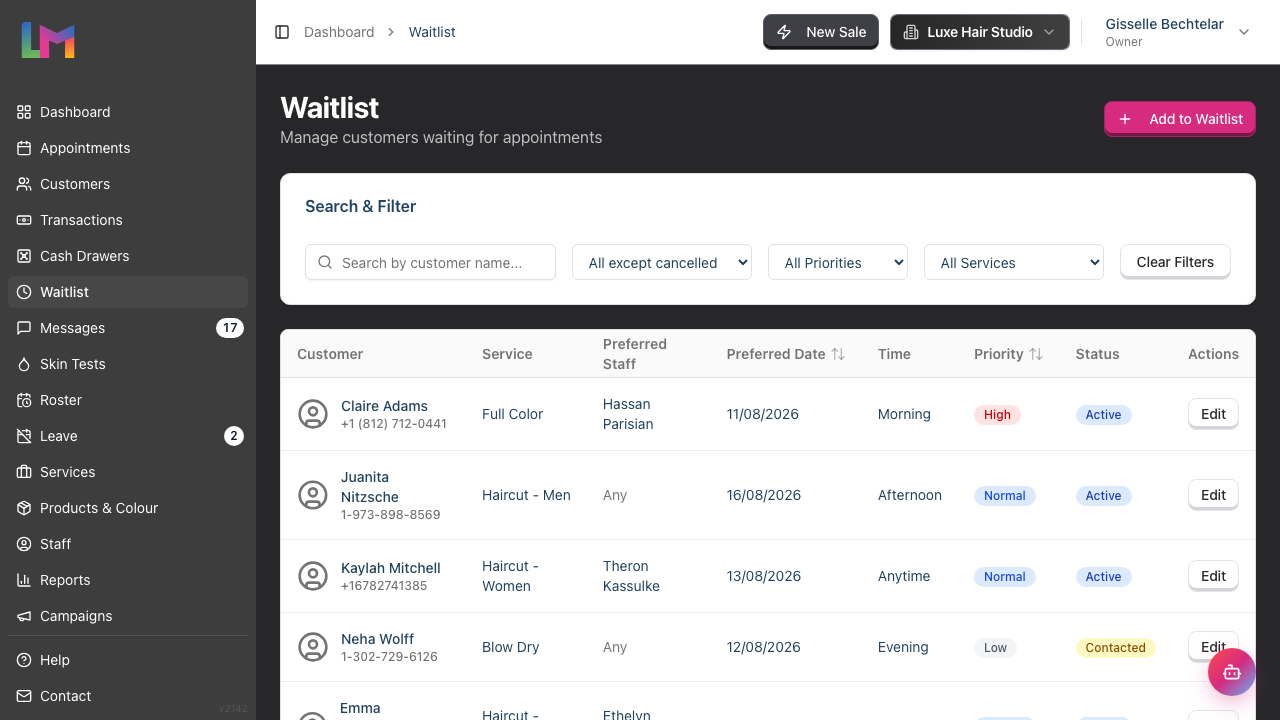
- The Waitlist page displays all entries in a searchable, filterable table
Waitlist page features:
- A Search & Filter card with a search box, three filters and a Clear Filters button
- Search by customer name, email or phone (the box is labelled Search by customer name..., but it matches email and phone too)
- Filter by status, priority or service
- Table columns: Customer, Service, Preferred Staff, Preferred Date, Time, Priority, Status and Actions
- Click the Preferred Date or Priority column headings to sort by them
- Click any row to view full entry details, or use the Edit button in the Actions column to go straight to the edit form
Cancelled entries are hidden by default. The status filter starts on All except cancelled. To see cancelled entries, choose Cancelled or All statuses.
Alternative access:
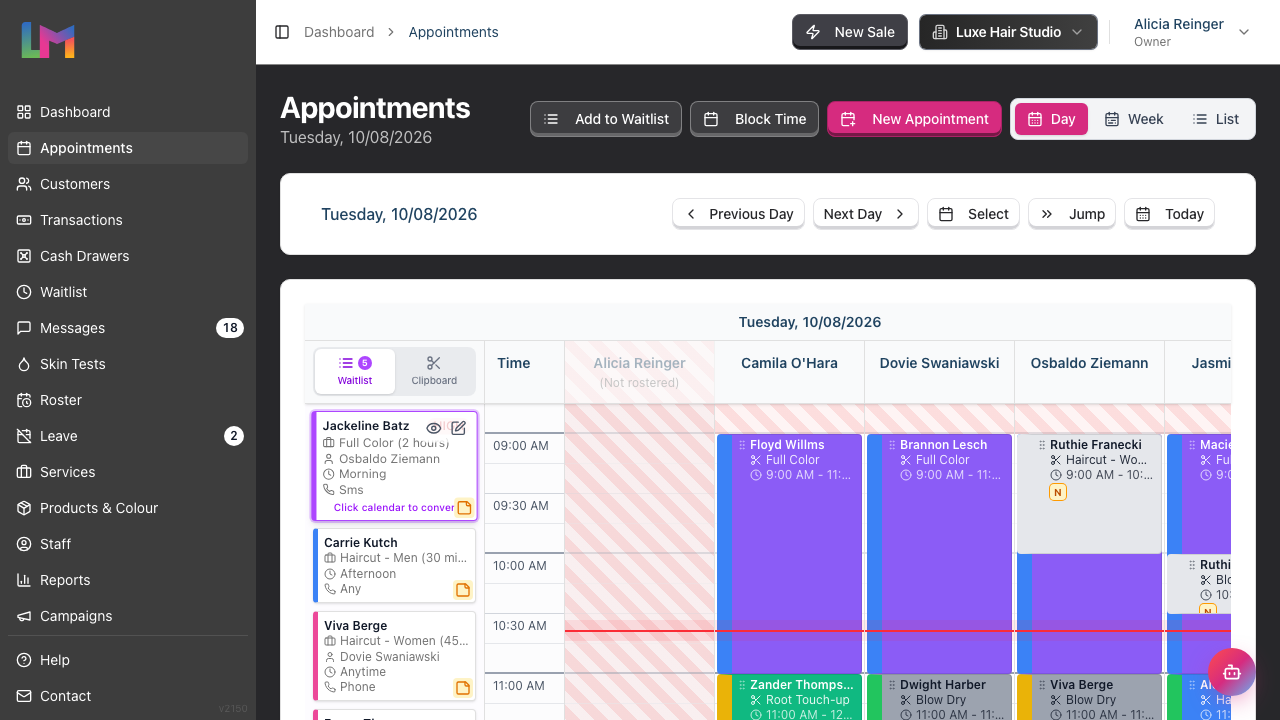
- The Appointments calendar has a Waitlist tab in its left panel (Day and Week views only) listing every Active and Contacted entry, highest priority first
- Click an entry to select it, then click on the calendar to place it as a new appointment (see Step 8)
- The calendar toolbar also has its own Add to Waitlist button, which returns you to the calendar after saving
Step 2: Add a Customer to the Waitlist
When a customer requests an appointment but no slots are available:
- Click Add to Waitlist button on the Waitlist index page
- The Add to Waitlist form opens with three sections
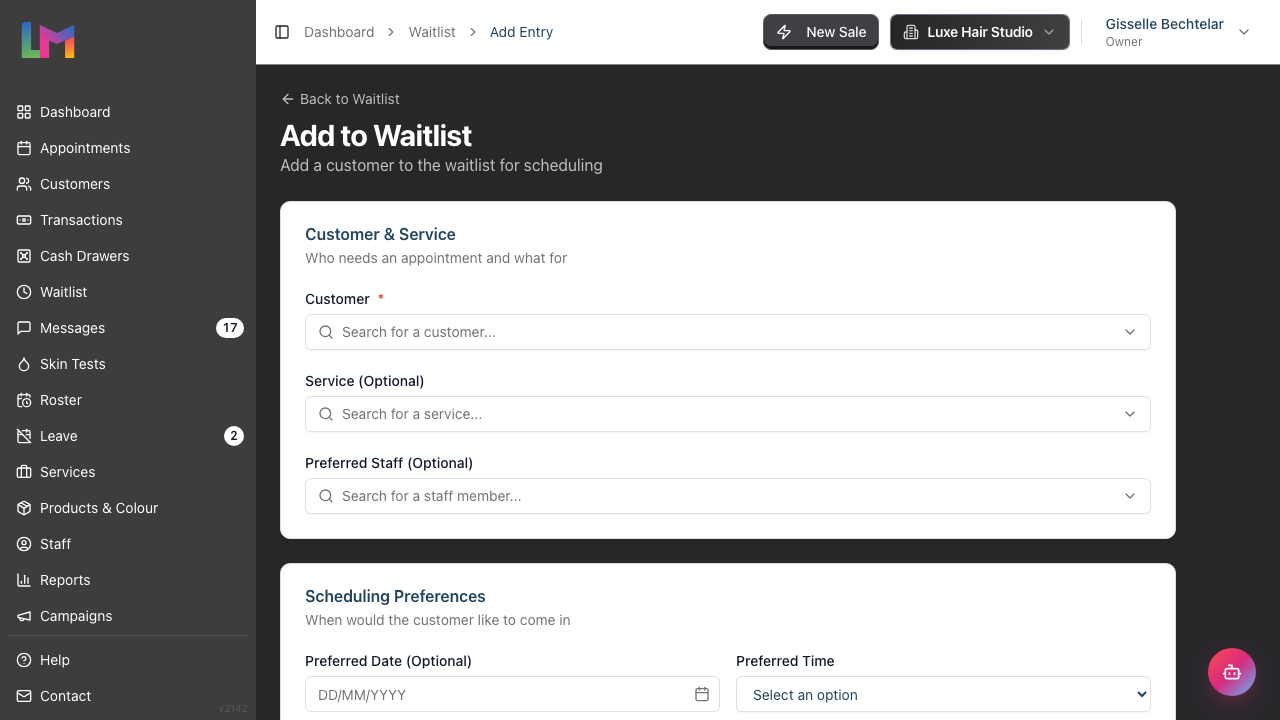
Section 1: Customer & Service
| Field | Required | Description |
|---|---|---|
| Customer | Yes | Search and select the customer |
| Service (Optional) | No | The service they're requesting |
| Preferred Staff (Optional) | No | If they want a specific team member |
Section 2: Scheduling Preferences
| Field | Required | Description |
|---|---|---|
| Preferred Date (Optional) | No | When they'd like to come in. Must be today or later - past dates are rejected with "Preferred date cannot be in the past." |
| Preferred Time | No | Options: Anytime, Morning, Afternoon, Evening |
| Priority | Yes | High Priority, Normal, or Low Priority |
| Contact Preference | No | Options: Any method, Phone, SMS, Email |
Section 3: Notes
| Field | Description |
|---|---|
| Customer Notes | Special requests, preferences visible to customer |
| Internal Notes | Staff-only notes (e.g., "flexible on dates but needs Saturday") |
- Click Add to Waitlist to save
Step 3: Set Priority Levels
Priority marks how urgently a customer needs a slot:
| Priority | When to Use |
|---|---|
| High Priority | Urgent need, VIP customer, or long-waiting customer |
| Normal | Standard waitlist request |
| Low Priority | Very flexible customer, no rush |
High-priority entries appear at the top of the calendar's Waitlist tab, and are counted separately on the Dashboard.
On the Waitlist page itself the table is sorted newest-first by default, with priority used only to break ties. Click the Priority column heading to sort the whole list by priority.
Step 4: View and Filter Waitlist Entries
The Waitlist index page provides powerful filtering options:
Search:
- Type in the search box to find entries by customer name, email, or phone
Filters:
| Filter | Options |
|---|---|
| Status | All except cancelled (the default), Active, Contacted, Converted, Expired, Cancelled, All statuses |
| Priority | All Priorities, High, Normal, Low |
| Service | All Services, or select a specific service |
Clear Filters:
- Click Clear Filters to reset all filters and show all entries
Step 5: View Waitlist Entry Details
Click on any row in the waitlist table to view the full entry details:
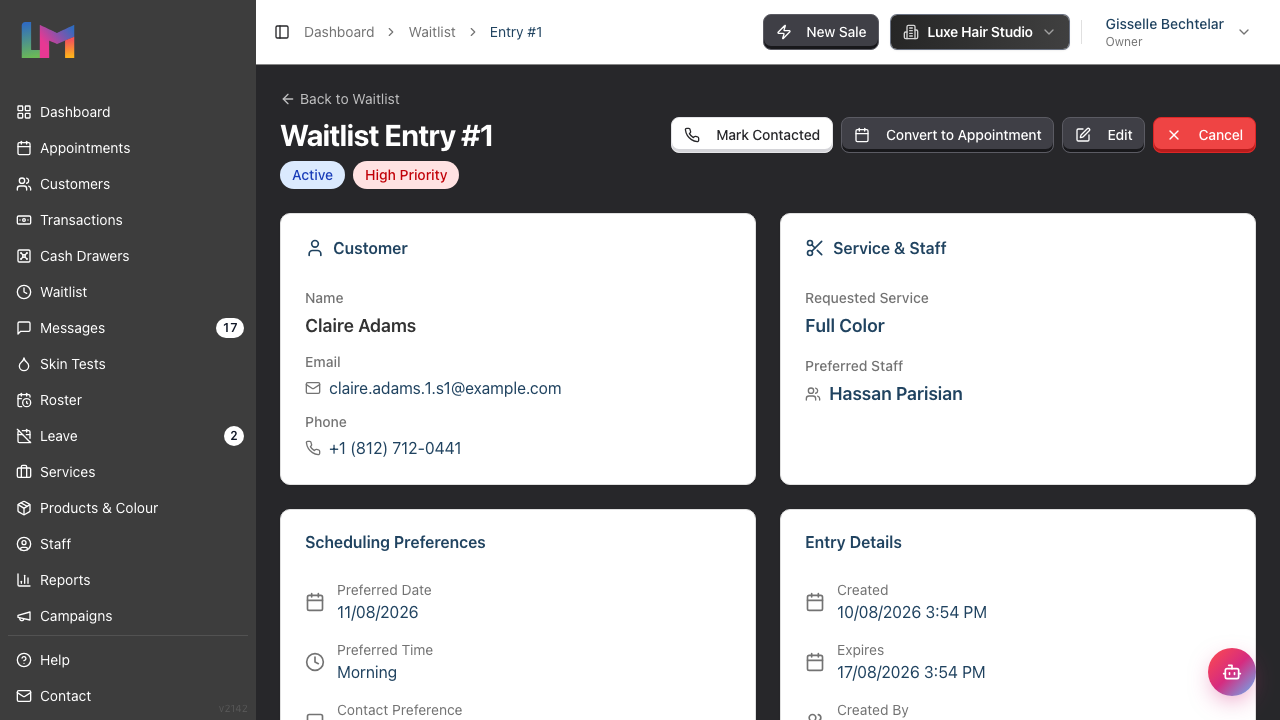
Entry Detail Page Shows:
- Status badge and priority level
- Customer information with contact links (phone, email)
- Service and preferred staff
- Scheduling preferences (date, time range, contact preference)
- Entry details (created date, contacted date, expiry date, and who created the entry)
- Notes section (customer notes and internal staff notes)
- Once an entry has been converted, a Converted to Appointment card with a View Appointment button
Quick Actions from Detail Page:
The available actions depend on the entry's current status:
- Mark Contacted - Record that you've reached out to the customer (shown only while the entry is Active)
- Convert to Appointment - Create an appointment from this entry (shown only when a service has been specified and the entry is Active or Contacted)
- Edit - Update entry details (always available)
- Cancel - Cancel the waitlist entry (shown only while the entry is Active or Contacted)
Step 6: Edit Waitlist Entry Details
To update a waitlist entry:
- Click on the entry to view details
- Click Edit button
- Update any fields including:
- Customer & Service selections
- Scheduling preferences
- Priority level
- Status (Active, Contacted, Cancelled, Expired)
- Contact preference
- Customer and internal notes
- Click Update Waitlist Entry to save
Note: The Status field lets you change the entry status by hand. Converted is not in the list - it's set for you whenever you convert an entry into an appointment (see Step 8).
Step 7: Update Notes Inline
On the entry detail page, you can quickly edit notes without going to the full edit form:
- In the Notes section, click Edit (or Add if the entry has no notes yet). You can also click straight onto an existing note, or onto the "No notes added - click to add" prompt
- Update Customer Notes and/or Internal Notes (staff only)
- Click Save to save changes
- Click the X button beside Save to cancel without saving
Step 8: Convert a Waitlist Entry to an Appointment
When a slot becomes available, you can convert a waitlist entry into an appointment. There are two ways to do this, and they behave slightly differently.
Method 1: From the Entry Detail Page
- Open the waitlist entry detail page
- Click Convert to Appointment (only shown when the entry has a service specified)
- The Create Appointment form opens with the customer, service, preferred staff and both sets of notes pre-filled
- Adjust the date, time, and any other details
- Click Create Appointment to save
Saving the appointment also marks the waitlist entry as Converted and links it to the new appointment, so the customer drops off the Waitlist page, out of the calendar's Waitlist tab and out of the Dashboard counts. Open the entry again and you'll see a Converted to Appointment card with a View Appointment button.
This works whether you book a single service or several services at once. With several, the entry links to the first appointment of the booking.
Method 2: Click to Place from Calendar (auto-converts)
- Navigate to Appointments in the sidebar
- In Day or Week view, open the Waitlist tab in the left panel
- Click a waitlist entry card to select it -- the card highlights with a purple border and shows "Click calendar to convert"
- Move your mouse over the calendar -- a ghost preview appears showing where the appointment would land
- Click the desired time slot and staff column
- The appointment is created immediately from the entry's customer, service, and staff -- no form opens
This method also marks the waitlist entry as Converted when the appointment is created, exactly as Method 1 does.
Step 9: Mark Entry as Contacted
When you reach out to a waitlisted customer:
- Open the waitlist entry detail page
- Click Mark Contacted (this button only appears while the entry is Active)
- The status changes to Contacted
This helps track which customers you've already tried to reach when slots open up.
Step 10: Cancel a Waitlist Entry
If a customer no longer needs to be on the waitlist:
- Open the waitlist entry detail page
- Click Cancel
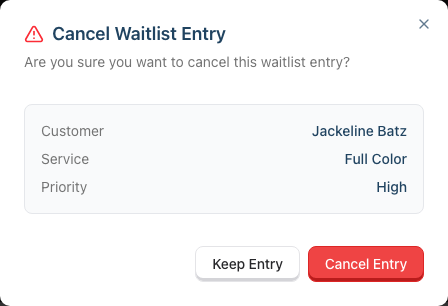
- The Cancel Waitlist Entry dialog opens, summarising the customer, service and priority
- Click Cancel Entry to confirm, or Keep Entry to back out
- The entry is marked as Cancelled and disappears from the default list view (it's still there under the Cancelled or All statuses filter)
Note: You cannot cancel an entry that has already been converted to an appointment.
Waitlist Entry Statuses
| Status | Description |
|---|---|
| Active | Waiting for an appointment slot |
| Contacted | Staff has reached out to the customer |
| Converted | Successfully converted to an appointment |
| Cancelled | Entry was cancelled |
| Expired | Set automatically once an Active entry passes the Expires date shown on its detail page. You can also set it by hand when an entry is no longer worth chasing |
Common Pitfalls
"I can't find a customer to add to the waitlist"
Customers must exist in the system before being added to the waitlist. Create the customer via Customers > Add Customer first.
"I can't find a waitlist entry"
Cancelled entries are hidden unless you set the status filter to Cancelled or All statuses. Otherwise use the search box and the priority and service filters, and check whether the entry has already been converted.
"I clicked a waitlist entry but nothing happened on the calendar"
Make sure the entry is selected -- look for the purple border and the "Click calendar to convert" message on the card. Once selected, click directly on a time slot in the calendar grid to place the appointment.
"Customer says they've been waiting but I can't find them"
Search by customer name on the Waitlist page. They might already be marked as Contacted, Converted, or Cancelled. Check all status filters.
"I can't change the status to Converted"
Converted isn't an option in the Edit form's Status dropdown - it's meant to be set for you when the entry is converted. Today only the Appointments calendar route (Method 2) does that. If you booked the customer via Convert to Appointment on the detail page, the entry stays Active; Cancel it to take it off the list.
"There's no Convert to Appointment button on the entry"
The Convert to Appointment button only appears when the entry has a service specified and is still Active or Contacted. Add a service via Edit first, or convert it from the calendar instead.
Tips and Best Practices
- Record specific preferences - "Afternoons only" or "After 3pm" is more useful than just "Afternoon"
- Use priority consistently - Reserve High Priority for genuine urgency or VIP customers
- Set contact preference - Know whether to call, text, or email before reaching out
- Add internal notes - Record details like "can do last-minute bookings" for quick reference
- Check the waitlist when cancellations occur - Make it part of your cancellation workflow
- Keep the waitlist current - Regularly review and clean up old entries
- Use filters to focus - Filter by "Active" status to see only pending entries
Related Tutorials
- Tutorial 2.1: Managing Your Appointment Calendar - Understanding the calendar
- Tutorial 2.2: Booking and Managing Appointments - Creating appointments
Frequently Asked Questions
Can customers add themselves to the waitlist?
Currently, the waitlist is managed internally by staff. Customers contact the salon to be added.
How long should customers stay on the waitlist?
Review entries regularly. Consider contacting customers after 2-3 weeks to confirm they still want to wait.
What's the difference between "Contacted" and "Converted"?
Contacted means you've reached out to the customer about a slot. Converted means an appointment was created from the entry. Both conversion routes in Step 8 set it for you.
Can I edit a waitlist entry after creating it?
Yes, click on the entry in the table, then click Edit to update preferences, priority, status, or notes.
Why can't I cancel a converted entry?
Once a waitlist entry becomes an appointment, the appointment record takes over. You would cancel the appointment instead.
How do I handle VIP customers?
Set their priority to High Priority so they appear at the top of the waitlist. You can also add notes about their VIP status.
Where do I find the waitlist?
Click Waitlist in the sidebar navigation, between Cash Drawers and Messages. The Dashboard also shows a Waitlist count tile and a High Priority Waitlist alert, and a customer's own record lists their active waitlist entries.
Last Updated: August 2026