
Managing Your Appointment Calendar
Introduction
The appointment calendar is the central hub of your daily salon operations. It provides a visual overview of all scheduled appointments, allowing you to see at a glance who is booked, when, and with which staff member.
This tutorial covers how to navigate the calendar, switch between different views, and understand the visual cues that help you manage your day effectively.
Who this is for: Owner, Admin, Manager, Staff, Receptionist What you'll learn:
- Navigate between dates using the calendar controls
- Switch between Day, Week, and List views
- Understand staff columns and rostered indicators
- Use the Waitlist and Clipboard panels
- Interpret the "now" line and appointment cards
- Block out time for breaks, training and admin
- Use keyboard shortcuts for faster navigation
Time to complete: 10 minutes
Prerequisites
- Access to a salon with at least one staff member configured
- Permission to view appointments (all roles have this by default)
Step-by-Step Instructions
Step 1: Access the Appointment Calendar
- Click Appointments in the sidebar navigation
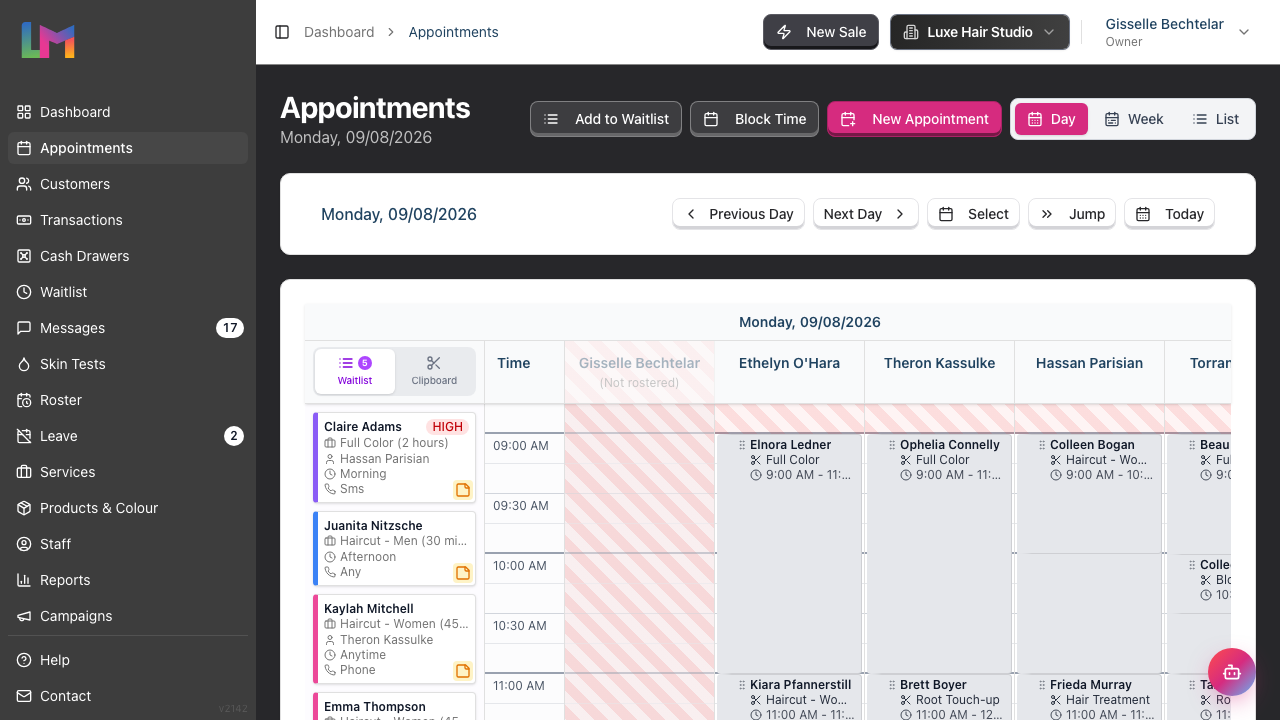
- The calendar opens in Day view by default, showing the current date
The page header displays "Appointments" with the current date below it, written as the day name followed by the date in your salon's chosen format (e.g., "Tuesday, 11/08/2026"). Alongside the header sit Add to Waitlist, Block Time and New Appointment, then the Day / Week / List view toggle.
Step 2: Navigate Between Dates
The date navigation bar appears below the header with these controls:
- Previous Day - Click to move to the previous day
- Next Day - Click to move to the next day
- Select - Opens a calendar picker to jump to any date
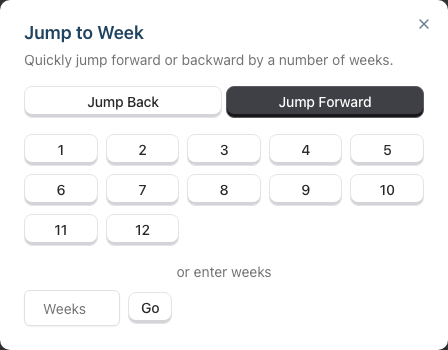
- Jump - Opens the Jump to Week dialog to quickly skip forward or backward by a number of weeks (see Step 5 for details)
- Today - Returns to the current date
The selected date appears to the left of these buttons, showing the day name and formatted date.
Step 3: Switch Between Calendar Views
Three view modes are available via the toggle buttons in the top-right corner:
Day - Shows a single day with all staff members as columns
- Each staff member has their own column
- Time slots run vertically from top to bottom
- Best for managing a single day's schedule
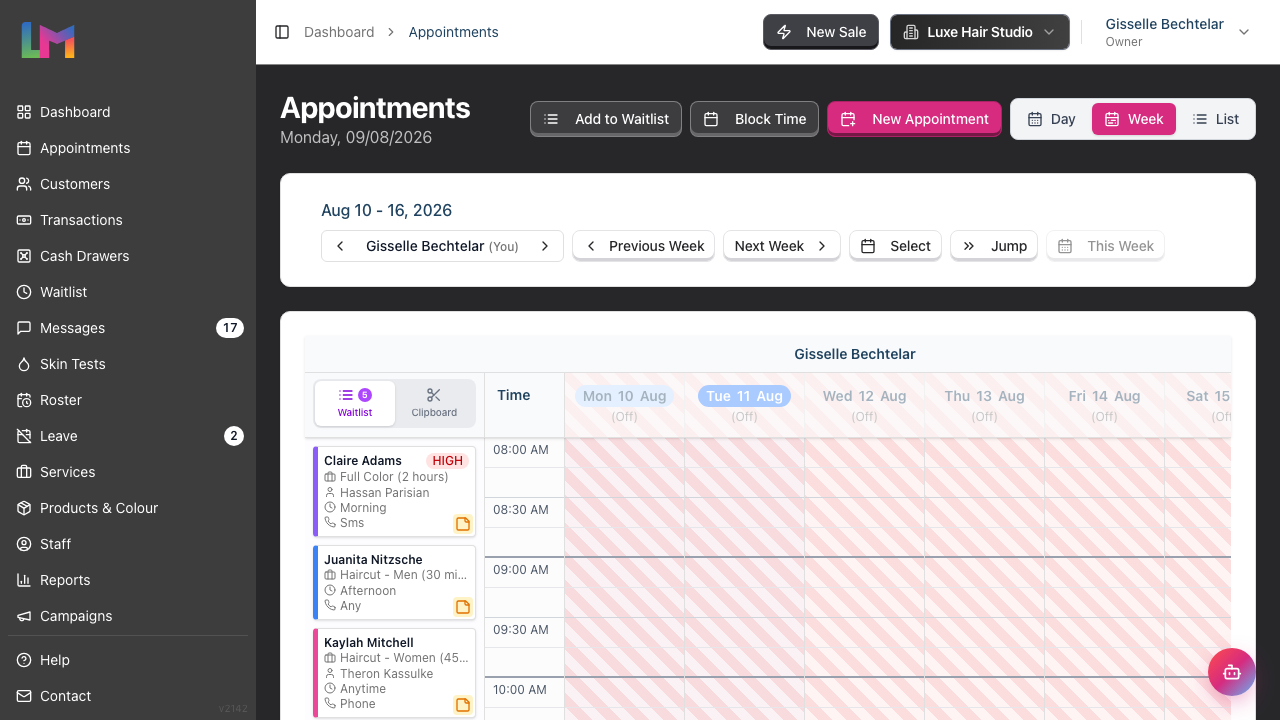
Week - Shows a full week for one staff member
- Days of the week appear as columns (Monday to Sunday)
- A staff selector appears at the top showing the selected staff member's name (with a "(You)" suffix when it's your own profile). Use the Previous staff (left chevron) and Next staff (right chevron) buttons to switch between team members
- Best for planning individual staff schedules
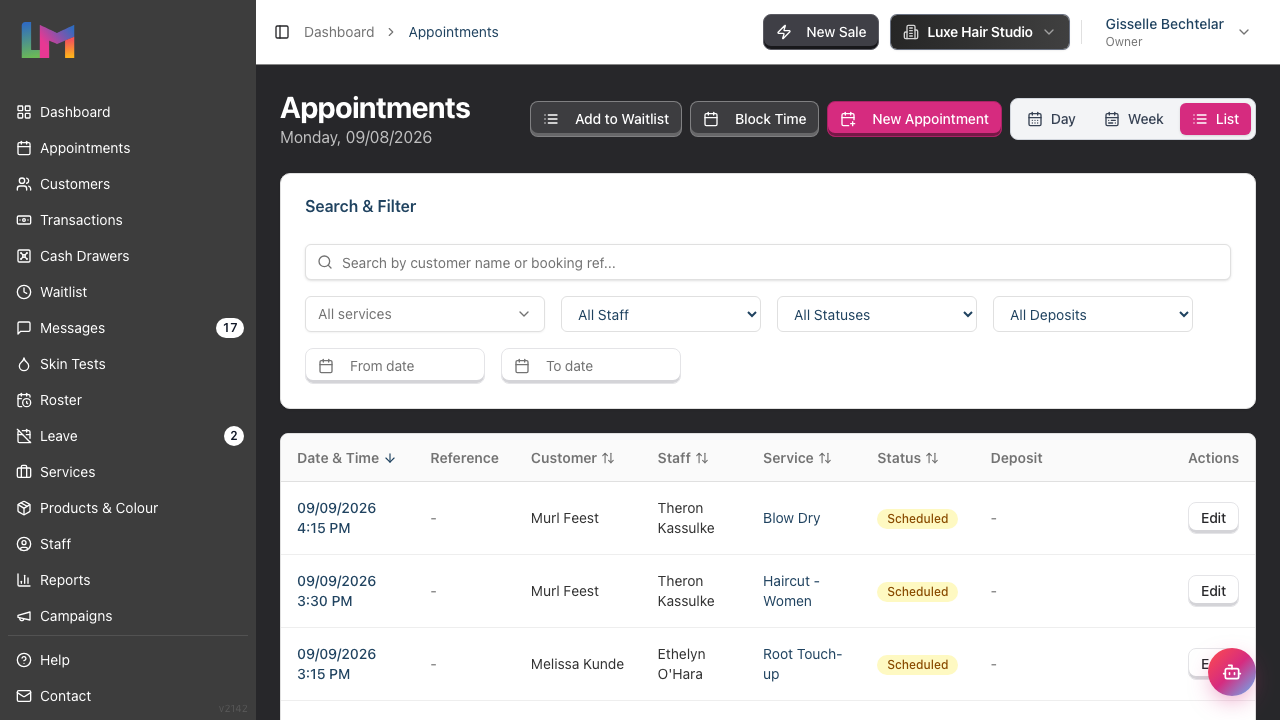
List - Shows appointments in a table format
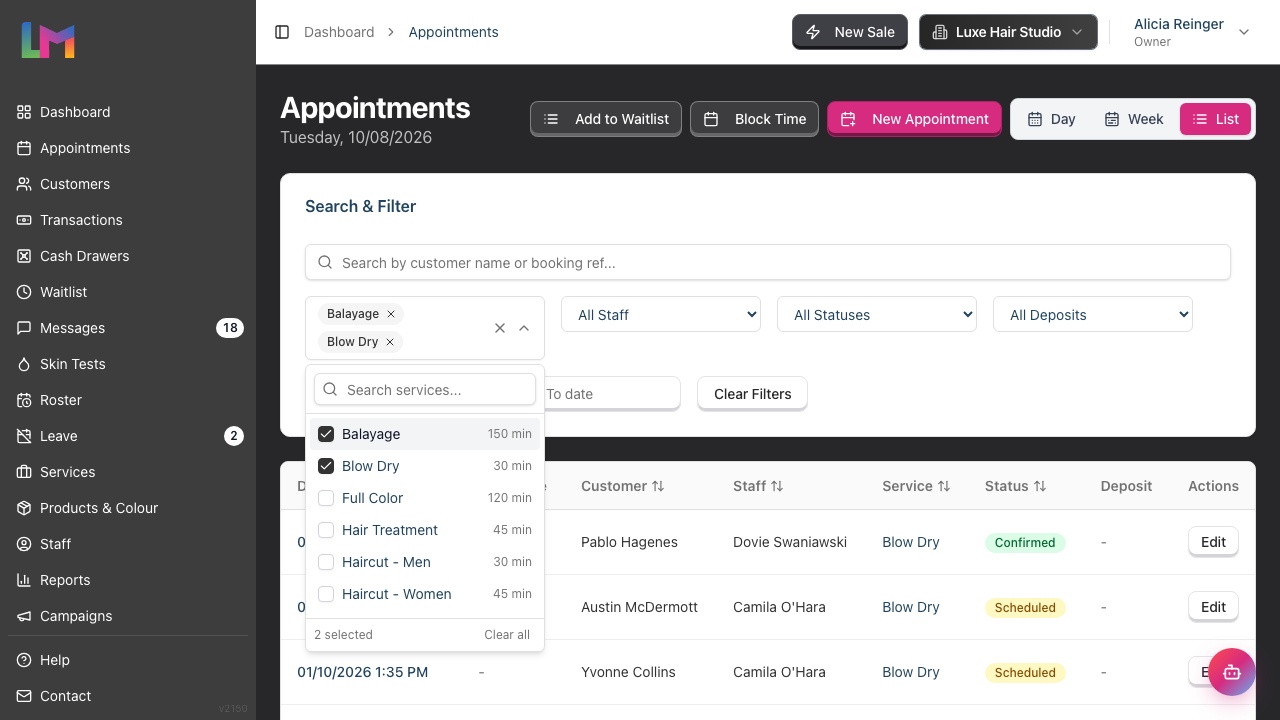
- A Search & Filter card sits above the table with a customer search box and filters for All services, All Staff, All Statuses, All Deposits, and a From date / To date range. A Clear Filters button appears once any filter is set
- The All services filter takes as many services as you like: open it, tick each service you want (every option shows its duration), and the list narrows to appointments booked for any of them. Your picks appear as removable chips in the field, collapsing to a count such as "4 services" once you go past three
- Search by customer name or booking reference
- Sortable columns — Date & Time, Customer, Staff, Service and Status are click-to-sort. Click a header to sort by that field, click again to reverse direction. The active column shows a directional arrow so the order is always clear, and screen readers announce which column the table is sorted by and in which direction. (Reference, Deposit and Actions are not sortable.)
- Best for searching and filtering across many appointments
Click the Day, Week, or List button to switch views. The currently active view is highlighted.
Step 4: Understand the Day View Layout
The Day view displays a grid with:
Header Row:
- Waitlist/Clipboard tabs on the left (see Step 6)
- Time column showing the time scale
- Staff columns - one column per active staff member
Staff Column Headers:
- Staff name displayed at the top
- (Not rostered) appears below the name if the staff member is not rostered for this date
- On [Leave Type] appears in purple if the staff member is on approved leave
- Click a staff column header to jump straight to that person's Week view
Time Grid:
- The grid is divided into 15-minute slots. The time column prints a label every half hour, with a heavier line at each hour, so a full working day fits on screen without scrolling far
- The grid adjusts dynamically based on your salon's operating hours
- A red horizontal line indicates the current time (only visible when viewing today), with a soft red band either side of it
- Sticky header — the staff/day header row pins to the top of the viewport when you scroll a long day, so you can always tell which column you're looking at
- Hovering over the grid tints the whole row and shows a blue chip with the exact slot time, so you can see where a click will land
Visual Indicators:
- Striped/faded columns indicate staff who are not rostered for the selected date (booking into one of these raises the Outside scheduled roster dialog — see Step 7 and Tutorial 5.1)
- Off-shift blocks appear as grey overlays during times outside a staff member's shift
Step 5: Understand the Week View Layout
When you switch to Week view:
- A staff selector appears at the top showing the staff member's name (with a "(You)" suffix when it's your own profile). Use the chevron buttons on either side to switch between team members, or click the name to pick from a dropdown. The last staff member you viewed is remembered per salon — if you manage multiple salons, each one keeps its own preference, so switching salons doesn't reset the view
- Days of the week appear as column headers showing the day name, date and month (e.g., "Tue 11 Aug"). Click a day header to switch to Day view for that date
- The current day is highlighted with a solid blue pill if you're viewing the current week
- The selected date column shows a blue background highlight and a paler blue pill, helping you see which day you've navigated to — even when it's not today
- Days where the staff member is not rostered appear faded and striped, with (Off) below the date. On [Leave Type] appears in purple on days with approved leave
Week Navigation:
- Previous Week and Next Week buttons navigate between weeks
- This Week returns to the current week (this button is disabled when already viewing the current week)
- Jump — Opens the Jump to Week dialog. Toggle between Jump Back and Jump Forward, then choose from preset buttons for 1–12 weeks or enter a custom number. This is useful for quickly checking a client's availability several weeks out without clicking through one week at a time. You can also press j on your keyboard to open this dialog
- The date range is displayed at the top (e.g., "Jan 19 - 25, 2026")
Step 6: Use the Waitlist and Clipboard Panels
Both Day and Week views carry the same left panel on desktop, with two tabs. On a phone or small tablet the panel slides in from the purple list button in the bottom-left corner, which carries its own count badge:
Waitlist Tab:
- Shows customers waiting for an appointment slot
- Entries can be dragged onto the calendar to create appointments
- A badge on the tab shows the count of waitlist entries
- Click an entry to view or edit it
Clipboard Tab:
- Shows items that can be placed on the calendar by clicking a time slot
- Cut items (amber, scissors icon): Appointments you've cut for rescheduling. On desktop, hover over an appointment card and click the scissors icon in the hover toolbar. On mobile, tap an appointment card and select Cut appointment
- Rebook items (blue, calendar icon): New appointments queued from the rebook prompt after completing a transaction in Quick POS (see Tutorial 2.2 for details)
- Select a clipboard item, then click/tap an empty calendar slot to place it
Step 7: Interact with Appointment Cards
Each appointment appears as a coloured card on the calendar. The card background is the service colour, so the calendar at a glance still tells you what kind of work is happening.
Appointment Card Information:
- Customer name
- Service name
- Appointment time
- Status hex stripe — a thin coloured strip on the card's left edge encodes the appointment's status (e.g. confirmed, arrived, no-show, cancelled). The stripe sits against the service-coloured background so you can see status and service type at the same time without losing the service association. Once an appointment is completed the whole card greys out.
Actions available by clicking/tapping an appointment:
On desktop: Clicking an appointment opens a sidebar showing the customer's name and contact details (click to copy), the service, staff member, price, and the date, time and duration. Below that sit:
- A row of icon buttons beside the appointment reference — View full appointment page, Edit appointment, Create transaction (or Continue transaction) and Close
- A status stepper: Scheduled → Confirmed → Arrived → Complete, with No Show and Cancel as separate destructive actions underneath. Click a step to move the appointment to that status
- Any alerts that apply, such as a skin test warning or an outstanding deposit
- Group with another appointment (or Manage group) for linked bookings
- Notes — a button with an amber count badge when the appointment has notes attached. Click it to open the notes modal, where you can read, add, pin, and filter General and Colour notes
- Badges for the customer and the appointment (VIP, Running Late, First Visit, and so on)
Hover toolbar: Hovering over an appointment card on the calendar reveals a small vertical strip of icons flush to the card's right edge — Cut appointment, Copy appointment, View appointment, and Create transaction (which reads Continue transaction and turns amber when a bill has already been started). The toolbar sits outside the card so it doesn't cover the resize handles, which means even short 15-minute appointments can be resized without fighting the icons for space. The toolbar flips to the left side automatically near the right edge of the calendar.
On mobile: Tapping an appointment opens an action sheet showing the customer, their contact details (tap to call/email), the service and fee, above the actions:
- View appointment — Opens the appointment details page
- Edit appointment — Opens the appointment edit form
- Create transaction — Starts (or continues) a bill for the appointment
- Copy appointment / Cut appointment — Puts the appointment on the clipboard for pasting elsewhere
- Refund deposit — Shown only while a paid deposit is held; refunds it without cancelling (the dialog explains if the refund can't be actioned, e.g. a shared group deposit)
- Cancel appointment — Shown for live appointments in its own red section at the bottom; runs the same deposit-aware cancellation flow as the desktop calendar, including the "this one or all linked" choice for group bookings
Drag and Drop:
- Drag an appointment to a different time slot to reschedule it
- Drag an appointment to a different staff column to reassign it
- Resize an appointment by dragging its top or bottom edge to adjust the duration
- If a drag or resize fails validation (e.g., the staff member already has a booking at that time, or the slot is outside their working hours), a toast notification appears explaining why the action could not be completed and the card springs back to where it started
- Drop an appointment onto a staff member who isn't rostered for that time — or onto a day they have approved leave — and the Outside scheduled roster dialog appears, naming the staff member and the reason. Cancel puts the calendar back as it was; Book anyway records the override. The same check runs when you paste a cut, copied or rebooked appointment from the clipboard (see Tutorial 5.1)
- If a resize or move would overrun the next booking, the Slot is too short dialog appears with the available gap, the appointment length and the shortfall. Choose Shrink to [X]min and resize to fit it into the gap, or Cancel to leave the appointment alone
Staff-level duration on drag: When you drag an appointment to a different staff member, the appointment automatically resizes to match that staff member's level-specific duration for the service (configured under Services — see Tutorial 4.3 and 7.1). The drag preview itself live-resizes while you hover over a different column, so the ghost matches what will be saved when you release. If you've manually resized an appointment yourself, that custom duration is preserved when you move it to another staff column.
Step 8: Use Keyboard Shortcuts
Luminate provides keyboard shortcuts to help you navigate the calendar quickly. These shortcuts only work when you're not focused on an input field (such as a search box).
Global Shortcuts (work from any page):
- d - Go to Dashboard
- a - Go to Appointments (Day view)
- w - Go to Appointments (Week view)
- t - Go to QuickPOS
Calendar-Specific Shortcuts (only work on the Appointments page):
- ← (Left arrow) - Previous day (in Day view) or previous week (in Week view)
- → (Right arrow) - Next day (in Day view) or next week (in Week view)
- j - Open the Jump to Week dialog
These shortcuts are disabled when you're typing in a search field, text box, or any other input element, and while a dialog or side panel is open — so pressing a inside an open dialog won't navigate away from it.
Common Pitfalls
"No staff are rostered for this time"
This amber warning appears on the New Appointment and Edit Appointment forms, below the Staff Member field, when nobody is rostered for the time you've chosen. You can still create the appointment. To fix the underlying gap, create shifts in the Roster section so the app knows when staff are available.
Striped columns in the calendar
Striped/faded columns indicate staff members who are not rostered on the selected date. You can still book appointments with them, but this serves as a visual reminder.
Staff not appearing on the calendar
If a staff member doesn't appear, check that:
- They are marked as Active in their staff profile
- They have a shift on the roster for the selected date
Tips and Best Practices
- Use the Today button - Quickly return to the current date after browsing other dates
- Check the now line - The red line shows the current time, helping you see what's coming up next
- Monitor the Waitlist panel - Keep an eye on the waitlist count to fill cancellations quickly
- Use Week view for planning - Review individual staff schedules when planning ahead
- Use List view for searching - When you need to find a specific appointment, the List view's filters are fastest
- Jump ahead with j - Press j or click Jump to skip multiple weeks at once, ideal for checking availability weeks out
- Pivot with the column headers - Click a staff name in Day view to see that person's whole week, then click a day header in Week view to drop back into that day
Related Tutorials
- Tutorial 2.2: Booking and Managing Appointments - Learn how to create and modify appointments
- Tutorial 2.3: Working with the Waitlist - Master the waitlist system for managing demand
- Tutorial 4.3: Staff Levels and Experience Tiers - Why the same service can take a different length of time for different staff
- Tutorial 5.1: Setting Up Your Weekly Roster - Create the shifts that decide which calendar columns are rostered
- Tutorial 7.1: Creating and Managing Your Service Menu - Set service colours and per-level durations
Frequently Asked Questions
Can I see multiple staff members in Week view?
No, Week view shows one staff member at a time. Use the Previous staff and Next staff buttons (chevron icons) to switch between team members. For viewing all staff on one day, use Day view.
Why do some staff columns appear faded?
Faded/striped columns indicate staff who are not rostered on the selected date. This visual cue helps you see at a glance who is scheduled to work.
How do I know what time it is on the calendar?
In Day view, a red horizontal line indicates the current time. This line only appears when viewing the current date and automatically updates every minute.
Can I drag appointments to reschedule them?
Yes, in Day and Week views you can drag appointments to a new time slot or staff column. The appointment will be updated automatically. If the move fails validation (e.g., staff not available at that time), a toast notification will explain why. For linked appointments (multi-service bookings), you'll be prompted about whether to move all linked appointments together.
What do the appointment colours mean?
The card's background colour comes from the service it's booked for — you can customise service colours by editing the service in Services settings. The thin stripe down the card's left edge is a separate signal: it shows the appointment's status.
What keyboard shortcuts are available?
Press d to go to Dashboard, a for Appointments (Day view), w for Week view, or t for QuickPOS. On the Appointments page, use the arrow keys (← and →) to navigate between days or weeks, or press j to open the Jump to Week dialog. Shortcuts don't work while you're typing in a form field, or while a dialog or panel is open.
Can I block out time on the calendar?
Yes, there are two ways to block time:
- From the header - Use the Block Time button in the top-right corner of the calendar
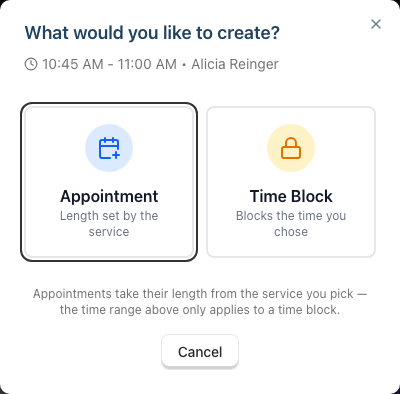
- From the calendar - Click an empty time slot, or drag down the column to mark out a longer range. Either way the What would you like to create? dialog opens, showing the time range and staff member you picked. Choose Time Block ("Blocks the time you chose") rather than Appointment ("Length set by the service")
Time blocks reserve calendar space for non-appointment activities like breaks, training, or admin time. Note that only a time block uses the exact range you dragged — an appointment always takes its length from the service you pick.
Last Updated: August 2026 Verified against Luminate codebase: August 2026