
The Customer Booking Experience
Introduction
Understanding what your customers see when they book online helps you provide better service and answer their questions. The Luminate online booking portal guides customers through five core steps: verifying their identity, choosing a service (or rebooking a previous appointment), selecting a stylist, picking a date and time, and confirming their booking. New clients also give their name on a short Your details step. Customers booking colour services for the first time complete a skin test screening questionnaire as a further step. If your salon requires deposits and has Stripe Connect active, customers pay their deposit after confirming.
This tutorial walks through the complete customer journey, explaining each step from the customer's perspective. This knowledge helps you guide customers who have questions and ensures your booking settings create the best possible experience.
Who this is for: Salon owners, administrators, and staff who want to understand the online booking process from the customer's point of view.
What you'll learn:
- Each step of the online booking process
- What customers see at each stage
- How identity verification works for both new and existing clients
- How new clients give their name on the Your details step
- How returning customers can rebook previous appointments quickly
- How the skin test screening flow works for first-time colour clients
- What happens after a booking is confirmed
- How the deposit payment step works (when applicable)
Time to complete: 10-15 minutes to read through
Prerequisites
Before reviewing this tutorial:
- Online booking should be enabled for your salon (Tutorial 18.1)
- Services and staff should be configured
- Consider opening your booking page in a separate tab to follow along
The Booking Journey Overview
When customers visit your booking page, they see your salon's business name, logo (if uploaded), and a Book Appointment heading. A progress bar sits under the heading. It shows one small circle per step, joined by connecting lines. The circle for the step the customer is on carries an icon and the step name; the other circles show their step number, and their names appear as tooltips on hover. Completed steps turn green with a tick. On a phone, the bar becomes a row of dots with the current step name beside it.
The booking process has five core steps:
- Identity - Verify identity via email or phone code
- Services - Select a service (or rebook a previous appointment)
- Stylist - Choose a preferred stylist or "Any Available"
- Date & Time - Pick an available slot
- Confirm - Review details and complete the booking
Extra steps appear depending on who is booking and what they book:
- Your details - Inserted after Identity when the verified email or phone doesn't match an existing client. The customer gives their first and last name here.
- Screening - Inserted between Services and Stylist when a new client selects a service that requires a colour test. Customers complete a 3-part skin test questionnaire and the colour service is automatically swapped for a skin test appointment.
- Deposit Payment - After Step 5, customers booking a service that requires a deposit are redirected to a Stripe-hosted payment page (only when your salon has Stripe Connect active).
The bar also gets shorter in one case. A customer can return to a booking link they have already verified on, either after a page refresh or from the Book Another Appointment button on a confirmation page. They skip Identity and start on Services, so the bar shows four steps.
Customers navigate using Continue and Back buttons at the bottom of each step. The browser's own Back and Forward buttons move between steps too, and keep what has already been filled in.
Step 1: Identity
The very first step in the booking flow asks the customer to identify themselves, so that returning customers are recognised immediately and can be offered personalised options like rebooking.
What Customers See
Customers are not asked to declare whether they are new or returning — the system works that out for them automatically once their contact is verified. This avoids the common mistake of a returning customer picking "new" (or vice versa) and ending up on the wrong path.
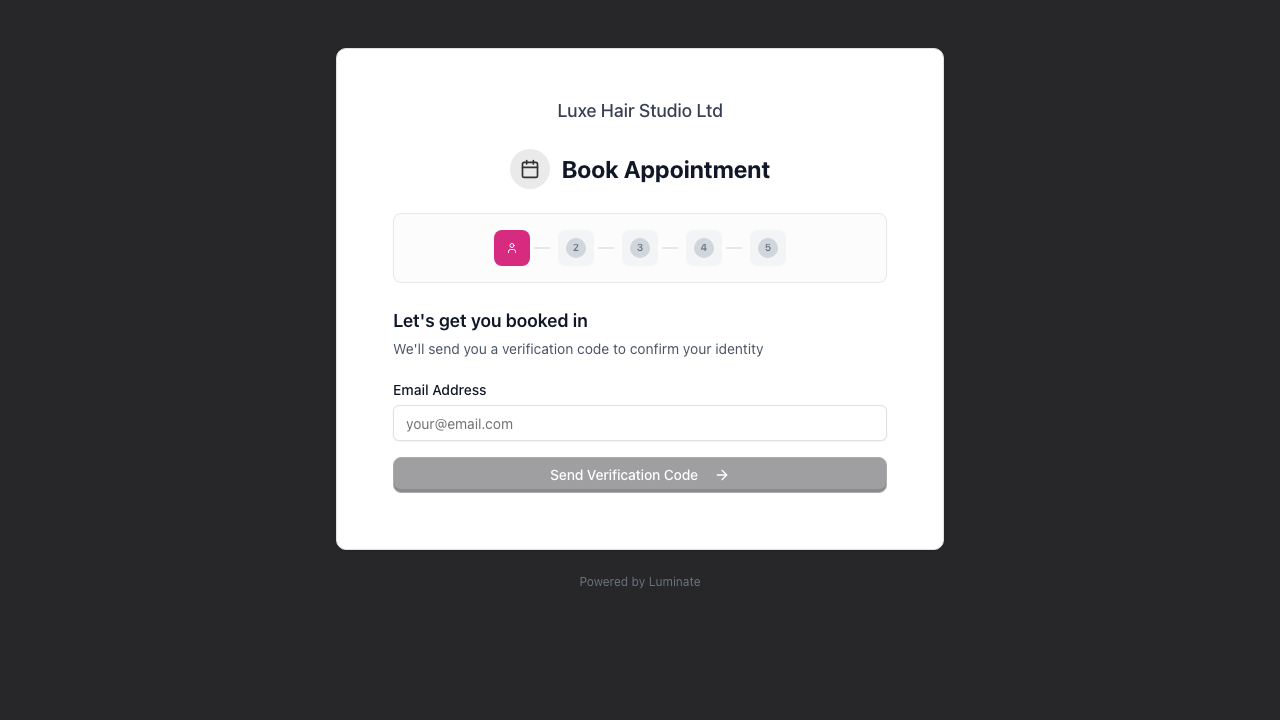
The screen opens with the heading Let's get you booked in and the subtext "We'll send you a verification code to confirm your identity". Customers simply enter their contact details:
- If your salon has SMS verification enabled, customers see two tabs: Email and Phone
- If SMS is not enabled, customers only see an email input field
- Phone numbers support international formats with country selection
Customers enter their email or mobile number and click Send Verification Code.
After Verification: New vs Existing
Once the customer enters their code, Luminate checks whether the email or phone matches an existing customer in your salon:
- Existing customer (match found): They proceed straight into the booking flow — the Book Again rebook screen or the service list. They are never asked for their name, because the salon already has it.
- New customer (no match): A Your details step appears in the progress bar and the customer goes there next to give their name (see below).
Verification Process
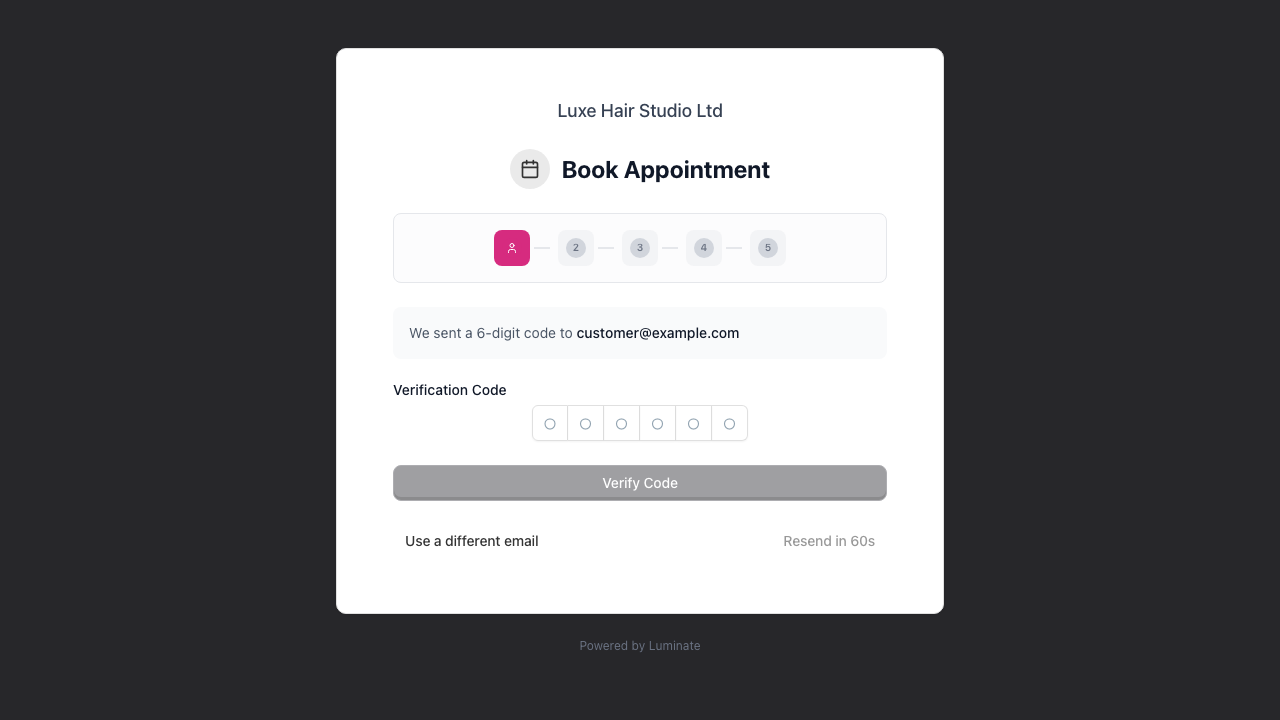
After requesting a code, customers see a confirmation panel showing "We sent a 6-digit code to [their email/phone]" and a 6-slot input.
- Luminate sends a 6-digit code to their email or phone
- The customer enters this code in the 6-digit input field
- The code auto-submits when all 6 digits are entered, or the customer can click Verify Code
- Once verified, they automatically proceed to the next step
Resending and switching contact:
- If a code doesn't arrive, customers see a countdown Resend in Xs - once it reaches zero, they can click Resend code
- They can switch to a different contact by clicking Use a different email or Use a different phone
Selecting Your Profile (Multiple Matches)
Occasionally, a customer's email or phone number matches multiple existing profiles in your salon's database. This can happen when:
- A customer booked under slightly different names on previous visits
- Family members share a phone number or email
- A customer was accidentally added twice by staff
What customers see: After verifying their code, customers see a We found multiple profiles screen showing:
- A list of matching customer profiles
- Each profile shows the customer's name, email, phone (when present), and when they last visited (e.g., "Last visit: Jan 2025")
- An I'm a new customer option at the bottom
How it works:
- The customer reviews the list of profiles
- They select the profile that belongs to them (their booking history will be linked to this profile)
- Or they select I'm a new customer if none of the profiles are theirs - they'll then need to enter their first and last name in the fields that appear before continuing
- They click Continue to proceed with booking
For returning customers: Selecting their existing profile ensures the new booking is added to their appointment history, and staff can see their preferences and previous visits.
For genuinely new customers: Selecting I'm a new customer creates a fresh profile. If this creates a duplicate, salon staff can merge the records later using the Duplicates feature.
Why Verification Matters
This step prevents:
- Fake or spam bookings
- Incorrect contact details
- Anonymous bookings you can't follow up on
Every booking has a verified email or phone number you can use to send confirmations and reminders.
Common Customer Questions
"Why do I need to verify?" This confirms your contact details so the salon can send you booking confirmations and reminders.
"I didn't receive the code" Check your spam/junk folder for emails. For SMS, ensure you entered the correct mobile number. You can resend the code after 60 seconds.
"It asked for my name, but I've been here before" Either the email or phone you verified didn't match any record at this salon — perhaps the salon has you under a different email or number — or you started a booking before and closed the tab on this step, which left a profile with no name on it. Enter your name to finish the profile off, or click Use a different email/phone on the code screen and try the contact details the salon already has on file. If a second profile does get created, staff can merge the two later.
"Why am I being asked to select a profile?" This means your email or phone matches more than one customer record in the salon's system. Select the profile that's yours to ensure your booking history stays together. If you're truly new, select I'm a new customer.
Your Details (New Clients Only)
The customer gets a short step of their own before the service list when the salon still needs their name. It appears in the progress bar as Your details, between Identity and Services. Two cases reach it:
- The verified email or phone matches nobody in your salon.
- It matches a profile that has no name yet. This happens when an earlier visit stopped on this step, which leaves an unnamed profile behind. The customer is asked for their name again rather than booked as "Guest Customer".
What Customers See
The heading reads Your details with the subtext "We just need your name to finish setting up your profile." Two fields sit below it, side by side:
- First Name (required)
- Last Name (required)
A full-width Continue button stays inactive until both fields have something in them.
How It Works
- The customer types their first and last name
- They click Continue (pressing Enter in either field does the same thing)
- Their name is saved against the contact they just verified, and they move on to the service list. An unnamed profile from an earlier visit is filled in rather than duplicated, so the salon never ends up with two records for the same person
This step has no Back button of its own. A customer who typed the wrong email can press the browser's Back button to return to the code screen, where the Use a different email link is waiting. The code they already typed is still there.
Common Customer Questions
"Why do you need my name?" So the salon knows who is coming in, and so your appointment can be found again when you call or arrive.
"I only gave my first name and it won't let me continue" Both names are required. Fill in the second field and Continue becomes active.
Step 2: Select a Service (or Book Again)
"Book Again" for Returning Customers
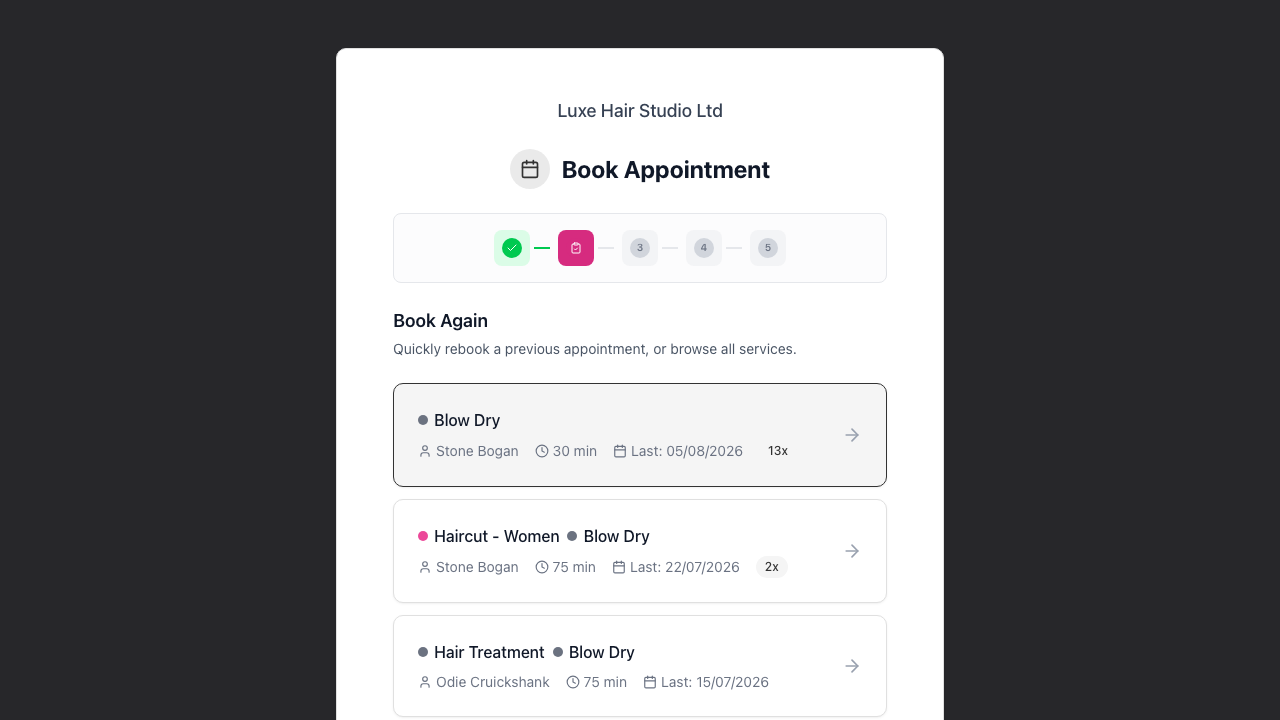
Verified existing customers reach this step and see a Book Again sub-step before the full service list. The heading reads Book Again with the subtext "Quickly rebook a previous appointment, or browse all services."
Each card shows:
- The previously booked services, each with its colour dot. A card can list more than one service, because it mirrors what was actually booked that day
- The stylist who carried out the appointment
- The total duration in minutes, annotated "(your usual)" if it differs from the catalogue length
- The date of that visit, labelled Last: (for example, "Last: 05/08/2026")
- A small badge counting how many times the customer has had this combination (e.g., "3x"), shown once they've had it more than once
- An amber warning if the original stylist is no longer available for online booking - the card reads "[stylist] is no longer available for online booking. We'll match you with the best available stylist," and the rebooking proceeds with "Any Available" in their place
Customers can either:
- Click a card to rebook that exact combination - this skips straight to Date & Time with the services and stylist pre-filled
- Click I'd like to book something different at the bottom to fall through to the full service list
Rebook cards are built from any past appointment at your salon, whether it was booked online or taken in the salon, so a client's first online booking can still offer their usual combination.
An existing client with no past appointments to offer doesn't see this screen at all - they go straight to the service list. The exception is the "restrict existing clients to rebook only" setting: with that on and no history to show, they see a No previous appointments message asking them to contact the salon directly.
What Customers See (Standard Service Selection)
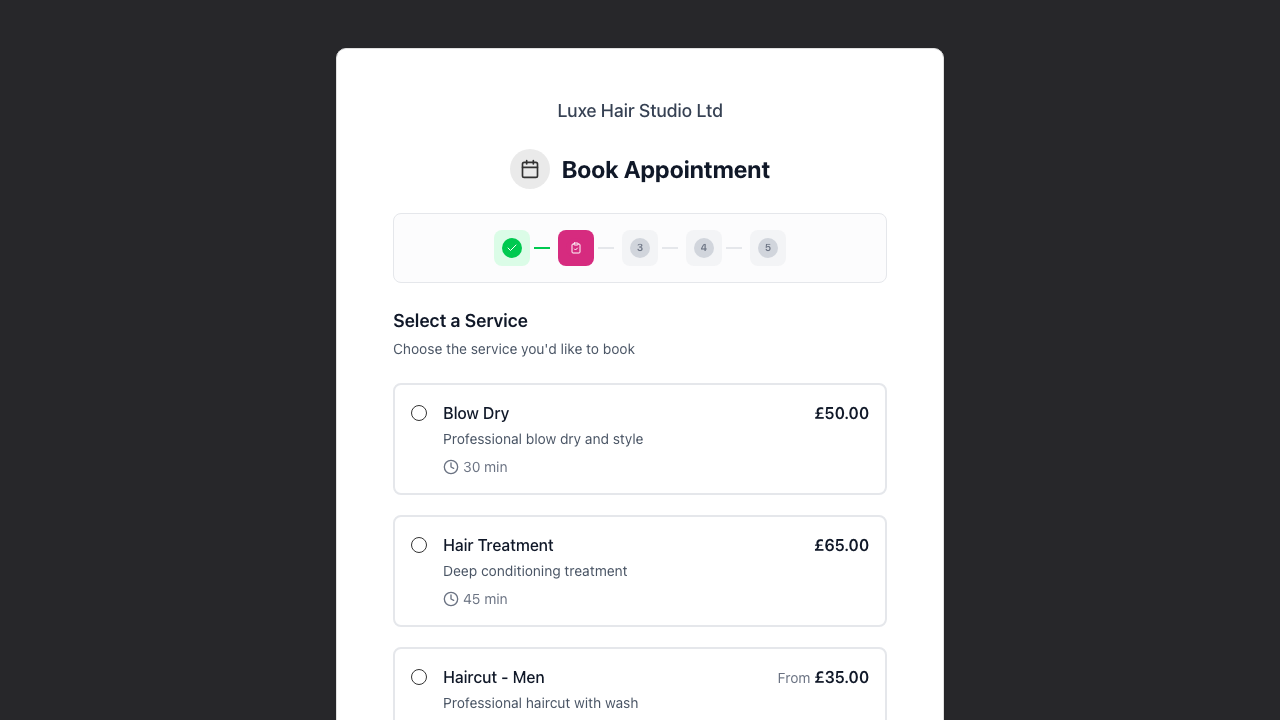
The heading reads Select a Service with the subtext "Choose the service you'd like to book". A list of all available services appears, each showing:
- Service name
- Price (or "From £X" if prices vary by stylist level)
- Brief description (if you've added one)
- Duration (e.g., "30 min", "45 min", "1h", "1h 30m", "2h"), with a "From" prefix if duration varies by stylist level
- Deposit badge (if the service requires a deposit) - shown in amber text as either "X% deposit required" or "£X deposit required"
Services are displayed as selectable cards with radio buttons. Customers select one service per booking.
How It Works
- Customers click a service card to select it
- Only one service can be selected per booking
- The selected service is highlighted with a coloured border
- A summary appears at the bottom showing the selected service name, price, and duration
Note: If your salon uses staff level pricing (e.g., Senior, Junior, Director stylists at different rates), customers see "From £X" showing the lowest available price and "From" before the duration if it also varies. The exact price and duration are confirmed once they select a specific stylist.
When Customers Can Continue
The Continue button becomes active once a service is selected. On the Book Again screen it stays inactive, because customers move on by tapping a card or the "book something different" link instead.
Common Customer Questions
"Why can't I see a particular service?" The salon controls which services appear on their online booking page. Some services may be available in-salon only. Contact the salon directly to book services not listed on the booking page.
"Why does it say 'From' before the price?" This means the price varies depending on which stylist you choose. You'll see the exact price after selecting a stylist in the next step.
"Can I just rebook my last appointment?" Yes - if you're an existing client with previous appointments at the salon (booked online or in-salon), you'll see a Book Again screen listing your previous appointment combinations. Tap the one you want and you'll skip straight to choosing a date and time.
"Can I book two services at once?" Choosing from the service list gives you one service per booking. A Book Again card can hold more than one, though: if your last visit was a cut and a blow dry together, tapping that card rebooks both in one appointment. For any other combination, contact the salon and they'll book it for you.
Skin Test Screening (Conditional)
If a new client selects a service that requires a colour test (e.g., permanent colour, balayage, lightening), an additional Screening step is inserted into the journey between Services and Stylist. Existing customers don't see this step - the salon already has their patch test on file.
What Customers See
A blue info banner explains: "Skin Test Required - Before your colour appointment, we need to complete a skin test. Let's start with the screening questionnaire now, then we'll book you in for the patch test."
The screening is a 3-step mini-wizard with its own progress bar showing Step X of 3 and the current sub-step name (Questions, Signature, or Confirm).
Sub-Step 1: Questions
A Health Screening card lists every screening question your salon has configured (allergies, medical history, etc.). A counter at the top shows "X of Y answered". Each question must be answered before proceeding.
Sub-Step 2: Signature
A Your Signature card asks for:
- Your Full Name (required text input)
- Your Signature (touch/mouse-drawn signature pad)
Sub-Step 3: Privacy & Consent
A Review & Confirm card displays:
- The salon's full consent statement
- A checkbox to I accept the Privacy Policy linking to the Luminate Privacy Policy
- A summary showing how many questions were answered and who signed
How It Works
The Screening step has its own internal Back and Next buttons (the parent page navigation is hidden). On the final sub-step, the Next button becomes Complete Screening. The browser's Back and Forward buttons also move between the three sub-steps, keeping the answers already given. Once finished:
- The screening answers and signature are saved to the customer's profile
- The customer's selected colour service is automatically swapped for the salon's designated skin test service
- The customer continues to the Stylist step to book the patch test appointment
- A blue notice appears on the steps that follow, reminding them this is a patch test - titled Skin Test Booking on the Stylist step and Skin Test Appointment on the review step
After the patch test, the salon will manually book the original colour appointment once the skin test is cleared.
Common Customer Questions
"Why do I have to fill in this questionnaire?" Patch tests are required by colour manufacturers and your salon's insurance for first-time colour clients. The questionnaire captures any allergies or medical conditions that affect what products can be used.
"Will my colour appointment be booked too?" Not yet. This first booking is for the skin test only. Once the test is cleared (typically 48 hours later), the salon will get in touch to book your colour appointment.
Step 3: Choose Your Stylist
What Customers See
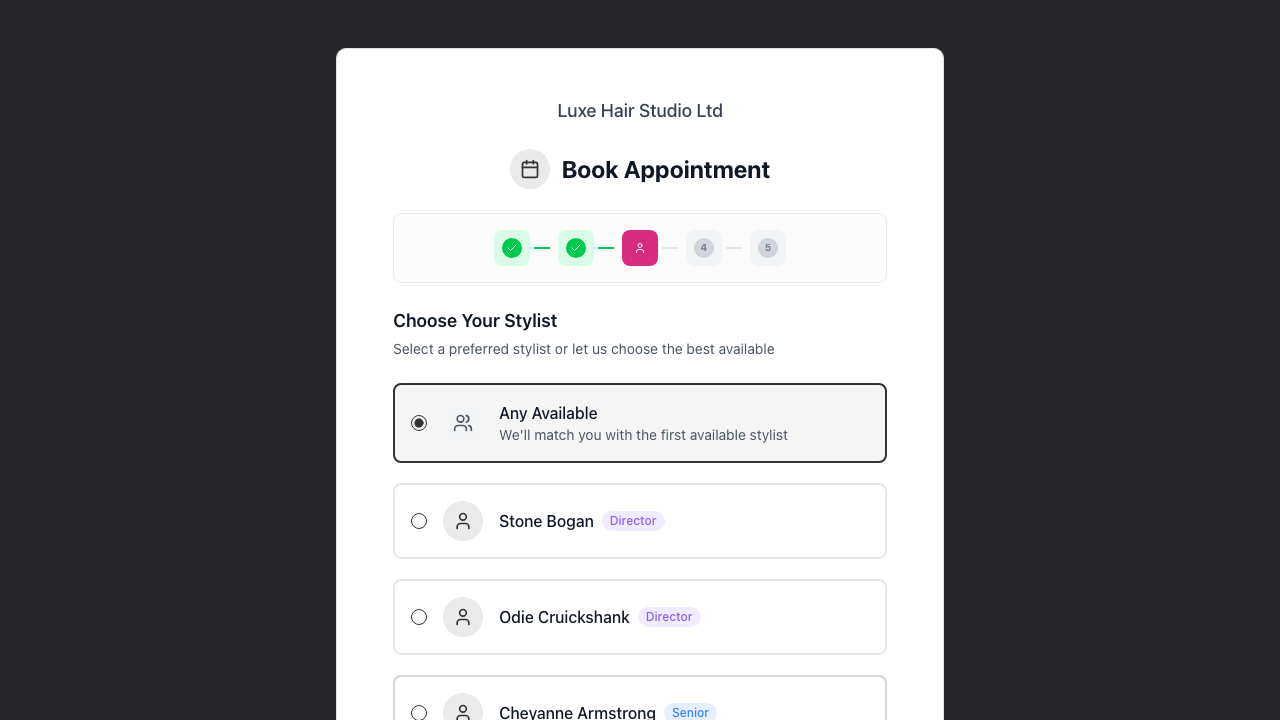
The heading reads Choose Your Stylist with the subtext "Select a preferred stylist or let us choose the best available". A list of stylists appears plus an "Any Available" option at the top:
- Any Available - "We'll match you with the first available stylist"
- Individual stylists - Listed by name with a profile icon and their staff level badge (e.g., Senior, Junior, Director)
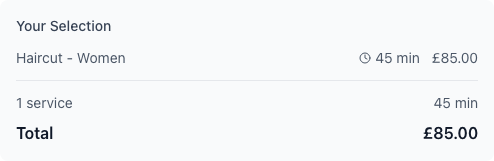
A summary panel shows Your Selection with the selected service name, duration, and price. It also shows a "1 service" count, total duration, and total price. When a specific stylist is selected, the prices and durations in the summary update to reflect that stylist's level pricing (removing any "From" prefix). If the service requires a deposit and your salon has Stripe Connect active, a Deposit due line appears showing the deposit amount.
If the customer is booking a skin test appointment, an additional info banner reads "Skin Test Booking - You're booking a patch test appointment. Once your skin test is confirmed, we'll get your colour appointment booked in."
How It Works
- "Any Available" is selected by default
- Customers can select a specific stylist if they have a preference
- Only one option can be selected (radio button behaviour)
- Selecting a specific stylist updates the price and duration in the summary to show exact values (the "From" prefix disappears)
When Customers Can Continue
This step is optional. Customers can continue immediately with "Any Available" selected, or choose a specific stylist first.
Common Customer Questions
"Do I have to choose a specific stylist?" No, selecting "Any Available" means the salon will assign the first available stylist who can perform your selected service.
"What if my preferred stylist has no availability?" If they choose a specific stylist, only that stylist's available slots will show on the next step. If none are available, they can go back and select "Any Available" or try different dates.
Step 4: Date & Time
What Customers See
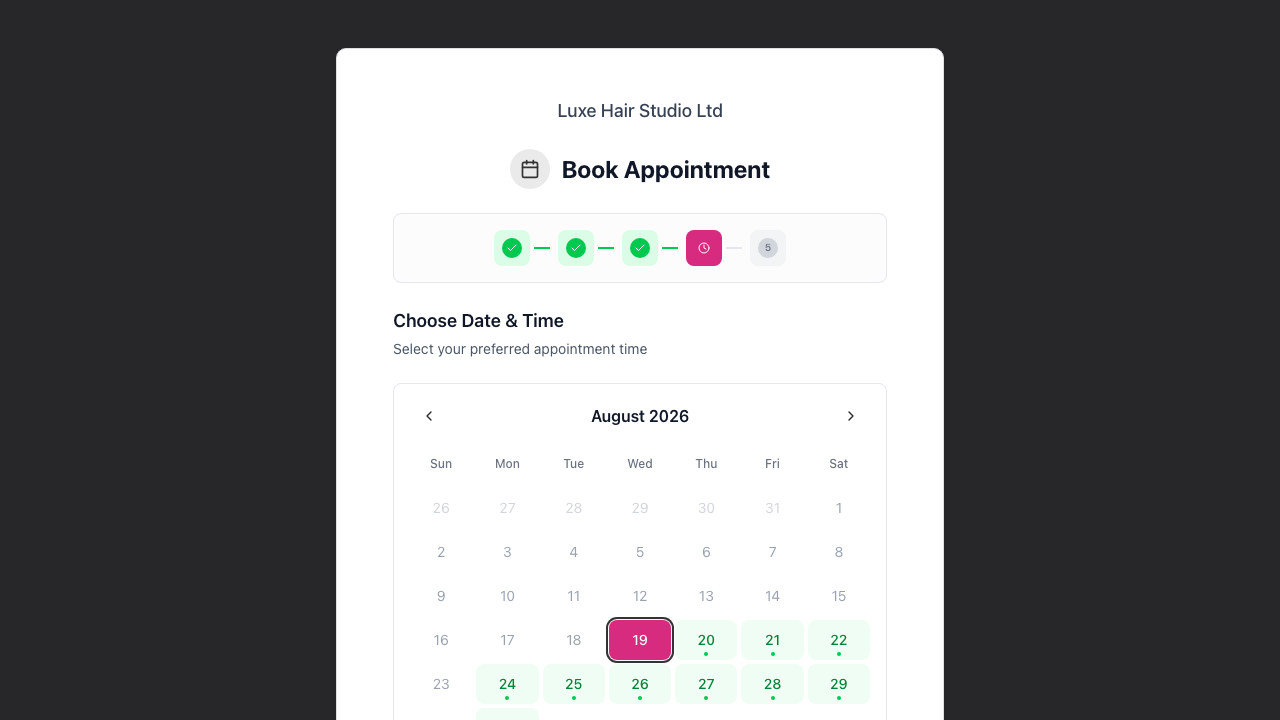
The heading reads Choose Date & Time with the subtext "Select your preferred appointment time". The page shows:
- A calendar showing the current month
- Available dates are highlighted with a green background and a small green dot
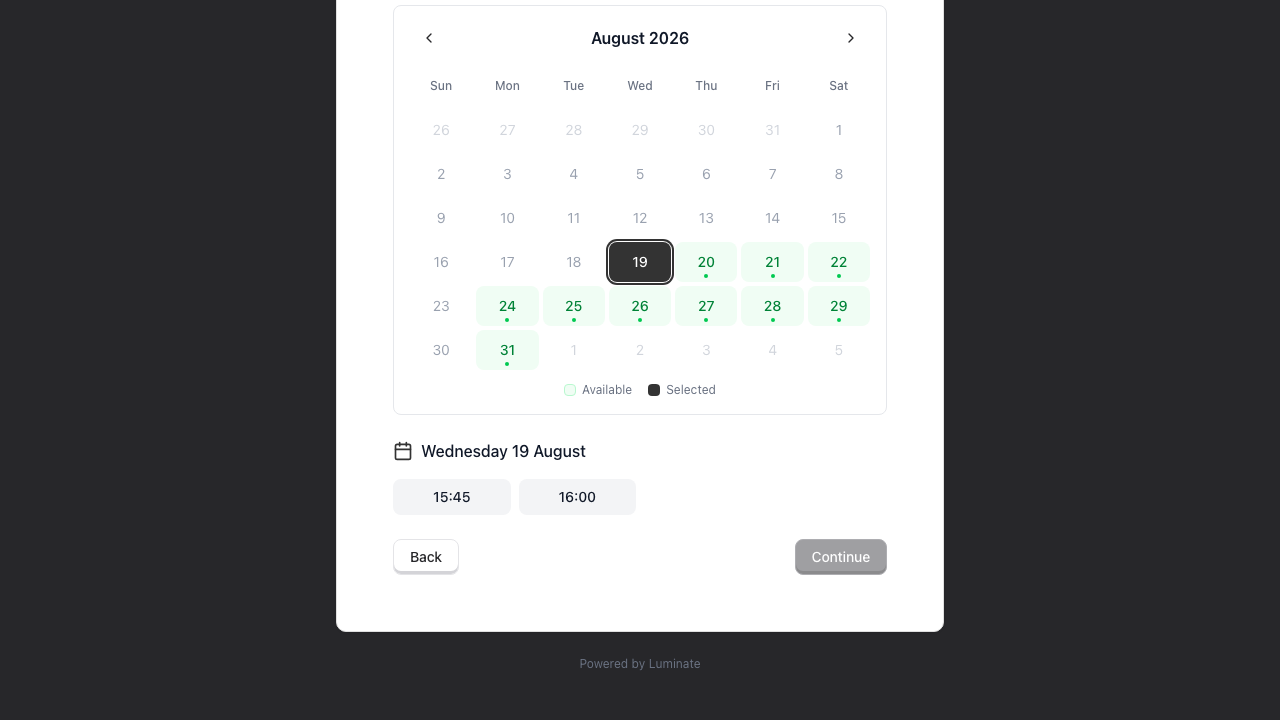
- A legend at the bottom of the calendar showing Available and Selected indicators
- After selecting a date, available time slots appear in a grid below the calendar
How It Works
Selecting a Date:
- Available dates are marked with a green dot and green highlighted background
- Customers click on an available date to select it (the selected date turns solid)
- They can navigate between months using the arrow buttons either side of the month name
- Today's date has a ring around it for reference
Selecting a Time:
- After selecting a date, time slots appear below the calendar with the chosen date written out above them (e.g., "Wednesday 19 August")
- Available slots show as selectable buttons in 24-hour format (e.g., "09:00", "09:30", "16:00")
- Each slot shows the start time of the appointment
- Customers click a slot to select it
How Availability is Determined: The system shows slots where:
- A staff member (the selected one, or any if "Any Available") is rostered for a shift on that day, and is not on approved leave
- The slot isn't already booked
- The time fits within your minimum lead time and maximum advance settings
- There's enough time for the selected service plus any buffer time
Customers cannot book outside a stylist's roster. The public booking flow is hard-blocked from selecting any slot that falls outside a stylist's rostered shift, or on a day they have approved leave. There is no override path on the customer side - those slots simply do not appear, and any attempt to submit one (e.g. via a saved link) is rejected as unavailable. The customer sees "This time slot is no longer available. Please choose a different time." and picks again. Front-desk staff can still override roster constraints for in-salon bookings (see Tutorial 5.1 → Booking Outside a Shift).
If nothing at all can be booked within your advance window, the calendar shows a message instead of dates, asking the customer to contact the salon directly.
Common Customer Questions
"Why are some dates greyed out?" Dates without availability appear greyed out. This could be because:
- Staff aren't rostered on those days, or are on approved leave
- All slots are already booked
- The date is beyond your maximum advance booking limit
- The date is within your minimum lead time
"I selected a stylist but there's no availability" Go back and try "Any Available", which shows all staff availability, or check dates further in the future.
"The time I want isn't available" That slot may already be booked, or staff may not be available. Try a different time or date, or contact the salon directly.
Step 5: Review & Confirm
What Customers See
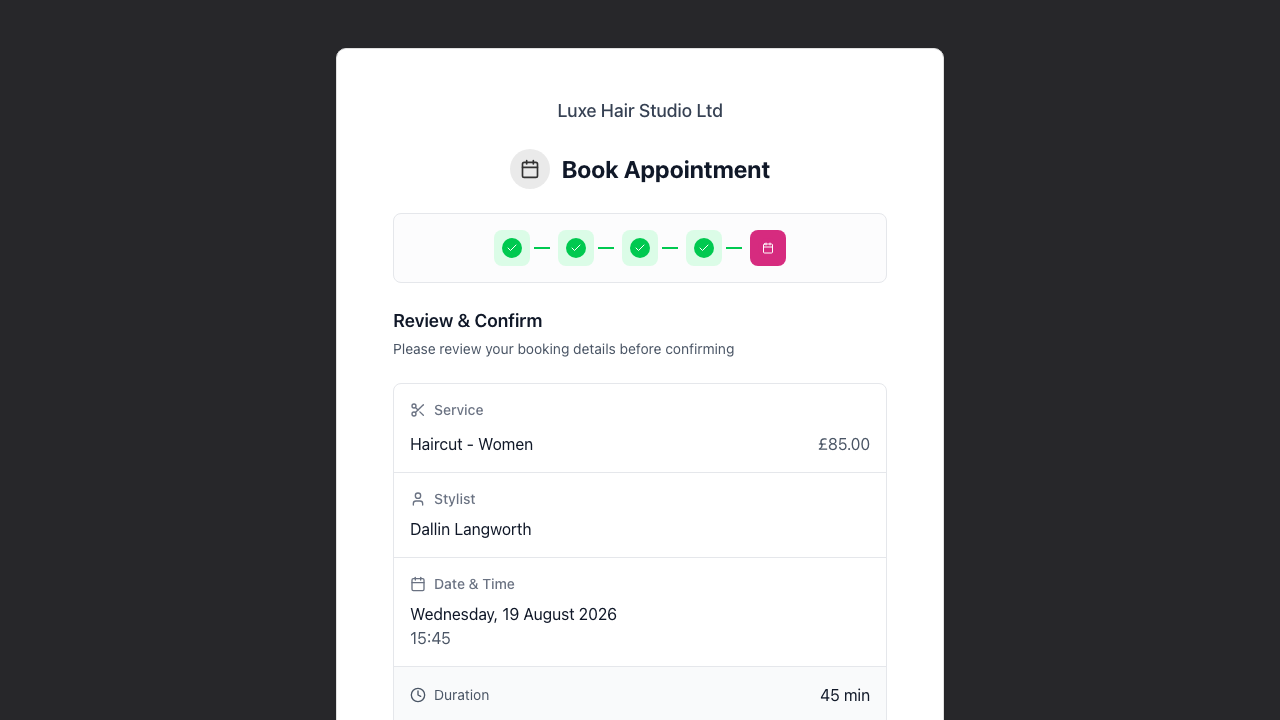
The heading reads Review & Confirm with the subtext "Please review your booking details before confirming". The page shows:
Skin Test Notice (if applicable): If the customer is booking a patch test, a blue info banner appears at the top explaining that they'll be able to book their colour appointment once the skin test is complete and cleared.
Deposit Notice (if applicable): If the service requires a deposit and the salon has Stripe Connect active, an amber Deposit Required notice appears. It gives the deposit amount, says the customer will be redirected to a secure payment page after confirming, and states the payment deadline ("Please complete payment within 30 min - unpaid bookings are automatically cancelled").
Booking Summary Card:
- Service - Each service being booked, with its price (a rebooked combination lists every service in it)
- Stylist - The assigned or selected stylist (or the specific stylist name from the time slot)
- Date & Time - The full date (e.g., "Wednesday, 19 August 2026") with the start time below it
- Duration - Total appointment length (with "From" prefix if applicable)
- Total - Total price (with "From" prefix if applicable)
- Deposit due today - If a deposit is required, this line appears below the total showing the deposit amount
Booking for - The customer's name and verified contact details (email or phone)
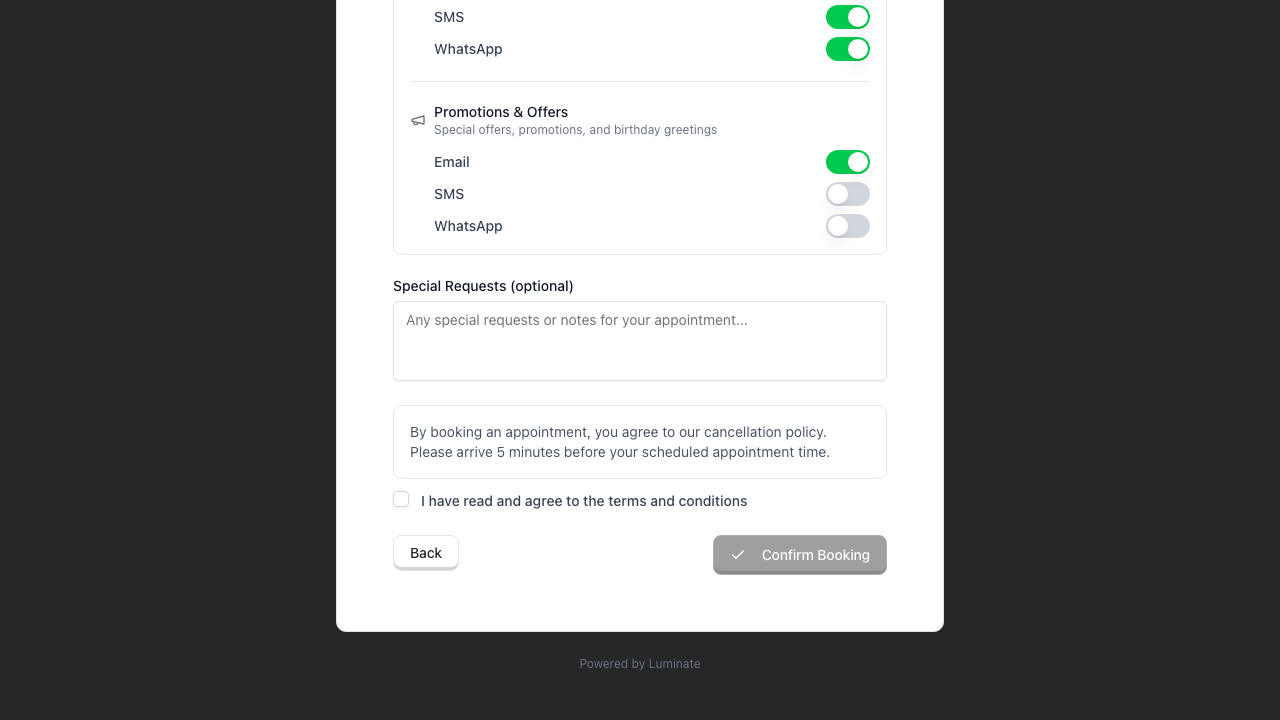
Communication Preferences - A section where customers choose how they'd like to hear from the salon:
- Appointment Reminders - Toggles for Email, SMS (if customer has a phone number), and WhatsApp (if customer has a phone number)
- Promotions & Offers - Toggles for Email, SMS, and WhatsApp for special offers, promotions, and birthday greetings
Special Requests (optional) - A text field for notes
Terms & Conditions - If you've configured booking terms, a scrollable text box displays the terms and a checkbox reads "I have read and agree to the terms and conditions"
How It Works
- Customer reviews all details
- They set their communication preferences using the toggles
- They can add optional notes in the Special Requests field
- If terms are configured, they check the box to accept your terms and conditions
- They click Confirm Booking to complete the booking (or Confirm & Pay Deposit if a deposit is required)
After Clicking Confirm
When a deposit is required, clicking Confirm & Pay Deposit briefly shows a "Redirecting to secure payment" loading screen with a spinner and the deposit amount before redirecting the customer to the Stripe Checkout page (see Step 6 below).
When no deposit is required, clicking Confirm Booking creates the booking and takes the customer straight to the Booking Scheduled confirmation page.
The Confirmation Page
The confirmation page shows:
- A success message: "Your appointment has been scheduled. We'll be in touch shortly to confirm."
- Their booking reference (format: XX-YYYYYY, e.g., "LH-F54E32")
- Full appointment details including date, start and end time, stylist, service, duration, and total
- Deposit status (if applicable) - a coloured panel reading Deposit Paid, Deposit Processing, or Deposit Pending depending on whether the payment has been received, is still settling, or hasn't been completed
- A Your Details section showing the customer's name and verified contact details (email and/or phone)
- A Salon Details section showing the salon's address, phone number, and email
- An Add to Google Calendar button
- A Manage Booking button (only if self-service rescheduling or cancellation is enabled)
- A Book Another Appointment button to quickly book again without re-verifying
- A confirmation notice showing where the confirmation was sent (email or phone)
Common Customer Questions
"Can I add notes to my booking?" Yes, use the Special Requests field on the confirmation step. This is useful for things like "Running 5 minutes late" or "Please avoid a particular product".
"What's the booking reference for?" The reference (e.g., "LH-F54E32") uniquely identifies your booking. Quote it when contacting the salon or checking in.
"Will I get a reminder?" If the salon has reminders enabled, you'll receive them by email or SMS before your appointment.
Step 6: Paying Your Deposit (When Required)
If the salon requires a deposit for the service you've booked and has Stripe Connect active, you'll be redirected to a payment page after clicking Confirm & Pay Deposit.
What Customers See
A Stripe-hosted checkout page showing:
- The salon's name
- The service requiring a deposit, with the deposit amount
- The total deposit amount
- A secure card entry form
How It Works
- After clicking Confirm & Pay Deposit on the review step, the booking is created and the customer is redirected to the Stripe Checkout page
- The customer enters their card details
- On successful payment, the customer is returned to the booking confirmation page showing a Deposit Paid status
- If the customer abandons the Stripe page without paying, the booking is automatically cancelled after 30 minutes
Common Customer Questions
"Is the Stripe payment page safe?" Yes. Stripe is a PCI-compliant payment processor trusted by millions of businesses worldwide. Your card details are handled entirely by Stripe - the salon never sees or stores your full card number.
"What if I don't pay the deposit?" If the payment isn't completed within 30 minutes, the booking is automatically cancelled, the time slot is released, and you receive a cancellation message. You would need to book again.
"What if I close the page by accident?" Go back to the still-open Stripe tab if you have it and finish paying. If it's gone, contact the salon: they can send you a fresh payment link (Tutorial 18.5). Bookings with an unpaid deposit are cancelled after 30 minutes, and you'd then need to book again.
"Why is the deposit amount different from what I expected?" If the salon uses percentage-based deposits with different prices per stylist level, the deposit is calculated based on the price for the specific stylist you selected.
After the Booking
What Customers Receive
- Confirmation email or SMS - Sent immediately with booking details
- Calendar invite option - They can add the appointment to Google Calendar
- Management link - If self-service is enabled, a link to view, reschedule, or cancel
What Appears in Your Salon
The booking appears in your:
- Appointments page - Listed with other bookings
- Calendar - Shown on the relevant date/time
- Dashboard - Counted in today's appointments (if applicable)
The appointment shows the customer's name, service, time, and a note that it was booked online.
Common Pitfalls
"Customer says they booked but we don't see it"
- Check if they completed all steps including the final confirmation
- Ask for their booking reference
- Check under the correct date in your appointments
- Ensure you're looking at the right salon (if you have multiple)
"A returning customer was asked for their name"
After verifying their code, the email or phone they entered didn't match any record at this salon. They may have booked under a different contact previously. Ask them to use the Use a different email/phone link on the code screen and try the alternative contact, or let them create a fresh profile and merge the duplicate later from the Duplicates feature.
"Customer's name doesn't look right"
New customers enter their first and last name on the Your details step, straight after verifying their code. If a customer's name appears incorrect, you can update it from their customer profile. The booking will always have their verified email or phone as a reliable contact method.
"Customer's first colour booking turned into a skin test"
This is by design. New clients booking colour services for the first time complete the screening questionnaire and are booked in for a patch test instead. Once the test is cleared, you'll need to book the original colour appointment manually.
"Customer says the page is slow or not loading"
- The booking page is publicly accessible; no login required
- Suggest they try a different browser or device
- Check your internet connection isn't blocking the page
Tips for Supporting Customers
Test the booking process yourself - Book a test appointment using a personal email to experience what customers see, including the new client and existing client paths.
Keep your services up to date - Ensure names, descriptions, prices, and durations are accurate.
Maintain your roster - The booking page only shows slots where staff are rostered. Keep rosters current.
Monitor online bookings - Check your appointments list regularly for new online bookings.
Add clear service descriptions - Help customers choose the right services by including helpful descriptions.
Configure your skin test service properly - If you offer colour, make sure your designated skin test service is set up so the screening flow has somewhere to land.
Reassure customers that browser back/forward is safe - The browser Back and Forward buttons (and the mobile back gesture) move between booking steps without losing what they've already filled in, so customers can review earlier choices freely. Refreshing the page is different: they stay verified, but they return to the service list and choose their service, stylist and time again.
Related Tutorials
- Tutorial 18.1: Setting Up Online Booking for Your Salon - Enable online booking
- Tutorial 18.2: Managing Your Online Booking Settings - Configure constraints (including "Book Again" and rebook restrictions)
- Tutorial 18.4: Customer Self-Service - How customers manage bookings
- Tutorial 18.5: Collecting Online Booking Deposits with Stripe - Deposit setup and management
- Tutorial 10.1: Setting Up Appointment Reminders - Reminder configuration
- Tutorial 11.1: Colour Test Management - How the skin test service and screening questionnaire are configured
Frequently Asked Questions
Can customers book without creating an account?
Yes. Customers don't need to create an account or password. They verify their identity with a one-time code, and their details are associated with the booking.
What happens if a customer closes the page mid-booking?
Their service, stylist and time selections aren't saved. Their verified identity is: the booking link they were on carries their booking session for two hours, so reopening that same link within the window puts them back at the service list without a new code. Opening your booking page fresh starts them at Identity again.
Can customers book for someone else?
The booking is associated with the contact details entered. If someone books using another person's email, the confirmation goes to that email. It's best for each person to book using their own contact details.
Do customers see the same services as staff?
No. Customers only see the services you tick in Bookable Services on the Online Booking settings tab (Tutorial 18.2). Anything left unticked stays in-salon only, so if nothing is ticked the service list is empty. Inactive services never appear, and your designated skin test service is held back from the list too - it's only used by the screening flow.
How long do customers have to complete a booking?
Booking sessions expire 2 hours after they begin. Within that window, available slots may also become unavailable if someone else books them. Encourage customers to complete bookings promptly.
Can customers modify their selection during booking?
Yes, customers can use the Back button to return to previous steps and change their selections. The browser's Back and Forward buttons also navigate between steps without losing what's already been filled in — useful on mobile, where the back gesture is the natural reflex. Refreshing the page is the one thing that clears choices: the customer stays verified and lands back on the service list, then picks their service, stylist and time again. Changes to the service or stylist may affect available times.
Can customers book multiple services in one appointment?
Yes, through Book Again. Choosing from the service list gives one service per booking, but a rebook card carries whatever was booked together last time - so a returning client can rebook a cut and a blow dry as a single appointment, and the review step shows both services with a combined duration and total. For any other combination, customers should book each service separately or contact the salon.
Can a returning customer rebook their last appointment in one tap?
Yes. Once a verified existing customer reaches the Services step, they see a Book Again screen listing their previous appointment combinations (taken from any past appointment in the salon, whether booked online or in-salon). Selecting one pre-fills the services and (if available) the original stylist, then jumps straight to date and time selection.
Last Updated: August 2026