
Guide for Service Providers (Stylists/Therapists)
Introduction
As a Staff member (service provider) in Luminate, your focus is on delivering excellent service to customers. Whether you're a stylist, therapist, or technician, Luminate helps you manage your schedule, track your appointments, and process transactions for your work.
This guide covers everything you need to work effectively—viewing your schedule, managing your customers, processing payments, and requesting time off. You'll understand exactly what you can access and how to make the most of the system for your daily work.
Who this is for: Team members assigned the Staff role in Luminate—stylists, therapists, beauticians, barbers, or any service provider.
What you'll learn:
- Viewing and managing your personal schedule
- Working with your appointments and customers
- Processing transactions for your services, and your cash-drawer limits
- Sending deposit payment links to customers
- Requesting and tracking your leave
- Using the Lumen AI assistant for quick answers
- Understanding your role's focus and limitations
Time to complete: 10-12 minutes
Prerequisites
Before you begin:
- You should have received a login invitation and completed setup
- Helpful to have read Tutorial 1.3: Understanding Roles and Permissions
- Familiarise yourself with the basic navigation (Tutorial 1.1)
What Staff Can Do
Staff members have a focused set of permissions centred on your own work:
| Feature Area | Staff Access |
|---|---|
| Dashboard | Personal performance stats (Analytics tab) |
| Appointments | Create, edit, manage appointments |
| Your Schedule | Your own column in Day view; your own week in Week view |
| Other Schedules | The whole salon's day is visible in Day view |
| Waitlist | View and manage waitlist entries |
| Skin Tests | View and record skin tests |
| POS/Transactions | Process sales for services |
| Refunds | No access |
| Cash Drawers | Open, close and record movements — no adjustments, no reopening a closed session |
| Customers | View and manage customer profiles |
| Merging duplicate customers | No access |
| Account credit | Take payment by account credit at the till — cannot adjust balances |
| Roster | View all shifts; add, edit and delete your own only |
| Leave | Request and cancel your own leave |
| Services | View only |
| Products | View only |
| Staff records | No access |
| Reports | No access |
| Salon Settings | No access (your own account settings are still yours) |
| Notifications and Campaigns | No access |
| Messages | View and send — cannot close or archive conversations |
| Lumen AI Assistant | Ask questions about your own data |
| Deposit Links | Send deposit payment links from appointments |
| Billing | No access |
Your Dashboard
Location: Sidebar → Dashboard
Your dashboard is personalised to show your work. It is split into a Right Now section at the top and two tabs below: Today's Appointments and Analytics.
Right Now
Under the Right Now heading you'll see at-a-glance cards for the current day:
- Next appointment - Who's coming in next (yours, not the salon's)
- This week's commission - Your commission earned so far this week. This card only appears if you're on a commission-based pay arrangement
- Quick stats - A salon-wide snapshot: today's appointment count for the whole salon, low-stock items, upcoming birthdays, active waitlist entries and the salon's remaining SMS credits
- Alerts - Low stock, high-priority waitlist entries, and pending deposits
Note: the Quick stats strip is deliberately salon-wide — it's shared shop-floor information, not your personal figures. Your own numbers live on the Analytics tab. Skin-test alerts are not shown to Staff; they appear only on a Manager's, Admin's or Owner's dashboard.
Today's Appointments
The first tab lists your appointments for today only. Colleagues' bookings aren't included — for the full salon day, use the calendar's Day view.
Personal Stats
Open the Analytics tab to see your "My Performance" card, which shows:
- My Revenue - Your service revenue for the period
- My Appointments - How many appointments you've completed
- My Clients - Unique clients you've served
- My Commission - Your earnings (if commission applies)
- My Tips - Your share of tips for the period
- My Rebook Rate - Percentage of clients who rebooked with you
- Rank #n of n - Where you stand among all staff, shown as a badge on the card
Below that card you'll also find:
- Monthly Targets - Progress bars against any targets your Manager has set for you. These always measure the current calendar month, regardless of the period you've selected above. If no targets have been set for you, the card doesn't appear at all
- Services Completed and Products Sold - Itemised tables for the selected period, each listing the item, quantity and revenue, with a total row
- Commission tracker - A breakdown of how your commission was earned, shown only if you're on a commission-based arrangement
Use the period selector to view different timeframes (today, this week, this month, or a custom range), and the Export CSV button to download your own figures for the selected period.
Note: Your leave balance is not shown on the dashboard. To see your holiday entitlement and remaining days, go to the Leave page (covered below).
Viewing Your Schedule
Location: Sidebar → Appointments
The calendar shows your appointments and helps you prepare for each day.
Your Calendar Column
When you open the Appointments page, you'll see the full salon calendar. Your column shows:
- Your scheduled appointments
- Service types and durations
- Customer names
- Appointment status (scheduled, confirmed, arrived, completed)
Calendar Views
Switch between views using the Day / Week / List toggle on the toolbar:
- Day - The day's schedule with a column per staff member
- Week - One staff member's week at a time (defaults to you); use the staff selector to view a colleague's week
- List - A simple list of appointments
What You Can See
In Day view you can see the entire salon's day, including every staff member's column. This helps you understand salon flow and availability. In Week view the calendar focuses on a single person — yourself by default — and you can switch to a colleague using the staff selector. Your primary focus should be your own column, but you have full visibility of the salon's day.
Managing Your Appointments
Viewing Appointment Details
Click on any of your appointments to see:
- Customer name and contact details
- Service booked
- Duration and timing
- Notes from the booking
- Appointment status
Updating Appointment Status
Open the appointment and use the buttons on the Status card to track each customer's journey. There are six statuses, and you can move between any of them — the buttons are a row of options, not a fixed sequence:
Scheduled, Confirmed, Arrived, Complete, No Show, Cancel

In everyday use the natural run is:
- Scheduled — the booking as made
- Confirmed — the customer has confirmed they're coming
- Arrived — mark this when your customer walks in
- Complete — mark this when you finish the service
Keeping status updated helps the team know what's happening.
There is no "In Progress" status. Move straight from Arrived to Complete when you finish. Arrived is also the point at which the appointment becomes billable at the till.
Editing Your Appointments
If changes are needed:
- Click on the appointment
- Click Edit
- Modify the details (time, service, notes)
- Click Save
Booking Appointments
You can create new appointments:
- Click New Appointment on the calendar toolbar, or drag out an empty slot in the grid
- Select or create the customer
- Choose yourself as the staff member
- Select the service
- Set the date and time
- Click Save
Note: You can also book appointments for other staff members if needed—useful when a customer asks about a colleague's availability.
Sending Deposit Payment Links
If your salon collects deposits, you can send a deposit payment link directly from an appointment:
- Open the appointment
- Click Send Payment Link on the appointment page — or Send Link in the "Deposit Due" alert if you're working from the calendar's side panel
- The Collect Deposit dialog opens. Check the amount (click the pencil to change it), pick how to send it under Send via — Email, SMS, or Email & SMS — then click Send Payment Link
- The customer receives the link and can pay the deposit online at their convenience
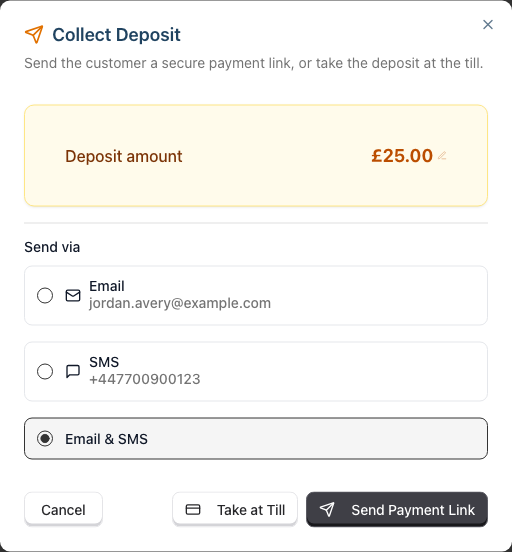
This is useful when a customer books over the phone and you need to collect a deposit to confirm the appointment. The same dialog also offers Take at Till, which hands the sale over to the POS so you can collect the deposit in person instead.
For a booking with several services, each service's deposit gets its own editable row and the footer total is what the link charges.
When the button appears: the payment-link option only shows when your salon has online payments connected (Stripe), the appointment has a deposit amount set that hasn't been paid yet, the customer has an email address or phone number on file and hasn't opted out of transactional messages on that channel, and the appointment is still scheduled, confirmed, or arrived. If you don't see it, one of these conditions isn't met — a cancelled or no-show appointment never offers a link, because there's nothing left to hold with a deposit.
Take at Till works more widely. Only a cancelled appointment blocks it, so you can still collect a no-show's deposit in person at the till even though no link can be sent for it.
Taking Payment from the Appointment
You don't have to go to the till and search for the customer again. On the appointment page, Create Transaction opens a sale already loaded with that booking (it reads Continue Transaction if a draft bill is already open for the appointment). The button disappears once the appointment is marked Complete and billed.
If you see a Refund Deposit button, don't worry. It appears on any appointment that has a deposit already paid, whatever your role. Opening it as a Staff member shows "This deposit can't be refunded from here. You do not have permission to issue refunds." — the deposit is safe and nothing has changed. Ask a Receptionist, Manager, Admin or Owner to hand it back.
Cancelling Appointments
If a customer cancels:
- Click on the appointment
- Click Cancel
- Confirm the cancellation
The slot becomes available for rebooking.
Working with Customers
Location: Sidebar → Customers
You can view and manage customer profiles.
Viewing Customer Profiles
Each profile shows:
- Contact information
- Appointment history
- Any notes or preferences
- Marketing preferences
Adding New Customers
Walk-in or new referral? Create their profile:
- Click Add Customer
- Enter their details
- Record any preferences or notes
- Set marketing consent
- Click Save
Adding Notes
Record important information for future visits:
- Allergies or sensitivities
- Preferred products
- Style preferences
- Personal notes (birthday, how they like their coffee)
Click Edit on the customer profile to add notes.
Viewing Customer History
Before an appointment, check the customer's history:
- Previous services
- Past stylists they've seen
- Any notes from previous visits
This helps you provide personalised service.
What You Cannot Do
Two customer tools are held back from Staff:
- Manage Duplicates — merging two profiles for the same person is a Receptionist, Manager, Admin or Owner job. If you spot a duplicate, flag it rather than trying to tidy it yourself
- Adjust Credit — you can see a customer's account credit balance, but changing it needs a Manager, Admin or Owner
Skin Tests
Location: Sidebar → Skin Tests
You can view and record skin (patch) tests for customers, which matters if you provide colour services. Note that the skin-test alerts panel — the "who's due a test" summary — is a Manager-and-above dashboard feature; from your side you'll see the warning on the appointment itself when you open a booking that needs one.
Waitlist
Location: Sidebar → Waitlist
You can view and manage waitlist entries, and convert one into a booking when a slot frees up. See Tutorial 2.3: Working with the Waitlist.
Processing Transactions
Location: Sidebar → Transactions
You can process payments for your services.
After Completing a Service
- Click New Sale — it's in the top bar on every page, and also at the top of the Transactions list
- Answer Which till are you using? when prompted, and click Continue. Your choice is remembered for future sales
- Select your customer
- Their unbilled appointments appear
- Select the services to charge
- Add any retail products they're buying
- Choose payment method
- Complete the transaction
Tip: pressing T anywhere in Luminate jumps straight to a new sale.
Adding Products
If the customer buys retail products:
- Search for the product
- Add it to the transaction
- The product and service appear together
Payment Methods
The buttons under the totals are Cash, Card, Voucher, Credit and Other:
- Cash - Record the amount tendered; the till works out the change
- Card - Process through the terminal, then record it here
- Voucher - Redeem a gift voucher against the bill
- Credit - Draw down the customer's account credit balance. You can spend credit here even though you can't adjust a customer's balance
- Other - Anything else your salon accepts (bank transfer, for example)
There's no separate "split payment" button. To split a bill, record one payment for less than the full amount — the Balance due figure updates and you add the next payment on top, repeating until it reaches zero.
Receipts
After completing:
- Print Receipt - For physical copy
- Email Receipt - Send to the customer
What You Cannot Do
You cannot process refunds. If a customer needs one:
- Explain that you need a colleague to authorise it
- Find a Receptionist, Manager, Admin, or Owner
- They can process the refund
The same restriction covers refunding a paid deposit and refunding a gift voucher.
Cash Drawers
Location: Sidebar → Cash Drawers
Because you take payments, you also get the Cash Drawers screen. Each drawer card carries Open Drawer or Close Drawer depending on its state, and an open drawer adds Top Up, Payout, Safe Drop and History.
Two actions are held back from Staff:
- Adjustments — correcting a counted discrepancy needs a Manager, Admin or Owner
- Reopening a closed session — needs a Manager or Owner
See Tutorial 2.5: Using the Cash Drawer for the full workflow.
Viewing and Managing Your Roster
Location: Sidebar → Roster
You can view the full salon roster and manage your own shifts.
What You Can See
The roster shows:
- All staff members' shifts across the salon
- Shift times and break periods for each day
- Any leave booked by staff
- Public holiday indicators
A note appears at the top of the roster: "You can view the roster, but you can only add, edit, or delete your own shifts."
What You Can Do
For your own shifts, you can:
- Add new shifts to your schedule
- Edit your shift times and breaks
- Delete shifts you no longer need
This is useful when you have flexibility to set your own hours or need to adjust your schedule within salon guidelines.
What You Cannot Do
You cannot create, edit, or delete shifts for other staff members. That's handled by Managers, Admins, or the Owner.
Being Told When Your Shifts Change
You don't have to keep refreshing the roster to spot changes. When a Manager, Admin or Owner edits your shifts, Luminate emails you a summary — one email covering everything that changed for you, never one email per shift.
- It waits until the editing has settled, roughly 30 minutes after the last change, so a manager reshuffling the week doesn't fill your inbox
- If the editing carries on and off through the day, you'll still get a summary at least every 4 hours
- A change to a shift starting in the next 24 hours goes out almost immediately — that's the one you need to act on tonight
- If a change is undone before the summary sends, you're never emailed about it at all
The email lists shifts added, shifts whose times changed (showing the old time then the new one), and shifts removed. If a long editing session touched a great many of your shifts, the email lists the first twenty and summarises the rest — open the Roster page for the full picture.
Reporting Issues
If you spot a roster problem with another team member's shifts:
- Wrong shift time
- Missing shift
- Incorrect break
Let your Manager or the Receptionist know so they can fix it.
Requesting Leave
Location: Sidebar → Leave
Request time off through Luminate.
Submitting a Leave Request
- Navigate to Leave
- Click Request Leave
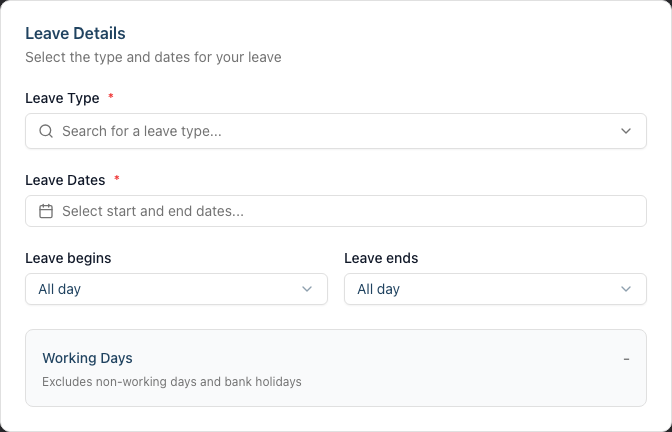
- Fill in the Leave Details card:
- Leave Type - Holiday, sick, unpaid, and whatever else your salon has set up
- Leave Dates - One picker for the whole run; choose the first and last day
- Start Day Period and End Day Period - Leave both on Full Day, or set either to a half day when your leave starts or ends mid-day
- Working Days updates as you go, showing how many days will come off your allowance
- Add anything useful under Reason (optional) in the Additional Information card
- Click Submit Request
You won't see a staff picker — the request is always for you.
Tracking Your Request
After submitting, your request shows as Pending.
Check back to see:
- Approved - Your leave is confirmed
- Rejected - Not approved (check for notes explaining why)
Viewing Your Leave Balance
The Leave page opens with a Your Leave Allowance card for the selected year, broken into six figures:
- Base - Your annual entitlement before anything is carried over
- Carried Over - Unused days brought forward from last year
- Total - Base plus carried over: everything you have to spend this year
- Used - Leave already taken
- Booked - Days sitting in requests that haven't been taken yet
- Remaining - What's actually left to book
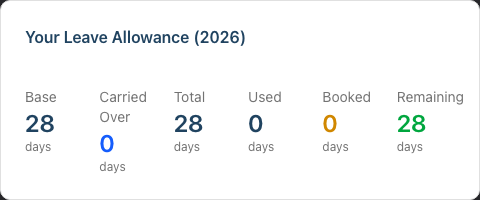
Alongside it sits a Next Year Preview card, an estimate of what you'll start next year with based on your current remaining balance. It's a forecast, not a commitment — the figures firm up when the year rolls over.
Cancelling a Request
If your plans change, you can cancel your own leave requests:
- Open the pending or approved request from the list
- Click Cancel Request
- Confirm in the Cancel Leave Request dialog
You can cancel both pending and approved requests. Your leave balance updates automatically when a request is cancelled.
Messages
Location: Sidebar → Messages
You can participate in customer communications.
What You Can Do
- View conversations with your customers
- Read incoming messages
- Reply to customer questions — type in the box at the foot of the thread, or press Ctrl+Enter / Cmd+Enter to send
- Start a fresh conversation with New Message
- See message history
When to Use
- Customer asks about product recommendations
- Following up on appointment queries
- Responding to customer questions
What You Cannot Do
- Close or archive conversations
- Configure messaging settings
For inbox management, ask a Manager.
Notifications on Your Phone
You can have Luminate tell you on your own phone when one of your customers arrives, instead of watching a screen for it.
Go to Settings > Notifications in the Luminate app, turn notifications on for your phone, then switch on Customer arrives under Push to my devices.
What a stylist can be notified about today:
| What it tells you | |
|---|---|
| Customer arrives | One of your booked customers has been marked as arrived |
These settings are yours alone. Turning them on changes nothing for anyone else, and your manager cannot switch them on for you.
Notifications are deliberately vague on a locked screen — a first name and an initial, never the service. Full detail appears when you tap through.
See 10.7 Push Notifications on Your Phone.
Lumen AI Assistant
A floating chat widget appears in the bottom corner of Luminate. This is Lumen, your in-app AI assistant.
What Lumen Can Help With
As a Staff member, you can ask Lumen questions about your own data:
- Your appointments - "What appointments do I have today?" or "Show me tomorrow's bookings"
- Customer details - "What's the phone number for Sarah Jones?" or "Show me this customer's notes"
- Services and products - "What services do we offer?" or "How much is a cut and colour?"
- Your own schedule - "When am I working this week?" or "Find me a gap on Friday"
- Transactions and vouchers - "Show me today's transactions" or "What gift vouchers are active?"
- Cash drawers - "Is the till still open?"
- Waitlist - "Who's on the waitlist for Friday?"
- Skin tests - "Which customers need a skin test?" or "Show skin test alerts"
- Public holidays - "When is the next bank holiday?"
- Your revenue - "How much revenue have I generated this week?" (your personal figures only)
- Your commission - "How much commission have I earned this month?" (your own commission only)
- Documentation - "How do I request leave?" or "How do I process a split payment?"
What Lumen Cannot Show You
Lumen respects your role permissions. You won't be able to ask about:
- Other staff members' performance data or personal details
- Salon-wide revenue figures or other staff members' commission
- SMS credit balance or usage statistics
- Salon settings or configuration
- Notification logs
- Leave requests — including your own. Lumen's leave tool is limited to Managers, Admins and Owners, so use the Leave page for anything about your own time off
One quirk worth knowing: Lumen only ever answers about your own shifts, even though the Roster page shows you the whole salon's week. Ask "when is Priya working on Thursday?" and Lumen can't even look Priya up — it has no access to the staff list — and any schedule it does return is yours, not hers. Check the Roster page instead.
The suggested questions Lumen offers when you open it aren't tailored to your role either, so a few of them (SMS credits, notification history) are above your permissions. Lumen will say so plainly rather than guess.
For more details on using Lumen, see Tutorial 15.4: Using Lumen, Your In-App AI Assistant.
What Staff Cannot Access
Understanding your boundaries helps you work efficiently:
Reports
You don't have access to the Reports section. This includes:
- Revenue reports
- Other staff performance
- Business analytics
Your personal stats appear on your dashboard.
Refunds
You cannot process refunds. Customers needing one should speak with a Receptionist, Manager, Admin or Owner.
Settings
You cannot access salon settings, service or product configuration, notification settings, or marketing campaigns.
Your own account settings are a different thing, and they are yours to change. Click your name in the top-right corner and choose Settings for Profile, Password, Two-Factor Auth, Preferences (including which page Luminate opens on when you log in) and Connected Accounts.
Other Staff Data
There is no Staff section in your sidebar. While you can see colleagues' bookings on the calendar and their shifts on the roster, you cannot open their staff records or see their performance figures.
Other Staff Roster Management
You can view the full salon roster and manage your own shifts, but you cannot create or modify shifts for other team members.
Customer Merging and Account Credit
You cannot merge duplicate customer profiles, and you cannot adjust a customer's account credit balance.
Your Daily Workflow
Starting Your Day
- Log in and check your dashboard
- Review your appointments for the day
- Check customer profiles for any notes or preferences
- Prepare for your first appointment
During Each Appointment
- Mark as Arrived when the customer arrives
- Deliver your service
- Mark as Complete when done
- Process payment — click New Sale
Between Appointments
- Check for walk-ins or rebookings
- Update customer notes from the previous appointment
- Prepare for the next customer
End of Day
- Ensure all appointments are marked complete
- Process any outstanding transactions
- Review tomorrow's schedule
- Check for any messages needing response
Common Pitfalls
"I can't see my column on the calendar"
Make sure you're viewing the correct date. Use the date navigation to return to today. If your column is still missing, check with a Manager—there may be a roster issue.
"I need to process a refund"
Staff cannot process refunds. Find a Receptionist, Manager, Admin, or Owner to help the customer.
"I'm looking for the In Progress status"
There isn't one. Appointments go Scheduled → Confirmed → Arrived → Complete, and you mark Complete when you finish the service. Marking a customer Arrived is what makes their appointment billable at the till.
"I can't find the Reports section"
Reports aren't available to Staff. Your personal stats are on the dashboard. For more detailed information, ask a Manager.
"I booked an appointment but can't find it"
Check you saved the appointment. Also verify you're viewing the correct date and that you selected yourself as the staff member.
"My roster shows the wrong times"
You can edit your own shifts directly on the roster. Click on your shift and update the times. If another team member's roster shows wrong times, report the issue to a Manager or Receptionist so they can correct it.
Tips and Best Practices
Check your schedule daily - Review the next day's appointments before leaving.
Update status in real-time - Keep appointment statuses current for accurate salon tracking.
Use customer notes - Record preferences and details after each visit.
Process payments promptly - Complete transactions before the customer leaves.
Request leave early - Give managers time to approve and plan coverage.
Know your team - Understand who can help with tasks outside your access (refunds, roster changes).
Build customer relationships - Use the history feature to remember details about regular clients.
Ask Lumen - Use the AI assistant for quick lookups instead of navigating through menus. Ask about customer details, your schedule, or how to do something in Luminate.
Tracking Your Performance
While you don't have access to full reports, you can track your work through:
Dashboard Stats
On the dashboard's Analytics tab, your "My Performance" card shows:
- My Revenue - Total revenue from your services
- My Appointments - Number of completed appointments
- My Clients - Unique clients you've served
- My Commission - Earnings from commission-based services
- My Tips - Your share of tips received
- My Rebook Rate - How often your clients come back
- Rank #n of n - Your performance ranking among team members
Underneath it, Monthly Targets tracks your progress against any targets your Manager has set for the current calendar month, and the Services Completed and Products Sold tables itemise exactly what made up your figures for the selected period.
Use the period selector to view different timeframes (today, this week, this month), and Export CSV to download the figures for that period.
Leave Balance
Your Your Leave Allowance card lives on the Leave page (not the dashboard) and breaks the year into Base, Carried Over, Total, Used, Booked and Remaining days, with a Next Year Preview estimate beside it.
Informal Tracking
Keep notes on:
- Regular customers
- Popular services you provide
- Retail sales performance
Discuss your performance with your Manager during reviews.
Related Tutorials
- Tutorial 1.3: Understanding Roles and Permissions - Complete role reference
- Tutorial 2.1: Managing Your Appointment Calendar - Calendar navigation
- Tutorial 2.2: Booking and Managing Appointments - Appointment details
- Tutorial 2.3: Working with the Waitlist - Filling cancellations
- Tutorial 2.4: Processing Transactions - POS guide
- Tutorial 2.5: Using the Cash Drawer - Opening, closing and movements
- Tutorial 3.2: Understanding Customer History and Analytics - Customer profiles
- Tutorial 6.2: Requesting and Managing Leave - Leave details
- Tutorial 8.4: Deposits and Pre-Payments - How deposits work end to end
- Tutorial 15.4: Using Lumen, Your In-App AI Assistant - Full Lumen guide
- Tutorial 16.3: Guide for Salon Managers - Understanding your supervisors
- Tutorial 16.4: Guide for Reception Staff - Understanding your colleagues
- Tutorial 20.10: Colour Bar Day-to-Day Use - If your salon uses colour management
Frequently Asked Questions
Can I see how I compare to other staff?
No. Individual performance comparisons are in Reports, which Staff cannot access. Discuss performance with your Manager during one-on-one meetings.
Can I book appointments for other stylists?
Yes. While your focus is your own schedule, you can book appointments for any staff member. This helps when customers ask about other stylists' availability.
What if a customer wants to rebook with someone else?
You can create the booking for the other staff member. It's professional and helpful—just book it on their calendar.
Can I change my own roster shifts?
Yes. You can add, edit, and delete your own shifts directly in the roster. However, you cannot modify other team members' shifts—only Managers, Admins, or Owners can do that.
Will I be emailed when my shifts change?
Yes, but as a single summary rather than one email per shift. When someone changes your roster, Luminate waits until the editing has settled — about 30 minutes — then sends you one email listing everything that changed for you: shifts added, times changed (showing the old and new times), and shifts removed. If a manager is editing on and off through the day, you'll get a summary at least every 4 hours.
Two things worth knowing: a change to a shift starting within the next 24 hours is sent almost straight away, because that's the one you need to act on; and if a change is undone before the summary goes out, you're never emailed about it at all. If your shifts look wrong and you haven't had an email, check the roster directly and speak to your Manager.
How do I see my commission?
If you're on a commission-based arrangement, the This week's commission card sits at the top of your dashboard, and the Analytics tab shows commission for the selected period plus a commission tracker breaking down how it was earned. If neither appears, you're not on a commission arrangement — check with your Manager.
Can I work at multiple salons?
No. Staff accounts are linked to one salon. If you work at multiple locations owned by the same person, you'd need separate accounts—ask the Owner about the setup.
Can I use Lumen to check my appointments?
Yes. Click the chat widget in the bottom corner and ask questions like "What appointments do I have today?" or "When is my next gap?" Lumen can look up your schedule, customer details, services, and more. It only shows data that your Staff role is permitted to access.
Can I send deposit links to customers?
Yes. If your salon uses deposits, open the appointment and click Send Payment Link (or Send Link in the calendar's side panel). The Collect Deposit dialog lets you check the amount and pick email or SMS. The button only appears while the appointment is scheduled, confirmed or arrived.
Can I use Lumen to check when a colleague is working?
No. Lumen restricts every schedule question to your own shifts, so it will answer for you even if you name someone else. Open the Roster page instead — that does show the whole salon's week.
Why can't I see the skin-test alerts on my dashboard?
That alert panel is a Manager-and-above feature. You'll still see a skin-test warning on the appointment itself when you open a booking that needs one, and the Skin Tests page in your sidebar lists them.
Can I access Luminate from home?
Yes. Log in from any device to check your schedule, view customer details, or request leave. The interface works on mobile and desktop.
Last Updated: August 2026
Documentation verified against Luminate codebase and re-tested live as the seeded Staff user (staff@example.com) in August 2026 — Staff permissions confirmed via config/roles.php, ShiftPolicy, TransactionPolicy, CashDrawerPolicy/CashDrawerSessionPolicy, ConversationPolicy, LeaveRequestPolicy, ColourTestPolicy, WaitlistEntryPolicy, DepositPaymentController, resources/js/utils/depositActions.ts (deposit status gating), DashboardController/DashboardService (Dashboard.vue, DashboardPersonalStats.vue, CompactQuickStats.vue, CombinedAlertsPanel.vue), AppSidebar.vue (navigation gating), appointments/Show.vue (status list, Create Transaction, Refund Deposit), QuickPOS.vue (till prompt and tender buttons), roster/Index.vue, leave/Index.vue and leave/Create.vue, SendRosterChangeDigests/RosterChangeBufferService (digest timings), and SupportChatAgentService (Lumen tool gating).