
Guide for Reception Staff
Introduction
As a Receptionist in Luminate, you're the front-desk authority. You run the diary, the roster, the catalogue, the till, and the inbox. You greet customers, book and reshape the day's appointments, manage shifts, take payments and refunds, void gift vouchers, and handle customer communications end-to-end.
Your role is broad on day-to-day operations but excludes staff records, most reports, salon settings, and billing — those stay with managers and above.
This guide covers everything you need to master the front desk: booking, the roster, the catalogue, payments and refunds, cash drawers, customer management, and the inbox. You'll learn what you can access, what's outside your role, and how to work efficiently within Luminate.
Who this is for: Team members assigned the Receptionist role in Luminate.
What you'll learn:
- Your complete access level and permissions
- Viewing all staff schedules for booking
- Managing appointments and the waitlist
- Processing sales and refunds at the till
- Running the cash drawer
- Sending deposit payment links
- Customer profile and skin test management
- Handling customer communications
- Using Lumen, the in-app AI assistant
- Understanding your role's boundaries
Time to complete: 12-15 minutes
Prerequisites
Before you begin:
- You should have received a login invitation and completed setup
- Helpful to have read Tutorial 1.3: Understanding Roles and Permissions
- Familiarise yourself with the basic navigation (Tutorial 1.1)
What Receptionists Can Do
Receptionists are focused on front-desk operations with broad viewing access:
| Feature Area | Receptionist Access |
|---|---|
| Dashboard | Today's operations plus your own performance (no salon-wide analytics or revenue) |
| Appointments | Create, edit, cancel any appointment; set any status |
| Time blocks | Create, edit, delete time blocks for any staff member |
| Deposit links | Send payment links from appointments |
| Waitlist | Full management |
| POS/Transactions | Process sales, view transactions |
| Refunds | Full access — refund any completed transaction, whole transaction only |
| Gift vouchers | Sell, redeem, and void vouchers |
| Account credit | Take credit as payment and sell top-ups. Cannot adjust a balance by hand |
| Cash drawers | Open and close a drawer, top up, pay out, safe drop, view history. Cannot record an adjustment or reopen a closed session |
| Customers | Full management — incl. merge duplicates |
| Skin tests | Full management — create tests and record results |
| Staff | View staff list and profiles (compensation and HR notes hidden) |
| Roster | Full management — create, edit, delete, duplicate shifts |
| Leave | Request your own leave only |
| Services | Full management — create, edit, deactivate |
| Products | Full management — create, edit, stock + price changes |
| Reports | Gift Vouchers and Account Credit only — every other report is managers and above |
| Data exports | Your own performance CSV only. No salon, customer or transaction exports |
| Payroll | No access |
| Salon Settings | No access |
| Messages | View, send, close, reopen, archive |
| Lumen AI | Access with role-limited tools |
| Billing | No access |
Understanding Your Unique Role
Receptionists have a special position in Luminate:
You Can See All Schedules
Unlike Staff members who see only their own schedule, Receptionists can view the entire salon calendar. This is essential for booking appointments with any stylist.
You Don't Provide Services
Receptionists are administrative staff. You won't appear in:
- Staff selection when booking appointments
- Calendar columns showing staff schedules
- Roster shift management
- Waitlist preferred staff options
You can view the staff list and individual staff profiles, but compensation, salary, commission rates, and confidential HR notes are hidden from you. Editing staff records is still restricted to Admins and above.
This is by design — your role is to support the team operationally, not provide services or manage payroll.
You're the Customer's First Contact
Most customers will interact with you more than anyone else. You control their booking experience and often handle their payments.
The Dashboard
Location: Sidebar → Dashboard
Your dashboard shows a tailored view for front-desk operations. It has three parts.
Right Now
The band at the top of the page. It holds the next appointment due in the salon — time, customer, service, stylist and duration — with Mark Arrived and View Details beside it. Three chips sit next to it, each linking through to the full list:
- Low Stock - products that have fallen below their threshold
- High Priority Waitlist - entries flagged high that need a call
- Pending Deposits - upcoming appointments with a deposit still owed, and the total outstanding
The Stats Strip
Five figures, each a link:
- Today's Appts - every appointment booked today, across all stylists
- Low Stock - turns amber when anything is below threshold
- Birthdays - customers with a birthday in the next seven days
- Waitlist - active entries, turning orange when any are high priority
- SMS Credits - the salon's remaining balance, turning red below 50
The SMS Credits figure is shown to you but isn't a link — topping up needs salon settings access.
The Two Tabs
Today's Appointments lists every appointment for the day with the stylist's name, the price and the status, and a 12/25 done counter. Each row carries View appointment, Create transaction and Edit appointment buttons, so you can work the day without leaving the page.
Analytics covers your own numbers only, for a period you choose with Today, This Week or This Month:
- My Revenue, My Commission and My Tips
- Services Completed and Products Sold, itemised
- Export CSV, which downloads the same figures
What you won't see:
- Today's revenue progress
- Salon-wide analytics (sales breakdown, revenue trends)
- Staff performance rankings
- Rebook rate data
- Skin test alerts
The dashboard gives you the operational information you need without the salon-wide business analytics that Managers and above access. Your leave balance lives on the Leave page, not here.
Viewing All Staff Schedules
Location: Sidebar → Appointments
The calendar is your primary tool. You can see every staff member's schedule at once.
Calendar Views
Three buttons at the top right switch the view:
- Day - one day, one column per stylist
- Week - the full week
- List - a filterable table instead of a grid
Previous Day, Next Day, Select, Jump and Today move you around. In week view they read Previous Week and Next Week.
Reading the Calendar
Each column represents a staff member who provides services. Appointments appear as blocks showing:
- Customer name
- Service type
- Duration (block height)
- Status (colour coding)
A stylist with no shift that day still gets a column, marked (Not rostered). Two extra controls sit above the columns: a Waitlist chip showing how many people are waiting, and Clipboard, which holds appointments you have cut or copied.
Filtering by Staff
Filters live on the List view, not the day grid. Switch to List and you get four:
- A staff dropdown, starting at All Staff
- A status dropdown, starting at All Statuses
- A deposit dropdown, starting at All Deposits
- From date and To date
Pick a stylist from the staff dropdown to see only their appointments. You won't find yourself in that list — see below.
Booking Appointments
Location: Sidebar → Appointments → New Appointment, or click an empty slot
This is your core function. You can book appointments for any staff member.
Two other buttons sit beside it in the same header: Add to Waitlist, and Block Time for lunches, breaks and training.
Step-by-Step Booking
Open the booking form:
- Click New Appointment in the top-right, or
- Click an empty slot on the calendar
Select or create the customer:
- Type a name or phone number into Customer and pick from the matches
- To add someone new, type their name and choose Create: {name} at the bottom of the list
Choose the staff member:
- Select from Staff Member
- Only service providers appear (not receptionists)
Select the service:
- Choose from Select a service
- Add more services to the same appointment if needed
Confirm date and time:
- Start Date, Start Time and End Time
- Pre-filled if you clicked a slot
Set a deposit if one is needed:
- Deposit Amount is pre-filled from the service's own deposit rule
- Clear it or change it if the customer has agreed something different
Save:
- Click Create Appointment
Conflict Checking
The system automatically checks for:
- Staff availability (roster)
- Existing appointments
- Time off or leave
If there's a conflict, you'll see a warning before saving.
Quick Tips
- Double-booking: The system prevents overlapping appointments
- Buffer time: Some services may have automatic buffers
- Drag to reschedule: Drag appointments to new slots on the calendar
Managing Appointments
Editing Appointments
- Open the appointment
- Click Edit
- Change the time, service or staff member
- Click Update Appointment
Cancelling Appointments
- Click on the appointment
- Click Cancel
- Confirm the cancellation
- The slot becomes available again
Updating Appointment Status
Open the appointment and use the Status card. It holds one button per status:
- Scheduled - booked, not yet confirmed
- Confirmed - the customer has confirmed they're coming
- Arrived - press this when they walk in
- Complete - the service is finished
- No Show - they didn't turn up
- Cancel - the appointment is off
Press the one that matches what has happened. The status changes straight away.

The appointment's own page also carries Create Transaction, Edit, Group, View on Calendar and Cancel across the top.
Handling No-Shows
If a customer doesn't arrive:
- Open the appointment
- Press No Show on the Status card
- The slot is freed for potential walk-ins
Sending Deposit Payment Links
If your salon collects deposits online, you can send a payment link straight from the appointment:
- Open the appointment
- Click Send Payment Link
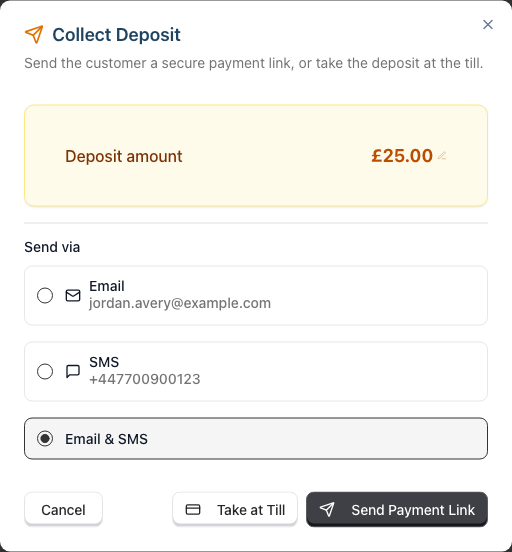
- In the Collect Deposit dialog, pick how to send it under Send via — Email, SMS or Email & SMS. Change the Deposit amount here too if the customer has agreed something different
- The customer receives a link to pay their deposit online
This is useful for securing bookings, especially for high-value services or new customers. The deposit amount comes from the service's own deposit rule, which your Manager or Admin sets.
Send Payment Link appears only when all four of these are true:
- the appointment needs a deposit
- that deposit hasn't been paid
- your salon has connected a Stripe account
- the customer has an email address or a mobile number on file
If you can't see the button, one of those four is missing. The same dialog also offers Take at Till, for when the customer is standing in front of you.
Working with the Waitlist
Location: Sidebar → Waitlist
The waitlist helps you manage customers wanting appointments when slots aren't available.
Adding to the Waitlist
- Navigate to Waitlist
- Click Add to Waitlist
- Select or create the customer
- Optionally set:
- Preferred service
- Preferred staff member — service providers only, so you won't be in the list
- Priority — High Priority, Normal or Low Priority
- A preferred time of day — Anytime, Morning, Afternoon or Evening
- Contact Preference
- Notes
- Click Save
Managing Waitlist Entries
Open an entry and you get four actions:
- Mark Contacted - record that you've reached out
- Convert to Appointment - turn it into a booking when a slot opens
- Edit - change the service, staff, priority or timing
- Cancel - take it off the list
The list itself shows Customer, Service, Preferred Staff, the date, Time, priority and Status, with an Edit button on each row.
Converting to Appointment
When a slot opens:
- Find the relevant waitlist entry and open it
- Click Convert to Appointment
- Select the available slot
- Confirm the booking
- The entry moves to Converted and drops out of the active list
Processing Transactions
Location: Sidebar → Transactions, then New Sale
You can process customer payments for services and products. New Sale also sits in the app header on every page, so you can start a sale from anywhere.
Creating a Sale
- Click New Sale. The Quick Sale screen opens
- Pick your till when prompted
- Select the customer
- Add items from the four tabs:
- Services - grouped by category, with prices
- Products - retail stock
- Vouchers - sell a gift voucher
- Misc - anything that isn't in the catalogue You can also search across services, products, categories and barcodes
- Apply any discounts if authorised
- Take payment with Cash, Card, Voucher, Credit or Other
- Click Complete Sale
Linking to Appointments
When a customer pays for services:
- Their unbilled appointments appear automatically
- Select the appointments to include
- The items are added to the sale
Split Payments
For payments across multiple methods, add one payment at a time. Enter the first amount and method, then add the next against what's left. The sale completes once the payments cover the total.
Taking Account Credit
Credit pays from the customer's own account credit balance. Select the customer first — the button stays disabled until you do, and until there's a balance to draw on. You can also sell a credit top-up as an item.
You can spend and sell credit, but you can't adjust a balance by hand. That needs a Manager or Admin.
Invoices and Receipts
Open a completed transaction and you get three tabs: Details, Invoice and Receipt. On Invoice or Receipt, two buttons appear:
- Print - send it to the printer
- Download - save it as a PDF
To get a copy to the customer, download it and attach it to a message, or hand them the print.
Refunds
You can refund any completed transaction:
- Open the transaction
- Click Refund
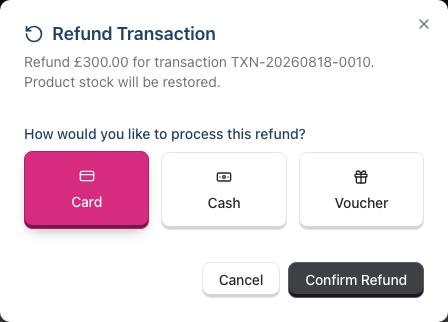
- Choose Card or Cash
- Click Confirm Refund
A refund returns the whole transaction. You can't refund part of a sale or pick individual items. If a customer is returning one item out of several, refund the sale and ring the rest through again.
The dialog tells you what will happen before you confirm — the amount, that product stock will be restored, and for a cash refund that the money comes out of the drawer. Deposit refunds and customer notifications are handled for you.
Voiding a Gift Voucher
Vouchers are listed under Reports → Gift Vouchers. Open the voucher from there and click Void Voucher. The voucher's page also shows its remaining value and its Redemption History.
Running the Cash Drawer
Location: Sidebar → Cash Drawers
Each till in the salon has its own drawer. A drawer has to be open before you can take cash on it.
What You Can Do
- Open Drawer - start a session with a counted opening float
- Close Drawer - count down at the end of your shift and reconcile
- Top Up - add change into the drawer
- Payout - take cash out for a supplier or a petty-cash spend
- Safe Drop - move cash out of the drawer into the safe
- History - every movement on the session
What You Cannot Do
- Adjustment — recording an over or short against the reconciliation is a Manager and above job
- Reopen & correct — reopening a closed session is a Manager and above job
- Adding, renaming or removing a till, which needs salon settings access
If your count doesn't balance at close, tell a Manager. They can record the adjustment.
Customer Management
Location: Sidebar → Customers
You have full access to customer profiles.
Adding New Customers
- Click Add Customer
- Fill in their details:
- First Name and Last Name
- Email and Mobile Number
- Date of Birth, so birthday greetings can find them
- How did they hear about us? and their address
- Set their Communication Preferences. Appointment Information covers reminders and confirmations; Promotions & Offers covers marketing. Each can be set per channel — Email, SMS and WhatsApp
- Click Create Customer
Editing Customer Profiles
Open the customer, click Edit, change what you need and click Save Changes. You can update contact details, their address, preferences, notes and their communication consent.
Viewing Customer History
A customer's profile is split into tabs:
- Appointments - past and upcoming bookings, plus Visit Insights and any Waitlist Requests
- Details - contact details, preferences, consent and Customer Status
- Billing - transactions, unbilled appointments and their account credit balance
- Colour - colour history and skin tests
- Notes - anything you or the team have recorded
- Messages - the conversation thread with this customer
This helps you provide informed service.
Deactivating a Customer
Open the customer, go to Details, and use the switch on the Customer Status card. It's a toggle, not a button — flip it and confirm.
Merging Duplicates
When the same person has been entered twice, click Manage Duplicates on the Customers index. That screen groups the likely duplicates and walks you through merging each pair. You can't merge from inside a customer's own profile.
Skin Tests
Location: Sidebar → Skin Tests
Colour services need a valid skin test on file. You have full control here:
- New Skin Test - start a test for a customer
- Record Test - enter the result once the patch has been read
Booking a colour service for a customer with no test, or an expired one, raises an alert on the appointment. Sort the test out before the appointment rather than on the day.
See Tutorial 11.1: Skin Test Management for the full workflow.
Services and Products
Location: Sidebar → Services and Products & Colour
You manage the catalogue.
Services
- Add Service - create a new service with its price, duration and deposit rule
- Edit - change any existing service
- Deactivate - retire a service without deleting its history
- Manage Categories - reorganise how services group on the till and the booking form
Products
- Add Product - create a retail line
- Edit - change price, cost, stock level or low-stock threshold
- Deactivate - retire a product
- Manage Brands and Manage Categories - organise the range
Price and stock changes take effect immediately across the till and the booking portal. Check with a Manager before changing a price.
Managing the Roster
Location: Sidebar → Roster
You have full control over the roster. Use it to add shifts, shuffle them when staff arrive late or swap, and duplicate weeks to set up future schedules.
What You Can Do
- View the full roster across all rosterable staff, a week at a time
- Click an empty cell to add a shift
- Use Edit shift and Delete shift on any existing shift
- Adjust break times and shift notes
- Use Duplicate to copy a week's roster forward into future weeks
Previous Week, Next Week, Select and This Week move you around. Each row shows the staff member, their role and their weekly hours total. You won't be in the roster yourself — receptionists don't take shifts on it.
Time Blocks
On the appointment calendar, Block Time creates a block (lunch, break, holiday-in-day, training) on any staff column. You can edit or delete blocks others have created too.
Best Practice
Roster changes feed straight into payroll calculations and customer-facing availability. Keep them accurate and communicate any large reshuffle to the team.
Messages
Location: Sidebar → Messages
You can participate in customer communications.
What You Can Do
- View all conversations
- Read customer messages
- Send replies
- Start a new thread with New Message
- Close conversations once resolved
- Reopen conversations
- Archive old threads to keep the inbox tidy
Filters across the top narrow the list by channel (Email, SMS, WhatsApp), by status (Open, Closed, Archived) and to unread only. The sidebar badge counts unread messages, and clicking it takes you straight to them.
Archiving is not reversible in the same way closing is — an archived conversation leaves the inbox for good. The dialog says so before you confirm.
What You Cannot Do
- Configure notification templates or channel settings
- Manage notification settings for the salon
- Buy SMS credit
If you need notification settings changed or the SMS balance topped up, ask a Manager or Admin.
Notifications on Your Phone
Luminate can send a short banner to your own phone when something needs you, instead of you watching a screen for it.
Go to Settings > Notifications in the Luminate app, turn notifications on for your phone, then choose what you want to be told about.
Today there is one thing to choose: Customer arrives, which fires when a customer is marked as arrived for an appointment you are the assigned staff member on. As a Receptionist you are never the assigned staff member, so this one will stay quiet for you.
These settings are yours alone. Turning them on changes nothing for anyone else, and nobody can switch them on for you.
Notifications are deliberately vague on a locked screen — a first name and an initial, never the service. Full detail appears when you tap through.
See 10.7 Push Notifications on Your Phone.
Using Lumen, Your AI Assistant
Location: Click the chat icon in the bottom-right corner of any page
Lumen is Luminate's built-in AI assistant. It can help you find information and answer questions without leaving the page you're working on.
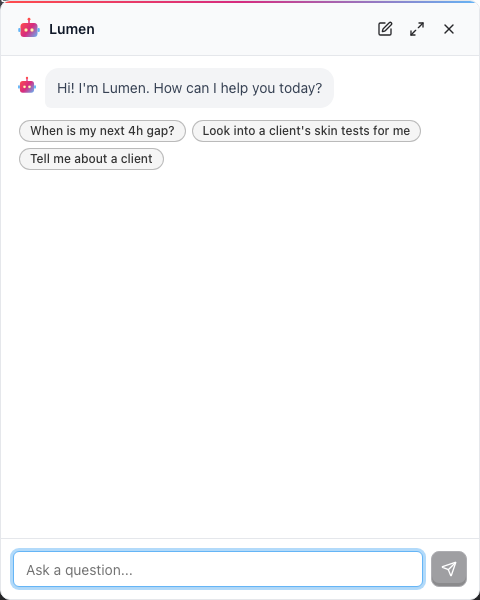
The widget opens with a few suggested questions to get you started, and a New chat button to begin again. Open full page gives you the whole screen if the conversation gets long.
What Lumen Can Help With
As a Receptionist, Lumen can:
- Look up customer details - Find a customer's contact info, appointment history, notes, or preferences
- Check appointments - Find upcoming bookings, check availability, or look up appointment details
- Check skin tests - Look up a customer's tests, and find who needs one before their next colour appointment
- Search transactions - Look up payment history for a customer, or check the cash drawer status
- View services and products - Check service details, pricing, stock levels or what's running low
- Check gift vouchers - Look up a voucher's balance or status
- Check the roster and team - See who's working on a given day and look up the staff list
- Find schedule gaps - Identify available slots for booking
- Check the waitlist - See who's waiting for an appointment
- Check public holidays - See what's coming up
- Report your own figures - Your revenue, commission and tips for a period. These are the same numbers as the Analytics tab on your Dashboard
- Search documentation - Get help with how to use Luminate features
What Lumen Cannot Access for You
Some Lumen tools are restricted based on your role:
- Salon settings - Cannot look up salon configuration
- Staff pay and HR - Lumen can list the team, but cannot pull up compensation, hourly rates, or confidential HR notes
- Notification logs - Cannot check message delivery history
- Leave requests - Cannot view or manage other staff members' leave
- Salon-wide revenue and reports - Cannot report the salon's takings, sales breakdowns, revenue trends or another staff member's commission. Ask a Manager for those
- Product cost prices - Lumen quotes retail prices only. Cost prices are on the Products pages
- SMS credits - Cannot check SMS balance or usage
For these, ask a Manager or Admin. For full details on using Lumen, see Tutorial 15.4: Using Lumen, Your In-App AI Assistant.
Requesting Leave
Location: Sidebar → Leave
You can request your own time off. The page shows only your requests — you won't see anyone else's, and there are no approval buttons.
Your Leave Allowance
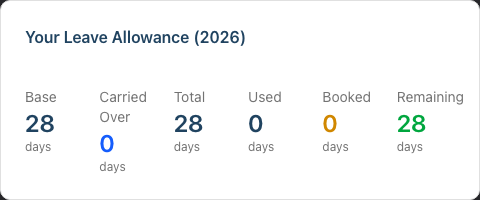
Two cards sit at the top of the page. Your Leave Allowance for the current leave year gives you six figures: Base, Carried Over, Total, Used, Booked (approved but not yet taken) and Remaining. Next Year Preview shows the same shape for next year, so you can plan ahead.
Your leave year may not run from January. It's set per salon.
Submitting a Request
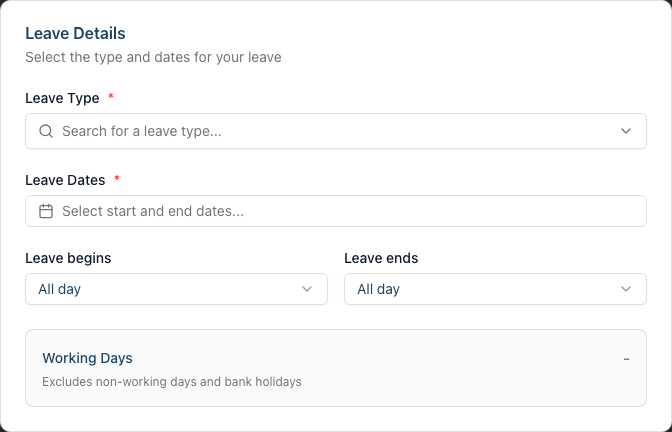
- Navigate to Leave
- Click Request Leave
- Choose a Leave Type — holiday, sick and so on
- Pick your Leave Dates as a range
- Set Leave begins — All day, or From midday for a half-day start
- Set Leave ends — All day, or Until midday for a half-day finish
- Check the Working Days figure, which the form works out for you
- Add a Reason if you want to. It's optional
- Click Submit Request
For a single day off in the afternoon only, set Leave begins to From midday. For a morning only, set Leave ends to Until midday.
Tracking Your Request
Your requests show their status:
- Pending - Awaiting approval
- Approved - Confirmed time off
- Rejected - Not approved
- Cancelled - Withdrawn
Filter the list by Status and Year.
Who Approves Your Leave?
Receptionist leave requests go to Managers, Admins, or the Owner for approval.
What Receptionists Cannot Access
Understanding your boundaries helps you work efficiently:
Reports
You have two reports. Open Reports in the sidebar and you'll find them under Financial Reports:
- Gift Vouchers — outstanding vouchers, their balances, sales and redemptions
- Account Credit — which customers are holding credit, and the movements behind it
Every other report is reserved for Managers and above, including:
- Revenue reports
- Staff performance
- Customer analytics
- VAT and accounts receivable reports
- SMS usage
- Payroll data
If you need information from one of these, ask a Manager.
Data Exports
You cannot export salon data (full salon export, customer exports, transaction exports). These require an Admin or Owner. Neither of your two reports has an Export button.
The one thing you can export is your own performance figures, with Export CSV on the Analytics tab of your Dashboard.
Salon Settings
You cannot access salon settings, notification template configuration, or staff/payroll management. Changes to opening hours, deposits, branding, etc. are handled by Admins.
Staff Records
You cannot add, edit, deactivate, or manage staff profiles or login accounts. You also cannot see other staff members' compensation (salary, commission, hourly rate) or confidential HR notes.
Billing
You cannot access subscription billing or payment method changes. These are owner-only.
Marketing Campaigns
Campaigns and Notifications don't appear in your sidebar. Building and sending marketing campaigns needs notification access, which sits with Admins and above.
Account Credit Adjustments
You can take account credit as payment and sell top-ups, but you cannot adjust a customer's balance by hand. If a balance is wrong, ask a Manager or Admin to correct it.
Cash Drawer Corrections
You can open, close, top up, pay out and safe-drop a drawer. Recording an over-or-short adjustment, or reopening a session you've already closed, needs a Manager or above.
Your Daily Workflow
Opening the Day
- Log in to Luminate
- Check today's appointments on the calendar
- Review any waitlist for potential gaps
- Confirm first appointments are still on (if salon policy)
Throughout the Day
- Greet customers as they arrive
- Mark arrivals in the system
- Book walk-ins if there's availability
- Process payments as customers finish
- Handle phone/online enquiries
- Manage the waitlist as slots open
End of Day
- Check tomorrow's schedule for early appointments
- Review unbilled appointments that might need processing
- Ensure all transactions are complete
- Note any issues for the Manager
Common Pitfalls
"I can't find myself in the staff list when booking"
This is expected. Receptionists don't provide services, so you won't appear in the booking staff selection.
"The report I need isn't in Reports"
You have two reports: Gift Vouchers and Account Credit. Everything else is reserved for Managers and above. Ask a Manager for the information you need.
"I can see a staff member but can't see their salary"
Compensation, commission rates, hourly rate, and confidential HR notes are hidden from Receptionists. The basic profile (name, role, email, phone, avatar) is visible so you can identify them on the calendar and contact them.
"I booked an appointment but it's not showing"
Check you clicked Create Appointment after booking. Also check the date — you might be viewing a different day.
"The customer's appointment shows with the wrong stylist"
Open the appointment, click Edit, change the Staff Member and save.
"There's no Send Payment Link button on this appointment"
The button needs four things: the appointment requires a deposit, the deposit is unpaid, your salon has a Stripe account connected, and the customer has an email address or mobile number saved. Check the customer's contact details first — that's the usual culprit.
"I can't refund just one item"
Refunds return the whole transaction. Refund the sale in full, then ring the items the customer is keeping through again.
"My drawer doesn't balance at close"
Tell a Manager. Recording an over-or-short adjustment needs a permission you don't hold, and so does reopening a session you've already closed.
Tips and Best Practices
Keep the calendar visible - The appointment calendar is your main tool. Keep it open throughout the day.
Check before booking - Always verify staff availability before confirming with customers.
Update statuses promptly - Mark arrivals and completions in real-time for accurate tracking.
Use customer notes - Record preferences and allergies for better service.
Manage the waitlist actively - When cancellations happen, check the waitlist first.
Communicate clearly - If you can't do something (like pull a report), explain who can help.
Know your team - Understand each stylist's specialities for better customer matching.
Use Lumen for quick lookups - Instead of navigating between pages, ask Lumen to find customer details, check availability, or look up appointment information.
Send payment links proactively - For high-value or first-time bookings, use Send Payment Link on the appointment to secure the booking before the day.
Check the Right Now band first - It tells you who's due next and what needs a call, before you go looking anywhere else.
Count the drawer carefully - You can top up, pay out and safe-drop, but you can't correct a reconciliation afterwards. Get the count right the first time.
Related Tutorials
- Tutorial 1.3: Understanding Roles and Permissions - Complete role reference
- Tutorial 2.1: Managing Your Appointment Calendar - Calendar details
- Tutorial 2.2: Booking and Managing Appointments - Booking workflow
- Tutorial 2.3: Working with the Waitlist - Waitlist management
- Tutorial 2.4: Processing Transactions - Till guide
- Tutorial 2.5: Using the Cash Drawer - Opening, closing and reconciling
- Tutorial 3.1: Adding and Managing Customer Profiles - Customer management
- Tutorial 3.6: Merging Duplicate Customer Records - Duplicate review
- Tutorial 3.8: Client Account Credit - Taking and selling credit
- Tutorial 5.1: Setting Up Your Weekly Roster - Roster basics
- Tutorial 5.4: Time Blocks and Availability Management - Blocking time out
- Tutorial 6.2: Requesting and Managing Leave - Leave requests
- Tutorial 7.1: Creating and Managing Your Service Menu - Services
- Tutorial 7.2: Product Catalog and Inventory Management - Products and stock
- Tutorial 8.2: Handling Refunds and Cancellations - Refund detail
- Tutorial 8.3: Gift Vouchers - Selling and Redeeming - Vouchers
- Tutorial 8.4: Deposits and Pre-Payments - Deposits and payment links
- Tutorial 10.4: Managing the Messaging Inbox - Conversations
- Tutorial 11.1: Skin Test Management - Patch tests and safety
- Tutorial 15.4: Using Lumen, Your In-App AI Assistant - AI chat help
- Tutorial 16.3: Guide for Salon Managers - What your Manager can do that you can't
- Tutorial 16.5: Guide for Service Providers - Understanding your colleagues
- Tutorial 17.1: Daily Opening Procedures - Opening routine
Frequently Asked Questions
Why don't I appear in the staff dropdown when booking?
Receptionists are administrative staff who support service providers. You don't appear in booking dropdowns because you don't provide services to customers.
Can I see how much a stylist is earning?
No. Performance and commission data live in reports you can't open — your two reports are Gift Vouchers and Account Credit. This is by design: staff financial data is restricted to management roles. You can see your own figures on the Analytics tab of your Dashboard.
What if I need to reschedule many appointments quickly?
On desktop, use drag-and-drop on the calendar — click and drag an appointment to a new slot. On mobile, tap the appointment and use Edit to change the time, or use Cut to move it via the clipboard. Both methods are faster than editing each appointment individually.
Can I give a customer a discount?
This depends on salon policy. The till allows discounts to be applied, but check with your Manager about what discounts you're authorised to give.
Why can't I see my own numbers on the Dashboard's front page?
Your figures live on the Analytics tab, next to Today's Appointments. The front of the Dashboard is the salon's day, not yours.
Where's my leave balance?
On the Leave page, in the Your Leave Allowance card. It isn't on the Dashboard.
How do I handle a complaint?
Listen to the customer, note their concern, and involve a Manager if needed. You can add notes to the customer profile for future reference.
Can Lumen look up anything I need?
Lumen can access most of the information you work with — customers, appointments, skin tests, transactions, the cash drawer, services, products, gift vouchers, the roster, the team list, the waitlist and your own revenue and commission. It cannot surface staff pay or HR details, salon settings, notification logs, other people's leave, product cost prices, SMS usage, or the salon's own revenue and reporting figures. If you need that information, ask a Manager.
Can I access Luminate from my phone?
Yes. Luminate works on mobile devices. The interface adapts to smaller screens while keeping core functionality available.
Last Updated: August 2026 Verified against Luminate codebase: August 2026