
Guide for Salon Owners - Everything You Can Do
Introduction
As a salon owner in Luminate, you have complete access to every feature in the system. This is the highest permission level, designed to give business owners full control over their operations, finances, and team management.
This comprehensive guide serves as your command centre reference, summarising all the features available exclusively to owners as well as the day-to-day operations you'll be performing. Whether you're checking in on revenue, managing multiple locations, or handling your subscription, this guide will help you quickly locate the features you need.
Who this is for: Business owners with the Owner role in Luminate.
What you'll learn:
- Owner-exclusive features and where to find them
- How to manage multiple salons from one account
- Billing and subscription management
- Staff account administration
- Complete report access and exports
- Marketing campaigns (email and SMS)
- Salon settings and configuration, including data exports and retention
- Lumen AI support chat
- Deposit payment links
- Your day-to-day operational features
Time to complete: 15-20 minutes
Prerequisites
Before you begin:
- You should have an Owner account (the account you created when registering)
- You should have at least one salon set up
- Helpful to have completed the onboarding checklist (Tutorial 1.4)
What Makes Owners Different
Owners have a fundamentally different relationship with Luminate than staff users:
| Aspect | Owner | Staff Users |
|---|---|---|
| Permission checks | Bypass all checks automatically | Must have specific permissions |
| Salon access | All salons they own | Only the salon they work at |
| Billing access | Full billing and subscription control | No billing access |
| Multi-salon | Can create and manage multiple salons | Works at one salon only |
| Stripe for deposits | Connect, open and disconnect the Stripe account | No access, not even for Admins |
| Account creation | Can register new accounts | Accounts created by owners |
| Lumen AI chat | Full access to all tools and data | Access limited by role permissions |
| Deposit payment links | Can send from any appointment | Needs appointment and messaging permissions |
Owner-Exclusive Features
Four things belong to the Owner alone. No other role reaches them, not even an Admin:
- Billing and subscription management
- Creating and deleting salons
- Connecting a Stripe account to collect online booking deposits
- Transferring ownership, which goes through support
The other sections below are the senior-management features you and your Admins share. Each one names who else can use it, and the Quick Reference at the end of this guide splits the two lists cleanly.
Billing and Subscription Management
Location: Click your name (top-right) → Billing
As an owner, you have complete control over your subscription:
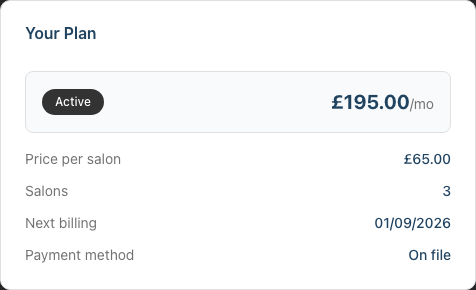
- Your Plan - Your status, monthly cost, price per salon, number of salons, next billing date, and whether a payment method is on file
- Add Payment Method - Enter card details to activate or continue your subscription
- Manage Payment Method - Opens the payment provider's portal, where you change your card and download invoices. The button appears once a card is on file and your trial has ended
- View History - Opens Billing History, a dated log of every billing event and subscription change
- Cancel subscription - End your subscription. You keep full access to the end of the current billing period, then the account enters a 90-day read-only grace period before all data is permanently deleted
- Restore Subscription - Reactivate a cancelled subscription at any point during either period
Important: If you need to transfer ownership of a salon to someone else, contact support at hello@luminate.salon.
Multi-Salon Management
Location: Click the salon name badge in the header
Owners can create and manage multiple salon locations from a single account:
Creating a new salon:
- Click the current salon name in the header
- Click Manage Salons
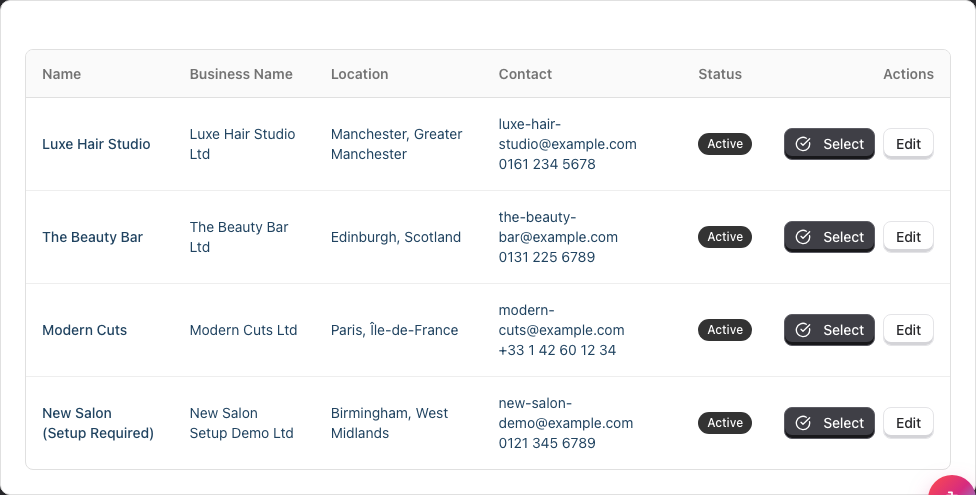
- On the My Salons page, click Add Salon
- Fill in the salon details
- Click Create Salon
- Check the cost summary, then click Confirm & Create Salon
- The new salon appears in your salon switcher
You need an active subscription to add a salon. Because Luminate charges per salon, step 6 shows what the extra location costs: the prorated charge for the days left in the current billing period, and your new monthly total. On a free trial it tells you what you'll pay when the trial ends instead.
Switching between salons:
- Click the salon name badge in the header
- Under Switch Salon, select the salon you want to view
- The entire interface updates to show that salon's data
You can also switch from the My Salons page — click Select on any row.
Deleting a salon:
- Switch to the salon you want to remove
- Open Salon Settings → General → Details
- Scroll to Danger Zone and click Delete Salon
- Type the salon's name into the confirmation field
- Click Delete Salon to confirm
Deleting a salon is permanent. It removes every customer record, appointment, transaction, staff account, service, product, gift voucher and skin test belonging to that location. Your subscription drops back to the remaining salon count. Only you can do this — an Admin cannot delete a salon.
Key points about multi-salon:
- Each salon has completely separate data (customers, appointments, transactions)
- Staff members are assigned to one salon only
- Reports and the dashboard always cover the salon you have selected, one location at a time
- You pay per salon, all on one subscription
Staff Login Account Management
Location: Staff → [Select staff member] → Login Account card
Only Owners and Admins can create and manage staff login accounts:
Creating a login account:
- Navigate to Staff in the sidebar
- Click on the staff member's name
- Find the Login Account card
- Click Create Login Account
- An invitation email is sent automatically to the address on their profile
Managing login accounts:
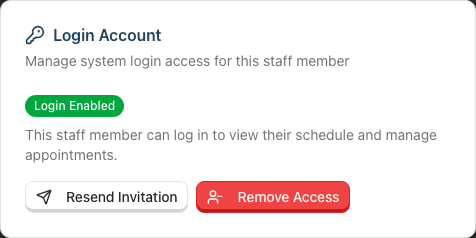
The card shows a Login Enabled badge once an account exists, or No Login Account if it doesn't. On an existing account you get two buttons:
- Resend Invitation - If the original email was lost or expired
- Remove Access - Immediately revoke login ability (the staff profile and its history remain)
Why this matters: Staff login accounts allow team members to access Luminate from home, view their schedule, and process transactions. You control who gets access.
Notification Settings and Templates
Location: Sidebar → Notifications
Owners and Admins see the Notifications link in the sidebar. The page has two tabs, Configuration and Templates. From here you can manage:
- Appointment Reminders - Configure when appointment reminders are sent (24 hours before, 48 hours, etc.)
- Other automated messages - Follow-up Messages, Birthday Notifications, Instant Notifications (booking confirmations, payment receipts, refunds, no-show and cancellation notices), Skin Test Reminders, Skin Test Expiry Reminders, and Outstanding Balance Reminders
- Templates - Customise the email, SMS, and WhatsApp messages customers receive
- Channel configuration - Choose email, SMS, or WhatsApp (or a combination) per message type
- Pause All Messaging - One switch at the top of Configuration stops every automated customer notification, on every channel and message type. Use it while you configure settings or import data. Staff can still message customers by hand
Your SMS credit balance lives in Salon Settings → SMS, not here.
Marketing Campaigns
Location: Sidebar → Campaigns
Owners and Admins can create and send marketing campaigns to customers via email or SMS:
- New Campaign - Draft email or SMS campaigns with custom content
- Audience targeting - Filter and segment your customer list to target specific groups
- Schedule sending - Send immediately or schedule campaigns for a future date and time
- Delivery reports - Track campaign delivery status and performance
- Manage drafts - Save campaigns as drafts and return to edit them later
As an Owner, you have full access to campaigns. Admins with notification management permissions can also create and send campaigns.
Setup Guide Access
Location: Click your name (top-right) → Setup Guide (if previously dismissed)
The onboarding setup guide tracks your progress in configuring the salon. Once dismissed, you can bring it back from this menu. Admins see the same item — anyone who can manage salon settings can reopen the guide.
Full Report Access and Exports
Location: Sidebar → Reports
Owners have access to all reports plus the ability to export data:
Available Reports
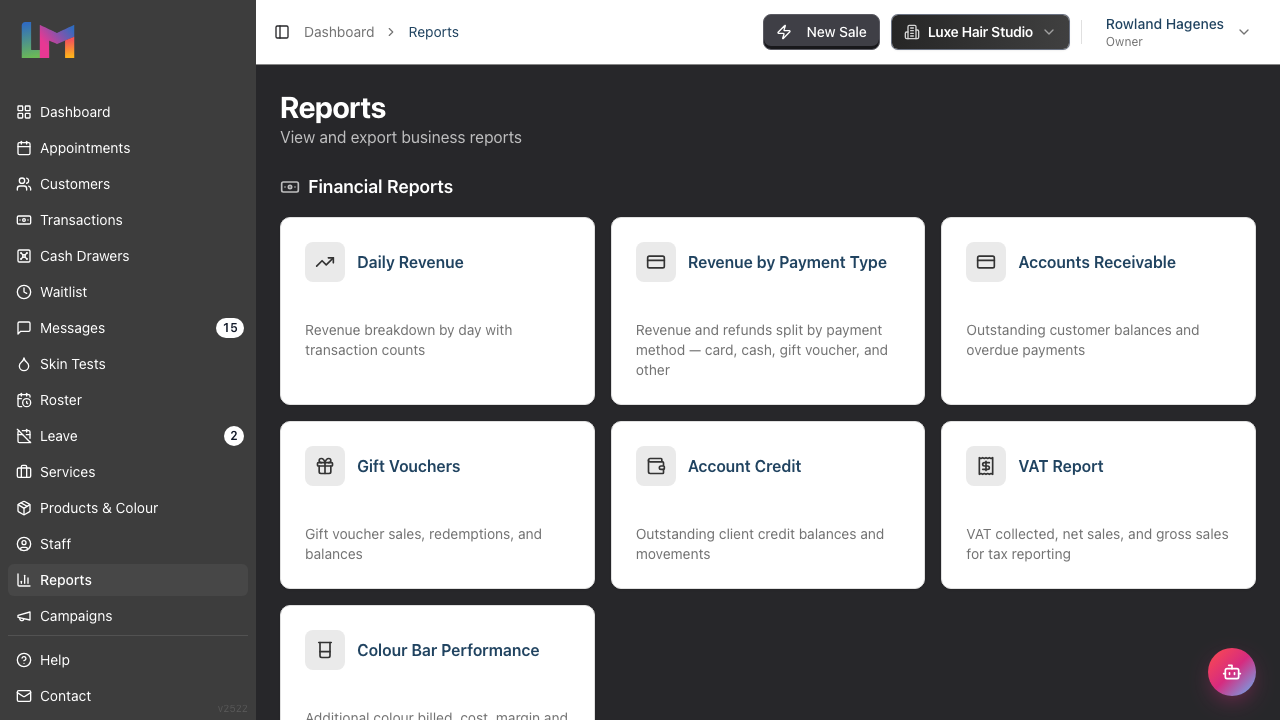
Reports are grouped into categories on the Reports index — Financial, Customer, Staff, Messaging, and Inventory. Appointment Reports sits below them under Coming Soon:
| Report | Category | What it shows |
|---|---|---|
| Daily Revenue | Financial | Revenue breakdown by day with transaction counts |
| Revenue by Payment Type | Financial | Revenue and refunds split by payment method - card, cash, gift voucher, and other |
| Accounts Receivable | Financial | Outstanding customer balances |
| Gift Vouchers | Financial | Gift voucher sales, redemptions, and balances |
| Account Credit | Financial | Outstanding client credit balances and movements |
| VAT Report | Financial | VAT collected, net sales, and gross sales for tax reporting. The tile takes its name from the tax label you set in General > Details, so it reads GST if that's what you charge |
| Colour Bar Performance | Financial | Additional colour billed, cost, margin, and per-employee waste |
| Top Customers | Customer | Your highest-spending and most frequent customers |
| Staff Performance | Staff | Revenue, tips, and commission per team member |
| Hours Worked | Staff | Rostered hours and shift totals for each staff member |
| Staff Commission | Staff | Per-staff commission earnings: service vs product split, item breakdown, and tier progression |
| Payroll | Staff | Monthly payroll calculations with hours, commission, and tips |
| Leave Report | Staff | Staff leave allowances, usage, and pending requests |
| SMS Usage | Messaging | SMS credit balance, usage history, and top-ups |
| Colour Stock & Reorder | Inventory | Live colour stock, usage velocity, days to stockout, and a supplier reorder worklist |
Exporting Data
Each report has an Export button. Only Owners and Admins see it — Managers can read the reports they have access to but cannot export them.
- Navigate to the report you want to export
- Set your date range and filters
- Click Export and choose Export as CSV or Export as PDF
- The file downloads automatically
Exports include all data matching your current filters—useful for accounting, tax records, or external analysis.
Salon Settings and Configuration
Location: Click salon name in the header → Salon Settings, or go to Salons page → Edit
Owners have full control over salon configuration. Settings are organised into six top-level tabs — General, Staff, Services, Online Booking, SMS and Data — four of which contain sub-tabs. Changes to the form fields save with Update Salon at the bottom of the page:
General Tab
Contains three sub-tabs:
Details:
- Salon name and Business name - For receipts and communications
- Contact details - Email, phone, address for customer contact
- Logo - Upload your salon logo for branding
- Timezone - Critical for accurate appointment times
- Currency - Displayed on all prices and transactions
- Date format - How dates appear throughout the system
- Tax settings - VAT/GST rate and label
Themes:
- Theme colour - Customise the interface colour scheme
- Choose from preset colours or set a custom brand colour
Badges:
- Appointment badges - Visual indicators on appointments (First Visit, Running Late, etc.)
- Customer badges - Traits to highlight on customers (VIP, Prefers Silence, etc.)
- Custom badges - Create your own badges with custom colours
Staff Tab
Contains seven sub-tabs:
Roster:
- Maximum weeks for roster duplication and other roster-wide defaults
Levels:
- Create experience tiers - Junior, Senior, Master, etc.
- Tiered pricing - Charge different rates for the same service by staff level
- Assign staff to levels - Match team members to their tier
Display Order:
- Set the order staff appear in the calendar, online booking, and reports
Leave:
- Default leave allowance - Annual holiday entitlement for new staff
- Carryover policy - How unused leave is handled year-to-year
- Leave year start - When your leave year begins
Payroll:
- Payroll defaults - Salon-wide settings for pay periods and commission calculation used by the Payroll report
Public Holidays:
- Enable/disable bank holidays - Choose which holidays to observe
- Create custom holidays - Add salon-specific closure dates
- Roster warnings - System warns when creating shifts on holidays
Time Blocks:
- Create categories for non-appointment time blocks (meetings, training, admin, etc.)
Services Tab
Contains three sub-tabs:
Colour:
- Configure colour-management settings used when offering tinting/colouring services
Skin Tests:
- Validity period - How long patch tests remain valid
- Enforcement - Warn or block bookings without valid tests
- Reminder settings - Automatic expiry notifications
- Consent statement - Custom consent text for forms
Gift Vouchers:
- Default expiry - How long vouchers remain valid
- Value limits - Minimum and maximum voucher amounts
- Code settings - Prefix and length for voucher codes
- Redemption rules - Allow partial redemptions
Online Booking Tab
- Enable/disable online booking - Allow customers to self-book
- Booking URL (slug) - Your unique booking page address
- Lead times - How far in advance customers can book
- Cancellation policies - Rules for customer self-service changes
- Bookable services/staff - Choose which are available online
- Deposit Payments - Connect a Stripe account to collect online booking deposits. This one card is yours alone: only the Owner can connect the account, open the Stripe dashboard, or disconnect it. Funds go straight to your account, less a small platform fee
SMS Tab
- Current balance - View your SMS credit balance
- Purchase credits - Buy credit packs
- Auto top-up - Configure automatic purchases when balance is low
- Usage history - Track SMS spending
SMS is switched off during a free trial, so you cannot buy credits until your subscription starts.
Data Tab
Contains two sub-tabs:
Exports:
Use Create Export to build a download, then pick two things:
- Export Scope - Full Salon for all data across every entity type, or Individual Customer for one person's complete record (the format a GDPR subject access request needs)
- Export Format - JSON, which can be re-imported into another salon, or CSV, which opens in a spreadsheet
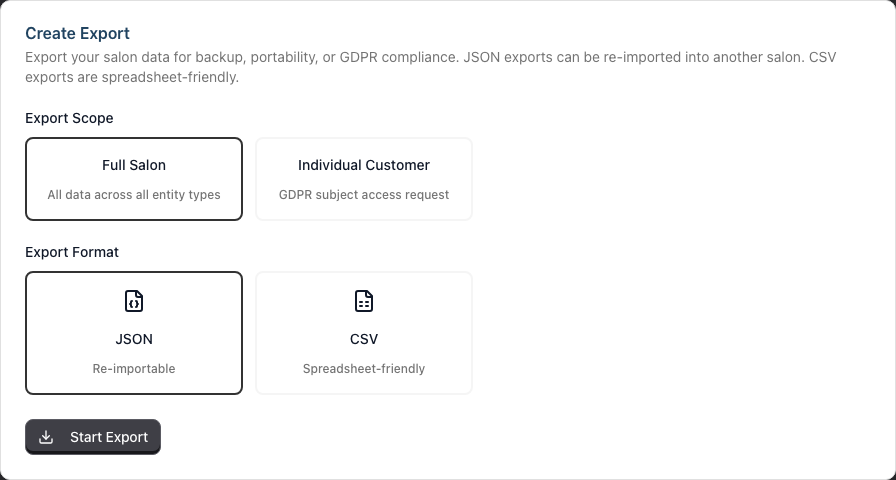
Click Start Export. Large exports run in the background, so the card shows progress while you carry on working. Finished exports appear under Export History, where you download them. Downloads stay available for 24 hours, so fetch the file the same day.
To export one customer, you can also start from their profile: open the customer, select the Details tab, and click Export Data under Data Privacy. That brings you here with the customer already selected.
Data Retention:
- Enable automatic anonymisation - Automatically strip personal data from customers who have been inactive beyond your retention period, which helps you meet GDPR storage-limitation obligations
- Retention period (months) - How long a customer can stay inactive before they qualify
- Email me before customers are anonymised - Get a warning list before anything is removed
- Warning lead time (days) - How far ahead that warning arrives
Lumen AI Support Chat
Location: Floating chat widget (bottom-right corner) or full-page mode
Lumen is Luminate's built-in AI assistant that can answer questions about your salon data and help you navigate the system. As an Owner, you have access to all of Lumen's tools and capabilities because your role bypasses all permission checks.
What Lumen can help with:
- Look up customer details, notes, appointment history, and upcoming bookings
- Check transaction records and revenue figures
- Find staff schedules, leave requests, leave balances, and performance data
- Answer questions about gift vouchers, products, and services
- Review notification logs and messaging history
- Check revenue and sales performance for any period (today, this week, this month) with comparison to the previous period
- View commission breakdowns for any staff member, including tiered and item-based commission
- Check SMS credit balance and usage statistics (how many sent, topped up, remaining)
- Check skin test records and which customers have an alert against them
- Report the current cash drawer status
- Find gaps in the schedule, and list upcoming public holidays
- Provide guidance on using Luminate's features
How to use Lumen:
- Click the chat icon in the bottom-right corner to open the floating widget
- Type your question in plain language (e.g., "How many appointments does Sarah have this week?") and click Send message
- Lumen responds with relevant data from your salon, and links to the page where you can act on it
- For a larger view, click Open full page
- To start again from scratch, click New chat
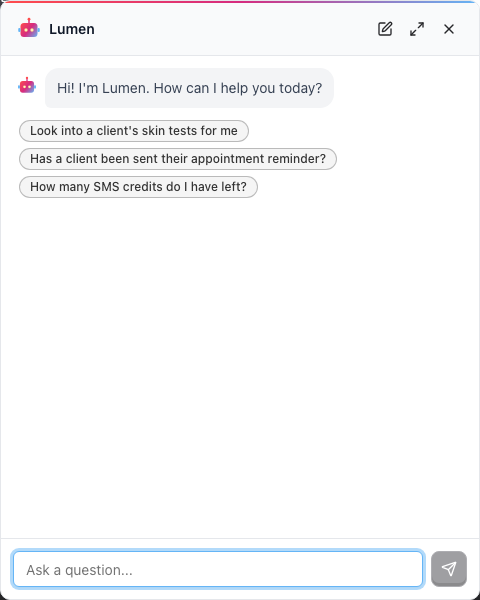
On first opening, the widget offers a few suggested questions you can click instead of typing.
Note: Lumen's capabilities vary by role. As an Owner, you have unrestricted access to all tools. Staff members with lower roles may have limited access depending on their permissions (e.g., notification logs require notification management permissions, leave request tools require a Manager or higher role).
For full details on Lumen's capabilities, see Tutorial 15.4: Using Lumen AI Support Chat.
Day-to-Day Operations
As an owner, you can perform all the same tasks as your team—plus more. Here's your quick reference for daily operations:
Appointments
Location: Sidebar → Appointments
- View and manage the appointment calendar
- Book appointments for any staff member
- Reschedule or cancel bookings
- Mark appointments as arrived, in progress, or completed
- Handle no-shows
- Send deposit payment links - From the appointment detail page, click Send Payment Link to send a payment link to the customer via email or SMS so they can pay their deposit online. The button appears when a deposit is due and unpaid, the salon has a Stripe account connected in Online Booking settings, and the customer has an email address or a mobile number on their profile
Waitlist
Location: Sidebar → Waitlist
- Add customers waiting for appointments
- Set priority levels and preferred staff
- Convert waitlist entries to bookings when slots open
Transactions (Point of Sale)
Location: Sidebar → Transactions, or the New Sale button in the header
- Process transactions for services and products
- Apply discounts and record tips
- Split payments across multiple methods
- Email or print receipts
New Sale in the header opens the Quick Sale till from anywhere in the app.
Cash Drawers
Location: Sidebar → Cash Drawers
- Open and close cash drawer sessions
- Record opening and closing balances
- Track cash movements throughout the day
- Reconcile variances
Customers
Location: Sidebar → Customers
- Add and edit customer profiles
- View customer history and analytics
- Manage marketing consent
- Deactivate or anonymise customer data (GDPR)
Skin Tests
Location: Sidebar → Skin Tests
- Track patch test requirements
- Record test results
- Monitor expiring tests on the dashboard
Messages
Location: Sidebar → Messages
- View two-way SMS/email conversations
- Reply to customer messages
- Close and archive conversations
Roster
Location: Sidebar → Roster
- Create and edit staff shifts
- Set break times and recurring patterns
- Duplicate rosters between weeks
- View public holiday indicators
Leave
Location: Sidebar → Leave
- View all leave requests
- Approve or reject requests from any staff member
- Monitor team leave balances
- See upcoming leave on the calendar
Staff
Location: Sidebar → Staff
- Add new team members
- Edit profiles, roles, and commission rates
- Create login accounts (covered above)
- Deactivate or anonymise staff records
Services
Location: Sidebar → Services
- Create and edit your service menu
- Set durations, prices, and commission rates
- Configure tiered pricing by staff level
- Assign colour coding for calendar visibility
Products and Colour Stock
Location: Sidebar → Products & Colour (or Products, if colour features are off)
- Add retail products to your catalogue on the Products tab
- Manage your colour lines and tubes on the Colour tab
- Track stock levels and reorder points
- Adjust inventory when stock arrives
- Set retail and cost prices
- Use Manage Categories and Manage Brands to organise the catalogue
Refund Processing
Location: Sidebar → Transactions → [Select transaction] → Refund
Owners, Admins, Managers and Receptionists can all process refunds. To refund a completed transaction:
- Navigate to Transactions in the sidebar
- Find the transaction and click View
- Click Refund
- In Refund Transaction, choose how to return the money — Card or Cash
- Click Confirm Refund
This refunds the whole transaction and restores product stock. The dialog tells you exactly what happens to each payment method used: money paid by gift voucher goes back to the voucher balance, money paid from account credit goes back to the customer's account, and a booking deposit is retained so you can refund the deposit transaction separately if you need to.
Refunds update the transaction status to Refunded and are recorded in reports.
Notifications on Your Phone
Luminate can send a short banner to your own phone when something needs you, instead of you watching a screen for it.
Go to Settings > Notifications in the Luminate app, turn notifications on for your phone, then choose what you want to be told about.
Today there is one thing to choose: Customer arrives, which fires when a customer is marked as arrived for an appointment you are the assigned staff member on. More will be added over time, and each new one appears on this page ready to switch on.
These settings are yours alone. Turning them on changes nothing for anyone else, and nobody can switch them on for you.
Notifications are deliberately vague on a locked screen — a first name and an initial, never the service. Full detail appears when you tap through.
See 10.7 Push Notifications on Your Phone.
User Profile and Account
Your Profile
Location: Click your name (top-right) → Profile
Your personal settings sit on tabs down this page:
- Profile - Update your name and email address
- Password - Change your password
- Two-Factor Auth - Turn two-factor authentication on or off
- Preferences - Your own display preferences
- Notifications - Choose which push notifications reach your phone (see below)
- Connected Accounts - Manage a linked sign-in account, when your salon has one enabled
These are your settings alone. They change nothing for anyone else on the team.
Switching Context
As an owner, you'll see:
- Your name in the top-right of the header with the Owner label beneath it
- The current salon name next to it, clickable to switch salons
- Billing in the menu behind your name
Common Workflows for Owners
Morning Opening
- Check the dashboard for today's appointments and alerts
- Open the cash drawer if handling cash
- Review any pending leave requests
- Check the waitlist for opportunities to fill gaps
- Review the week's revenue on the dashboard's Analytics tab
End of Day
- Close the cash drawer and reconcile the balance
- Review today's transactions in Transactions
- Mark any no-shows on the appointment calendar
- Bill any completed appointments still unpaid, from New Sale
- Check tomorrow's schedule for preparation
Weekly Review
- Run staff performance reports to see team productivity
- Check accounts receivable for outstanding balances
- Review the roster for the coming week
- Process any leave requests
- Check gift voucher sales and redemptions
Monthly Tasks
- Run payroll reports for commission calculations
- Export reports for your accountant
- Review top customers for VIP attention
- Check SMS usage and top up if needed
- Review subscription status and billing
Common Pitfalls
"I can't find the Billing page"
Billing is in the menu behind your name, not the sidebar. Click your name (top-right) and select Billing.
"My staff member can't access Reports"
Report access is not all-or-nothing. Owners and Admins get every report and the Export button. Managers read most reports but never see Payroll or the Leave Report, and cannot export. Receptionists reach only the Gift Vouchers and Account Credit reports. Service providers get no Reports link at all. If a staff member needs broader access, change their role — see Tutorial 1.3.
"I accidentally deactivated my only Admin"
As an owner, you can reactivate any staff member. Go to Staff, set the status filter to Inactive Only, open the person, and switch Active back on. Their history and login account are preserved throughout.
"I need to transfer ownership to my business partner"
Ownership transfer requires contacting support at hello@luminate.salon. We'll guide you through the process.
"The dashboard shows limited data"
The dashboard opens on Today's Appointments. Revenue, re-booking and commission figures live on the Analytics tab next to it, which defaults to This Week. Switch to Today or This Month with the buttons above the figures.
Tips and Best Practices
Regular billing checks - Review your billing status monthly to avoid unexpected subscription issues.
Delegate with roles - You don't need to do everything yourself. Assign Admin or Manager roles to trusted team members.
Weekly report review - Schedule time each week to review staff performance and revenue reports.
Audit login accounts - Quarterly, check who has login access and remove accounts for staff who've left.
Keep settings current - Update your salon details, holiday settings, and service prices as things change.
Export regularly - Monthly exports of key reports protect your data and keep your accountant happy.
Train your managers - Show Admins and Managers how to handle daily operations so you can focus on the business.
Quick Reference: What Only Owners Can Do
| Feature | Location |
|---|---|
| Billing & subscription | Your name (top-right) → Billing |
| Create new salons | Salon badge → Manage Salons → Add Salon |
| Delete a salon | Salon Settings → General → Details → Danger Zone |
| Connect Stripe for deposits | Salon Settings → Online Booking → Deposit Payments |
Note: The following features are available to both Owners and Admins:
| Feature | Location |
|---|---|
| Notification settings | Sidebar → Notifications |
| Campaigns | Sidebar → Campaigns |
| SMS balance & top-up | Salon Settings → SMS |
| Payroll finalisation | Reports → Payroll → Finalise Period |
| Gift voucher settings | Salon Settings → Services → Gift Vouchers |
| Online booking config | Salon Settings → Online Booking |
| Export reports | Reports → [Report] → Export |
| Access payroll | Reports → Payroll |
| View leave allowances | Reports → Leave |
| Data exports | Salon Settings → Data → Exports |
| Data retention settings | Salon Settings → Data → Data Retention |
| Staff login accounts | Staff → [Staff member] → Login Account |
| Delete customer personal data | Customers → [Customer] → Details → Data Privacy |
Note: These two are available to every role, not just senior staff:
| Feature | Location | Who |
|---|---|---|
| Lumen AI chat | Floating widget (bottom-right) or Open full page | Everyone. What Lumen will answer depends on the role's own permissions |
| Send deposit payment links | Appointments → [Appointment] → Send Payment Link | Anyone who can manage appointments and send messages, so every role |
Related Tutorials
- Tutorial 1.2: Setting Up Your Salon Profile - Initial salon configuration
- Tutorial 1.3: Understanding Roles and Permissions - Complete role reference
- Tutorial 1.4: The Onboarding Checklist - First-time setup guide
- Tutorial 4.2: Managing Staff Login Accounts - Staff invitation details
- Tutorial 12.1: Multi-Salon Management for Owners - Advanced multi-location guide
- Tutorial 12.4: Importing and Exporting Data - Data export details
- Tutorial 16.2: Guide for Salon Administrators - What you can delegate to an Admin
- Tutorial 14.1: Understanding Your Luminate Subscription - Billing details
- Tutorial 15.4: Using Lumen AI Support Chat - Full Lumen guide
- Tutorial 17.1: Daily Opening Procedures - Recommended daily routine
- Tutorial 17.4: Monthly Reporting and Review - Monthly management tasks
Frequently Asked Questions
Can I have multiple Owners for one salon?
Currently, each salon has one owner account. If you need multiple people with full access, make them Admins—they have nearly identical permissions except for billing.
What happens if I forget my password?
Use the "Forgot Password" link on the login page. A reset link will be sent to your registered email address.
Can I downgrade an Admin to a lower role?
Yes. Go to Staff → [Admin's name] → Edit → change their Role. The change takes effect immediately.
How do I give someone access to Billing without making them an Owner?
You can't. Billing access is exclusively for Owners. If you trust someone with billing, consider making them a co-owner (contact support).
Is my data safe if my subscription lapses?
Yes, for a while. You keep full access until the end of the billing period you have already paid for. After that the account becomes read-only for 90 days, and you can restore your subscription at any point during either stretch with all data intact. Once those 90 days pass, the data is permanently deleted. Contact hello@luminate.salon before that point if you need longer.
Can I use Luminate on my phone?
Yes. Luminate is fully responsive and works on mobile devices. The interface adapts to smaller screens while keeping all functionality available.
Last Updated: August 2026