
Guide for Salon Managers
Introduction
As a Manager in Luminate, you handle day-to-day operations and team supervision. You're the bridge between the administrative team (Owners and Admins) and the front-line staff. Your role includes managing appointments, approving leave for your team, viewing reports, and ensuring smooth daily operations.
This guide explains your complete permission set—what you can do, what you can see, and where your role's boundaries lie. Perfect for senior stylists who've been promoted to a supervisory position or floor managers overseeing daily operations.
Who this is for: Team members assigned the Manager role in Luminate.
What you'll learn:
- Your complete access level and permissions
- Managing appointments, the waitlist and the roster
- Approving leave for staff members
- Viewing reports (without export)
- Processing transactions, refunds and cash drawer reconciliation
- Adjusting client account credit
- Sending deposit payment links to customers
- Using Lumen, the AI support assistant
- Understanding your role's limitations
Time to complete: 12-15 minutes
Prerequisites
Before you begin:
- You should have received a login invitation and completed setup
- Helpful to have read Tutorial 1.3: Understanding Roles and Permissions
- Familiarise yourself with the basic navigation (Tutorial 1.1)
What Managers Can Do
Managers have operational access focused on team supervision and daily management:
| Feature Area | Manager Access |
|---|---|
| Dashboard | Full access with all statistics |
| Appointments | Create, edit, cancel any appointment |
| Waitlist | Full management |
| Skin Tests | Full management |
| Transactions | Process sales, view all transactions |
| Refunds | Yes - Process refunds |
| Cash Drawers | Open, close, reconcile, record movements and adjustments |
| Reopen a closed drawer session | Yes - shared with Owners and Admins |
| Customers | Full customer management, including merging duplicates |
| Account Credit | Yes - Adjust client credit balances |
| Staff | View only - Cannot add or edit staff |
| Staff Accounts | No access - Cannot manage logins |
| Roster | Full schedule management |
| Leave | Approve Staff and Receptionist requests only |
| Services | Create, edit, delete services |
| Products & Colour | Full inventory management |
| Reports | View only - Cannot export |
| Payroll & Leave Report | No access |
| Salon Settings | No access |
| Notifications | No access |
| Messages | Full access - View, send, close, archive |
| Lumen AI | Access to all but two support chat tools |
| Deposit Links | Send deposit payment links to customers |
| Billing | No access |
The Manager Dashboard
Location: Sidebar → Dashboard
As a Manager, you see the full management dashboard. It's in two parts.
Right Now
The panel at the top of the page is the live operational view — what needs attention today:
- Next appointment (or "No more appointments today") with a link straight to the calendar
- Skin Tests Due - customers needing a patch test
- Low Stock - products at or below their reorder level
- High Priority Waitlist - waitlist entries flagged as urgent
- Pending Deposits - unpaid deposits and their total value
- Counters for today's appointments, low stock, birthdays, waitlist size and remaining SMS credits
Each one links through to the relevant page, so this is the fastest way to start your day.
Today's Appointments and Analytics
Below Right Now are two tabs:
- Today's Appointments - the day's bookings with a completion counter (for example "19/33 done"), filterable by stylist
- Analytics - Sales (total takings, transaction count, and the split between services and products, with a comparison against the previous period), Operators (per-staff productivity), Re-Booking (how many clients left with another appointment) and Revenue Trend (a daily revenue graph with a daily average)
Use the period selector on the Analytics tab to change the timeframe:
- Today - Current day only
- This Week - Monday to today
- This Month - First of month to today
Appointment Management
Location: Sidebar → Appointments
You have full control over the appointment calendar.
Viewing Appointments
The calendar shows appointments for all staff. You can:
- Switch between Day, Week and List views
- Filter by specific staff members
- See appointment status through colour coding
- View appointment details by clicking on them
Booking Appointments
- Click an empty slot on the calendar or use New Appointment
- Select or create the customer
- Choose the staff member
- Select the service(s)
- Confirm the date and time
- Click Save
Editing Appointments
- Click on the appointment
- Click Edit
- Make your changes
- Click Save
You can also drag appointments to reschedule them on the calendar.
Cancelling Appointments
- Click on the appointment
- Click Cancel
- Confirm the cancellation
- Optionally record a reason
Sending Deposit Payment Links
If an appointment requires a deposit, you can send the customer a secure payment link instead of taking the deposit at the till:
- Open the appointment details
- Click Send Payment Link
- Choose the channel (email, SMS or WhatsApp) and confirm the amount
- The customer receives a message with a link to pay online
- You can track whether the deposit has been paid from the appointment detail page
The Send Payment Link button only appears when all of the following are true:
- The appointment has a deposit that hasn't been paid yet
- The appointment status is Scheduled, Confirmed or Arrived (a cancelled or completed booking can't be paid online)
- The salon has completed Stripe Connect setup — without it, online deposit collection isn't available at all
- The customer has an email address or a mobile number on file
If you'd rather take the deposit in person, use Take Deposit instead, which opens the till with the deposit pre-loaded. See Tutorial 8.4 for the full deposit workflow.
Managing Appointment Status
The appointment detail page has a row of status buttons. Click one to move the booking straight to that status — there is no fixed sequence you have to step through:
| Status | When to use it |
|---|---|
| Scheduled | Booked but not yet confirmed by the customer |
| Confirmed | The customer has confirmed they're coming |
| Arrived | The customer is in the salon |
| Complete | The service is finished |
| No Show | The customer didn't turn up |
| Cancel | The booking was cancelled |
There is no "In Progress" status — a booking goes from Arrived straight to Complete.

Roster Management
Location: Sidebar → Roster
Managers can fully manage the staff roster.
Creating Shifts
- Click on an empty slot for a staff member and date
- Set the start and end times
- Add break duration if applicable (in minutes)
- Add optional notes for internal reference
- Click Create Shift
Shifts are created one at a time — there is no recurrence option on the shift itself. To repeat a pattern across future weeks, use duplication instead.
Editing Shifts
Use the pencil icon in the top-right of a shift block to change its times, break duration, or notes, and the trash icon to delete it. You cannot move a shift to a different staff member — delete it and create a new one on the right row.
Duplicating Rosters
Duplication is a three-step wizard — Staff → Dates → Review:
- Click Duplicate in the week navigation bar at the top of the Roster page (you don't need to be on the source week — the wizard asks)
- Select staff — tick who to include
- Choose weeks — the week you're copying, how many weeks form the pattern (up to 8 for a rotating rota), the repeat interval, and the first and last week to write into. Bank holidays are excluded by default
- Review changes — a server-run dry run showing exactly what will be created, and what to do with any shifts already in those weeks (Keep them, Replace clashes, or Clear the weeks). Deleting options need an explicit acknowledgement
- Click Duplicate roster
There is no undo, which is why the Review step states the exact counts. See Tutorial 5.3 for the full walkthrough.
Roster Change Notifications
Staff aren't emailed for every shift you save. Changes are collected as you work, and each affected staff member gets one summary email once you've stopped editing for about 30 minutes (or every 4 hours if you're editing on and off). Changes to a shift starting within the next 24 hours go out almost immediately, and anything you undo before the summary sends is never emailed at all. You can plan a whole week without flooding anyone's inbox.
This covers duplicated shifts as well as ones you add, edit or delete by hand on the grid — so publishing a duplicated roster reaches the team through the same summary email, without you having to tell them separately.
Public Holiday Indicators
The roster shows warnings when you try to create shifts on public holidays. The system won't prevent it but will ask you to confirm.
Leave Approval (Limited)
Location: Sidebar → Leave
Managers can approve leave requests, but with hierarchy restrictions.
Who You Can Approve
| Whose request | Can You Approve? |
|---|---|
| Staff | ✓ Yes |
| Receptionist | ✓ Yes |
| Another Manager | ✗ No |
| Your own | ✗ No |
| Admin | ✗ No |
| Owner | ✗ No |
Key point: you cannot approve leave for another Manager, for an Admin, or for yourself. Those requests go to an Admin or the Owner. (Admins are the only role that can approve their own leave.)
The Leave Page
Leave opens on your own allowance card first — base days, days carried over, total, used, pending and remaining, plus an estimate for next year. Below that is the full list of requests for the whole team, filterable by status, staff member and year.
Approving Requests
- Navigate to Leave
- Find a Pending request from a Staff member or Receptionist
- Click View to open it
- Review the dates, leave type and any clashing appointments the system has flagged
- Click Approve or Reject
- Optionally add a note
Your Own Leave
You can request leave like any other staff member:
- Go to Leave → Request Leave
- Select leave type and dates
- Submit the request
Your requests go to an Admin or Owner for approval.
Processing Transactions and Refunds
Location: Sidebar → Transactions (or the New Sale button in the top bar)
Managers can process sales and refunds.
Processing Sales
- Click New Sale
- Select or create a customer
- Add items (services, products)
- Apply any discounts
- Record payment method(s)
- Complete the transaction
Processing Refunds
Unlike Staff, you can process refunds:
- Find the transaction in the Transactions list
- Click View to open it
- Click Refund (this button appears only on Completed transactions)
- Choose full or partial refund
- Confirm the refund
When to refund:
- Customer returns a product
- Service was not delivered as expected
- Double-charge correction
- Pre-payment cancellation
See Tutorial 8.2 for the full refund workflow.
Cash Drawers
Location: Sidebar → Cash Drawers
Managers have full cash-handling access — this is one of the most substantial parts of the role.
What You Can Do
- Open a drawer with an opening float at the start of the day
- Close a drawer and reconcile the counted cash against the expected balance
- Add a drawer if the salon needs another till
- Record cash movements — Top Up, Payout and Safe Drop
- View History for any drawer
- Record an Adjustment — an over/short correction that resolves a reconciliation variance
- Reopen a closed session — see below
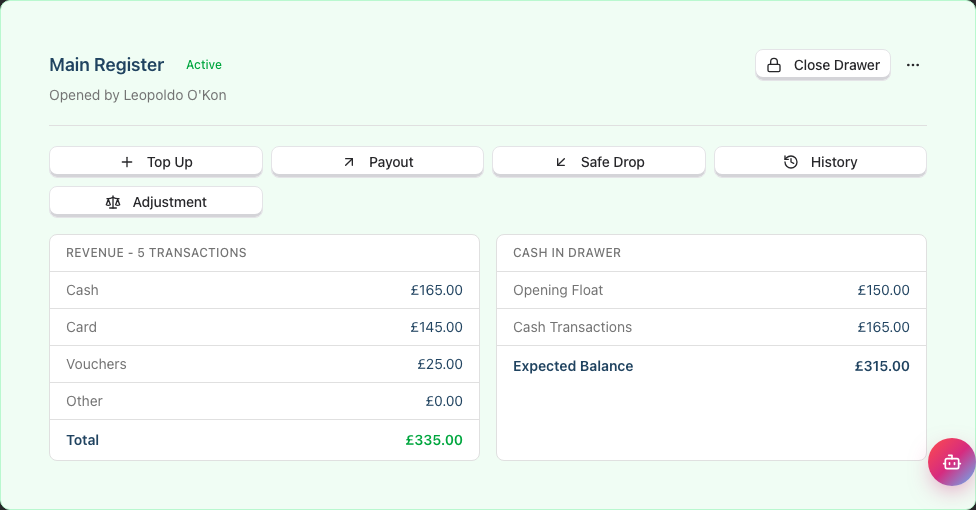
Each drawer card shows the day's revenue split (cash, card, vouchers, other) alongside the cash calculation: opening float, cash transactions, and expected balance.
Reopening a Closed Session
If a drawer was closed by mistake, you can reopen it. Because reopening reactivates a closed audit record, it is deliberately restricted to the senior roles — Owners, Admins and Managers. Receptionists and Service Providers can't reopen a session, even though they can take payments.
Reopen is only offered when all of these are true:
- The drawer is active
- It has no session currently open
- The session you're reopening was opened today
If the session was opened on an earlier day, it stays closed — ask the Owner if a correction is genuinely needed.
Adjustments
An adjustment rewrites the expected-cash reconciliation and can zero out a variance, so declaring a discrepancy "corrected" is limited to Owners, Admins and Managers. Ordinary movements (top-up, payout, safe drop) are open to anyone using the till.
Viewing Reports (No Export)
Location: Sidebar → Reports
Managers can view all reports but cannot export them.
Available Reports
You see 13 report tiles, grouped by category:
| Category | Report | What It Shows |
|---|---|---|
| Financial | Daily Revenue | Revenue by day with transaction counts |
| Financial | Revenue by Payment Type | Revenue and refunds split by card, cash, voucher and other |
| Financial | Accounts Receivable | Outstanding customer balances and overdue payments |
| Financial | Gift Vouchers | Voucher sales, redemptions and balances |
| Financial | Account Credit | Outstanding client credit balances and movements |
| Financial | VAT Report | VAT collected, net sales and gross sales |
| Financial | Colour Bar Performance | Additional colour billed, cost, margin and per-employee waste |
| Customer | Top Customers | Highest-spending customers by revenue |
| Staff | Staff Performance | Revenue, tips and commission by staff member |
| Staff | Hours Worked | Rostered hours and shift totals |
| Staff | Staff Commission | Service vs product split, item breakdown and tier progression |
| Messaging | SMS Usage | Credit balance, usage history and top-ups |
| Inventory | Colour Stock & Reorder | Live stock, usage velocity, days to stockout and a reorder worklist |
Not available to you: the Leave Report (staff leave summaries) and Payroll reports require Admin or Owner access, so those two tiles don't appear on your Reports page at all. You can still approve leave and check pending requests — only the formal leave report itself is restricted.
Viewing Reports
- Navigate to Reports
- Select the report type
- Set your date range
- Apply any filters
- View the data
About Export
Exporting is reserved for Owners and Admins because:
- Exported data leaves the system
- Financial exports may have compliance implications
- The Owner controls what data is extracted
The Export button doesn't appear on reports for your role, so there's nothing to click by mistake.
If you need exported data, ask an Admin or Owner to generate it for you.
Customer Management
Location: Sidebar → Customers
You have full customer management access.
Adding Customers
- Click Add Customer
- Enter contact details
- Record any preferences or notes
- Set marketing consent
- Click Save
Editing Customers
- Update contact information
- Add notes and preferences
- Manage marketing consent
- View appointment history
- Check transaction history
Merging Duplicate Customers
There is no Merge button on an individual customer profile. Merging runs from the duplicate-review screen:
- Go to Customers
- Click Manage Duplicates in the top-right
- The system groups records it thinks are the same person
- Open a group, review the data that will be combined, and choose which record to keep
- Confirm the merge
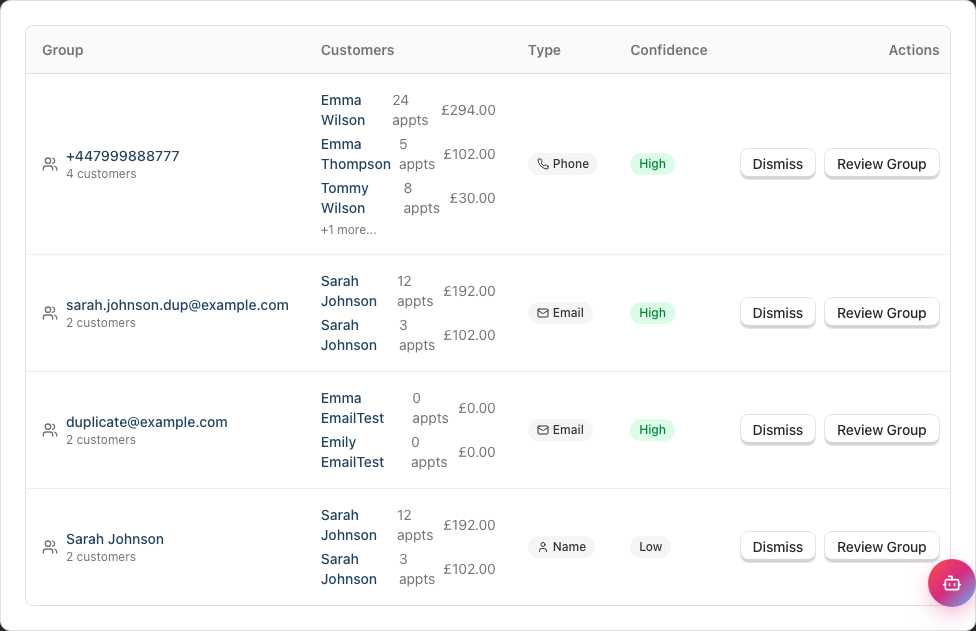
The merged record combines appointment history, transactions, and notes from both profiles. See Tutorial 3.6 for the full walkthrough.
Adjusting Account Credit
Managers can adjust a client's account credit balance — credit is spendable at the till as the Credit payment method.
- Open the customer profile
- Go to the Billing tab, then the Credit sub-tab
- Click Adjust Credit
- Enter the amount and a reason
- Confirm
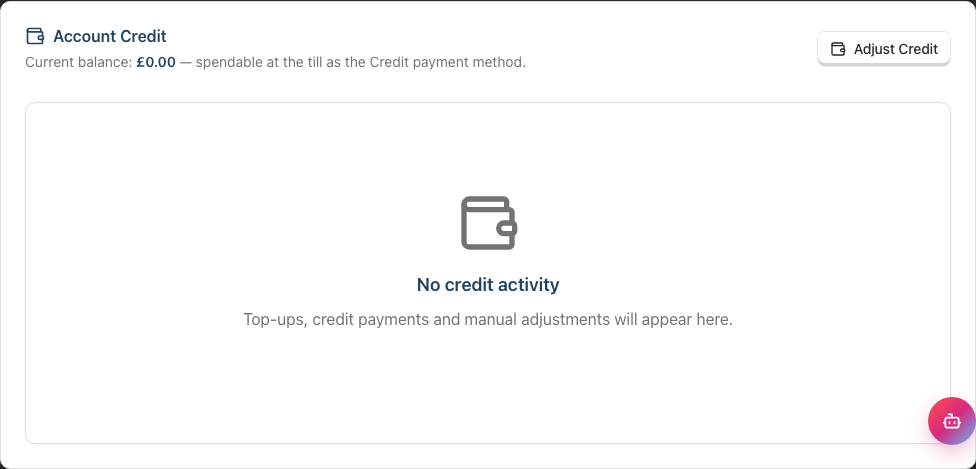
Every adjustment is recorded against the customer, and the salon-wide picture is on the Account Credit report. See Tutorial 3.8 for details.
Service and Product Management
Location: Sidebar → Services / Products & Colour
Managers can manage both services and products.
Services
- Create new services with duration and pricing
- Edit existing services
- Set commission rates
- Configure tiered pricing (by staff level)
- Assign colour coding
Products & Colour
- Add retail products and colour stock
- Set prices (retail and cost)
- Track stock levels
- Adjust inventory
- Configure SKUs
- Manage brands and product lines
Waitlist and Skin Tests
Both sit in the sidebar and both come with your appointment access, so you have full control of each.
Waitlist
Location: Sidebar → Waitlist
Add clients waiting for a slot, set their priority, and convert an entry into a booking when a gap appears. High-priority entries surface on the dashboard's Right Now panel.
Skin Tests
Location: Sidebar → Skin Tests
Track patch test requirements, record results, and see which clients are due or overdue. Customers needing a test appear in the dashboard's Skin Tests Due tile, and the system warns you when booking a colour service for a client without a valid test.
Messages
Location: Sidebar → Messages
Managers have full messaging access, including inbox management.
What You Can Do
- View all conversations
- Read customer messages
- Reply to messages
- View customer-specific history
- Close and reopen conversations
- Archive threads
What You Cannot Do
- Configure messaging settings (notification templates, auto-responses)
For settings changes, ask an Admin.
Notifications on Your Phone
Luminate can send a short banner to your own phone when something needs you, instead of you watching a screen for it.
Go to Settings > Notifications in the Luminate app, turn notifications on for your phone, then choose what you want to be told about.
Today there is one thing to choose: Customer arrives, which fires when a customer is marked as arrived for an appointment you are the assigned staff member on. More will be added over time, and each new one appears on this page ready to switch on.
These settings are yours alone. Turning them on changes nothing for anyone else, and nobody can switch them on for you.
Notifications are deliberately vague on a locked screen — a first name and an initial, never the service. Full detail appears when you tap through.
See 10.7 Push Notifications on Your Phone.
Lumen AI Support Assistant
Location: Chat icon in the bottom-right corner
Lumen is Luminate's built-in AI assistant that can answer questions and look up salon data for you. Lumen has 26 tools; as a Manager you can use all but two of them.
What Lumen Can Help With
- Customer lookups - Find customers, view their details, notes, and transaction history
- Appointment queries - Check schedules, find appointment details, view colour test alerts
- Staff information - View staff lists and details
- Service and product lookups - Check pricing, availability, and stock levels
- Transaction queries - Look up transactions and cash drawer status
- Roster and leave - View rosters and pending leave requests
- Waitlist - Check the current waitlist
- Gift vouchers - Look up voucher details and balances
- Schedule gaps - Find available booking slots
- Public holidays - Check the salon's configured holiday dates
- Revenue and sales - Check salon-wide revenue figures for today, this week, or this month
- Commission - View commission earned by any staff member
- SMS credits - Check remaining SMS balance and usage
- Documentation - Search help articles and guides
Lumen is read-only. It can look things up and explain them, but it never books, edits or cancels anything on your behalf.
What Lumen Cannot Access for Managers
Some Lumen tools require permissions you don't have:
- Salon settings - Lumen cannot look up salon configuration for you (requires Admin access)
- Notification logs - Lumen cannot check notification delivery history (requires Admin access)
For these queries, ask an Admin or Owner, or use Lumen when logged in alongside them.
See Tutorial 15.4: Using Lumen, Your In-App AI Assistant for full details.
What Managers Cannot Access
Understanding your boundaries prevents confusion:
Staff Management
You can view staff profiles but cannot:
- Add new staff members
- Edit staff details
- Create or remove login accounts
- Change staff roles
- Deactivate or anonymise staff
Settings
You have no access to:
- Salon settings and configuration
- Notification settings
- Public holiday management
- Staff level configuration
- Leave policy settings
Reports Export
You can view reports but you cannot export them — the Export button isn't shown to your role, and every export route is blocked behind it. Request exports from Admins or the Owner.
The Leave Report is also restricted — viewing staff leave summaries requires Admin or Owner access, even though you can approve and view individual leave requests. That tile doesn't appear on your Reports page.
Payroll
No access to payroll reports or staff pay management. Payroll is handled by Owners and Admins.
Billing
No access to subscription or payment information.
Daily Workflow for Managers
Morning Routine
- Check the dashboard — work through the Right Now panel: skin tests due, low stock, high-priority waitlist and pending deposits
- Open the cash drawer with the day's float
- Review pending leave requests from Staff and Receptionists
- Check the waitlist for booking opportunities
- Review today's appointments for any issues
- Ensure staff are rostered correctly
Throughout the Day
- Monitor appointments - Handle reschedules and issues
- Send deposit links - Send payment links for upcoming appointments requiring deposits
- Process transactions - Assist with payments
- Supervise staff - Help with questions
- Handle customer issues - Resolve problems
- Check messages - Respond to customer enquiries
- Ask Lumen - Use the AI assistant for quick data lookups
End of Day
- Review completed appointments
- Process any pending transactions
- Mark no-shows on the calendar
- Close and reconcile the cash drawer — record an adjustment if there's a variance
- Check tomorrow's schedule
- Flag any issues for Admin/Owner
Weekly Tasks
- Review staff performance in reports
- Plan the roster for the coming week
- Process outstanding leave requests
- Check customer feedback via messages
- Report issues to Admin/Owner
Common Pitfalls
"I can't approve my colleague's leave request"
Check their role. Managers can only approve Staff and Receptionist leave. Manager leave goes to Admins or Owners.
"There's no Export button on the report I'm looking at"
Exporting is reserved for Owners and Admins, so the button isn't shown to Managers. The report itself is still yours to read on screen — ask an Admin or Owner to generate the export for you.
"I closed the till by mistake"
You can reopen it — Cash Drawers offers a reopen option on a drawer whose last session was opened today. If the session was opened on an earlier day, it can't be reopened; speak to the Owner.
"I can't edit a staff member's profile"
Managers have view-only access to staff. Ask an Admin to make changes.
"A customer is asking about refund policy"
You can process refunds. Explain the salon's policy (check with Admin/Owner if unsure) and process the refund if appropriate.
"I need to change the roster settings"
Roster creation is within your access, but roster settings (like default shift lengths) may require Admin access. You can create and edit individual shifts.
Tips and Best Practices
Prompt leave responses - Staff appreciate quick decisions. Check pending requests at the start of each day.
Use the dashboard daily - The dashboard gives you a quick overview of salon health.
Document issues - Keep notes on recurring problems to share with Admins during weekly reviews.
Know your limits - Rather than trying workarounds, escalate to Admins for tasks outside your access.
Train your team - Help Staff and Receptionists understand the system so they can be more self-sufficient.
Communicate upward - Keep Admins informed of operational issues before they become problems.
Monitor performance - Regular review of staff performance reports helps identify training needs.
Use Lumen for quick answers - Instead of navigating through menus, ask Lumen to look up customer details, check schedules, or find transaction information.
Reconcile the till the same day - Cash variances are far easier to explain while people still remember the shift, and a session can only be reopened on the day it was opened.
Related Tutorials
- Tutorial 1.3: Understanding Roles and Permissions - Complete role reference
- Tutorial 2.2: Booking and Managing Appointments - Detailed appointment guide
- Tutorial 3.6: Merging Duplicate Customer Records - The duplicate-review workflow
- Tutorial 3.8: Client Account Credit - Credit balances and adjustments
- Tutorial 5.1: Setting Up Your Weekly Roster - Roster management
- Tutorial 5.3: Duplicating and Managing Roster Patterns - The duplication wizard
- Tutorial 6.3: Approving and Rejecting Leave Requests - Leave workflow details
- Tutorial 8.2: Handling Refunds and Cancellations - Refund processing
- Tutorial 8.4: Deposits and Pre-Payments - Deposit links and till collection
- Tutorial 9.3: Staff Performance and Commission Reports - Performance reports
- Tutorial 15.4: Using Lumen, Your In-App AI Assistant - AI support chat
- Tutorial 16.2: Guide for Salon Administrators - How your access compares
- Tutorial 16.4: Guide for Reception Staff - Understanding your team
- Tutorial 16.5: Guide for Service Providers - Understanding your team
- Tutorial 17.1: Daily Opening Procedures - Opening routine
- Tutorial 17.2: Daily Closing Procedures - Closing and cash reconciliation
Frequently Asked Questions
Why can't I approve another Manager's leave?
The role hierarchy prevents Managers from approving each other's leave. This ensures proper oversight — Manager leave is approved by Admins or Owners. The same rule stops you approving your own request.
Can I see my own performance statistics?
Yes. The Staff Performance report includes your data, and you can also see personal stats in your dashboard profile.
What if I disagree with an Admin's decision?
Speak with them directly or escalate to the Owner. The system enforces the role hierarchy, but human communication solves most disagreements.
Can I be promoted to Admin?
Yes, if the Owner or current Admin changes your role. This is done through the Staff profile editing function (which you can't access, but they can).
What's the difference between Manager and Admin?
Almost everything an Admin can do, a Manager can too. The differences that matter:
What Admins can do that you can't:
- Staff management - Admins can add/edit staff; Managers view only
- Staff accounts - Admins can create logins; Managers cannot
- Report export - Admins can export; Managers cannot
- Data exports - Admins can export full salon data; Managers cannot
- Leave & payroll reports - Admins can view the Leave Report and payroll; Managers can approve leave but cannot open either report
- Settings access - Admins can modify settings; Managers cannot
- Notifications - Admins can configure notifications; Managers cannot
- Leave approval - Admins can approve any staff member, including themselves; Managers only Staff and Receptionists
- Lumen AI - Admins have full tool access; Managers cannot query salon settings or notification logs
What you can do that an Admin can't:
- Reopen a closed cash drawer session - restricted to Owners, Admins and Managers, because reopening reactivates a closed audit record
Everything else — appointments, waitlist, skin tests, customers, account credit, the roster, services, products, the till, refunds, cash adjustments and the inbox — is the same for both roles.
Can Lumen look up everything for me?
Almost. Lumen can access customer data, appointments, staff lists, services, products, transactions, cash drawer status, rosters, leave requests, public holidays, and more. Of its 26 tools, only two are closed to you: salon settings and notification logs, both of which require Admin permissions.
Can I access the salon from home?
Yes. Log in with your credentials from any device. Your access is the same whether you're in the salon or remote.
Last Updated: 9 August 2026 Verified against application code and a live Manager login: 9 August 2026