
Guide for Salon Administrators
Introduction
As a Salon Administrator (Admin) in Luminate, you're responsible for running the day-to-day operations of the salon. You have nearly full access to the system. Billing, creating and deleting salons, and the Stripe account that collects deposits stay with the Owner. Everything else is yours.
Think of the Admin role as the "operations manager" position. You can manage staff, refund transactions, export reports, and configure almost every salon setting. This guide covers your complete capability set and helps you understand both what you can do and where your responsibilities lie.
Who this is for: Team members assigned the Admin role in Luminate.
What you'll learn:
- Your complete permission set and access levels
- How to manage staff profiles and login accounts
- Refunding transactions and other financial operations
- Report access and export capabilities
- Marketing campaigns (email and SMS)
- Data exports and retention for backup and compliance
- Sending deposit payment links
- Using Lumen, the AI support assistant
- Salon settings you can modify
- What stays with the Owner
Time to complete: 12-15 minutes
Prerequisites
Before you begin:
- You should have received a login invitation email from the salon owner
- You should have completed your first login and set your password
- Helpful to have read Tutorial 1.3: Understanding Roles and Permissions
What Admins Can Do
Admins have comprehensive access to salon operations. Here's the complete overview:
| Feature Area | Admin Access |
|---|---|
| Dashboard | Full access with all statistics |
| Appointments | Create, edit, cancel any appointment |
| Waitlist | Full management |
| Transactions (POS) | Process sales, view all transactions |
| Refunds | Refund a completed transaction |
| Cash Drawers | Open, close, reconcile, record adjustments, and reopen a closed session |
| Customers | Full customer management, including merging duplicates and removing personal data |
| Account credit | Take top-ups at the till and make manual balance adjustments |
| Staff | Add, edit, and deactivate staff members |
| Staff Accounts | Create and remove login access |
| Roster | Full schedule management |
| Leave | Approve or reject any staff leave request, including your own |
| Services | Create, edit, delete services |
| Products | Full inventory management |
| Reports | View all reports |
| Exports | Export any report as CSV or PDF |
| Payroll | View payroll and finalise a pay period |
| Salon Settings | Modify every setting except the Stripe deposit account |
| SMS credits | View the balance, buy credit packs, and set up auto top-up |
| Notifications | Configure reminders and templates, and pause all messaging |
| Campaigns | Create and send email/SMS marketing campaigns |
| Messages | Full messaging access |
| Lumen AI | Full access to all support chat tools |
| Deposit Links | Send deposit payment links to customers |
| Data Exports | Export full salon and customer data, and set data retention |
| Billing | No access |
The Admin Dashboard
Location: Sidebar → Dashboard
When you log in, you'll see the full management dashboard. It has three parts.
Right Now sits at the top and never changes:
- Next up - The next appointment due, with a countdown and a View Details link
- Commission This Week - Your own commission so far, against last week
- Attention chips - Skin Tests Due, Low Stock, High Priority Waitlist and Pending Deposits, each with a View all link
- Quick stats - Today's appointments, low stock, upcoming birthdays, waitlist size, and your SMS credit balance
Below that are two tabs:
- Today's Appointments - The day's bookings in time order, with a per-appointment View appointment, Create transaction and Edit appointment action, a staff filter, and a "12/25 done" counter
- Analytics - Sales breakdown by service, product and payment method, staff performance, the revenue trend graph, re-booking rate, and your commission tracker
The dashboard opens on Today's Appointments. If salon setup is incomplete, a setup checklist appears above everything else.
On the Analytics tab, use the period buttons to switch between Today, This Week and This Month, or pick your own range in the date picker beside them. The arrows step back and forward one period at a time. The tab opens on This Week.
Staff Management
As an Admin, you have full control over staff profiles and accounts.
Adding a New Staff Member
Location: Sidebar → Staff → Add Staff Member
- Click Add Staff Member in the top-right corner
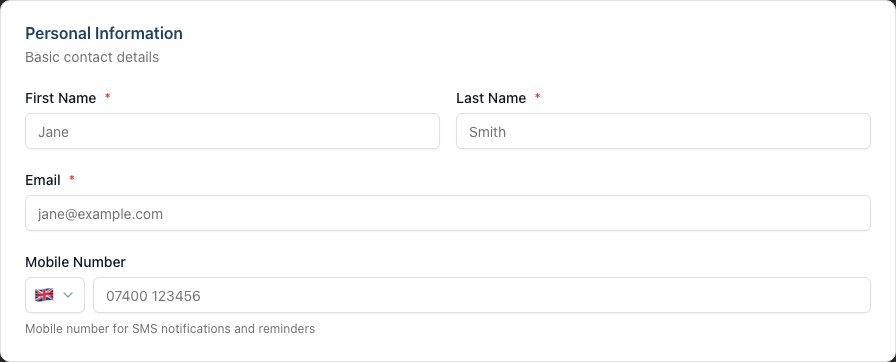
- Under Personal Information, fill in the required fields:
- First Name and Last Name
- Email — required. It's also the address the login invitation goes to
- Mobile Number — optional, used for SMS notifications and reminders
- Under Role, choose Admin, Manager, Staff or Receptionist. New staff default to Staff
- Work down the remaining cards, all optional:
- Scheduling - Show on Roster & Appointments, and a Staff Level for tiered pricing
- Employment Details - Hire Date
- Services Offered In-Salon and Services Offered Online - which services they can be booked for on the calendar, and which appear for them in the public booking portal
- Compensation - Hourly, Salary Only, Commission Only or Salary + Commission, plus Earns Product Commission
- Monthly Targets - goals shown to them on their own My Performance page
- Leave Settings - a Leave Allowance Override and their usual Working Days
- Additional Information - Qualifications and Notes
- Status - the Active switch, on by default
- Click Create Staff Member
Editing Staff Profiles
Location: Sidebar → Staff → [Select staff member] → Edit
You can modify every field on the create form, including:
- Contact information
- Role, and the permissions that come with it
- Compensation and monthly targets
- Staff level assignment
- Which services they offer, in salon and online
Two limits apply:
- Role is disabled on your own profile. You cannot change your own role — the Owner or another Admin must do it
- The Owner's staff profile is read-only to you. You can open it, but only the Owner can change it
Creating Login Accounts
Location: Staff → [Staff member] → Login Account card
To give a staff member their own login:
- Navigate to their profile
- Find the Login Account card
- Click Create Login Account
- An invitation email is sent automatically to the address on their profile
The card shows a green Login Enabled badge once an account exists, or No Login Account if it doesn't. On an existing account you get two buttons:
- Resend Invitation - If they didn't receive the original or it expired
- Remove Access - Revoke their login immediately. The staff profile and its history remain
Deactivating Staff
When someone leaves the salon:
- Navigate to their profile
- In the Staff Status card, switch Active off
- Confirm in the Make [name] inactive? dialog by clicking Make Inactive
Deactivating someone signs them out on every device straight away, hides them from staff lists, and stops them being booked for new appointments. Their login account and history are kept.
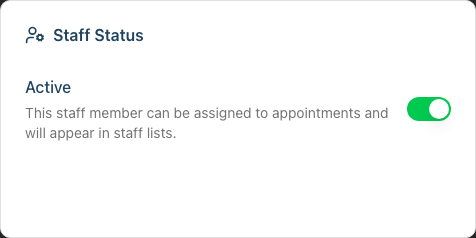
To bring someone back, set the status filter on the Staff page to Inactive Only, open their profile, and switch Active back on.
Note: Deactivation is different from removing their data. Deactivated staff can be reactivated at any time.
Removing Personal Data (GDPR)
For complete data removal:
- Navigate to the staff member's profile
- Scroll to Danger Zone and click Remove Data
- Read the dialog, then click Remove Personal Data to confirm
This deletes their name, email, phone number, qualifications and notes, and removes their login account. Historical transactions, past appointments, and commission and compensation history are all preserved for your financial records. This action cannot be undone.
Processing Refunds
Location: Sidebar → Transactions → [Select transaction] → Refund
Admins can refund a transaction when customers return products or cancel services. Owners, Managers and Receptionists can too.
To refund a completed transaction:
- Navigate to Transactions in the sidebar
- Find the transaction and click View
- Click Refund
- In Refund Transaction, choose how to return the money — Card or Cash
- Click Confirm Refund
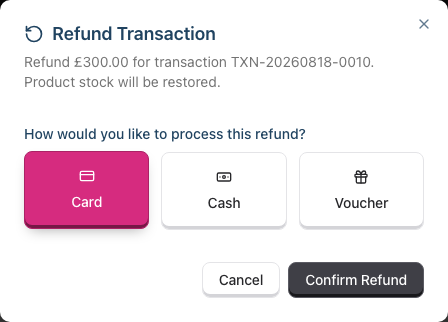
A refund returns the whole transaction. The dialog tells you exactly what happens to each payment method that was used:
- Money paid by gift voucher goes back to the voucher balance, not out as cash or card
- Money paid from account credit goes back to the customer's account balance
- A booking deposit is retained. Refund the deposit transaction separately if you need to
What happens:
- Product stock is restored
- The transaction status updates to Refunded
- A cash refund is recorded as cash out of the drawer
- The refund appears in revenue reports
- If linked to an appointment, the appointment billing status updates
If someone else took the payment as part of a combined checkout, the dialog names the payer so you refund against their card or cash, not the customer's.
To correct a transaction rather than reverse it, see Tutorial 8.2.
Report Access and Exports
Location: Sidebar → Reports
Admins have access to all reports with full export capability.
Available Reports
Reports are grouped into categories on the Reports index — Financial, Customer, Staff, Messaging, and Inventory. Appointment Reports sits below them under Coming Soon. You see the same tile set as the Owner:
| Report | Category | Purpose |
|---|---|---|
| Daily Revenue | Financial | Track income by date and source |
| Revenue by Payment Type | Financial | Revenue and refunds split by payment method - card, cash, gift voucher, and other |
| Accounts Receivable | Financial | Monitor unpaid balances |
| Gift Vouchers | Financial | Track voucher sales and redemptions |
| Account Credit | Financial | Outstanding client credit balances and movements |
| VAT Report | Financial | VAT collected and owed. The tile takes its name from the tax label set in General > Details, so it reads GST if that's what your salon charges |
| Colour Bar Performance | Financial | Additional colour billed, cost, margin, and per-employee waste |
| Top Customers | Customer | Identify your best clients |
| Staff Performance | Staff | See who's generating revenue |
| Hours Worked | Staff | Review rostered hours |
| Staff Commission | Staff | Per-staff commission earnings: service vs product split, item breakdown, and tier progression |
| Payroll | Staff | Commission and pay calculations |
| Leave Report | Staff | Staff leave taken and remaining |
| SMS Usage | Messaging | Monitor message sending |
| Colour Stock & Reorder | Inventory | Live colour stock, usage velocity, days to stockout, and a supplier reorder worklist |
Exporting Data
Each report has an Export button. Only Owners and Admins see it — Managers can read the reports they have access to but cannot export them.
- Navigate to the report
- Set your date range and filters
- Click Export and choose Export as CSV or Export as PDF
- The file downloads to your device
Export formats:
- CSV - Simple format for spreadsheets and accounting tools
- PDF - Formatted for printing or sharing
The export always reflects the filters on screen, so set your date range before you click.
Tip: Monthly exports help with accounting and tax preparation.
Salon Settings
Location: Salon name in the header → Salon Settings
Admins reach the same settings page as the Owner. It has six tabs, four of which hold sub-tabs. Changes to the form fields save with Update Salon at the bottom of the page.
You CAN change:
General — sub-tabs Details, Themes, Badges
- Salon name and business name - Display names for the salon
- Contact details - Email, phone, address
- Localization - Timezone, currency, and date format
- Tax Settings - Tax rate and the label used for it, which also names the VAT report
- Logo - Upload or replace the salon logo
- Theme colour - Interface colour scheme
- Badges - Which badges appear on appointment and customer cards
Staff — sub-tabs Roster, Levels, Display Order, Leave, Payroll, Public Holidays, Time Blocks
- Staff levels - Create experience tiers for tiered pricing
- Leave settings - Default allowances, carryover, and the leave year
- Public holidays - Enable, disable, or create custom holidays
- Roster and time blocks - Opening hours and the block types staff can book out
Services — sub-tabs Colour, Skin Tests, Gift Vouchers
Online Booking - Enable and configure customer self-booking, bookable services, booking constraints, self-service options, SMS verification, and terms and conditions
SMS - Your credit balance, credit packs, and auto top-up
Data — sub-tabs Exports, Data Retention
You CANNOT change:
- Deposit Payments - Only the Owner can connect a Stripe account, open the Stripe dashboard, or disconnect it. The card sits on the Online Booking tab
- Owner assignment - Who owns the salon
- Billing settings - Subscription and payment details
Leave Management
Location: Sidebar → Leave
Admins can approve leave requests from any staff member, regardless of their role.
Viewing Requests
The Leave Requests page opens on your own Your Leave Allowance card — Base, Carried Over, Total, Used, Booked and Remaining days — with a Next Year Preview beside it.
Below that, Search & Filter narrows the request list by Status, Staff and Year. Filtering to one person switches the allowance card to their balance too.
The table lists every request in the salon with its staff member, leave type, dates, working days and status.
A badge on the sidebar's Leave link shows how many requests are waiting on you.
Approving/Rejecting Leave
- Navigate to Leave
- Find the pending request and click View
- Check the request, and the Conflicting Appointments card if the dates clash with bookings
- Click Approve or Reject
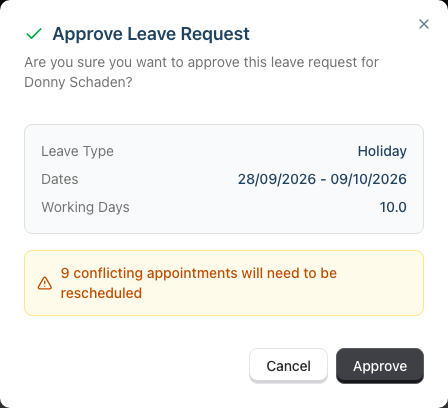
Approve opens a confirmation dialog summarising the leave type, dates and working days, and warns you how many appointments will need rescheduling. Click Approve to confirm.
Reject asks for a Rejection Reason before it will let you continue. Write at least a sentence — the reason is stored on the request and shown to the staff member.
Hierarchy note: Unlike Managers, Admins can approve leave from anyone in the salon, including other Admins and yourself. Managers can only approve Staff and Receptionist requests.
Requesting Your Own Leave
You can request leave like any other staff member:
- Go to Leave → Request Leave
- Under Staff Member, leave yourself selected. Because you hold leave management, you can also file a request on someone else's behalf here
- Choose a Leave Type, then set Leave begins and Leave ends. Each date can be a full day or a half day, and the form works out the Working Days as you go
- Add a Reason if it helps — it's optional
- Click Submit Request
As an Admin you can approve your own request. Any other Admin, or the Owner, can approve it too.
Notification Management
Location: Sidebar → Notifications
Admins can configure customer communications. The page has two tabs, Configuration and Templates.
Configuration
A single Pause All Messaging switch sits at the top. It stops every automated customer notification, on every channel and message type. Use it while you configure settings or import data. Staff can still message customers by hand.
Below it, each message type has its own card:
- Appointment Reminders - Set when reminders are sent (24 hours before, 48 hours, and so on)
- Follow-up Messages - Messages sent after an appointment
- Birthday Notifications - Birthday greetings
- Instant Notifications - Booking confirmations, payment receipts, refunds, no-show and cancellation notices
- Skin Test Reminders and Skin Test Expiry Reminders
- Outstanding Balance Reminders
Use Add Reminder (or the equivalent Add button on each card) to create one, and Edit or Delete on an existing entry. Each entry chooses its own channels — email, SMS, WhatsApp, or a combination.
Templates
The Templates tab holds Message Templates, the wording customers actually receive:
- Customise content for email, SMS, and WhatsApp
- Use variables (customer name, appointment time, and so on)
- Create Template adds a new one, Edit opens an existing one
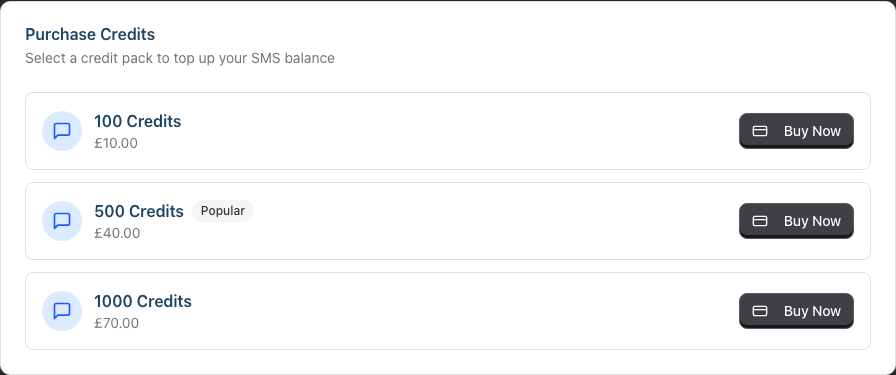
SMS credits: Your balance is not on this page. It lives in Salon Settings → SMS, where you can see the Current Balance, buy a credit pack with Buy Now, and set up Auto Top-up with a threshold and a pack. Admins get the same access to this tab as the Owner.
While the salon is on a trial, SMS is switched off, so nobody can buy credits or turn on auto top-up — the Owner included. The tab explains this and the buttons stay greyed out. Only the Owner can subscribe and open SMS up.
Marketing Campaigns
Location: Sidebar → Campaigns
Like the Owner, you can create and send marketing campaigns to customers via email or SMS. Managers and below have no Campaigns link at all.
- New Campaign - Draft an email or SMS campaign with custom content
- Audience targeting - Filter and segment your customer list to target specific groups
- Schedule sending - Send immediately or schedule for a future date and time
- Delivery reports - Track campaign delivery status and performance
- Manage drafts - Save campaigns as drafts and return to edit them later
Campaigns respect each customer's marketing consent—only customers who have opted in are included.
Messages Inbox
Location: Sidebar → Messages
Admins have full access to the messaging system:
- View all conversations - SMS and email threads
- New Message - Start a conversation with a customer
- Reply to messages - Respond to customer enquiries
- Close - Mark a thread as resolved. Reopen brings it back
- Archive - Remove a thread from the active view
A badge on the sidebar's Messages link counts unread threads.
Data Exports
Location: Salon name in the header → Salon Settings → Data → Exports
Admins can export salon data for backup, migration, or compliance purposes.
Creating an Export
- Open Salon Settings and select the Data tab
- On the Exports sub-tab, use the Create Export card
- Choose an Export Scope:
- Full Salon - All data across every entity type
- Individual Customer - One person's complete record, which is the format a GDPR subject access request needs
- Choose an Export Format:
- JSON - Can be re-imported into another salon
- CSV - Opens in a spreadsheet
- Click Start Export
Large exports run in the background, so the card shows progress while you carry on working. Finished exports appear under Export History, where you download them. Downloads stay available for 24 hours, so fetch the file the same day.
Full exports include: staff levels, staff, customers, tags, services, products, appointments, transactions, shifts, colour tests, and gift vouchers. Customer exports include their profile, appointments, transactions, colour tests, and gift vouchers.
Exporting One Customer
You can also start from the customer:
- Open the customer and select the Details tab
- Under Data Privacy, click Export Data
- That brings you to the Exports sub-tab with the customer already selected
- Choose a format and click Start Export
Data Retention
The Data Retention sub-tab automates the same GDPR housekeeping:
- Enable automatic anonymisation - Strip personal data from customers who have been inactive beyond your retention period
- Retention period (months) - How long a customer can stay inactive before they qualify
- Email me before customers are anonymised - Get a warning list before anything is removed
- Warning lead time (days) - How far ahead that warning arrives
Tip: Regular full exports provide a safety net. Consider running a monthly export for your records.
For more detail, see Tutorial 12.4: Importing and Exporting Data.
Deposit Payment Links
Location: Appointment detail page
When your salon collects deposits online, you can send a customer a payment link straight from their appointment:
- Open an appointment that has an unpaid deposit
- Click Send Payment Link
- In the Collect Deposit dialog, choose to send by Email, SMS, or both
- Click Send Payment Link
The customer receives a secure link to pay their deposit online. This is useful when a customer books over the phone and needs to pay their deposit remotely.
Send Payment Link appears when three things are true: the appointment has a deposit that is due and unpaid, the Owner has connected a Stripe account in Online Booking settings, and the customer has an email address or a mobile number on their profile.
The same dialog also offers Take at Till, which works whether or not Stripe is connected. Use it when the customer is standing in front of you.
Anyone who can manage appointments and send messages can do this, so every role has it — not just Admins.
Notifications on Your Phone
Luminate can send a short banner to your own phone when something needs you, instead of you watching a screen for it.
Go to Settings > Notifications in the Luminate app, turn notifications on for your phone, then choose what you want to be told about.
Today there is one thing to choose: Customer arrives, which fires when a customer is marked as arrived for an appointment you are the assigned staff member on. More will be added over time, and each new one appears on this page ready to switch on.
These settings are yours alone. Turning them on changes nothing for anyone else, and nobody can switch them on for you.
Notifications are deliberately vague on a locked screen — a first name and an initial, never the service. Full detail appears when you tap through.
See 10.7 Push Notifications on Your Phone.
Lumen AI Assistant
Location: Chat icon in the bottom-right corner of any page
Lumen is Luminate's built-in AI support assistant. Every role has Lumen, but what it will answer depends on that role's permissions. As an Admin you hold every permission Lumen checks, so no question is refused:
- Customer lookups - Ask about customer details, notes, appointment history, and transaction summaries
- Appointment information - Check today's schedule, upcoming bookings, and waitlist status
- Staff and roster queries - View staff details, roster schedules, and leave requests
- Schedule gaps - Find the empty slots in a day
- Transaction details - Look up specific sales, gift vouchers, and cash drawer status
- Salon settings - Query current configuration, services, and products
- Notification logs - Check recent email and SMS delivery status
- Colour test alerts - Find customers needing patch tests
- Public holidays - Check upcoming holidays
- Revenue and sales - Check salon revenue for any period, with comparison to previous periods
- Commission - View commission breakdowns for any staff member
- SMS credits - Check SMS credit balance and usage statistics
- Documentation search - Get help with how to use Luminate features
Type your question in plain language and click Send message. For example: "Who has appointments tomorrow?" or "Show me today's revenue." Lumen answers with real data from your salon and links to the page where you can act on it.
The widget header carries New chat to start again, Open full page for a larger view, and Close chat.
Two of these tools are closed to Managers and below: notification logs need notification management, and leave requests need leave management. If a colleague tells you Lumen "won't answer" one of those, their role is the reason, not a fault.
For full details on using Lumen, see Tutorial 15.4: Using Lumen, Your In-App AI Assistant.
Daily Workflow for Admins
Morning Tasks
- Check dashboard for today's overview
- Review pending leave requests (badge count in sidebar)
- Open cash drawer if your salon uses one
- Check waitlist for booking opportunities
- Review any skin test alerts
Throughout the Day
- Monitor appointments for issues or changes
- Process transactions as customers pay
- Handle customer enquiries via Messages
- Assist staff with any system questions
End of Day
- Close cash drawer and reconcile
- Review today's transactions in Transactions
- Check tomorrow's schedule for preparation
- Address any pending leave requests
Weekly Tasks
- Run staff performance reports for team review
- Check accounts receivable for follow-up
- Review roster for the coming week
- Export reports as needed for accounting
What Admins Cannot Do
Understanding your boundaries helps avoid confusion:
| Feature | Why You Can't |
|---|---|
| Access Billing | Subscription management is Owner-only |
| Create new salons | Multi-salon creation requires Owner |
| Delete the salon | Only Owners can delete salons |
| Connect a Stripe account for deposits | The Owner connects, opens and disconnects it, because the money lands in their account |
| Edit the Owner's staff profile | The Owner's own profile, login account and data are theirs alone. You can view it |
| Change your own role | Another Admin, or the Owner, has to do it |
| Transfer ownership | Contact support for ownership changes |
If you need any of these actions, speak with the salon Owner.
Common Pitfalls
"I can't find the Billing page"
This is expected. Billing is Owner-only. If you need billing information, ask the Owner.
"I can't top up SMS credits"
Admins can purchase SMS credits and set up auto top-up. Open the salon name in the header, choose Salon Settings, then the SMS tab. If you can't see the tab at all, check that your role is set to Admin rather than Manager.
Credits cannot be bought while the salon is on a free trial, because SMS sending is switched off until the subscription starts. Ask the Owner where the subscription stands.
"A staff member didn't receive their invitation"
- Check they have the correct email address on file
- Ask them to check their spam folder
- Use Resend Invitation to send a new one
- If still not working, ask the Owner to check email delivery settings
"I accidentally deactivated the wrong staff member"
Nothing is lost. Go to the Staff page, set the status filter to Inactive Only, open their profile, and switch Active back on. Their history and login account were preserved throughout.
"I can't find the Export button on a report"
The Export button sits at the top of the report itself, not on the Reports index. Open the report first. Clicking Export opens a short menu with Export as CSV and Export as PDF — pick one and the file downloads.
"I can't edit the Owner's staff profile"
That's expected. The Owner's own staff record, login account and personal data can only be changed by the Owner. You can open the profile and read it.
Tips and Best Practices
Regular report reviews - Weekly performance reports help identify trends before they become problems.
Prompt leave responses - Staff appreciate quick decisions on leave requests. Check the pending count regularly.
Keep staff data current - Update contact details and roles when they change.
Export for backup - Monthly exports of key reports protect against data loss.
Document your processes - Keep notes on how you handle common situations for consistency.
Communicate with the Owner - Keep them informed of major changes or issues.
Train your managers - Help Managers understand their responsibilities to share the workload.
Related Tutorials
- Tutorial 1.3: Understanding Roles and Permissions - Complete role reference
- Tutorial 4.1: Adding New Staff Members - Detailed onboarding guide
- Tutorial 4.2: Managing Staff Login Accounts - Invitation process details
- Tutorial 6.3: Approving and Rejecting Leave Requests - Leave workflow
- Tutorial 8.2: Handling Refunds and Cancellations - Refund process details
- Tutorial 9.3: Staff Performance and Commission Reports - Performance reporting
- Tutorial 10.7: Push Notifications on Your Phone - Choosing what reaches your phone
- Tutorial 12.4: Importing and Exporting Data - Data export details
- Tutorial 15.4: Using Lumen, Your In-App AI Assistant - AI chat features
- Tutorial 16.1: Guide for Salon Owners - What the Owner keeps
- Tutorial 16.3: Guide for Salon Managers - Manager capabilities
- Tutorial 17.3: Weekly Management Tasks - Weekly routine
Frequently Asked Questions
How is Admin different from Owner?
Five things belong to the Owner alone:
- Billing and subscription - Owners only
- Creating a new salon - Owners only
- Deleting a salon - Owners only
- Connecting a Stripe account for deposits - Owners only
- Their own staff profile - Only the Owner can edit it, remove its login, or remove its data
Everything else is shared. For daily operations, Admin and Owner are the same job.
Can I be an Admin at multiple salons?
No. Staff accounts (including Admins) are assigned to one salon only. If you need to work across salons, ask the Owner about alternative arrangements.
Can I change my own role?
No. The Role field is disabled when you open your own profile. Another Admin, or the Owner, has to change it for you.
Can I approve my own leave request?
Yes. Admins are the only role that can. Any other Admin, and the Owner, can approve it too.
What happens if the Owner is unavailable?
Admins can handle nearly everything. The only actions requiring the Owner are:
- Billing issues (payment failures, subscription changes)
- Creating or deleting salons
- Connecting or disconnecting the Stripe account used for deposits
- Changes to the Owner's own staff profile
- Ownership transfers
For emergencies, contact hello@luminate.salon.
Can I see what the Owner sees on their dashboard?
Yes. Admins see the same full dashboard as Owners, with all statistics and charts.
Can other Admins see my activity?
The system logs certain activities, but there's no dedicated "audit log" visible to users. The Owner may be able to see some activity through transaction and appointment history.
Last Updated: August 2026