
Approving and Rejecting Leave Requests
Introduction
Managers review pending leave requests and decide whether to approve or reject them. This tutorial covers the approval workflow, including checking for conflicting appointments, adding rejection reasons, and managing requests on behalf of staff.
Who this is for: Owner, Admin, Manager What you'll learn:
- View and review pending leave requests
- Approve requests with confirmation
- Reject requests with a required reason
- Handle conflicting appointments
- Request leave on behalf of staff members
Time to complete: 10 minutes
Prerequisites
- Logged in as Owner, Admin, or Manager
- At least one staff member with a pending leave request
- Complete Tutorial 6.1 (Understanding Staff Leave Allowances)
Step-by-Step Instructions
Step 1: Access Pending Leave Requests
- Click Leave in the sidebar. The badge beside it counts the pending requests you're allowed to approve
- The default view shows all leave requests for the current year
- Set the status filter (the first box, showing All Statuses) to Pending to see only requests awaiting review
- If you can manage leave for multiple staff, use the staff search box to narrow results
- Use the year box to switch between the current and next year. Clear Filters resets all three filters
The table shows:
- Staff: Who submitted the request
- Type: Leave type (Holiday, Sick, etc.)
- Dates: Start and end dates with period indicators (AM/PM)
- Days: Calculated working days
- Status: Pending, Approved, Rejected, or Cancelled
Step 2: Open a Leave Request
- Click on any row in the table, or click View
- The leave request detail page opens
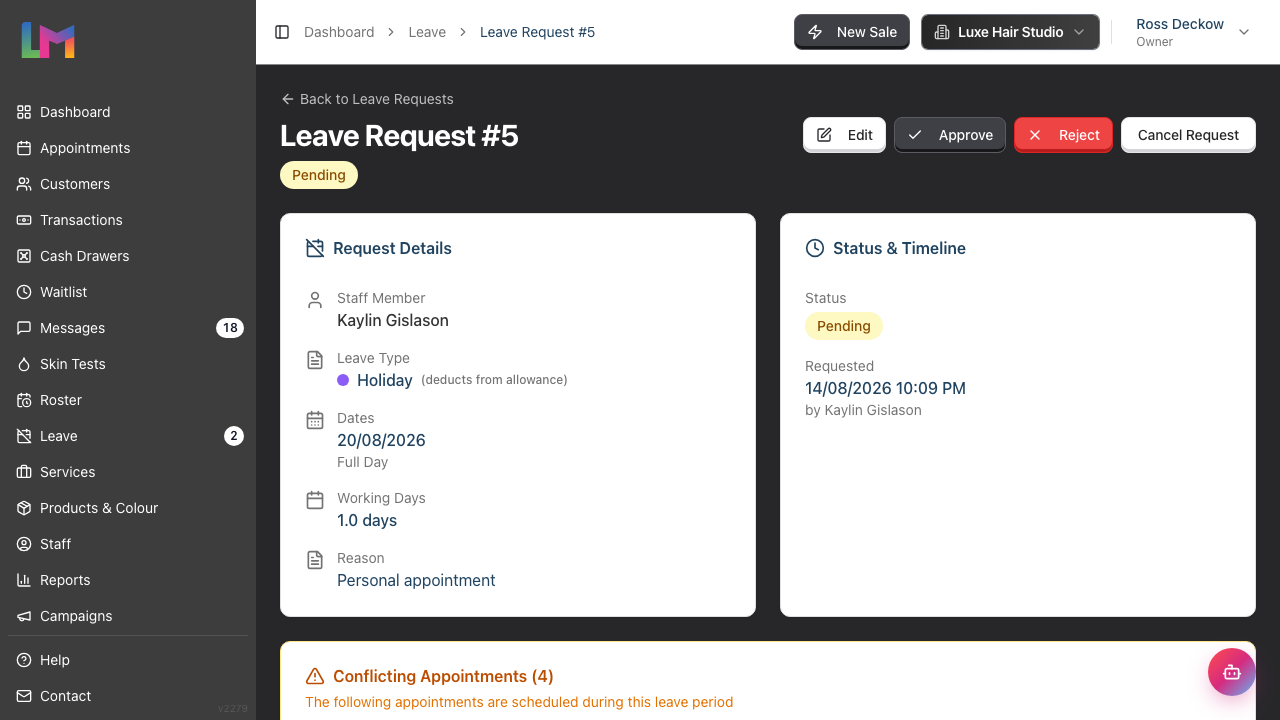
The detail page shows two main cards, side by side:
Request Details:
- Staff Member name, which links through to their staff profile
- Leave Type (with a colour dot, plus a "(deducts from allowance)" note for types that draw down the holiday balance)
- Dates (formatted as a range, with how the leave is trimmed — All days, or All day from midday on the first day / until midday on the last day — shown on the line beneath)
- Working Days (calculated)
- Reason (if provided)
Status & Timeline:
- Current status badge
- Requested date and time, followed by a by line naming who submitted the request. The line appears when a submitter was recorded — for example, the manager who raised it on the staff member's behalf
- Approved date and by whom, shown in green (if approved)
- Rejected date and by whom, shown in red (if rejected)
- Rejection reason displayed in a highlighted red box (if rejected)
- Cancelled date (if cancelled)
Step 3: Check for Conflicting Appointments
If the staff member has appointments booked during the requested leave period, a Conflicting Appointments card appears (the card is always present; when there are no conflicts it simply reads "No conflicting appointments").
Every live booking counts — scheduled, confirmed and arrived. Appointments that are already completed, cancelled or marked as a no-show are settled, so they are not listed.
The card shows:
- The number of conflicts in the card title (for example, "Conflicting Appointments (2)")
- A table with: Date & Time, Service, Customer
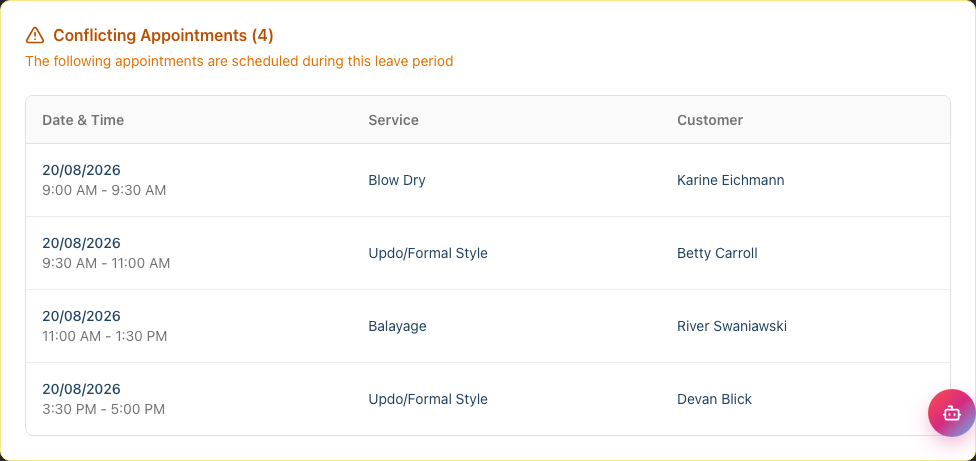
Important: Conflicting appointments aren't automatically cancelled. If you approve the leave, you'll need to manually reschedule or reassign these appointments.
Step 4: Approve a Leave Request
To approve a pending request:
- Click the Approve button (top-right, marked with a tick)
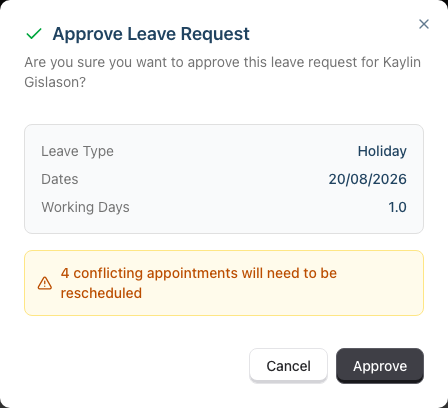
- A confirmation dialog appears. The staff member's name is in the question at the top, and a summary box shows:
- Leave type
- Dates
- Working days
- A warning about conflicting appointments (if any exist), for example "2 conflicting appointments will need to be rescheduled"
- Click Approve to confirm
What happens when approved:
- Status changes to Approved
- The approval date and your name are recorded in the Timeline
- For leave types that deduct from allowance (Holiday), the working days are deducted from the staff member's balance, so their Remaining decreases
- Future-dated approved leave is counted under Pending on the allowance summary; once the leave dates have passed it moves into Used
Step 5: Reject a Leave Request
To reject a pending request:
- Click the Reject button (top-right, the red button with a cross)
- A dialog prompts for a Rejection Reason (required, minimum 10 characters). The Reject button stays disabled until you've typed at least 10 characters
- Enter an explanation, for example:
- "We're short-staffed that week - could you take the following week instead?"
- "Peak period - please discuss alternative dates"
- "Insufficient allowance remaining"
- Click Reject to confirm
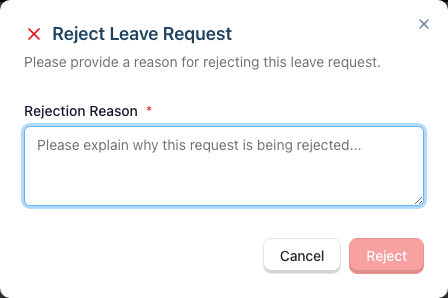
Rejection reason is mandatory: You cannot reject without providing a reason of at least 10 characters. This ensures staff receive a meaningful explanation for why their request was declined.
What happens when rejected:
- Status changes to Rejected
- The rejection date, your name, and your reason are recorded
- The rejection reason appears on the request detail page
- Requested days return to the staff member's "Remaining" balance (they were never deducted)
Step 6: Edit a Pending Request
If you need to modify a pending request before approving:
- Open the request detail page
- Click Edit (top-right)
- Update the dates, periods, leave type, or reason, then Save Changes
- Then approve or reject as needed
Note: You can only edit pending requests — the Edit button is hidden once a request is approved, rejected, or cancelled. The staff member can't be changed on an existing request; to log leave for someone else, create a new request instead.
Step 7: Cancel a Request
Staff members can cancel their own pending requests. As a manager, you can also cancel requests:
- Open the request detail page
- Click Cancel Request
- Confirm the cancellation
Cancelled requests remain visible in the history but don't count against allowance.
Requesting Leave on Behalf of Staff
Managers can submit leave requests for staff members. This is useful for:
- Logging sick leave after the fact
- Recording time off for staff without system access
- Entering agreed leave from verbal discussions
To create a leave request on behalf of a staff member:
- Navigate to Leave in the sidebar
- Click Request Leave
- In the Staff Member section, search for and select the staff member
- Complete the form as usual (leave type, dates, periods, reason)
- Click Submit Request
The request is created with your staff selection. It follows the normal workflow and appears as a pending request until approved.
Recording leave that has already happened: managers can pick dates in the past, which is how you log sick leave after the event. You can go back as far as the start of the current leave year — earlier dates are greyed out in the picker, because a leave year that has closed may already have been reported on. Staff booking their own leave can only choose today or later.
Approval hierarchy: Leave requests follow a role-based approval hierarchy. Nobody can action a request from a role above their own:
- Owners can approve any leave request, including their own
- Admins can approve any leave request except the Owner's, including their own
- Managers can approve requests from Staff and Receptionists, but not from other Managers, Admins or the Owner
- Staff and Receptionists cannot approve leave requests
If you create a leave request for yourself and don't have permission to self-approve (Managers and below), another authorised user must approve it.
The Owner sits at the top of the hierarchy, so an Owner records their own leave by filing the request and then approving it themselves. No Admin can approve or reject it for them.
Common Pitfalls
"I approved leave but appointments weren't cancelled"
Approving leave doesn't automatically cancel appointments. You must manually reschedule or reassign conflicting appointments from the Calendar or Appointments pages.
"I can't reject without a reason"
The rejection reason field is mandatory and requires at least 10 characters to ensure staff receive meaningful feedback. Write a brief, constructive explanation of why the request couldn't be approved.
"Staff says they didn't get notified"
Approving or rejecting a request sends the staff member both an email and an in-app notification, provided their staff record is linked to a login account. Staff without a login account get nothing, so tell them directly.
"I want to undo an approval"
There's no un-approve. Open the request and click Cancel Request instead - you or the staff member can cancel a request that's already approved, whatever its dates, and the days go back to their allowance. If you need the record to stand but the balance to change, set a Leave Allowance Override on the staff member instead (see Tutorial 6.1).
"Who can see rejection reasons?"
The staff member can see their rejection reason when viewing the request detail. Other staff members cannot see each other's requests.
Tips and Best Practices
- Review requests promptly - Aim to approve or reject within 48 hours so staff can plan accordingly
- Check conflicts first - Always look at the Conflicting Appointments card before approving
- Offer alternatives when rejecting - Instead of just "no", suggest alternative dates
- Consider team coverage - Before approving, mentally check who else is off that week
- Document verbal agreements - If you discussed leave in person, add that context to the request reason
Related Tutorials
- Tutorial 6.1: Understanding Staff Leave Allowances - How allowances work
- Tutorial 6.2: Requesting and Managing Leave - Staff perspective
- Tutorial 6.4: Leave Reports and Year-End Management - Team-wide leave data
Frequently Asked Questions
Can I approve leave that exceeds the staff member's balance?
Yes. The Request Leave form warns the person submitting that the request exceeds their remaining allowance, but nothing blocks the request or the approval. The Approve dialog doesn't repeat that warning. Check the staff member's Remaining balance yourself before you approve. The balance goes negative for leave types that deduct from allowance.
What if two staff request the same dates?
Review each request individually. There's no automatic rule for overlapping requests - you decide based on operational needs and when each request was submitted.
Can I bulk-approve multiple requests?
No. Each request must be individually reviewed to ensure proper consideration of conflicts and coverage.
Can I approve my own leave request?
This depends on your role. Owners and Admins can approve their own leave requests. Managers and below cannot self-approve and need another authorised user to approve their requests.
Who approves the Owner's leave?
Only the Owner. The Owner is the top of the approval hierarchy, so an Admin sees the Owner's request in the list but cannot approve or reject it.
What happens to the rejection reason after I reject?
It's permanently recorded and visible to the staff member on their request detail page.
Can I change a rejection to an approval?
No. Once rejected, the request cannot be changed. The staff member would need to submit a new request.
Do I need to approve sick leave?
Sick leave requests can be approved or rejected like any other leave type. However, since sick leave doesn't deduct from the holiday allowance, you may have a more lenient approval policy.
Last Updated: 15 August 2026