
Staff Levels and Experience Tiers
Introduction
Staff levels allow you to organise team members by experience and set different prices for services based on who performs them. A haircut with a Junior stylist might cost £35, while the same service with a Director costs £60. This tutorial shows you how to configure staff levels and set level-based service pricing.
Who this is for: Owner, Admin What you'll learn:
- Configure staff levels in salon settings
- Add custom staff levels
- Assign staff members to levels
- Set level-specific service pricing
- Reorder and manage levels
Time to complete: 10 minutes
Prerequisites
- Logged in as Owner or Admin
- Complete Tutorial 4.1 (Adding New Staff Members)
- Some services already created (see Section 7 tutorials)
Step-by-Step Instructions
Step 1: Access Staff Level Settings
Staff levels are configured in your salon settings:
- Click the salon name in the header to open the salon dropdown
- Click Salon Settings to open salon settings
- Click the Staff tab
- Click the Levels sub-tab
You'll see the Staff Levels card listing your existing levels. By default they are ordered by seniority, with the most senior level (Director) at the top and the least senior (Junior) at the bottom.
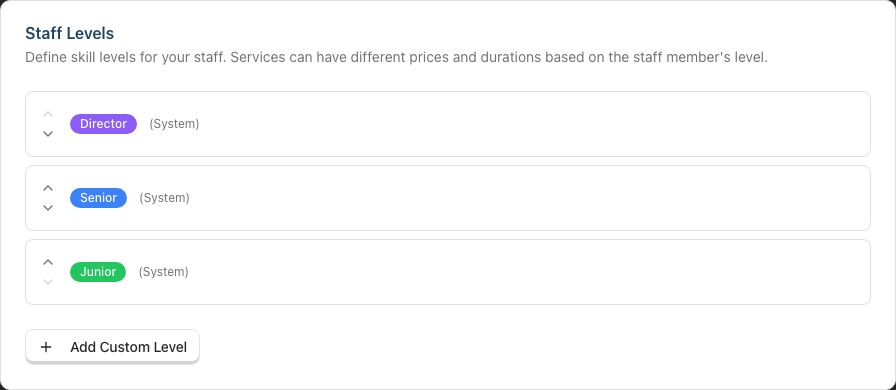
Step 2: Understand System Levels
Every new salon starts with three default system levels:
| Level | Colour | Typical Use |
|---|---|---|
| Junior | Green | Entry-level staff, trainees, newly qualified |
| Senior | Blue | Experienced staff, 3+ years qualified |
| Director | Purple | Most experienced, master stylists, salon leaders |
System levels are marked with a small (System) label next to their name.
System levels:
- Cannot be deleted (the trash icon is hidden on them)
- Can be renamed
- Can have their colour changed
- Can be reordered
Step 3: Add a Custom Level
If the default three levels don't suit your salon structure:
- Click Add Custom Level below the existing levels
- Enter a Level Name (e.g., "Apprentice", "Master", "Art Director")
- Choose a Color from the swatch grid. It offers 24 preset colours in two rows, and a Preview: pill next to the grid shows how the level will look
- Click Add Level
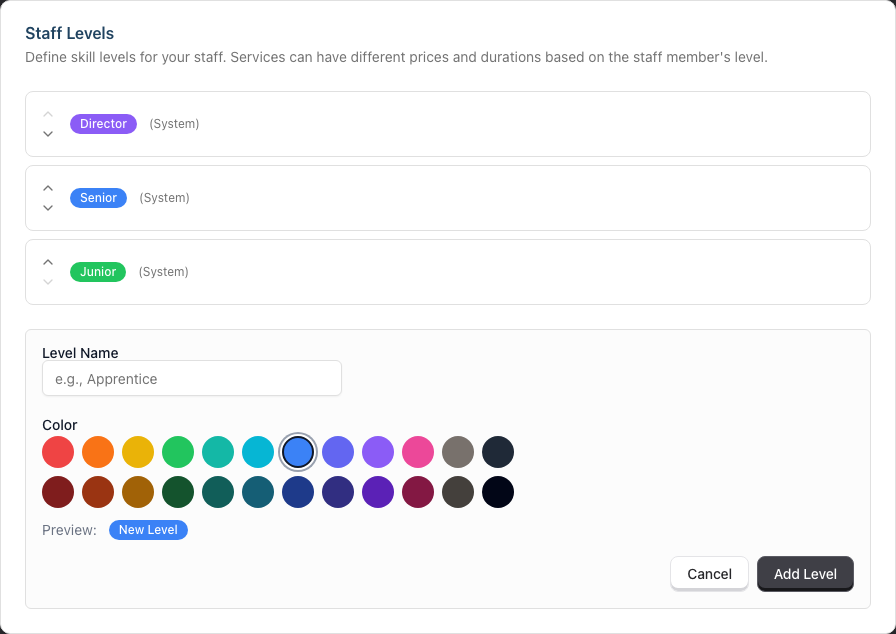
The new level appears at the bottom of the list. You can reorder it afterwards.
Example custom structures:
Because system levels can't be deleted, build your structure by renaming and reordering them and adding custom levels alongside.
Two-tier salon:
- Stylist (rename Senior)
- Senior Stylist (rename Director)
- Rename or keep Junior depending on whether you take on trainees
Four-tier salon:
- Apprentice (custom)
- Junior (system)
- Senior (system)
- Director (system)
Step 4: Reorder Staff Levels
The order of levels affects how they display throughout the system:
- Find the level you want to move
- Click the Move up chevron (▲) to move it one place higher in the list
- Click the Move down chevron (▼) to move it one place lower
The chevrons sit to the left of each level. Move up is greyed out on the top level and Move down on the bottom level. Reordering is disabled while you are editing a level. Each move saves straight away — there is no separate save step.
Order matters:
- This order is used in dropdowns and displays throughout the system
- The default is seniority order, with the most senior level at the top
Step 5: Edit an Existing Level
To modify a staff level:
- Find the level in the list (hover over the row to reveal the action icons)
- Click the Edit (pencil) icon
- Update the Level name field or pick a different colour from the swatch grid
- Click the green tick icon to save, or the X icon to cancel
Note: The inline edit only changes a level's name and colour — these are the only two fields the form exposes. There is no active/inactive toggle in the current interface.
Step 6: Delete a Custom Level
Custom levels can be deleted if no staff are assigned:
- Find the custom level (it has no (System) label, so the trash icon is shown)
- Hover over the row and click the Delete (trash) icon
- The Delete Staff Level confirmation appears — it reads No staff members use this level. Do you want to delete it? You cannot undo this. Click Delete Level
Cannot delete if:
- The level is a system level (Junior, Senior, Director) — the trash icon isn't shown
- Staff members use the level — the row shows a marker such as Used by 3 staff members, and the trash icon is greyed out
To delete a level with staff:
- First reassign those staff to a different level
- Then delete the empty level
Levels set what a service costs, so Luminate never unassigns staff for you.
Step 7: Assign a Staff Member to a Level
Once levels are configured, assign staff to them:
- Navigate to Staff in the sidebar
- Click on a staff member, then click Edit
- Find the Scheduling card (its description reads "Roster visibility, skill level, and working pattern")
- Use the Staff Level dropdown — it lists your levels in the order you set in Step 4, each with its colour, plus a No level assigned option to clear the level
- Click Update Staff Member
The dropdown shows a placeholder of Select a level (optional) when no level is set, and only appears once at least one staff level exists. Below it, Luminate reminds you that "Staff level affects service pricing. Leave empty to use base service prices."
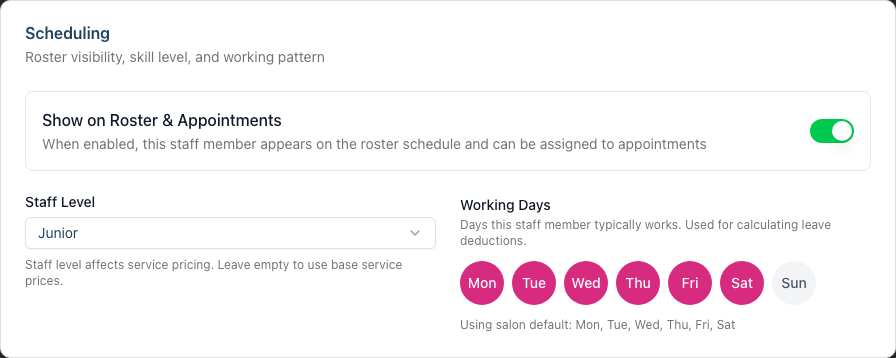
Show on Roster & Appointments must be on. The Staff Level dropdown sits inside the Scheduling card and is only available when Show on Roster & Appointments is enabled for that staff member. If the toggle is off, the dropdown is greyed out.
Staff without a level:
- If no level is assigned, the staff member uses base service pricing
- Consider assigning all service-providing staff to a level
Step 8: Set Level-Specific Service Pricing
The main purpose of staff levels is differentiated pricing. Configure this on each service:
- Navigate to Services in the sidebar
- Click on a service, then click Edit
- Find the Pricing & Duration card. Its description reads "Set base pricing and override for different staff skill levels. Leave level fields empty to inherit from base."
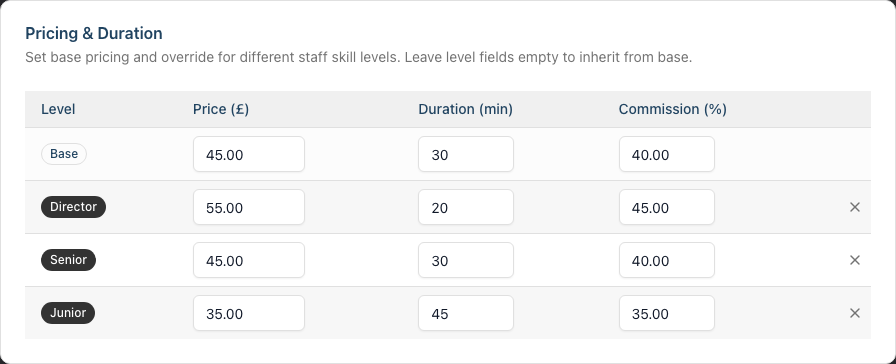
The pricing table shows:
The columns are Level, Price (£), Duration (min) and Commission (%). The Base row sits at the top, and one row follows for each staff level, in the order you set in Step 4. The example above is a men's haircut priced by level:
| Level | Price (£) | Duration (min) | Commission (%) |
|---|---|---|---|
| Base | 45.00 | 30 | 40.00 |
| Director | 55.00 | 20 | 45.00 |
| Senior | 45.00 | 30 | 40.00 |
| Junior | 35.00 | 45 | 35.00 |
How it works:
- Base row - The default price, duration, and commission for this service
- Level rows - Override any field for that specific level
- Leave a level field empty to inherit from Base. The greyed-out placeholder in each empty box shows the Base value it will inherit
To set level pricing:
- Edit the Base row values as your standard price
- For each level, enter overrides as needed
- Leave fields blank to use Base values
- Click the X button at the end of a level row to clear all overrides for that level
- Save the service — level prices save with the rest of the form, not on their own
Example configurations:
Simple price tier:
- Base: £45, 60 min
- Director: £60 (duration inherits from Base)
- Senior: (inherits Base price and duration)
- Junior: £35 (duration inherits from Base)
Price and time variation:
- Base: £85, 90 min
- Director: £110, 75 min (faster)
- Senior: £85, 90 min (inherits)
- Junior: £65, 120 min (takes longer)
Step 9: Understand How Level Pricing Applies
When booking an appointment:
- Customer selects a service
- Customer selects a staff member
- System looks up the staff member's level
- System finds the price for that service + level combination
- If no level override exists, Base price is used
Staff without a level assigned:
- Always use the Base price for all services
- Useful for staff who don't fit the tier structure
Level-specific durations on the calendar:
Level overrides apply to duration as well as price. When level-specific durations are configured for a service, they are honoured everywhere on the calendar:
- Creating an appointment — the duration auto-fills from the selected staff member's level
- Editing an appointment — switching the staff member on the form recomputes the duration to match the new staff member's level, unless the appointment carries a manual override. The service list on the edit form shows the effective duration and price for the staff member you chose
- Drag-and-drop across staff columns — the appointment resizes to the destination staff member's level duration as you drag, and saves at that duration when you release
- Cut-and-paste / copy-and-paste — pasting onto a different staff member adopts that staff's level duration; the clipboard preview live-resizes during hover so you see the final size before clicking
- Resize (dragging the bottom edge of an appointment card) — locks the duration to whatever you've set, so it won't be recomputed if you later move the appointment to a different staff member
Dragging or pasting within the same staff column always keeps the current duration. Only a move to a different staff member triggers the recalculation.
Manual duration overrides are preserved. If you've explicitly resized an appointment, or typed an End Time on the appointment form, Luminate flags it as a manual override. It then keeps that length when you move the appointment to a different staff member, by drag, by paste, or by changing the staff member on the edit form. To go back to level-based durations, re-select the service on the edit form — changing which service is booked clears the manual flag and recalculates from the new service and staff level.
For more on calendar drag, resize, and clipboard actions, see Tutorial 2.1 (Managing Your Appointment Calendar) and Tutorial 2.2 (Booking and Managing Appointments).
Common Pitfalls
"I can't delete a staff level"
Check two things:
- Is it a system level? System levels (Junior, Senior, Director) cannot be deleted.
- Do staff use it? The row says Used by 3 staff members and the trash icon is greyed out. Reassign those staff to other levels, then delete the level.
"Staff level dropdown doesn't appear on staff profile"
The dropdown only shows when at least one staff level exists. It also sits inside the Scheduling card and is greyed out unless Show on Roster & Appointments is enabled for that staff member.
"Level pricing isn't showing on services"
The Pricing & Duration card is always there, but it only holds a Base row until your salon has staff levels. One row is added per level, so configure your levels first (Step 3) and the rows appear.
"Price isn't changing based on staff level"
Verify:
- The staff member has a level assigned
- The service has level-specific pricing configured
- You've saved both the staff profile and service changes
"I want to charge the same price but different commission"
You can override just the commission rate:
- Leave price and duration empty for the level
- Enter only the commission rate
- The staff member gets Base price but different commission
Tips and Best Practices
- Start with system levels - The three default levels suit most salons
- Use clear naming - Customers see level names when booking online
- Price strategically - Consider your market position and competition
- Commission should scale - Higher levels typically earn higher commission
- Review quarterly - Adjust pricing as staff progress between levels
- Don't overcomplicate - 3-4 levels is usually sufficient
- Communicate to customers - Explain what each tier offers
Related Tutorials
- Tutorial 2.1: Managing Your Appointment Calendar - Drag, resize, and reschedule with level-aware durations
- Tutorial 2.2: Booking and Managing Appointments - Cut, copy, and paste with level-aware durations
- Tutorial 4.1: Adding New Staff Members - Assigning levels to staff
- Tutorial 4.4: Tracking Staff Performance and Commission - Commission reporting
- Tutorial 7.1: Creating and Managing Your Service Menu - Service configuration
Frequently Asked Questions
How many staff levels can I have?
There's no fixed limit, but 3-5 levels is practical. More levels become confusing for customers and difficult to manage.
Can I rename the system levels?
Yes. Click the pencil (Edit) icon on any system level to change its name. You might rename "Director" to "Master Stylist" or "Senior" to "Stylist".
Do customers see staff levels when booking online?
Yes. Staff levels appear when customers select a stylist, helping them understand the price difference.
Can different services have different level pricing structures?
Yes. Each service has its own level pricing table. A cut might have £10 between levels, while colour might have £30 between levels.
What if a staff member doesn't fit any level?
Leave their Staff Level unassigned. They'll use Base pricing for all services.
Can I change commission rate without changing price?
Yes. On the service level pricing table, leave price and duration blank but enter a commission rate. The price inherits from Base while commission is overridden.
Do staff see their level?
Staff can see their own profile including their level assignment. They cannot see other staff members' levels or compensation details.
How do I handle promotions between levels?
- Edit the staff member's profile
- Change their Staff Level to the new level
- Save changes
- The new level pricing applies to future bookings
Does changing a service's level pricing affect existing appointments?
No. Existing appointments keep their original pricing. Only new bookings use the updated prices.
Last Updated: August 2026