
Managing Staff Login Accounts
Introduction
Staff login accounts give team members access to Luminate based on their role. Not every staff member needs a login account - you may manage some staff's appointments and roster for them. This tutorial covers creating login accounts, resending invitations, and removing access when staff leave.
Who this is for: Owner, Admin What you'll learn:
- Understand the difference between staff profiles and user accounts
- Create a login account for a staff member
- Resend invitation emails
- Remove login access
- Handle the account setup process
Time to complete: 10 minutes
Prerequisites
- Logged in as Owner or Admin with
manage-staff-accountspermission - Complete Tutorial 4.1 (Adding New Staff Members)
- Staff member profile already exists in the system
Managers, Receptionists and Staff do not have this permission, so the Login Account card does not appear on the profile for them. Only an Owner can manage the login account on an Owner's own staff record.
Step-by-Step Instructions
Step 1: Understand Staff Profiles vs User Accounts
| Type | Purpose | Required? |
|---|---|---|
| Staff Profile | Work record - name, role, compensation, schedule | Yes, for all team members |
| User Account | Login credentials - allows signing into Luminate | Optional |
Key points:
- Every staff member has a profile
- Not every staff member needs a login account
- One staff member = one profile + zero or one user account
- Login access is based on the staff member's role
Who needs login accounts:
| Scenario | Needs Login? |
|---|---|
| Stylists managing their own schedule | Yes |
| Receptionists booking appointments | Yes |
| Managers viewing reports | Yes |
| Contractors whose bookings you manage | No |
| Staff on long-term leave | Consider removing temporarily |
Step 2: Create a Login Account
To give a staff member system access:
- Navigate to Staff in the sidebar
- Click on the staff member's name to open their profile
- Scroll to the Login Account section
- Click Create Login Account
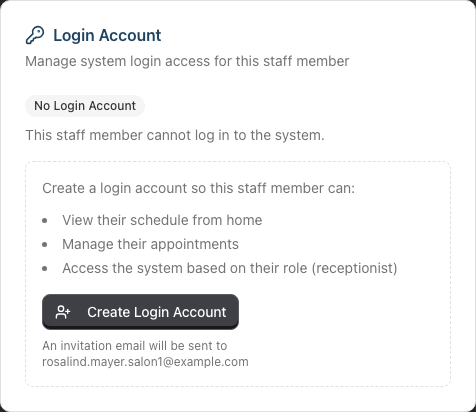
When a staff member has no account yet, the Login Account section shows a grey No Login Account badge with the note "This staff member cannot log in to the system", a short summary of what an account would let them do, and the Create Login Account button beneath it.
What happens:
- A user account is created linked to the staff profile
- An invitation email is sent to the staff member's email address
- The email contains a link to set their password
- Luminate confirms: "Login account created. An invitation email has been sent to [email address]"
Before creating: Verify the staff member's email address is correct. The invitation goes to the email in their profile, and that address becomes the one they log in with. If you change the email on the profile later, Luminate moves the login account to the new address as well.
Step 3: Understand the Invitation Process
When you create a login account:
- System sends an invitation email to the staff member
- Email contains a secure link to set their password
- Link expires after 60 minutes for security reasons
- Staff member clicks link and creates their password
- They can then log in with email + password
What the staff member sees:
Subject: Welcome to Luminate - Join [Salon Name]

Welcome to Luminate, [First Name]!

You've been invited to join [Salon Name] on Luminate, the all-in-one
salon management platform.

What is Luminate?
Luminate helps salons manage appointments, customers, inventory, staff
and more - all in one place. You'll have access to:

- Your schedule - View your shifts and appointments
- Customer management - Access customer profiles and booking history
- Transaction processing - Handle sales and payments
- Your performance - Track your sales and commission

[Set My Password]

This link will expire in 60 minutes for security reasons. If it expires,
please contact [Salon Name] to request a new invitation.
If your salon has social sign-in enabled, the email also invites the staff member to sign in with their connected account (for example Microsoft), as long as they use the same email address that's on their staff profile.
Step 4: Check Login Account Status
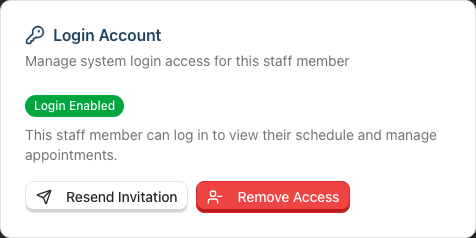
Once a login account exists, the Login Account section shows:
- Login Enabled badge (green)
- Description: "This staff member can log in to view their schedule and manage appointments."
- Available actions: Resend Invitation and Remove Access
Step 5: Resend Invitation Emails
If a staff member didn't receive the invitation or the link expired:
- Open the staff member's profile
- Scroll to the Login Account section
- Click Resend Invitation
- A new invitation email is sent with a fresh link
Luminate confirms: "A new invitation email has been sent to [email address]". The new link replaces the old one.
Common reasons to resend:
- Original email went to spam/junk folder
- Staff member deleted the email
- Invitation link expired
Resending sends to the address the account was created with. If that address is wrong, remove the login access and create a new account instead - see Common Pitfalls.
Tip: Ask the staff member to check their spam folder before resending.
Step 6: Remove Login Access
When a staff member should no longer have system access:
- Open the staff member's profile
- Scroll to the Login Account section
- Click Remove Access
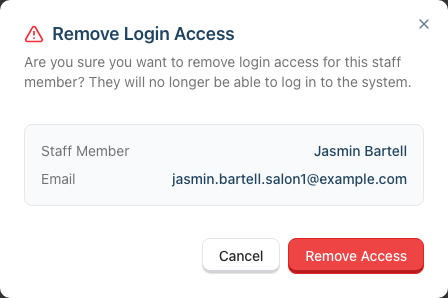
- The Remove Login Access dialog shows the staff member's name and email
- Click Remove Access to confirm, or Cancel to keep the account
What happens:
- The user account is unlinked from the staff profile
- The staff member can no longer log in
- If they are signed in at that moment, they lose access straight away - the next page they open shows Access denied
- Their staff profile and all historical data are preserved
- You can create a new login account later if needed
When to remove access:
- Staff member leaves the salon
- Staff member goes on extended leave
- Security concern about the account
- Role change that no longer requires system access
Step 7: Staff Account Setup
When staff receive the invitation, guide them through:
- Check email (including spam folder) for the invitation
- Click Set My Password within 60 minutes (request a new link if expired)
- The Set up your account page opens with their email already filled in
- Create a secure password:
- Minimum 10 characters
- Must include uppercase and lowercase letters
- Must include at least one number
- Must include at least one special character
- Type the same password again under Confirm Password
- Click Set password
- Log in with email and new password
The page lists the password rules as they type and turns each one green when it is met. The Set password button stays disabled until every rule passes and both passwords match. After they set the password, Luminate returns them to the login page with the message "Your password has been reset." They then sign in with their email and new password.
If social sign-in is enabled, the Set up your account page also offers the connected options (for example Continue with Microsoft) as an alternative to a password. They must use the same email address as their staff profile.
First login: Staff will see a dashboard based on their role:
- Staff: Own schedule, assigned appointments
- Receptionist: All schedules, appointments, customers, transactions, roster, services and products
- Manager: Operations access including reports and roster
- Admin: Full access except billing
Understanding Role-Based Access
The staff member's role determines what they can do when logged in:
| Role | Can See | Can Do |
|---|---|---|
| Staff | Own schedule | Book/edit appointments, take payments, manage own roster |
| Receptionist | All schedules | Book for anyone, manage customers, run the roster and the catalogue |
| Manager | Reports, roster | Full operations, approve leave |
| Admin | Almost everything | All except billing |
To change what a staff member can access, change their role in their staff profile (see Tutorial 4.1). The change applies the next time they load a page. They do not need a new invitation.
Common Pitfalls
"The invitation email never arrived"
- Check spam/junk folder
- Use Resend Invitation to send a fresh link
- If the address on the profile is wrong, correct it on the staff profile, then click Resend Invitation. The new invitation goes to the corrected address.
"Staff says the link doesn't work"
The link may have expired. Invitation links expire after 60 minutes for security reasons. Use Resend Invitation to generate a fresh link.
"I removed access but they can still view appointments"
Removing login access prevents them from signing in. If you also want them hidden from the roster and booking screens, deactivate the staff profile. Open their profile and switch Staff Status to Inactive.
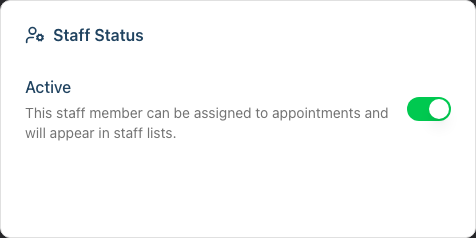
Luminate asks you to confirm. Deactivating suspends their access: they are signed out on every device, and they cannot sign in until you make them active again. Their login account is kept, so turning Staff Status back on restores it - no new invitation needed.
The Active switch on the Edit form does exactly the same thing.
To delete the login account instead of suspending it, use Remove Access on the Login Account card.
"I need to change their email address"
Edit the staff profile and update the email. Luminate moves their login account to the new address at the same time. They sign in with the new email from then on.
If they have not set a password yet, click Resend Invitation afterwards. The new invitation goes to the new address.
If Luminate refuses the new address, another account already uses it. Ask the staff member to confirm the address, or use a different one.
"The buttons stop working after a few clicks"
Luminate allows five login-account actions per minute, per user. If you create, resend or remove several accounts in quick succession, further attempts are refused. Wait a minute, then try again.
"Staff forgot their password"
Staff can use the Forgot password? link on the login page. They'll receive a password reset email. You don't need to do anything unless they can't access their email.
Tips and Best Practices
- Create accounts before first shift - Give staff 2-3 days to set up their account
- Use work email addresses - Salon-owned emails are easier to manage than personal ones
- Verify email addresses - A typo means the invitation goes nowhere
- Remove access promptly when staff leave - Security best practice
- Don't delete, deactivate - Staff profiles cannot be deleted because they hold appointment and payroll history. Deactivate the profile to hide them from booking screens and suspend their sign-in
- Deactivate for a break, remove access for a leaver - Deactivating is reversible and keeps the login account. Remove Access deletes it, so only use that when the person has left for good
Related Tutorials
- Tutorial 4.1: Adding New Staff Members - Create staff profiles
- Tutorial 4.3: Staff Levels and Experience Tiers - Skill-based pricing
- Tutorial 4.4: Tracking Staff Performance and Commission - Viewing reports
Frequently Asked Questions
Can a staff member have multiple login accounts?
No. Each staff member can have at most one login account linked to their profile.
What happens to appointments when I remove login access?
Nothing. Removing login access doesn't affect appointments or historical data. The staff member simply can't sign into the system.
Can staff change their own password?
Yes. Staff can change their password from their account settings. They need to know their current password or use the forgot password flow.
How long do invitation links last?
Invitation links expire after 60 minutes for security reasons. After expiry, use Resend Invitation to send a fresh link.
Can I see when staff last logged in?
No. Luminate does not record or display a last sign-in time for staff accounts.
What if staff access the system from outside the salon?
Staff can log in from any location with internet access. Luminate does not restrict logins by location or IP address.
How do I handle temporary or seasonal staff?
Create their profile and login account when they start. Remove login access when their period ends. If they return, create a new login account - their profile and history are preserved.
Can staff see other staff members' information?
Staff can see other staff's names and schedules (for booking purposes). They cannot see compensation details, notes, or other sensitive information.
Last Updated: August 2026