
Advanced Appointment Features - Linked Bookings and Multi-Service
Introduction
Some salon treatments require multiple services or multiple time blocks. A colour appointment might need an initial application, processing time, and then a blow dry. A bridal party might book several services back-to-back. Luminate handles these complex bookings through linked appointments - multiple appointments connected together that maintain timing relationships.
This guide covers creating multi-service bookings, understanding how linked appointments work, and managing complex colour treatments that need processing time between services.
Who this is for: Salon owners, managers, and staff who book complex treatments involving multiple services.
What you'll learn:
- Creating multi-service bookings
- Understanding linked appointments and booking groups
- Managing processing time between services
- Updating status for linked appointments
- Moving and rescheduling linked bookings
Time to complete: 15-20 minutes
Prerequisites
Before you begin, make sure you have:
- Staff members set up in your salon
- Services created with appropriate durations
- Some services configured with processing time (for colour treatments)
- The Appointments page accessible
Step-by-Step Instructions
Step 1: Understanding Multi-Service Bookings
In Luminate, each appointment handles one service. When a customer wants multiple services, the system creates linked appointments - separate appointments connected by a booking group ID.
For example, if a customer books "Root Touch-up + Full Colour + Blow Dry":
- Three separate appointments are created
- They share the same booking group ID
- They're sequenced (1, 2, 3) to maintain order
- Linked appointment indicators appear on the calendar
Why this approach?
- Each service is tracked individually, so it can be billed, rescheduled, or cancelled on its own
- Processing time (e.g., colour development) can be scheduled between services
- Individual services can be billed separately if required
- Flexibility to complete services at different times if circumstances change
Note on staff: When you build a multi-service booking on the New Appointment form, every service in it is performed by the same staff member — you choose one stylist and all the linked services are assigned to them. (If a service really needs a different stylist, book it separately and then group the two bookings together — see Step 9. Grouping is what lets a colour with one stylist and a cut with another behave as a single linked visit.)
Step 2: Create a Multi-Service Booking
To book multiple services for one customer:
Go to Appointments from the sidebar
Click New Appointment
Search for and select a Customer
Select the Staff Member who will perform the services
In the Services card ("Select one or more services for this appointment"), pick the first service from the Select a service dropdown. The duration and price automatically populate from the service's defaults.
Once the first service is in the list, the dropdown's label changes to Add another service. Pick additional services from it — each one is appended to the list and numbered 1, 2, 3 in the order it will happen. For every service in the list you can:
- Click the duration (e.g. "60 min") to override the service's default for this one booking — the edit panel offers preset lengths and a Reset button
- Click the price to override the default price for this booking, again with a Reset button
- Use the up/down arrows on the left (Move up / Move down) to reorder the services
- Click the × (Remove service) on the right to take a service back out
Where a service has processing time configured, its row shows +X min processing time before next service. Underneath the list, a summary row totals the booking: the number of services, the total duration, and the total price.
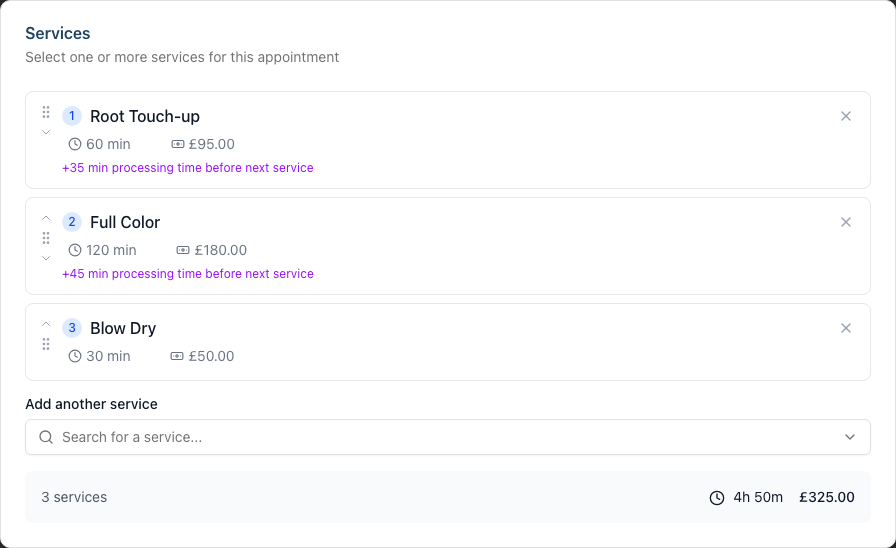
Set the Start Date and Start Time for the first service in the Date & Time card
The system calculates subsequent appointment times based on:
- Service durations
- Processing time between services
Review the Booking Timeline preview that appears underneath the Start Time. It shows each service stacked in order with its start time, end time and length, any processing gap before the next service begins, and a Total Duration for the whole visit.
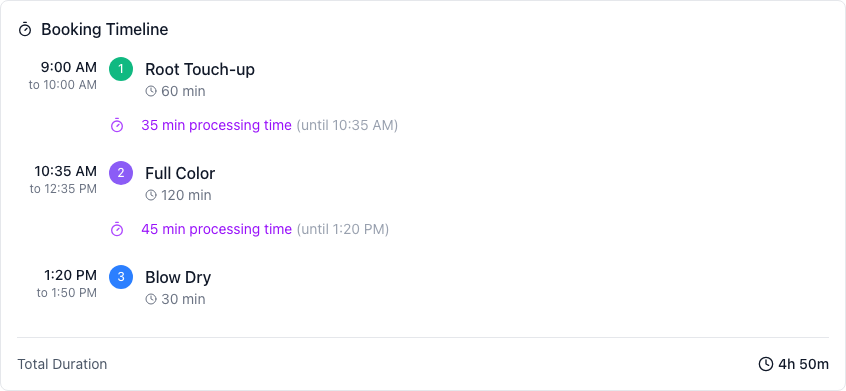 10. Click Create Appointment to create all linked appointments
Example timeline for a colour appointment (Root Touch-up has 35 minutes of processing time configured, Full Colour has 45):
9:00 AM - 10:00 AM: Root Touch-up (60 min)
    35 min processing time (until 10:35 AM)
10:35 AM - 12:35 PM: Full Colour (120 min)
    45 min processing time (until 1:20 PM)
1:20 PM - 1:50 PM: Blow Dry (30 min)
Total Duration: 4h 50m
Step 3: Identify Linked Appointments on the Calendar
Linked appointments display visual indicators on the calendar:
- A link icon appears on appointment cards that are part of a group
- Hovering over the link icon shows "Linked appointment (X in group)", where X is this appointment's position within the group (not the total number of appointments). So the first service shows "1 in group", the second shows "2 in group", and so on.
- The appointments appear sequentially on the calendar for the assigned staff
In the Day or Week view:
- Look for the small link icon on appointment cards
- Cards from the same booking group share the same customer name
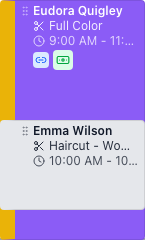
Tip: The link icon shows on cards in both the Day and Week views, so you can spot linked bookings without switching views. On the narrowest cards the icon can be tight for space — if you're scanning a busy week, Day view gives each card more room.
Step 4: View Linked Appointment Details
To see all appointments in a booking group:
- Click on any linked appointment card on the calendar. On a large desktop screen this opens the appointment details panel (a sidebar that slides in from the right). On a smaller screen it opens the full appointment detail page — and on a touch device (phone or tablet) tapping the card opens the action sheet instead, where View appointment takes you to the detail page.
- The panel/page shows this appointment's details, and — because it's part of a group — a group button labelled Manage group (X) (where X is the number of appointments in the group). On a standalone appointment the same button reads Group with another appointment in the sidebar, and simply Group on the detail page.
- On the full appointment detail page, a Linked Services section lists all the other appointments in the booking group, each with its service name and start time
- You can click on any linked service to navigate straight to that appointment
The Linked Services list makes it easy to see the full booking at a glance and to jump between siblings. (To reach the full detail page from the calendar sidebar, open the appointment and follow its detail link, or click the card on a smaller screen.)
Step 5: Update Status for Linked Appointments
When changing the status of a linked appointment (e.g., marking as arrived, completed, or cancelled), you'll be asked whether to apply the change to all appointments in the group.
- Click on a linked appointment to open it
- Use the status buttons to change the status (e.g., click Arrived)
- A dialog appears titled Linked Appointments explaining this appointment is part of a group
- The dialog asks: "Would you like to change the status to [Status] for:"
- Choose:
- All X Appointments - Updates all linked appointments in the group
- This Appointment Only - Updates only this specific appointment
- Cancel - Backs out and leaves every status unchanged
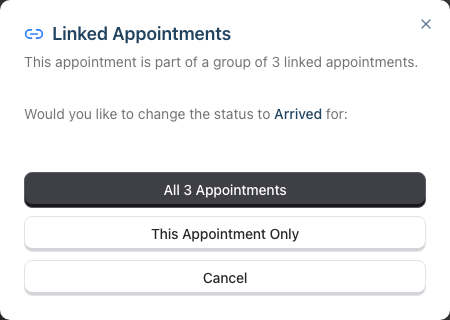
Best practice: For arrivals and completions, update all linked appointments together to maintain consistency.
What the customer receives: When you confirm, cancel, or mark a linked booking as a no-show — and for automatic reminders — the customer gets a single message covering the whole visit, not one per service. It lists every service in the order they happen and shows the full booking window, from the start of the first service to the end of the last (e.g. 10:00 AM - 12:30 PM). This holds no matter what order the services were added or how the booking was rearranged afterwards — the message always reads in real time order, so the customer arrives for the start of their visit.
Step 6: Move a Linked Appointment
When you drag a linked appointment to reschedule it, the system validates that the move doesn't break processing time constraints:
- Click and hold on a linked appointment card
- Drag it to a new time slot
- If the move would violate processing time requirements (e.g., moving the second service too close to the first), a warning dialog appears titled Linked Appointment Constraint
- The dialog shows all appointments in the linked group with their times and processing requirements
- You can:
- Cancel Move - Abort the move and keep the original time
- Move Anyway - Proceed with the move despite the constraint warning
Moving all linked appointments: To reschedule the entire booking group, you need to move each appointment individually. The system warns if you're creating conflicts.
Step 7: Cancel a Linked Appointment
To cancel a linked booking (the flow is the same from the calendar sidebar, the appointment page, or the mobile action sheet):
- Open the appointment (click on it in the calendar, or open its detail page)
- Set its status to Cancelled (or use the Cancel button on the appointment page)
- Because the appointment is linked, the Linked Appointments dialog appears first, asking whether to apply the cancellation to:
- All X Appointments — cancels every service in the booking group
- This Appointment Only — cancels just the one you opened
- The Cancel Appointment confirmation dialog then appears, summarising what will be cancelled — and, if a deposit has been paid, asking whether to Refund or Retain it before anything happens
- Click Cancel Appointment (or Cancel & apply when a deposit decision is involved) to confirm, or Keep Appointment to back out
Cancelling just one service from a group can leave orphaned appointments. Before you confirm "This Appointment Only", decide whether the remaining services still make sense without the cancelled one (e.g. a blow dry on its own after the colour is cancelled). If the customer is cancelling their whole visit, choose All X Appointments so nothing is left behind.
Step 8: Cut and Paste Linked Appointments
You can use the clipboard to move appointments:
- On desktop: Hover over an appointment card — an action toolbar floats next to the card (it appears on the right by default, or flips to the left if there's no room). Click the Cut appointment (scissors) icon in that toolbar. On mobile: Tap the appointment card to open the action sheet and select Cut appointment.
- For linked appointments, a dialog appears titled Linked Appointment asking: "Would you like to cut all linked appointments or just this one?"
- Choose:
- Cut All X Appointments - Cuts all linked appointments in the group
- Cut Only This One - Cuts just this single appointment
- The cut appointment(s) appear in the Clipboard panel (in the left panel tabs, alongside Waitlist)
- Navigate to the new date/time
- Drag from the clipboard or click on an empty time slot to paste
Tip: The Clipboard panel is accessed via the tabs on the left side of the calendar view. Switch between "Waitlist" and "Clipboard" tabs to see cut appointments.
Clipboard persists across sessions. Cut, copy, and pending-paste items are now saved to your account. If you cut an appointment and then close your browser, log out, or refresh the page, your clipboard items will still be there when you return — scoped to the salon you cut them in. The original appointment also stays visually marked as "cut" (faded out) on the calendar until you paste it or cancel the cut.
Clearing the clipboard. Open the Clipboard tab — when there are items in the clipboard, a Clear all button appears at the top of the list. Clicking it opens a Clear clipboard? confirmation (so you don't lose work by accident) and then removes every item from your clipboard in one go. Any appointments you'd cut go back to looking normal on the calendar — nothing is deleted, the cut is simply undone.
Pasting into a short slot — Shrink to fit. If the slot you click to paste into is shorter than the appointment's duration (because there's another appointment soon after on that staff column), Luminate opens a Slot is too short dialog. The dialog shows:
- The available gap size (e.g. "15min")
- The appointment's current length (e.g. "60min")
- The shortfall (e.g. "45min")
You can either:
- Shrink to {gap}min and paste — reduces the appointment's length to fit the gap exactly and pastes it. The shrunk appointment is marked as manually-resized, so it stays at that length even if you later move it to a different staff member.
- Cancel — discards the paste; the clipboard item stays where it was.
Shrinking is disabled when the gap is below 5 minutes (too short to be a viable appointment). In that case only Cancel is available — pick a larger slot or move the blocking appointment out of the way first.
Paste preview snaps to neighbouring appointments. The calendar normally aligns to a 15-minute grid, but if the appointment you're hovering ends at, say, 1:20 PM, the next grid line is 1:15 PM (5 minutes too early) or 1:30 PM (10 minutes too late). To save you fighting the grid, Luminate now snaps the marching-ants preview to the end of the previous appointment (or the start of the next one) when your cursor is within about 7 minutes of that edge. So hovering near 1:15 PM in the example above lands the paste exactly on 1:20 PM, with no awkward stub of dead time before the next appointment.
When no nearby appointment edge is in range, the preview behaves as before and snaps to the 15-minute grid.
Trying to paste on top of an existing appointment. If the slot you click already has an appointment in it, the paste can't happen — the system shows a short toast like "Can't paste here — overlaps with Sarah Jones" and leaves the clipboard item where it was, ready for another attempt. No confirmation dialog or wasted clicks: just pick a different slot, or move the blocking appointment first.
Step 9: Group Existing Appointments Together (Retrospective Grouping)
Sometimes a customer has two or more separate bookings on the same day that should be treated as a single visit — for example, a colour with one stylist followed by a cut with another. Instead of cancelling and recreating them as a multi-service booking, you can group existing appointments together.
From an existing appointment:
- Open any of the customer's same-day appointments (click the card to open its details panel, or open the detail page)
- Click the group button. On a standalone appointment it reads Group with another appointment in the sidebar and Group on the detail page; on an appointment that's already linked it reads Manage group (X)
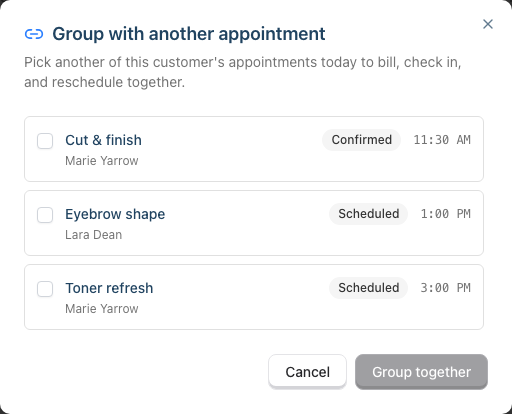
- The Group with another appointment dialog lists every other non-cancelled appointment for that customer today — regardless of which stylist they're with. The list is fetched fresh each time you open the dialog, so it isn't limited to the appointments currently drawn on your calendar: siblings booked with a different stylist show up even when you're in Week view or looking at a single staff column
- Tick the appointments you want to group with this one. Each row shows the service, its status, the start time and the stylist. A row already in this booking group is greyed out and marked Already in this group; a row that belongs to a different group carries an In a group of N badge, and ticking it will merge the two groups (the dialog warns you first: "This will merge two groups into one group of N appointments")
- Click Group together (the button reads Add to group / Add N to group when adding to an existing group, or Merge groups when combining two existing groups)
All selected appointments now share one booking group and behave as linked appointments from that point forward (status changes prompt for "all or one", cut/copy treats them as a unit, deposits aggregate, and so on).
Managing a group you've already created:
Opening the group dialog on an appointment that's already linked lands you on the Manage group view instead of the picker. It lists every appointment in the group in time order — service, times, date and stylist, with the one you opened marked (this one) — and gives you three actions:
- Add another appointment — switches to the picker described above so you can fold in another of the customer's same-day bookings
- Remove this from group — ungroups just the appointment you opened. A Remove from group confirmation explains that the rest of the group is unaffected and that this appointment will be billed, checked in and rescheduled separately from now on
- Close — dismisses the dialog without changing anything
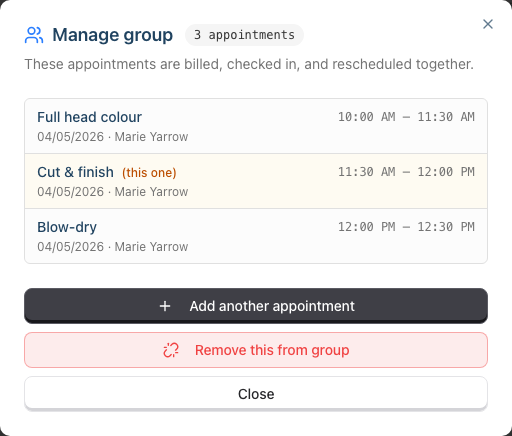
Note: If removing an appointment would leave only one behind, that last appointment is ungrouped too — a "group" of one isn't a group.
Automatic prompt after booking or rescheduling:
When you create a new appointment or reschedule one onto a different day, Luminate checks for other non-cancelled appointments that customer already has on that day. If any exist, a Group with existing appointments? dialog appears automatically with the new or rescheduled appointment as the source, explaining that "This customer already has N other appointments today."
Tick the siblings you want and click Group together to link them, or click Don't group to leave everything as it is.
Declining is always safe. The appointment has already been created (or the reschedule has already happened) by the time the prompt appears — dismissing it only declines the grouping, it never undoes the booking. You can group the appointments manually at any time afterwards from the appointment's group dialog, and you can ungroup again just as easily.
This prompt fires regardless of which stylist the existing appointments are with — so cross-stylist visits get flagged the moment you create them.
Step 10: Copy and Paste an Appointment
If you want to duplicate an existing appointment instead of moving it, use Copy:
- Hover over the appointment card to reveal the floating action toolbar (right or left of the card), then click the Copy appointment icon next to the Cut appointment scissors icon. On a touch device, tap the card and choose Copy appointment from the action sheet.
- For linked appointments, the same Linked Appointment dialog appears, with Copy Only This One and Copy All X Appointments buttons.
- The clipboard item appears in the Clipboard panel with a small COPY label and a copy icon (still amber, like cut). The original appointment stays exactly where it was on the calendar.
- Navigate to the new date/time and click an empty slot to paste — a brand-new appointment is created with the same customer, service, staff (overridden by the slot you paste into), notes, and any other details. The clipboard item is consumed once pasted.
When to use Copy vs Cut:
- Cut moves the original — use when rescheduling.
- Copy leaves the original in place — use when booking the same customer for the same service again (e.g. recurring blow-dry, follow-up appointment).
Common Pitfalls
"The processing time isn't being added"
Processing time is configured per service. Go to Services > Edit the service and check the Processing Time field. This is the gap added after this service before the next one begins.
"I can't move the appointment where I want"
If a linked appointment has processing time constraints, you can't move it into a time slot that would conflict with adjacent linked appointments. Either move the adjacent appointments first, or confirm you want to override the constraint.
"Only one appointment was cancelled"
When you cancel a linked appointment, the Linked Appointments dialog asks whether to apply the cancellation to All X Appointments or This Appointment Only. If you chose "This Appointment Only", just that one service was cancelled and the rest of the group stays active — which is sometimes what you want. To cancel the whole booking instead, cancel again and choose All X Appointments.
"The linked icon isn't showing"
The link icon only appears for appointments that are part of a multi-appointment booking group. Single-service appointments don't display this icon, even if the customer has several separate appointments that day — until you group them (see Step 9), they aren't linked.
"The group dialog says there are no other appointments today"
The dialog only offers appointments for the same customer on the same calendar day that aren't cancelled. If the customer's other booking is on a different day, or has been cancelled, it won't appear. It does not matter which stylist the other appointment is with, or whether that stylist's column is visible in your current calendar view.
Tips and Best Practices
- Configure processing times on services - Set up colour services with their required development times so the system automatically spaces appointments correctly
- Use multi-service booking for same-day services - This keeps all appointments connected and easier to manage
- Update status for all linked appointments - When a customer arrives or completes, update all linked appointments for consistency
- Review the timeline before saving - The Booking Timeline in the Date & Time card shows exactly when each service will start, end, and any processing gap in between, plus the total length of the visit — verify it makes sense before clicking Create Appointment
- Book processing time realistically - Consider that customers might take breaks, so allow slightly more time than the minimum
Related Tutorials
- Tutorial 2.2: Booking and Managing Appointments - Basic appointment creation
- Tutorial 7.1: Creating and Managing Your Service Menu - Setting up services with processing times
- Tutorial 12.3: Customising Your Calendar - Calendar views and filters
- Tutorial 5.4: Time Blocks and Availability Management - Blocking time for other purposes
Frequently Asked Questions
Can linked appointments have different staff members?
Yes — but not from the New Appointment form. A multi-service booking created there assigns all its services to one staff member. To link services performed by different stylists (e.g. a colour with one stylist and a cut with another), book them separately and then group them together (see Step 9). Once grouped, they behave as linked appointments even though they're with different staff.
What if the customer only wants some of the services?
Cancel the linked appointment and, when the Linked Appointments dialog appears, choose This Appointment Only. The other services stay active. Consider whether the remaining services still make sense on their own (e.g., a blow dry without the preceding colour might be unnecessary).
Can I add another service to an existing linked group?
Yes. Create the new appointment in the usual way. If the customer already has same-day appointments — with any stylist — a Group with existing appointments? prompt appears automatically after you save, letting you fold the new appointment into the existing group in one click. You can also group retrospectively at any time by opening one of the appointments and using its group button (see Step 9).
How does billing work for linked appointments?
Each appointment in a linked group can be billed separately or together. When you create a transaction, you can select which appointments to include. The system tracks billing status (unbilled, billed, partial) for each appointment individually.
How do I unlink an appointment from a group?
Open the appointment, click Manage group (X), then Remove this from group and confirm. Only that appointment is detached — the rest of the group carries on as before. If that would leave a single appointment behind, it's ungrouped as well.
Can I see all linked appointments in reports?
Reports show appointments individually. The booking group ID isn't displayed in standard reports, but you can see the same customer with multiple sequential appointments.
Is there a limit to how many services can be linked?
There's no hard limit, but practical considerations apply. Very long booking groups (5+ services) can become unwieldy. Consider whether services truly need to be linked or can be separate bookings.
Last Updated: August 2026