
Product Catalog and Inventory Management
Introduction
Managing product inventory helps you track retail items sold to clients and professional supplies used in services. Luminate's inventory system tracks stock levels, displays low stock alerts, calculates profit margins, and records adjustments when stock changes.
Who this is for: Owner, Admin, Manager, Receptionist What you'll learn:
- Add products to your catalogue
- Assign a brand, product line and shade family to each product
- Set up pricing, SKUs, and barcodes
- Track stock levels and low stock alerts
- Adjust stock for deliveries and discrepancies
- Use the Colour tab to add and stock-take gram-tracked colour products
- Activate and deactivate products
Time to complete: 15-20 minutes
Prerequisites
- Logged in with the
manage-productspermission — Owner, Admin, Manager or Receptionist. Staff can view the product list but cannot change it - Complete Tutorial 1.1 (Initial Salon Setup)
- List of products with pricing information
- Optional: colour formula mode set to Full (Tutorial 20.2) — required before the Colour tab appears
Step-by-Step Instructions
Step 1: Access Product Management
- Click Products in the sidebar (once structured colour formulas are switched on, this item is labelled Products & Colour)
- The Products page displays your current inventory
- Click Add Product in the top-right corner
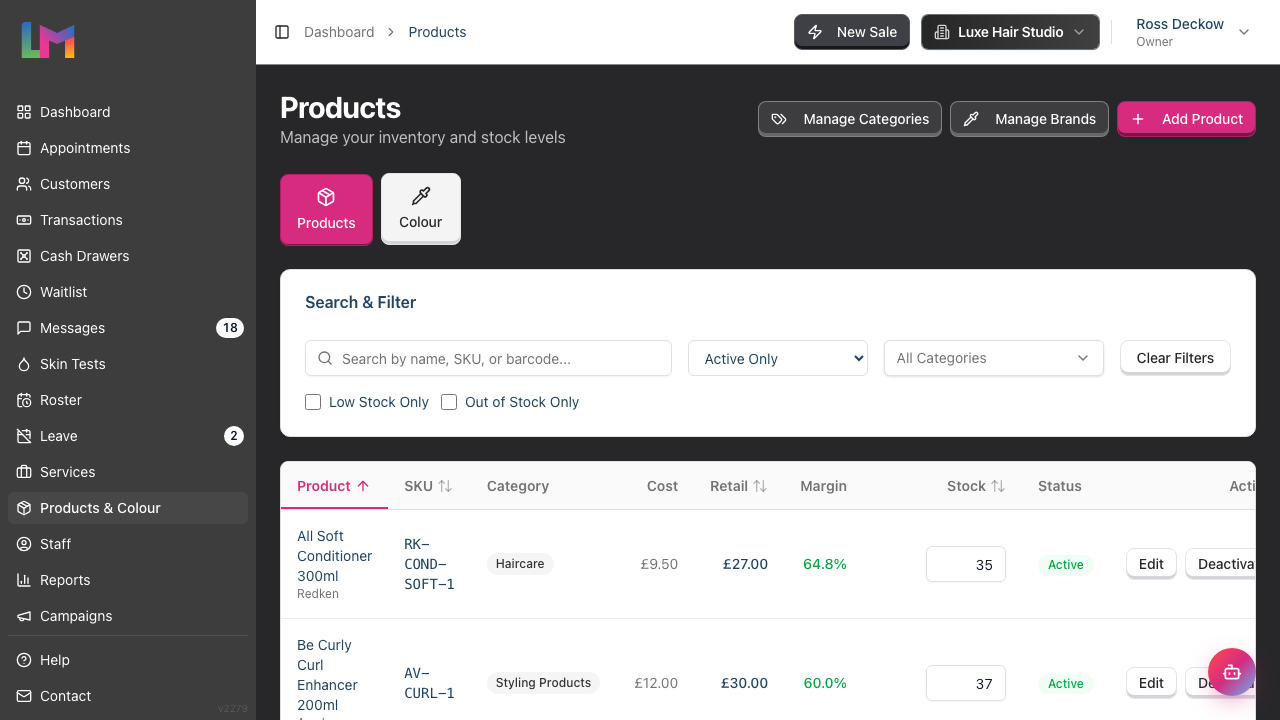
Page header buttons: The Products tab also exposes Manage Categories and Manage Brands in the top-right, so you can jump straight to those catalogues without leaving the Products area.
Low Stock Alert: If any active product anywhere in your catalogue is below its low stock threshold, a yellow alert card appears above the filter section and tells you how many. It counts your whole catalogue, not just the page you are looking at. Click View Low Stock to filter to those products.
Step 2: Enter Basic Information
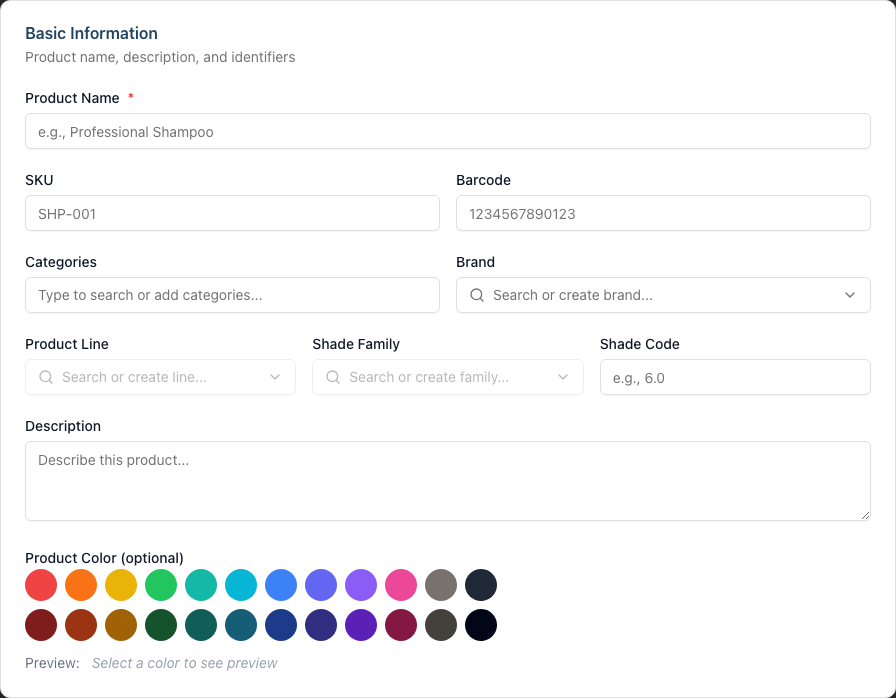
The first form section captures product identification:
Product Name (required): Enter the full product name as it appears on packaging.
Example: "Olaplex No. 3 Hair Perfector 100ml"
SKU (optional): Enter a unique stock keeping unit code.
Example: "OLAP-003-100"
Barcode (optional): Enter the product barcode from packaging. If you have a barcode scanner connected, scan the product to auto-fill this field.
Categories: Type to search existing categories or create new ones. Categories help filter and organise products. See Tutorial 7.3 for category management.
Brand (optional): Select a brand from the dropdown. Type to search the existing brands, or start typing a new name and click Create: {name} to add it on the fly. Brands are managed as their own catalogue so they can be reused across products and colour supplies — see Tutorial 20.3 for full brand management.
Example: "Olaplex"
Product Line (optional): Pick the brand's range this product belongs to — for example "Koleston Perfect" under Wella. The field stays greyed out until you choose a Brand, because a line always belongs to one brand. Type a new name and click Create: {name} to add a line on the fly. See Tutorial 20.3 for the full Brand > Line > Shade Family catalogue.
Shade Family (optional): Pick the family within that line — for example "Naturals" or "Ash". This field stays greyed out until you choose a Product Line. New families can be created inline the same way.
One name per brand, one name per line. A line name is unique within its brand, and a family name is unique within its line. If the name is taken, a message tells you what holds it and the picker keeps the name you typed. Switched-off lines and families still hold their names, and the family list only shows the ones that are switched on — so the message names that case too, and tells you where to turn it back on.
Shade Code (optional): Enter the shade number printed on the tube.
Example: "6.0"
Description (optional): Add details about the product for staff reference.
Product Color (optional): Select a colour for the product. This colour appears as a visual indicator on the product list and in the QuickPOS screen, helping you quickly identify products. Click the colour picker to choose from preset colours or enter a custom hex code.
Step 3: Set Pricing
The Pricing section captures cost and sale information:
Cost Price (optional): Enter what you pay your supplier for this product. Leave blank if you don't track cost prices — margin reports will simply omit the cost figure for that product until it's filled in.
Retail Price (required): Enter the price you charge customers.
Commission Rate (optional): Enter the percentage staff earn when selling this product. Leave blank to use the staff member's default commission rate.
The system automatically calculates profit margin (displayed on the product list and detail pages).

Step 4: Configure Stock Management
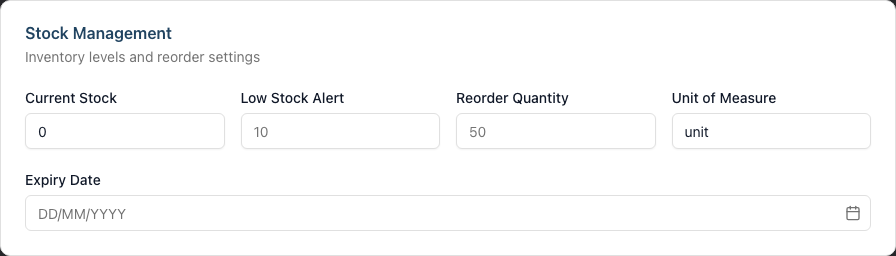
The Stock Management section tracks inventory:
Current Stock: Enter the number of units currently in stock. Default is 0.
Low Stock Alert: Enter the threshold at which you want a low stock warning. When stock falls below this number, the product shows a "Low" badge.
Example: 5 (warn when fewer than 5 remain)
Reorder Quantity: Enter the typical quantity you order from suppliers. This is for reference when reordering.
Unit of Measure: Enter how the product is measured (e.g., "unit", "bottle", "box"). Default is "unit".
Expiry Date (optional): Select a date if the product expires. Once that date has passed, the product's detail page shows an Expired badge.
Step 5: Configure Settings
The Settings section contains two checkboxes:
Product is active:
- Checked (default): Product appears in transactions and lists
- Unchecked: Product hidden from new transactions
Product is taxable:
- Checked (default): VAT/tax applies to this product
- Unchecked: Product is tax-exempt
Step 6: Save the Product
- Review all entered information
- Click Create Product
- You're redirected to the Products list
- A success message confirms the product was created
Managing Existing Products
View Product Details
Each product row on the index page displays a coloured bar on its left edge, matching the product's assigned colour. This makes it easy to visually identify products at a glance.
Click any row in the Products table
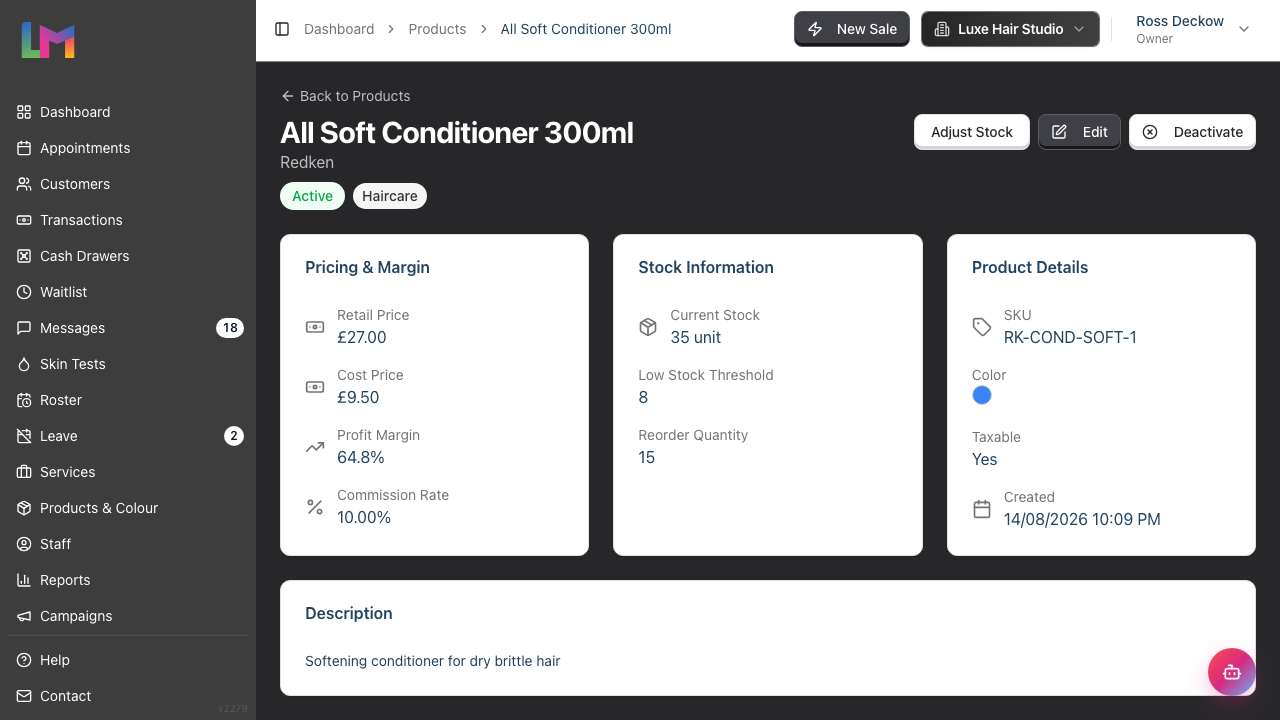
The product detail page shows the brand name as the page subtitle (under the product title) along with status, category and stock badges (Low Stock, Out of Stock, Expired), and three info cards:
- Pricing & Margin card (retail, cost, margin %, commission)
- Stock Information card (current stock, threshold, reorder qty, expiry)
- Product Details card (SKU, barcode, colour, taxable status, created date)
A Description card sits below them when the product has a description.
Edit a Product
- From the Products list, click Edit next to the product
- Or from the product detail page, click Edit
- Make your changes
- Click Update Product
Adjust Stock
When stock levels change (deliveries, stock takes, damage):
- From the product detail page, click Adjust Stock
- In the dialog, select:
- Increase (for deliveries or corrections up)
- Decrease (for damage, loss, or corrections down)
- Enter the Quantity to add or remove
- Enter an optional Reason (e.g., "Stock delivery invoice #123")
- Click Adjust Stock
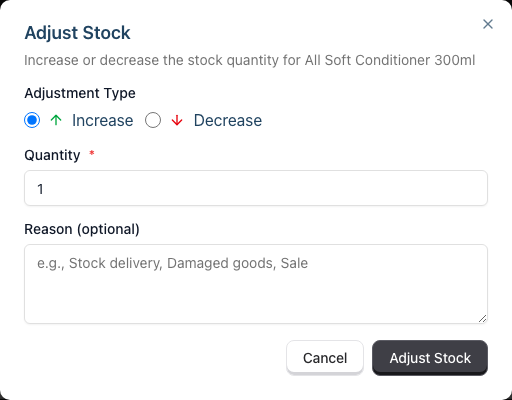
The stock level updates immediately.
Quick stock edit from the list
For a fast stock take you don't have to open each product. On the Products tab, the Stock column is an editable input:
- Click into a product's stock figure in the table
- Type the new count and press Enter (or click out of the cell) to save; press Esc to cancel
- A green checkmark confirms the save
This sets the stock to the figure you type — it's a stock-take overwrite, not an increase or decrease, and it records no reason. Use Adjust Stock on the detail page when you want to log a movement with a reason against it, such as a delivery or breakage.
Deactivate a Product
To hide a product from new transactions without deleting it:
- From the Products list, click Deactivate next to the product
- Or from the product detail page, click Deactivate
- A confirmation dialog asks you to confirm — click Deactivate in the dialog to proceed, or Cancel to back out
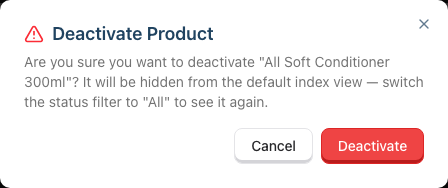
Deactivated products don't appear in transaction product selections but remain in historical records. After deactivation a toast confirms the action and reminds you that the product is now hidden from the default view — switch the status filter to All to find it again.
Activate a Product
To restore a deactivated product:
- Switch the status filter at the top of the Products list from Active Only to All Products (or Inactive Only) to show inactive products in the list
- Click Activate next to the product
The Colour Tab — Gram-Tracked Colour Products
When your salon's colour formula mode is set to Full (see Tutorial 20.2), the Products page gains a second tab labelled Colour. Colour stock is only tracked in Full mode, so the tab does not appear in Notes or Structured formulas mode — there is nothing to count. Regular retail and professional products live on the Products tab; colour products (tubes, bottles, developer etc. that are measured by weight) live on the Colour tab and are tracked in grams instead of units.
Why a separate catalogue? Colour formulas need exact gram-level stock tracking, cost-per-gram calculations, and an append-only stock movement log. The Colour tab is purpose-built for that — regular products keep their simple unit-based flow.
The page subtitle switches to "Manage gram stock levels for colour products." while you're on this tab. The header buttons change to Manage Brands, Manage Lines, and Add Colour Product.
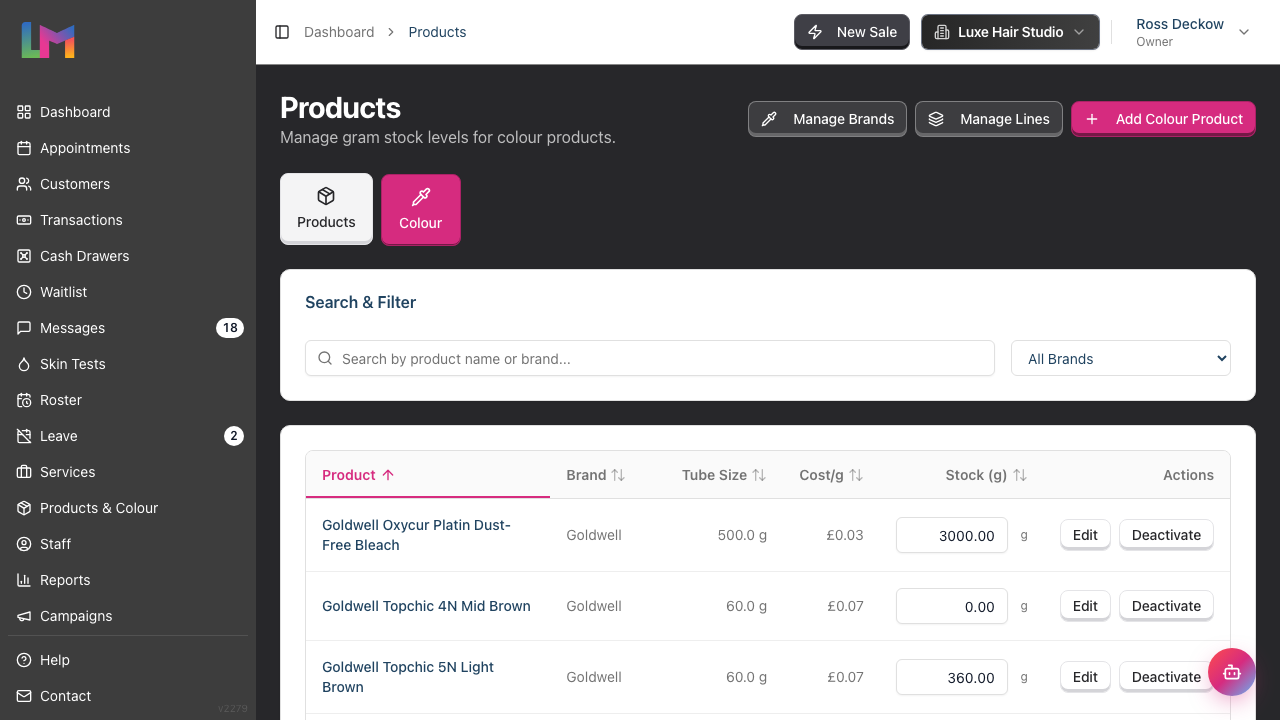
Add a colour product
Open the Colour tab on the Products page
Click Add Colour Product in the top-right
Fill in the dialog:
Field Notes Product name Full product name (required) Brand Searchable dropdown with inline create — pick an existing brand or type a new one and press Create: {name} Role What the product does in a formula — Colour (default), Developer, Lightener or Additive. This drives how it's grouped and searched in the Colour Bar Barcode Scan or type (optional); used by the Colour Bar's barcode capture SKU Optional Tube weight (g) The full container weight — e.g. 60for a 60g tube,1000for a litre bottle (required)Cost price What you pay for one full container (required) Initial stock (g) Grams on hand right now (required — enter 0if you're starting empty, or the full tube weight if it's a fresh container)Click Add Product — the product is created, tracked in grams from here on, and appears in the Colour tab list.
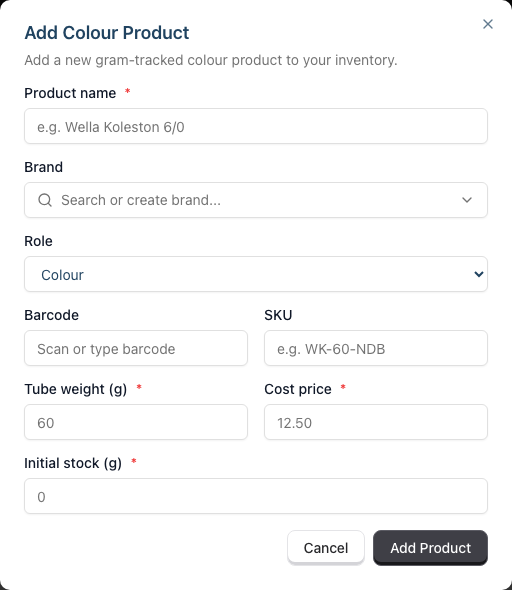
Cost per gram is calculated automatically as cost price ÷ tube weight and is displayed read-only on the row.
Inline stock edit (rapid stock take)
The Colour tab's Stock (g) column is an always-editable input so you can work through a physical stock take without navigating between pages:
- Click into the stock input for any product
- Type the new grams remaining
- Press Enter (or click out of the cell) to save; press Esc to cancel without saving
- A green checkmark appears in the cell to confirm the save; tab to the next row to keep going
Each inline edit writes an audit row to the product stock movement log, so your history shows who adjusted what and when. See Tutorial 20.5 for the full stock-take workflow.
Edit or deactivate a colour product
Use the Edit and Deactivate buttons on each row. Edit opens a dialog where you can change name, brand, role, barcode, SKU, tube weight and cost. Deactivate zeroes the product's stock and hides it from new formula search in the Colour Bar, but it stays on historic formulas for record-keeping.
Sorting and filtering
The Colour tab supports:
- Search by product name or brand (Search & Filter card above the table)
- Sort by clicking the column headers — Product, Brand, Tube Size, Cost/g, Stock (g)
- Filter by brand using the All Brands dropdown next to the search field
Filtering and Searching Products
Use the filters at the top of the Products page:

Search: Type to search by product name, brand, SKU, or barcode
Status filter: By default the list shows active products only. Use the status dropdown next to the search field to switch the view:
- Active Only (default) — hides deactivated products
- Inactive Only — shows only deactivated products (useful when looking for something to reactivate)
- All Products — shows both active and inactive together
Categories: Select one or more categories to filter by
Additional Filters (checkboxes):
- Low Stock Only: Show products below their low stock threshold
- Out of Stock Only: Show products with zero stock
The table can be sorted by clicking column headers:
- Product name
- SKU
- Retail price
- Stock quantity
Understanding Stock Indicators
On the Products list, a badge sits next to the figure in the Stock column:
| Indicator | Meaning |
|---|---|
| Low (yellow badge) | Stock is below the low stock threshold |
| Out (red badge) | Stock is zero |
The stock figure itself also turns yellow when the product is low.
The product's detail page uses fuller wording for the same states, and adds one more:
| Indicator | Meaning |
|---|---|
| Low Stock (yellow badge) | Stock is below the low stock threshold |
| Out of Stock (red badge) | Stock is zero |
| Expired (red badge) | Product has passed its expiry date |
The Expired badge appears on the detail page only — the list doesn't flag expiry, so check dated stock from the product's own page.
Common Pitfalls
"Product doesn't appear when adding to transactions"
Check that the product is marked as Active. On the Products list, switch the status filter to All Products or Inactive Only to find and reactivate it.
"Stock level is incorrect"
Use Adjust Stock to correct the level. Enter the difference (not the final count) as an increase or decrease with a reason for the audit trail.
"Insufficient stock" error when decreasing
The Adjust Stock dialog will refuse a Decrease that would take the unit count below zero — a Couldn't save message reads "Insufficient stock. Current stock: N" and the level is left unchanged. Either lower the quantity to match what's actually on hand, or do an Increase first if you've found more stock that wasn't recorded.
"Low stock alert isn't showing"
Verify the Low Stock Alert threshold is set on the product. If the threshold is blank, no alert triggers. A product counts as low when its stock is at or below the threshold — so a threshold of 8 flags the product once stock reaches 8, not only when it drops to 7. The product also has to be active; deactivated products are not counted.
"I can't scan barcodes"
Barcode scanning works automatically if you have a compatible USB barcode scanner connected. The scanner types the barcode into the active field. Place your cursor in the Barcode field before scanning.
Tips and Best Practices
- Set accurate thresholds - Calculate based on how quickly products sell and how long suppliers take to deliver
- Use consistent SKUs - Create a naming convention (e.g., BRAND-PRODUCT-SIZE)
- Check expiry dates - Set expiry dates for products that expire to avoid selling expired items
- Adjust stock promptly - Record deliveries and adjustments immediately to maintain accuracy
- Regular stock takes - Count physical inventory monthly and adjust any discrepancies
- Deactivate, don't delete - Deactivate discontinued products to preserve sales history
Related Tutorials
- Tutorial 7.1: Creating and Managing Your Service Menu - Managing services
- Tutorial 7.3: Using Categories to Organise Services and Products - Creating categories
- Tutorial 12.4: Importing and Exporting Data - Bring a whole product catalogue across from another system
- Tutorial 20.2: Configuring Colour Settings & Charge Rules - Switch your salon to Full colour mode
- Tutorial 20.3: Brands and Your Colour Catalogue - Manage brands as their own catalogue
- Tutorial 20.4: Setting Up Colour Products - Deep dive on gram-tracked colour products
- Tutorial 20.5: Colour Stock Take - Full stock take workflow with movement history
Frequently Asked Questions
Can I bulk import products from a spreadsheet?
Not from the Products page — there's no self-serve spreadsheet upload, so day-to-day additions go through the Add Product form one at a time. If you're moving to Luminate from another system, your whole product catalogue (including brands, lines, shade families and gram stock) can be brought across in the one-off migration import. See Tutorial 12.4 for how that works, or contact hello@luminate.salon.
How do I handle products with multiple sizes?
Create separate product entries for each size (e.g., "Shampoo 300ml" and "Shampoo 500ml"). This allows accurate stock tracking per size.
What happens when I sell a product?
When a product is added to a completed transaction, the stock level decreases automatically. Refunding that transaction puts the stock back.
Can I track professional products used in services?
Yes. Add them as products with the retail price set to your cost price (no markup). Use Adjust Stock to decrease when you use them, or estimate usage periodically.
How do I record a stock delivery?
Use Adjust Stock with Increase and enter the quantity received. Add the invoice number in the Reason field for reference.
Do price changes affect existing transactions?
No. Price changes only affect future transactions. Historical transactions retain their original prices.
What's the difference between Low Stock and Out of Stock?
Low Stock: Stock is below your threshold (time to reorder) Out of Stock: Stock is zero (no units available)
Can I use a regular product in a colour formula?
No — colour formulas need gram-level stock tracking, and regular products are counted by unit. Add colour supplies via the Colour tab's Add Colour Product dialog so they're tracked in grams from day one. If you have a product in the wrong catalogue, the cleanest fix is to deactivate the regular entry and re-create it on the Colour tab.
I'm in Notes mode — why don't I see a Colour tab?
The Colour tab only appears when your salon's colour formula mode is Full. Change the mode via Settings > Colour (see Tutorial 20.2). Structured formulas mode records what went into a colour but does not track its stock, so the tab stays hidden there as well as in Notes mode.
Will deleting a brand remove its products?
Brands and products are kept separate. Deleting a brand prompts you to reassign its products to another brand (or leave them brand-less). See Tutorial 20.3 for the full brand lifecycle.
Last Updated: August 2026