
Time Blocks and Availability Management
Introduction
Time blocks reserve time on the calendar for non-appointment activities. Use them for lunch breaks, team meetings, training sessions, or personal appointments. When time is blocked, appointments cannot be booked during that period. This tutorial shows you how to create and manage time blocks.
Who this is for: Owner, Admin, Manager, Receptionist, Staff What you'll learn:
- Understand the difference between shifts and time blocks
- Create time blocks from the calendar
- Choose time block categories
- Adjust time blocks using drag and resize
- Edit a time block on the dedicated Edit page (including from mobile)
- Delete time blocks
- Understand conflict checking
Time to complete: 10 minutes
Prerequisites
- Logged in with at least Staff permissions
- Understanding of the appointment calendar (see Tutorial 2.1)
- Shifts are not required first - a time block works with or without a shift (see Tutorial 5.1 for shifts)
Step-by-Step Instructions
Step 1: Understand Shifts vs Time Blocks
| Type | Purpose | Where Created |
|---|---|---|
| Shift | Define when staff are working and available | Roster page |
| Time Block | Block time for non-appointment activities | Calendar page |
Key differences:
- Shifts make staff available for appointments
- Time blocks make staff unavailable during specific times
- Shifts appear on the roster; time blocks appear on the calendar
- Time blocks don't require shifts to exist first
Step 2: Access Time Block Creation
Time blocks are created from the appointment calendar:
- Click Appointments in the sidebar
- Navigate to the desired date using the calendar navigation
- Click the Block Time button in the page header (next to "New Appointment")
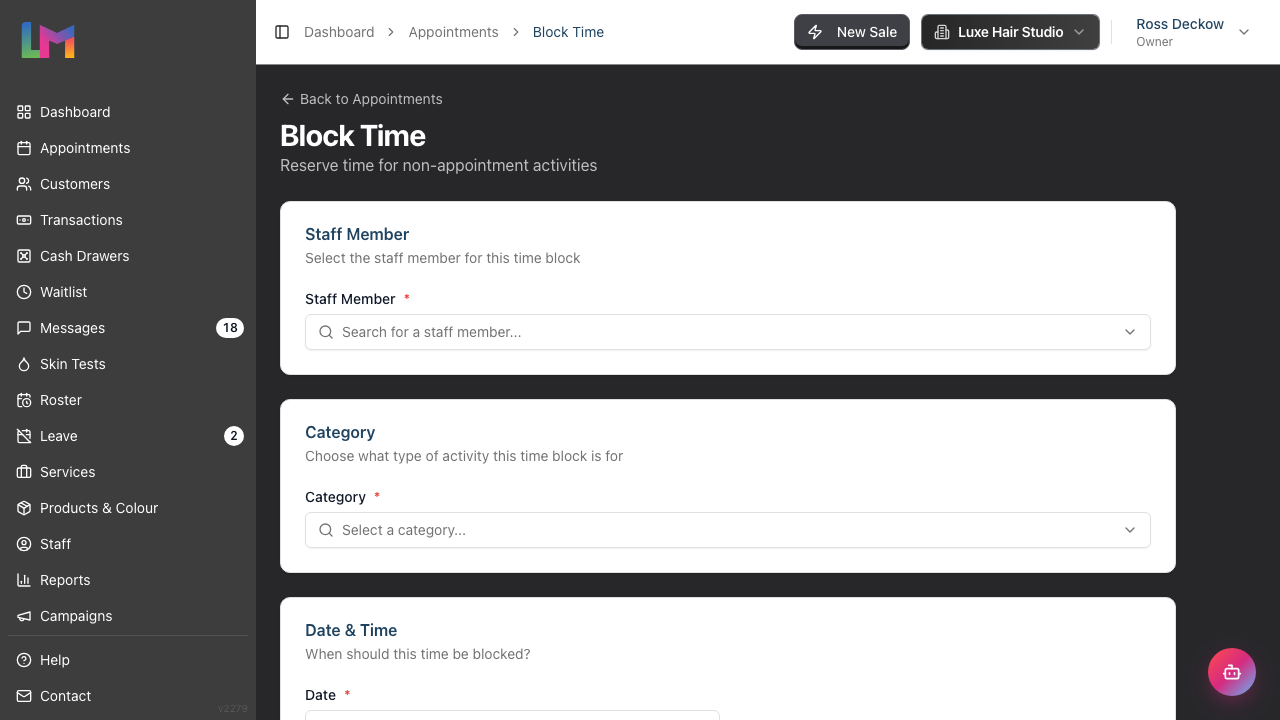
The Block Time page opens with a form to create the time block.
Alternative: block time straight from a calendar slot
You can also start from the time you want to block:
- Drag down an empty part of a staff member's column on the calendar
- The What would you like to create? dialog opens
- Click Time Block (Blocks the time you chose)
The Block Time form opens with the staff member, date, start time and end time already filled in from the slot you dragged. Choose a category and save.
Step 3: Complete the Time Block Form
The form is organised into sections. Fill in the time block details:
Staff Member Section:
| Field | Required | Description |
|---|---|---|
| Staff Member | Yes | Select who the time block is for from the dropdown |
Category Section:
| Field | Required | Description |
|---|---|---|
| Category | Yes | Select the type of time block from the dropdown |
Date & Time Section:
| Field | Required | Description |
|---|---|---|
| Date | Yes | The day the block falls on (DD/MM/YYYY) |
| Start Time | Yes | When the block begins (e.g., 09:00) |
| End Time | Yes | When the block ends (e.g., 10:00) |
A time block covers one day, so there is a single Date field. To block time across several days, add one block per day.
Details Section (Optional):
| Field | Required | Description |
|---|---|---|
| Custom Title | No | Custom label (e.g., "Team Meeting") - leave empty to use category name |
| Notes | No | Additional details about the time block |
Step 4: Select a Category
Categories help organise and visually identify time blocks. Built-in categories include:
| Category | Typical Use |
|---|---|
| Lunch Break | Daily lunch period |
| Meeting | Team meetings, one-on-ones |
| Admin Time | Paperwork, stock takes |
| Personal Time | Doctor appointments, errands |
| Training | Skills development |
| Consultation | Extended client consultations |
Select the category that best describes the time block. Categories can be enabled/disabled and custom categories added in salon settings (see "Managing Time Block Categories" below).
Step 5: Set the Time Range
Configure when the block occurs:
- Select the Date using the date picker
- Select the Start Time (e.g., 12:00)
- Select the End Time (e.g., 13:00)
Note: End time must be after start time, and both must fall on the same day.
Step 6: Add Optional Details
Title: Add a custom label if the category isn't specific enough:
- "Team Meeting"
- "Product Training"
- "Dentist appointment"
Notes: Add context for yourself or managers:
- "Monthly team catch-up"
- "Back by 2pm"
- "Mandatory attendance"
Step 7: Handle Conflict Checking
Before saving, the system checks for conflicts:
Conflict detected:
Time Conflict
This time overlaps an appointment (9:00 AM–11:00 AM).
The message names what the block would clash with. For another time block, it uses that block's title or category name, for example "This time overlaps Lunch Break (12:00 PM–1:00 PM)."
If a conflict is detected:
- The Create Time Block button is disabled
- Change the time range to avoid the conflict
- Or reschedule the conflicting appointment first
No conflict: The button is enabled, and you can proceed.
Step 8: Save the Time Block
- Review all details
- Click Create Time Block at the bottom of the form
- You'll be redirected to the appointments calendar
- The time block appears on the calendar
The blocked time now shows as unavailable for appointment booking.
Step 9: View Time Blocks on the Calendar
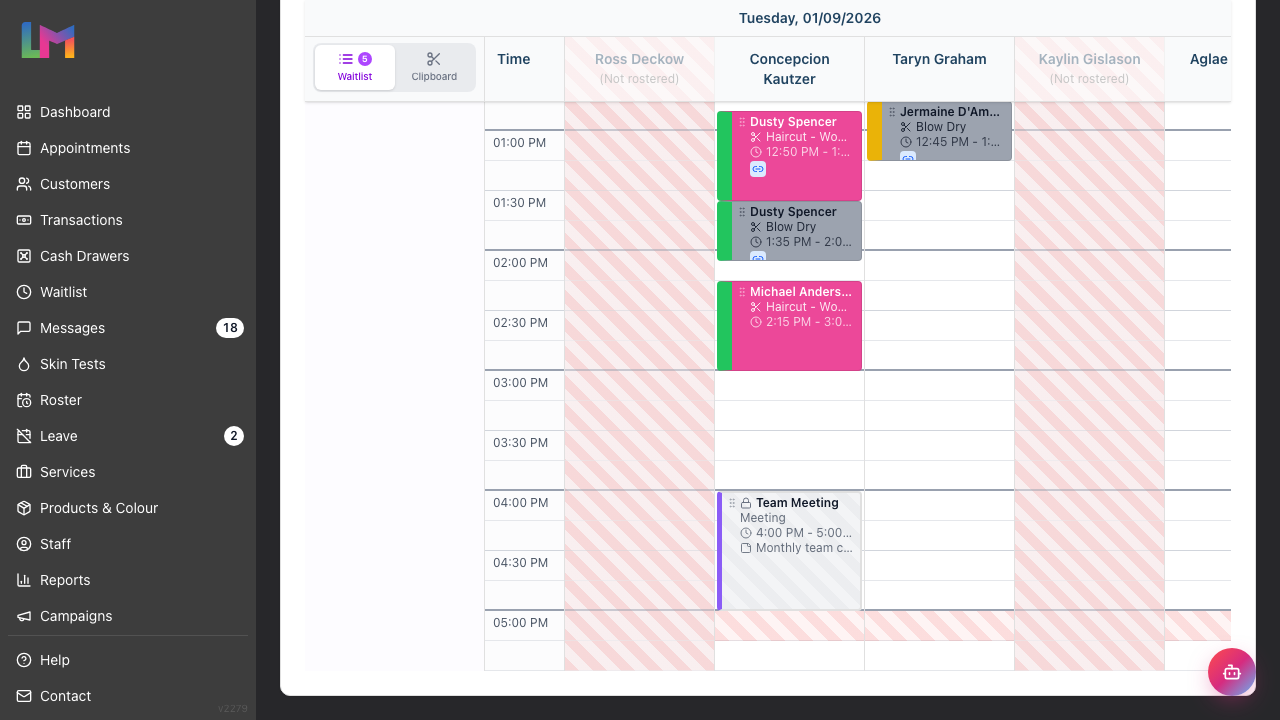
Time blocks appear on the calendar with:
- Category colour coding (left border)
- Lock icon indicating blocked time
- Title (custom title, or the category name if you left the title empty)
- Category name below the title, when you gave the block a custom title
- Time range
- Staff name (in week view)
- Notes preview (in day view) or notes indicator icon (in week view)
They're visually distinct from appointments with a striped background pattern, helping you see availability at a glance.
Step 10: Adjust a Time Block
You can adjust time blocks directly on the calendar using drag and resize:
Moving a Time Block:
- Hover over the time block to reveal the drag handle (grip icon on the left)
- Click and drag to move the time block to a different time
- Release to confirm the new position
Resizing a Time Block:
- Hover over the time block to reveal resize handles at the top and bottom edges
- Click and drag a resize handle to adjust the start or end time
- Release to confirm the new duration
On mobile: Drag-and-resize interactions are not available on mobile devices. Use the Edit action (Step 11) to change the time on mobile.
Note: The system checks for conflicts when you move or resize. If the new position conflicts with an existing appointment or time block, the change will be prevented.
Step 11: Edit a Time Block
To change a time block's staff member, category, title, notes, or times without deleting it:
- On desktop: Hover over the time block on the calendar to reveal the action buttons and click the Edit button (pencil icon). On mobile: Tap the time block. A short menu opens with the block's title and time at the top. Tap Edit time block.
- The Edit Time Block page opens with the current values pre-filled
- Change any of: Staff Member, Category, Date, Start Time, End Time, Custom Title, or Notes
- Click Save Changes to apply, or Cancel to discard
- You're returned to the calendar view (day or week) and the same date/staff selection you were on, so you can keep working without losing your place
The Edit page runs the same conflict check as the create form. If the new time clashes with an appointment or another block, Save Changes stays disabled until you move it.
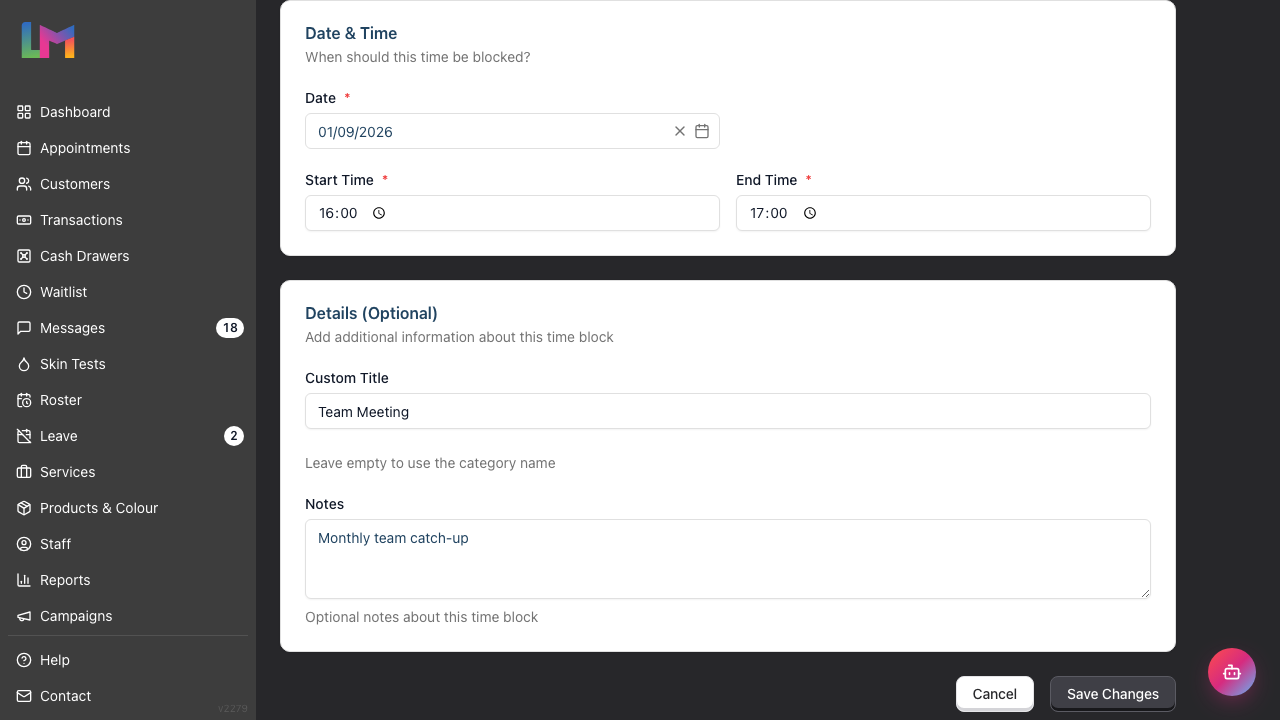
Tip: Use the Edit page when you need to fix a category, reassign a time block to a different staff member, or correct a typo in the title — there's no need to delete and recreate.
Step 12: Delete a Time Block
To remove a time block:
- On desktop: Hover over the time block on the calendar to reveal the action buttons and click the Delete button (bin icon). On mobile: Tap the time block, then tap Delete time block in the menu that opens.
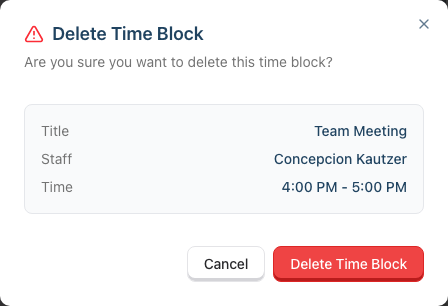
- Review the confirmation dialog showing the time block details:
- Title
- Staff member
- Time range
- Click Delete Time Block to confirm, or Cancel to keep it
The time becomes available for appointments again.
Managing Time Block Categories
Owners and Admins can customise time block categories in salon settings. Managers, Receptionists and Staff can use the categories but cannot change them - salon settings are closed to them.
- Click on your salon name in the header
- Select Edit Salon from the dropdown
- Click the Staff tab
- Click the Time Blocks sub-tab
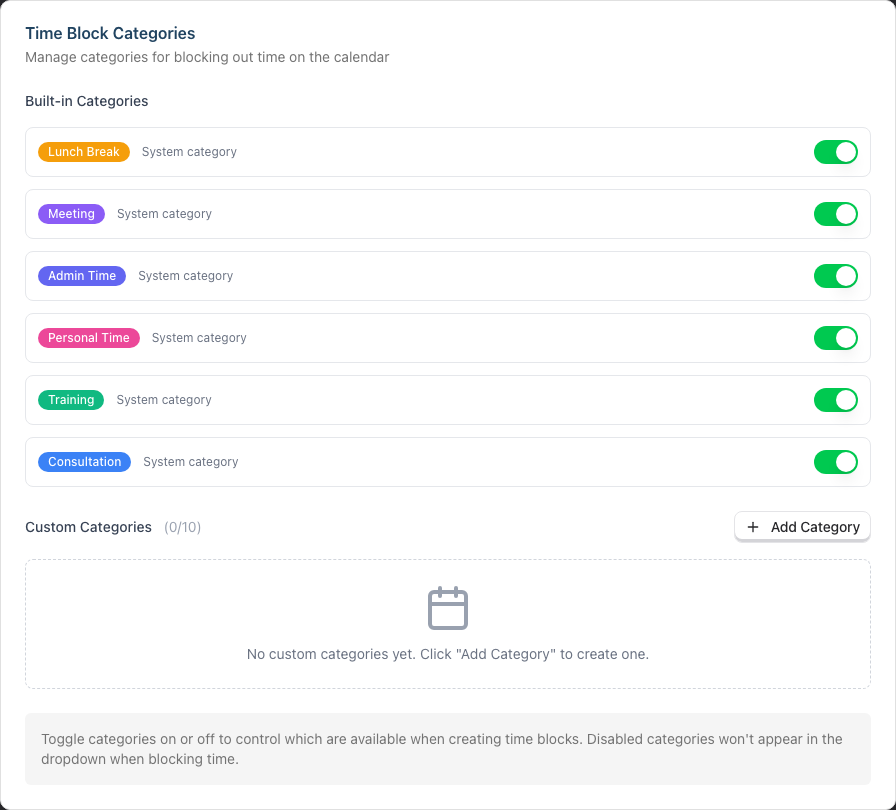
Built-in Categories: The system comes with six built-in categories, listed under Built-in Categories and marked System category: Lunch Break, Meeting, Admin Time, Personal Time, Training and Consultation. These cannot be deleted, but you can turn each one on or off with the switch beside it. A disabled category disappears from the Category dropdown on the Block Time form. Existing time blocks that already use it are not affected.
Adding a Custom Category:
- Click the Add Category button
- Enter a Category Name (e.g., "Photo Shoot")
- Pick a Category Color from the palette - the Preview pill shows how the category will look
- Click Add Category to save
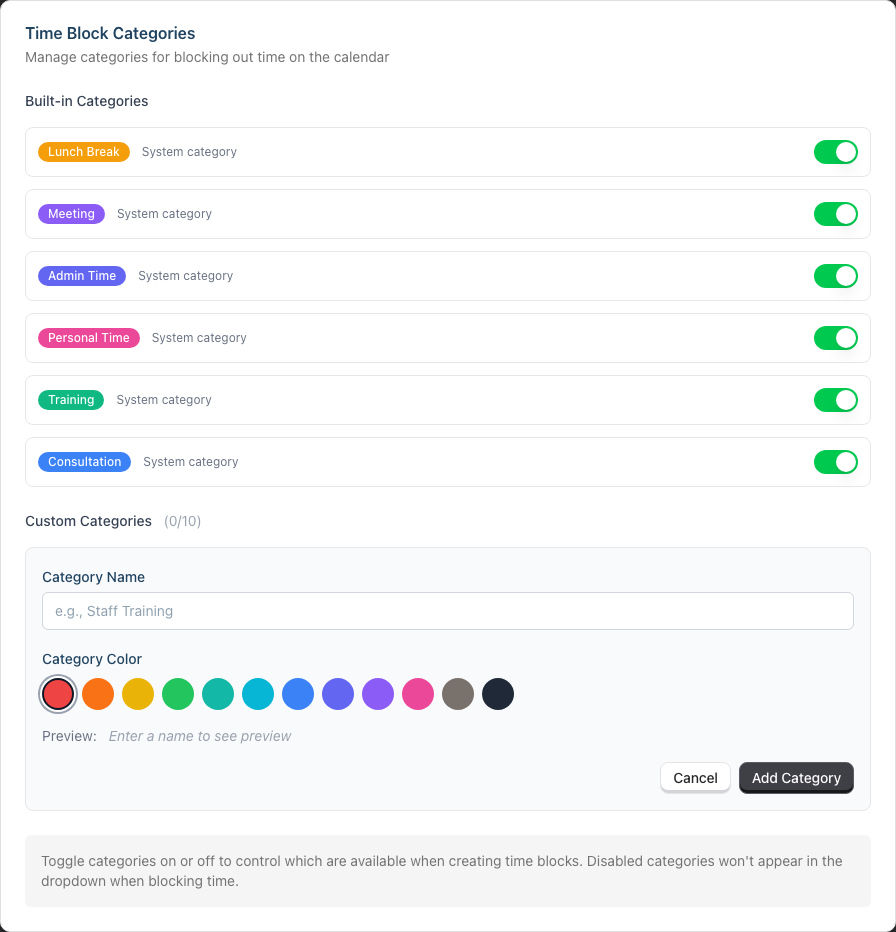
You can add up to 10 custom categories. The counter on the Custom Categories heading shows your current usage (e.g., "2/10"), and the Add Category button disappears once you reach 10.
Custom categories have the same on/off switch as the built-in ones, plus an Edit button (to rename or recolour them) and a bin button to delete them. Deleting asks you to confirm in a Delete Category dialog. A category that already has time blocks assigned to it cannot be deleted - delete or re-categorise those time blocks first.
Common Pitfalls
"I can't create a time block - there's a conflict"
The time slot has an existing appointment or time block. Either:
- Choose a different time
- Reschedule the conflicting appointment
- Delete the existing time block
"Time block doesn't show on the calendar"
Check that:
- You're viewing the correct date
- You're viewing the correct staff member's column
- The time block was saved successfully
"I can't block time across two days"
A time block must start and end on the same day. If you save one that crosses midnight, you'll see "A time block must start and end on the same day. To block several days, add one block per day." Add one block per day, or use a leave request for a full absence (see Section 6).
"I can't delete a category"
Built-in categories cannot be deleted - turn them off with their switch instead. A custom category that still has time blocks assigned to it cannot be deleted either. Delete or re-categorise those time blocks first.
"I want to block the same time every week"
There's no recurring time block feature in the UI. Create time blocks individually for each week, or use a shift break instead (shifts have break duration but not specific break times).
"Staff created too many time blocks"
Review your salon's policy on personal time blocks. Consider requiring approval for certain categories or limiting how much time can be blocked.
"I need to change the category or staff member"
Click the Edit button (pencil icon) on the time block — the Edit page lets you change the staff member, category, title, times, and notes in one place. Drag and resize on the calendar still works for time-only adjustments.
Tips and Best Practices
- Use categories consistently - Helps with reporting and understanding patterns
- Add titles for context - "Meeting" is clearer with "Monthly team catch-up" title
- Check for appointments first - Don't block time where appointments exist
- Block lunch breaks early - Create them when planning the week
- Review blocked time weekly - Ensure it doesn't exceed reasonable limits
- Communicate training blocks - Let affected customers know in advance
- Use notes for follow-up - Record important details
- Use drag and resize - Quickly adjust time blocks without recreating them
Related Tutorials
- Tutorial 5.1: Setting Up Your Weekly Roster - Creating staff shifts
- Tutorial 2.1: Managing Your Appointment Calendar - Understanding the calendar view
- Section 6: Leave Management - For full days or longer absences
Frequently Asked Questions
What's the difference between a time block and a shift break?
- Shift break is a duration (e.g., 30 minutes) that's deducted from paid hours but doesn't block a specific time
- Time block blocks a specific time period (e.g., 12:00-13:00) and prevents appointments
Can customers see why time is blocked?
No. Customers only see that the time is unavailable. Category names, titles, and notes are internal only.
Can I create a time block for multiple staff at once?
No. Create time blocks individually for each staff member.
Do time blocks appear on the roster?
No. Time blocks appear on the calendar only. The roster shows shifts only.
What if I need to block time but there's an appointment?
Reschedule the appointment first, then create the time block. You cannot create a time block that conflicts with an existing appointment.
Can staff create their own time blocks?
Yes. Anyone who can manage appointments - Owner, Admin, Manager, Receptionist and Staff - can create time blocks, and the Staff Member dropdown lists everyone in the salon, so a Staff member can block a colleague's time as well as their own.
Editing and deleting are tighter. Owners, Admins, Managers and Receptionists can change any time block. A Staff member can only edit or delete the blocks that are on their own calendar - they need a manager to change one they made for someone else. Define your salon's policy on when blocking a colleague's time is appropriate.
Are time blocks duplicated with rosters?
No. Roster duplication copies shifts only. Create time blocks separately for each week.
How long can a time block be?
Up to one day - a block must start and end on the same day (an end at midnight is allowed). In practice most blocks are 15 minutes to 4 hours. For full-day or longer absences, use leave requests instead (Section 6).
Can I set a time block in the past?
Yes, for record-keeping purposes, but it won't affect past bookings.
Do time blocks affect commission or hours calculations?
Time blocks don't affect shift hours or commission. They only block appointment availability.
Can I change the staff member or category of a time block?
Yes. Click the Edit button (pencil icon) on the time block to open the Edit Time Block page, then change the staff member, category, date, times, title, or notes. You can also adjust times via drag and resize on the calendar (desktop only).
Last Updated: August 2026