
Setting Up Your Weekly Roster
Introduction
The roster defines when staff are available to take appointments. A shift tells the system that a staff member is working during specific hours. Without shifts, staff won't appear as available on the appointment calendar. This tutorial shows you how to create and manage shifts for your team.
Who this is for: Owner, Admin, Manager, Receptionist What you'll learn:
- Navigate the weekly roster view
- Create shifts for staff members
- Configure shift times and breaks
- Edit and delete shifts
- Understand weekly hours calculations
- Know how staff are told about roster changes
Time to complete: 10 minutes
Prerequisites
- Logged in as Owner, Admin, Manager or Receptionist — these roles all hold the
manage-rosterpermission, which lets you add, edit and delete shifts for everyone - At least one active staff member with Show on Roster & Appointments enabled exists (see Tutorial 4.1)
- Understand your salon's opening hours and staffing needs
Staff members hold manage-own-roster instead. They can open the roster and see the whole team's week, but can only add, edit or delete their own shifts — the page shows an amber note saying so.
Step-by-Step Instructions
Step 1: Access the Roster
- Click Roster in the sidebar
- The roster displays the current week by default
- You'll see a grid with days across the top and staff members down the left side
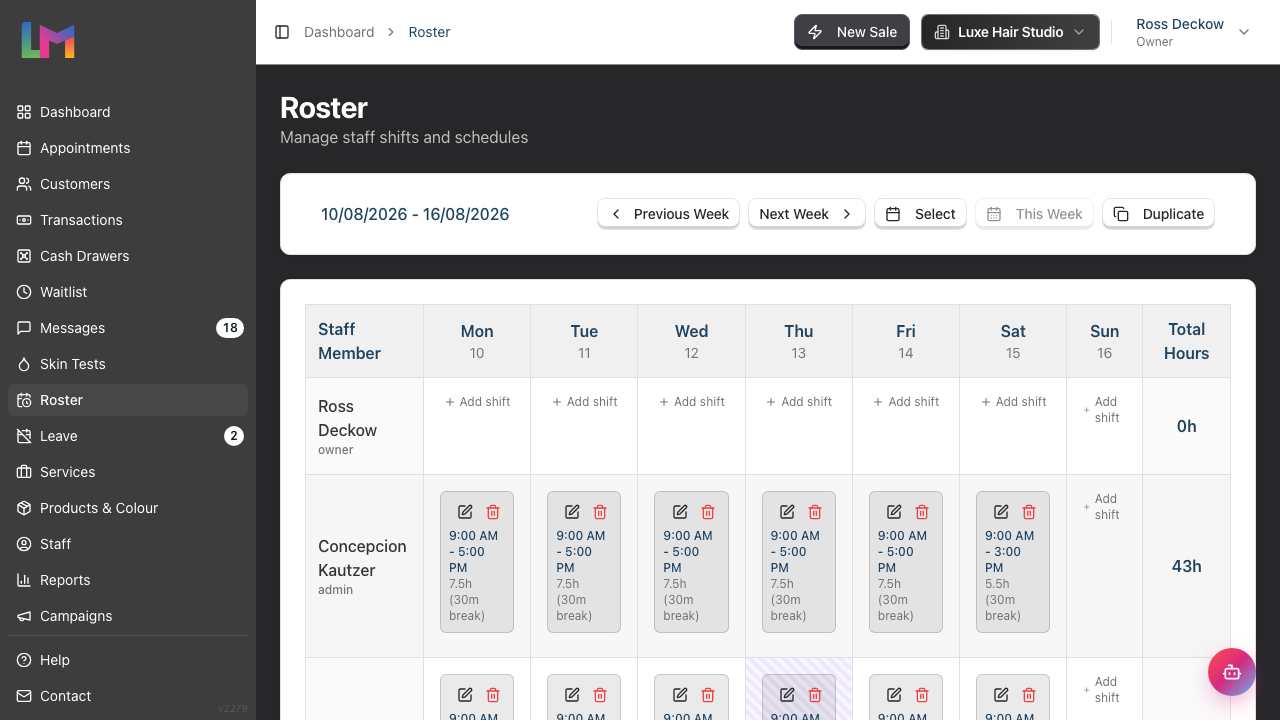
Understanding the roster layout:
| Element | Description |
|---|---|
| Week navigation | Buttons to move between weeks, plus the week's date range |
| Day columns | Monday through Sunday with date numbers |
| Staff rows | Each rostered staff member, with their role beneath their name. The name is a link to their staff profile |
| Shift blocks | Coloured rectangles showing scheduled shifts |
| Total Hours column | Weekly hours for each staff member |
| Total Weekly Hours row | The team's combined hours, along the bottom |
Note: Only active staff with Show on Roster & Appointments enabled appear on the roster. That toggle lives on each staff member's profile (see Tutorial 4.1) and is what controls roster visibility — not the person's role. Staff hidden from the roster cannot have shifts created for them, even if they're active.
Step 2: Navigate Between Weeks
The roster displays one week at a time:
Navigation buttons:
- Previous Week - View the week before
- Next Week - View the following week
- Select - Open a date picker to jump to any week
- This Week - Jump to the current week. Greyed out when you're already on it
- Duplicate - Copy a week's shifts forward (see Tutorial 5.3). Only shown if you can manage the whole roster
Click the date picker (Select) to navigate to a specific date. The roster shows the week containing that date.
On narrow screens the button labels collapse to icons only — hover for the tooltip.
Step 3: Create a Shift
To add a shift for a staff member:
- Click on an empty cell in the roster grid (intersection of staff row and day column)
- The Add Shift dialog opens with the staff member and date pre-selected
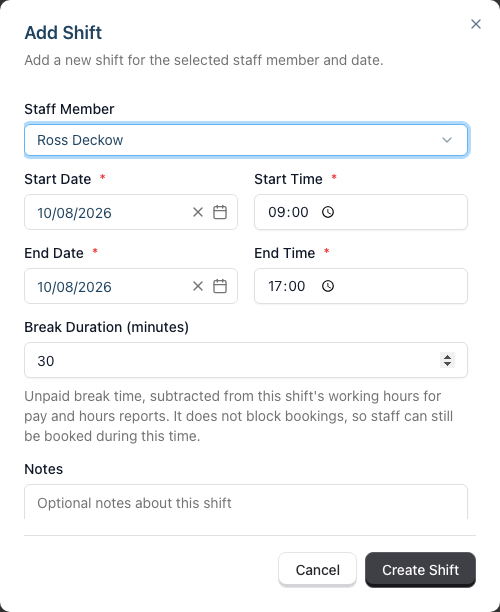
Shift form fields:
| Field | Description | Default |
|---|---|---|
| Staff Member | Pre-filled from the row you clicked. You can still pick someone else from the dropdown before saving | The clicked row |
| Start Date | The shift date | Pre-filled from clicked column |
| Start Time | When the shift begins | 09:00 |
| End Date | Usually same as start date | Same as start date |
| End Time | When the shift ends | 17:00 |
| Break Duration (minutes) | Break time in minutes | 30 |
| Notes | Optional internal notes | Empty |
Note: The Staff Member dropdown is locked in two cases — when you're editing an existing shift (see Step 9), and when you only hold manage-own-roster, in which case it lists just you.
Step 4: Set Shift Times
Configure the shift timing:
- Set the Start Time using the time picker (e.g., 09:00)
- Set the End Time using the time picker (e.g., 17:00)
- Times are entered as
HH:MMon a 24-hour clock. The picker itself is your device's native time control, so whether it displays 24-hour or AM/PM follows your computer or tablet's own settings — the value stored is the same either way - On the roster grid, shift times are shown using your salon's time format setting (e.g., "9:00 AM - 5:00 PM")
Example shift patterns:
| Shift Type | Start | End | Description |
|---|---|---|---|
| Full day | 09:00 | 17:00 | Standard 8-hour shift |
| Morning | 09:00 | 13:00 | Half-day morning |
| Afternoon | 13:00 | 18:00 | Half-day afternoon |
| Evening | 15:00 | 21:00 | Late shift |
Step 5: Configure Break Time
Set the break duration for the shift:
- Enter the Break Duration in minutes (not hours)
- Common values: 0, 15, 30, 45, 60
How breaks work:
- Break time is deducted from paid hours but not from shift duration
- A 09:00-17:00 shift with 30-minute break = 7.5 paid hours
- Breaks aren't shown as separate blocks on the roster
- Breaks don't block bookings — staff can still be booked during the break time. Use a time block (Tutorial 5.4) if you need the time protected
- Break duration must be less than the shift duration. An equal or longer break is rejected with "The break duration must be less than the shift duration."
Step 6: Add Optional Notes
The Notes field is for internal reference:
Good uses for notes:
- "Training new team member"
- "Coverage for Sarah's leave"
- "Available for late appointments"
- "VIP client at 2pm"
Notes are printed on the shift block itself, so anyone who can see the roster can read them — including the rest of the team. Keep them operational, not personal.
Notes are also the one field that never triggers a roster change email: editing only the notes on an existing shift won't notify the staff member.
Step 7: Save the Shift
- Review all details
- Click Create Shift
- The shift appears as a coloured block on the roster
- Weekly hours update automatically
After saving:
- The staff member can see the shift on their schedule
- Appointments can now be booked during this shift
- The time slot becomes available on the calendar
- If the staff member has a login account, they're emailed a summary of the change once you've finished editing — not one email per shift (see the FAQ below)
Step 8: Understand Shift Display
Each shift block on the roster shows:
- Time range - Start and end times (e.g., "9:00 AM - 5:00 PM")
- Duration - Working hours excluding break (e.g., "7.5h")
- Break - Break duration if set, shown in brackets (e.g., "(30m break)")
- Notes - Any notes you added
Each shift block displays edit and delete buttons in the top-right corner. They're always visible — you don't need to hover. They only appear on shifts you're allowed to change.
If a staff member has more than one shift on the same day, each shift is its own block, stacked in the cell.
Step 9: Edit an Existing Shift
To modify a shift:
- Locate the shift block on the roster
- Click the pencil icon (edit button) in the top-right of the shift
- The Edit Shift dialog opens, pre-filled with the current details
- Modify dates, times, break, or notes as needed
- Click Update Shift to save changes
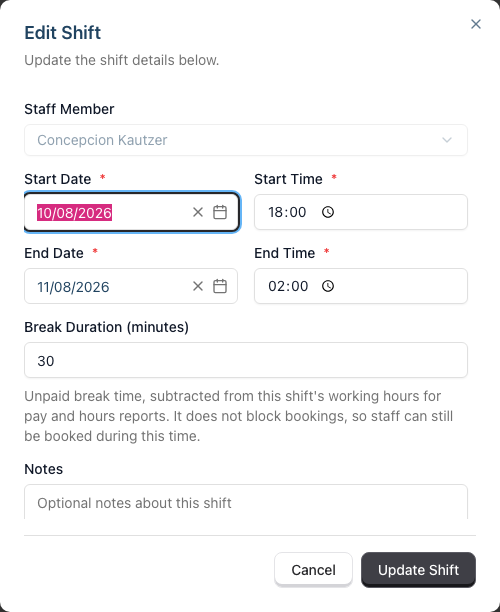
What can be edited:
- Start and end dates — changing the date moves the shift to another day, and it will jump to that column on the grid
- Start and end times
- Break duration
- Notes
Note: You cannot change the staff member — the dropdown is greyed out while editing. Delete the shift and create a new one instead.
Step 10: Delete a Shift
To remove a shift:
- Locate the shift block on the roster
- Click the trash icon in the top-right of the shift
- The Delete Shift confirmation dialog appears, warning that the shift will be permanently removed and asking "Are you sure you want to delete this shift?"
- Click Delete Shift to confirm, or Cancel to keep the shift
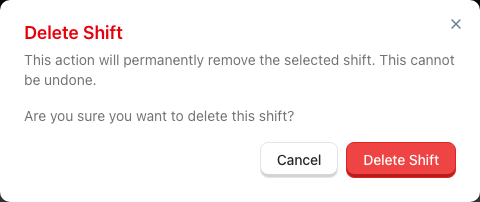
Warning: Deleting a shift affects appointment availability. Check the calendar before deleting shifts that might have appointments booked.
Step 11: Review Weekly Hours
The Total Hours column on the right shows each staff member's weekly hours:
- Hours are calculated as: (End time - Start time - Break duration)
- Each shift is rounded to two decimal places, then summed for the week
- Totals update automatically when shifts change
- The bottom Total Weekly Hours row sums every staff member's hours for the week
Use this to:
- Verify staff aren't over/under their contracted hours
- Check coverage is adequate across the week
- Spot scheduling imbalances
Step 12: Handle Public Holidays
When you try to create a shift on a public holiday:
- The whole day column — header and cells — shows a striped background pattern
- A Bank Holiday Warning dialog appears when you click to add a shift, naming the holiday and its date
- You can choose to Cancel or Proceed Anyway
If your salon operates on holidays, click Proceed Anyway to create the shift. See Tutorial 5.2 for holiday configuration.
Step 13: Handle Staff on Leave
When you try to create a shift for staff who have approved leave:
- A leave indicator appears at the bottom of the cell showing the leave type (e.g., "Annual Leave", "Sick Leave")
- The cell has a striped background in the leave type's colour
- When you click to add a shift, a Staff on Leave warning dialog appears, naming the staff member, the leave type and the date
- You can choose to Cancel or Add Shift Anyway
If the day is both a public holiday and a leave day, the two warnings appear one after the other — the bank holiday warning first, then the leave warning. You must clear both before the Add Shift dialog opens.
Generally, don't create shifts for staff on leave. See Section 6 for leave management.
Common Pitfalls
"I can't see a staff member on the roster"
Check that:
- The staff member is marked as Active
- The staff member has Show on Roster & Appointments enabled in their profile (this setting controls roster visibility regardless of role)
- You have
view-roster,manage-rosterormanage-own-rosterpermission — any of these opens the roster page
"The shift times look wrong"
Shifts are stored in UTC and displayed in your salon's timezone. Verify:
- Your salon timezone is correct in Settings → Edit Salon
- Refresh the page after timezone changes
"Weekly hours don't match what I calculated"
The system calculates: (End time - Start time - Break duration). Verify:
- Break is entered in minutes (30, not 0.5)
- The shift spans the times you expect
- Multiple shifts on the same day are added together
"Appointments aren't showing during shift hours"
Shifts create availability; they don't create appointments. The calendar shows available slots during shift hours. Book appointments separately.
"I can't edit someone else's shifts"
Staff with only manage-own-roster permission can only add, edit or delete their own shifts — an amber note at the top of the grid says exactly that, and the edit/delete buttons and Add shift prompts don't appear on anyone else's cells. Full manage-roster permission (Owner, Admin, Manager, Receptionist) is required to roster the whole team.
"I created a shift, but the staff member says they got no email"
Roster digests go to the staff member's login account. Someone who has a staff record but no user account has nowhere to receive it. Check they have an account (Tutorial 4.2), then see the roster-change FAQ below — the email is deliberately delayed until you've finished editing.
Booking Outside a Shift
Shifts are enforced when you book or move appointments — not just used as a visual cue.
On the calendar:
- Faded / striped "(Not rostered)" columns and rows still mark unrostered time. Booking, dragging, or resizing an appointment into one of those cells triggers an Outside scheduled roster dialog.
- The dialog explains which staff member, day, and reason (no scheduled shift, or approved leave) is in play, and offers an explicit Book anyway override. Cancel returns you to the calendar with no change.
- The same prompt appears when pasting from the clipboard or from a rebook flow.
On the appointment Create / Edit form:
- An Outside scheduled roster warning banner surfaces near the form when the chosen slot falls outside any rostered shift or onto approved leave (if more than one service is affected it reads "N services outside the roster"). The banner is informational — you can adjust the time / staff / date, or save anyway, in which case the same Book anyway override is applied.
Online customer bookings:
- Customers booking through the public portal are hard-blocked from selecting slots outside a stylist's roster or on a day they have approved leave. There is no override on the customer side — see Tutorial 18.3 for the customer-facing experience.
This gives front-desk staff full flexibility (with an explicit confirmation) while keeping the public booking flow safe.
Tips and Best Practices
- Create rosters 1-2 weeks ahead - Give staff notice of their schedules
- Use the Duplicate feature - Copy successful weeks instead of recreating (see Tutorial 5.3)
- Stagger start times - Don't have everyone start at 9:00; stagger for smoother openings
- Include opening/closing buffer - First shift starts before opening, last shift ends after closing
- Check public holidays - Review holidays before planning (see Tutorial 5.2)
- Add meaningful notes - Help team members understand special circumstances
- Review weekly hours - Ensure contracted hours are met
- Plan for coverage - Ensure adequate staff during peak periods
Related Tutorials
- Tutorial 4.1: Adding New Staff Members - Create staff before rostering
- Tutorial 4.2: Managing Staff Login Accounts - Needed for roster change emails
- Tutorial 4.5: Viewing Staff Hours Worked - Rostered hours across a longer period
- Tutorial 5.2: Managing Public Holidays - Configure holidays
- Tutorial 5.3: Duplicating Roster Patterns - Copy weeks efficiently
- Tutorial 5.4: Time Blocks - Block time for non-appointment activities
- Tutorial 2.1: Managing Your Appointment Calendar - Book on available shifts
- Tutorial 18.3: The Customer Booking Experience - How the roster limits online bookings
Frequently Asked Questions
How far in advance can I create shifts?
There's no limit. Create shifts as far ahead as you need, though 2-4 weeks is typical.
Can staff see their roster immediately?
Yes. Staff with login accounts can see shifts as soon as they're created.
What's the maximum shift length?
No hard limit, but shifts over 12 hours may indicate errors. The system validates that end time is after start time.
Can I create split shifts?
Yes. Create two separate shifts for the same staff member on the same day:
- Morning: 09:00-13:00
- Evening: 17:00-21:00
Do shifts span midnight?
Yes. The dialog has separate Start Date and End Date fields, so an overnight shift (e.g., 20:00 on Friday to 02:00 on Saturday) is a single shift — the only rule is that the end must be after the start. The shift block appears in the column of its start date, and all of its hours count towards that day's staff member total.
Can two staff have identical shifts?
Yes. Create the same shift times for multiple staff members as needed.
Do staff get notified when I change the roster?
Yes — but not with an email per shift. Changes you make are collected while you work, and once you've finished editing (about 30 minutes of no further changes), each affected staff member receives one summary email, subject "Your roster has changed". They also get a matching in-app notification.
The email groups the changes by day and lists each one as:
- Added: the new shift's times
- Changed: the old times → the new times, plus a note if the break length changed
- Removed: the times of the shift that was deleted
Longer than about 20 changes and the rest are summarised as "…and N more", with a View Roster button to see everything.
The timing rules:
- One email per staff member per salon, no matter how many shifts you touched
- Sent once you've stopped editing for about 30 minutes — every fresh change pushes that back, so one editing session produces one email
- A 4-hour ceiling, so on-and-off editing can't defer it indefinitely
- Changes to a shift starting within the next 24 hours skip the wait and go out on the next run (a few minutes)
- If you undo a change before the summary sends, no email goes out for it. A shift created and deleted in the same window is never mentioned at all
- Editing only the Notes on a shift never triggers an email
Do staff get an email if I change a shift that has already happened?
They may do — past shifts still appear in the summary if you edit them. What past shifts don't do is trigger the fast 24-hour path, so tidying up last week's roster won't fire an email straight away; it waits for the quiet period like anything else.
What happens if I delete a shift with appointments?
The appointments remain but may show as having no available staff. Always check the calendar before deleting shifts.
Can I copy individual shifts?
Not directly. Use week duplication (Tutorial 5.3) or manually recreate shifts.
Do breaks block appointments?
Breaks aren't treated as blocked time. They're for hour calculations only. Use time blocks (Tutorial 5.4) to block specific times.
What's the difference between shifts and time blocks?
- Shifts define when staff are working and available
- Time blocks mark unavailable periods within working hours
Last Updated: August 2026