
Daily Opening Procedures
Introduction
A consistent opening routine sets the tone for a successful day at your salon. This guide provides a recommended opening checklist that helps you prepare for the day ahead, ensuring nothing is missed before your first client arrives.
Following a structured opening procedure helps you identify potential issues early, confirms your team is ready, and ensures all systems are prepared for the day's transactions. Whether you're an owner, manager, or senior staff member responsible for opening, this checklist will help you build reliable routines.
Who this is for: Owners, Admins, Managers, and staff members responsible for opening the salon.
What you'll learn:
- How to read your dashboard for the day ahead
- How to open and prepare the cash drawer
- Reviewing today's appointment schedule
- Checking for waitlist opportunities and filling gaps
- Managing pending leave requests
- Checking messages and notifications
- Confirming the roster
Time to complete: 10-15 minutes
Prerequisites
Before you begin, make sure you have:
- Access to your Luminate account with appropriate permissions
- Cash float ready for the day (if handling cash payments)
- Access to the salon premises
Step-by-Step Instructions
Step 1: Log In and Check the Dashboard
Start your day by logging into Luminate and reviewing your dashboard for an instant overview of the day ahead.
- Open your web browser and navigate to your Luminate URL
- Enter your email and password, then click Log in
- You'll land on the Dashboard - your command centre
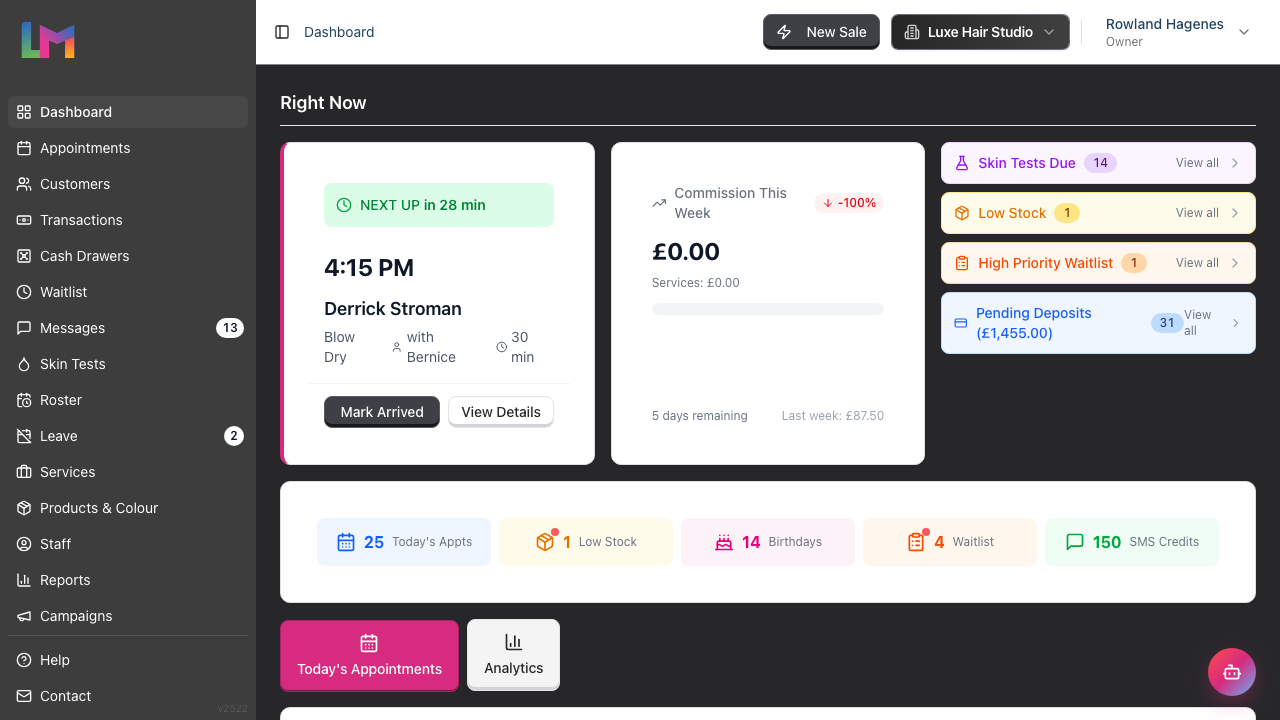
The Right Now section sits at the top. It shows your next appointment, with Mark Arrived and View Details buttons ready for when that customer walks in. Beside it, the alerts panel groups anything that needs attention into collapsible categories: Skin Tests Due, Low Stock, High Priority Waitlist, and Pending Deposits (which shows the total amount outstanding). Expand any category to see the detail, and make a note to address these during quieter periods. The panel only appears when there is something to report.
Quick Stats to Review (the row of tiles below the Right Now section):
- Today's Appts - See how many bookings are scheduled
- Low Stock - Note any products running low on inventory (a small red dot appears when any product is below its threshold)
- Birthdays - See upcoming customer birthdays for personalised service
- Waitlist - Check for customers waiting for slots (a red dot appears when high-priority entries are waiting)
- SMS Credits - Ensure you have credits for appointment reminders (a red dot appears when your balance is low)
Each tile is a link. Click one to open the page behind it.
Below the tiles, two tabs finish the picture. Today's Appointments lists the day in order with a progress count in its heading, such as "12/25 done", and lets you mark a customer as arrived or start their sale without leaving the dashboard. Use the All Stylists filter to narrow the list to one team member. Analytics holds the charts for the period you select.
Step 2: Open the Cash Drawer
If your salon accepts cash payments, opening the cash drawer session is essential before processing any transactions.
- Click Cash Drawers in the sidebar menu
- Find your cash drawer (e.g., "Main Register" or "Front Desk")
- Click Open Drawer
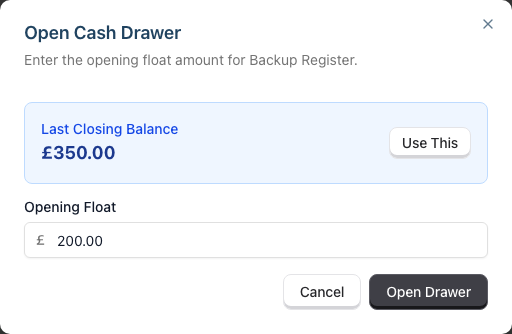
- In the Open Cash Drawer dialog that appears:
- Opening Float starts empty. The app never fills it for you, because this figure is what every reconciliation that day is measured against
- Count the cash in the till, then enter that amount (e.g., £200.00)
- If you see a Last Closing Balance displayed and your count matches it, click Use This to fill the field with that figure
- Click Open Drawer to confirm. The drawer will not open until you enter an amount
What happens next:
- The drawer card turns green, shows an Active badge, and names who opened the session
- Quick action buttons appear for the session: Top Up, Payout, Safe Drop, and History. An Adjustment button also appears if your role can record cash adjustments
- Two live summaries are shown: Revenue (broken down by Cash, Card, Vouchers, Other, and a Total, with the transaction count in the heading) and Cash in Drawer (Opening Float, Cash Transactions, and Expected Balance)
- All transactions during the day are tracked against this session
Tip: Count your physical cash float before entering the amount. This ensures any discrepancies are caught at the start of the day rather than at closing.
Step 3: Review Today's Appointments
Understanding the day's schedule helps you prepare resources, identify potential issues, and allocate staff effectively.
- Click Appointments in the sidebar menu
- The calendar opens in the Day view, showing the current day with every staff member in their own column side by side
- Review the appointments for each staff member
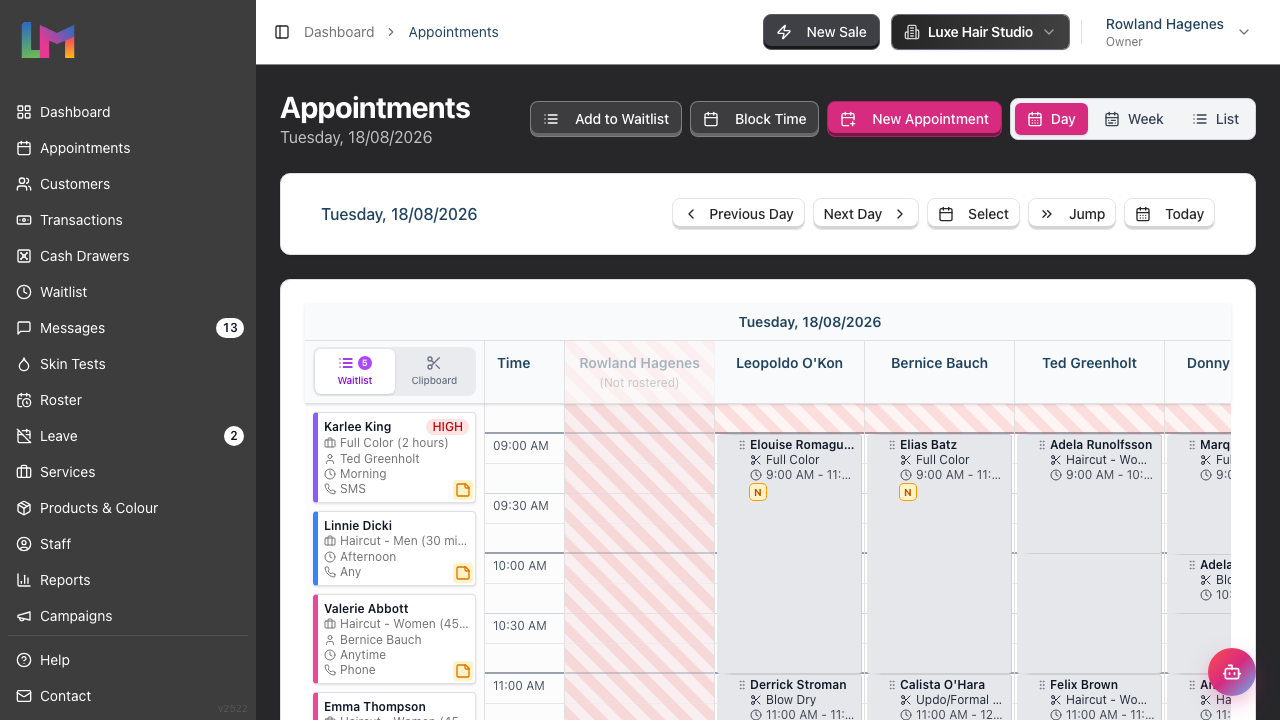
Luminate remembers the view you used last, so if you left the calendar in Week or List yesterday, that is where it opens today. Click Day to come back. Use Previous Day, Next Day, Select and Jump to move around the calendar, and Today to return to the current date.
Things to look for:
- Gaps in the schedule - Could you contact waitlist customers to fill these? See Step 4
- Back-to-back bookings - Ensure staff have adequate break time
- Colour services - For services that require a colour (patch) test, Luminate checks the test is valid when you book or move the appointment and prompts you if it isn't. Customers whose tests are due also appear in the dashboard Skin Tests Due alert
- New customers - Consider whether you need their details updated. Customer badges such as First Visit or VIP appear on the appointment card
- Deposits required - A coin icon on the card marks a deposit. Amber means the deposit is still due, green means it has been paid. Hover over the icon to see the amount
- Staff who are not working - A column headed (Not rostered) means that person has no shift today
Two more icons appear on appointment cards. A chain icon marks an appointment linked to another booking in the same visit. A small N marks an appointment with notes - hover to read them.
Using different views:
- Day - The default view, showing every staff member's column for the selected date
- Week - See the week ahead for a single staff member
- List - See appointments in table format with filtering options
Step 4: Check the Waitlist for Opportunities
If there are gaps in today's schedule, this is the perfect time to reach out to waitlist customers.
From the calendar (quickest)
The Day view carries the waitlist beside the calendar, so you can match a waiting customer to a gap you can see. The Waitlist tab on the left of the calendar shows how many people are waiting, and each card gives you the customer's name, priority, service and duration, preferred staff, preferred time of day, and how they want to be contacted.
- Click a waitlist card to select it. The card reads Click calendar to convert
- Click the empty slot you want to give them
- The booking form opens with their details already filled in
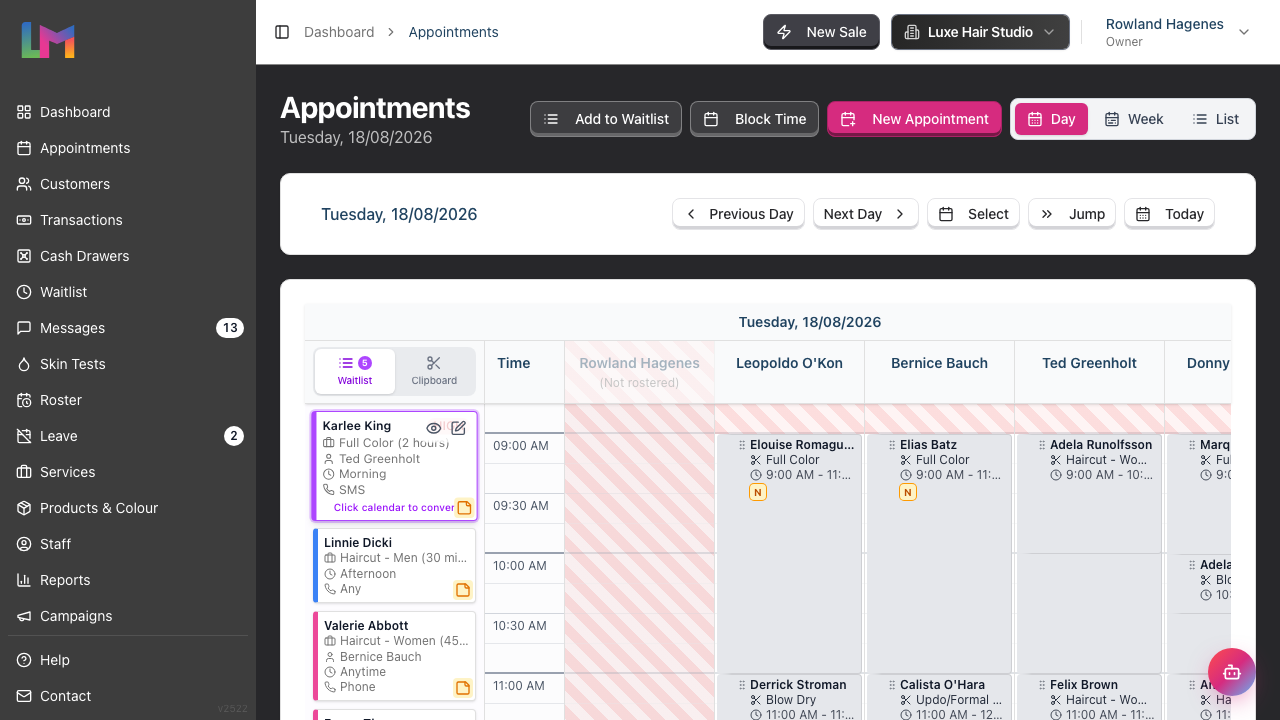
The Clipboard tab beside it holds appointments you have cut for moving elsewhere.
From the Waitlist page
- Click Waitlist in the sidebar menu
- Review the list of customers waiting for appointments
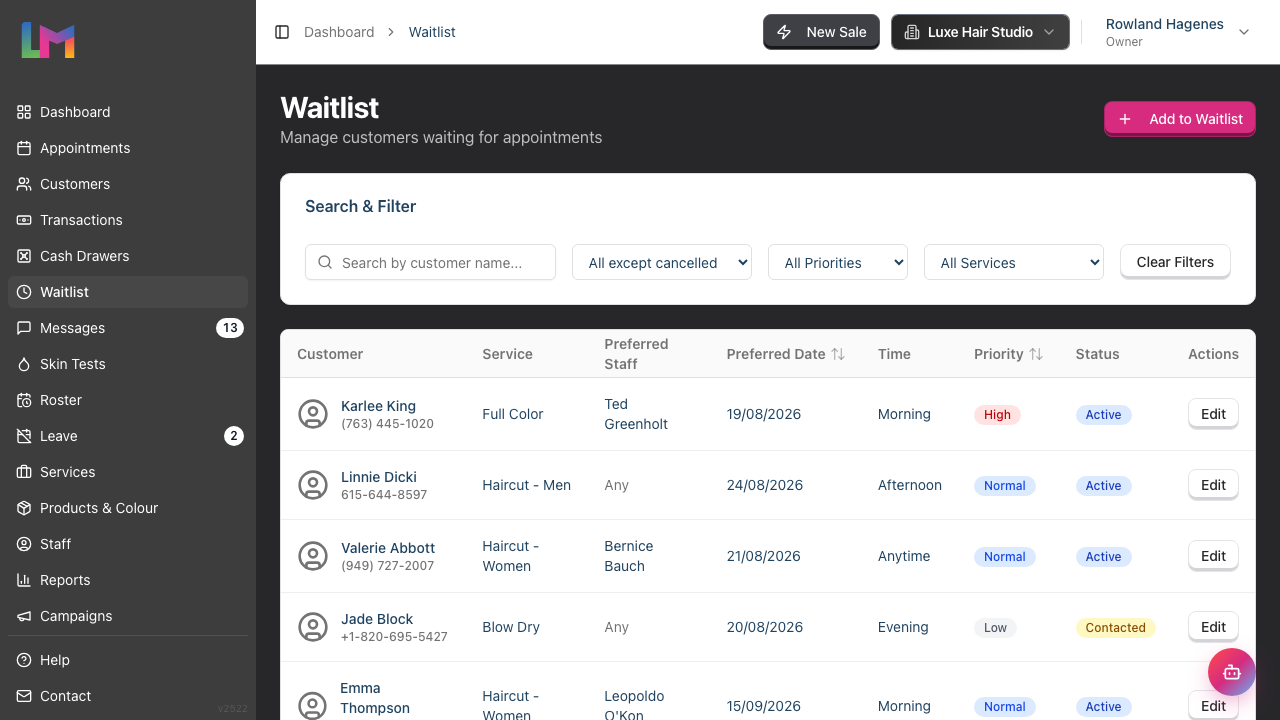 3. Look for entries that could fit into today's gaps:
- Check Priority - High-priority customers should be contacted first
- Check Preferred Staff - Match with available staff
- Check Service - Match with available time slots
- Check Preferred Date and Time - Match against today's gaps
Use the Priority and Service filters to narrow a long list, and click the Preferred Date or Priority column headings to sort by them.
To contact a waitlist customer:
- Click on the waitlist entry to open it
- Note their contact preference (phone, email, or SMS)
- Contact them through your preferred method
- Click Mark Contacted to record that you have reached out
- If they confirm, click Convert to Appointment to book them in. This button appears once the entry has a service against it
- If they no longer want the slot, click Cancel to close the entry
Step 5: Review Pending Leave Requests
If you're a manager, admin, or owner, check for any leave requests that need approval. A number next to Leave in the sidebar tells you how many are waiting.
- Click Leave in the sidebar menu
- Select Pending from the Status filter
- Review any pending requests
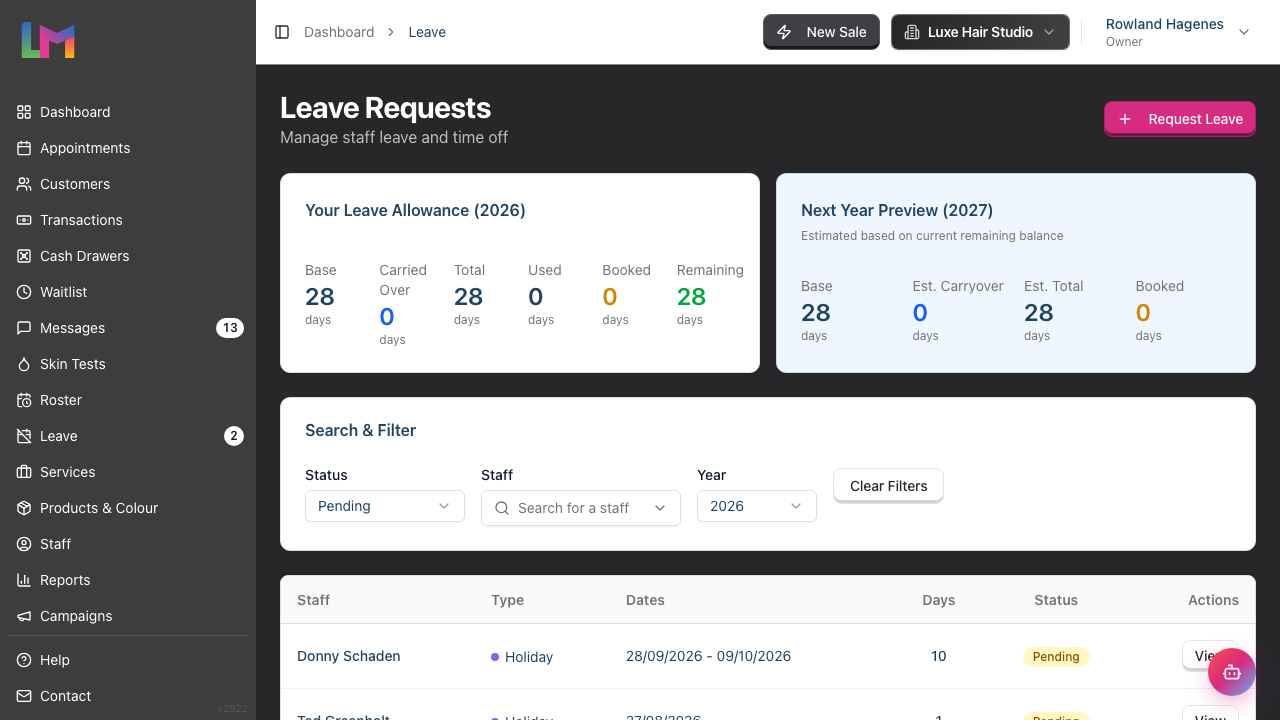 4. For each request, consider:
- Does the date clash with other approved leave?
- Will the salon have adequate cover?
- Is this a reasonable request given the notice period?
- Click View on a request to open it, then Approve or Reject as appropriate
The request page does the cover check for you. A Conflicting Appointments card lists every booking already scheduled during the leave period, with the date, time, service and customer for each one. If the list is long, plan who will cover those appointments before you approve.
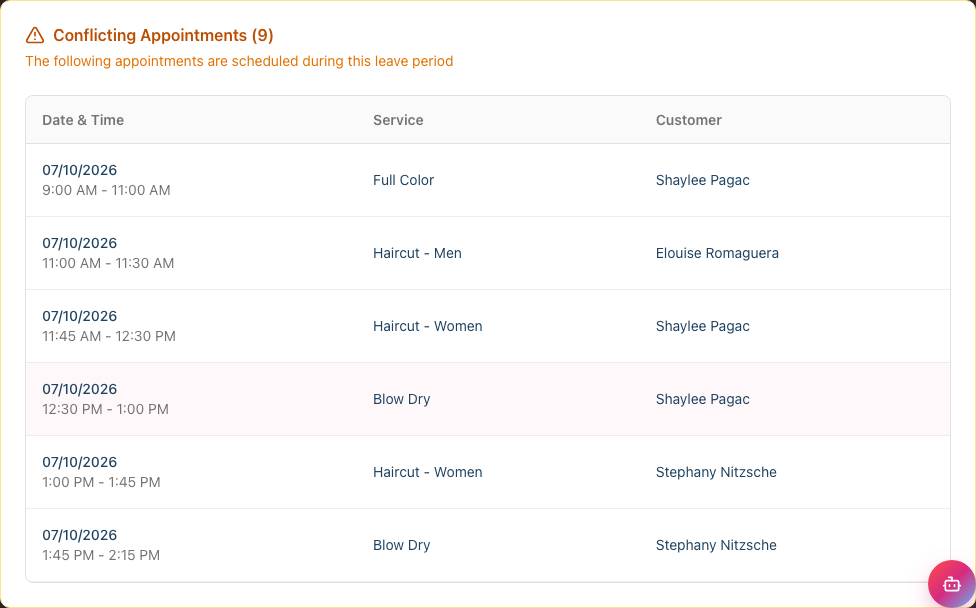
Rejecting a request asks you for a reason, which the staff member sees. Approving takes one confirmation.
Who can approve what: Owners and Admins can approve any request. Managers can approve Staff and Receptionist requests only - a Manager's own leave, or another Manager's, needs an Admin or Owner.
Tip: Approving leave promptly allows staff to plan their personal time with confidence and helps with roster planning.
Step 6: Check Messages and Notifications
Review any customer messages or system notifications that arrived overnight.
- Click Messages in the sidebar menu. When you have unread messages, this opens the inbox already filtered to them
- The inbox lists every customer conversation. Each row shows the customer's name, the status, a count of new messages, a preview of the last message, the channel, and how long ago it arrived
- Tick Unread to see only conversations waiting on you
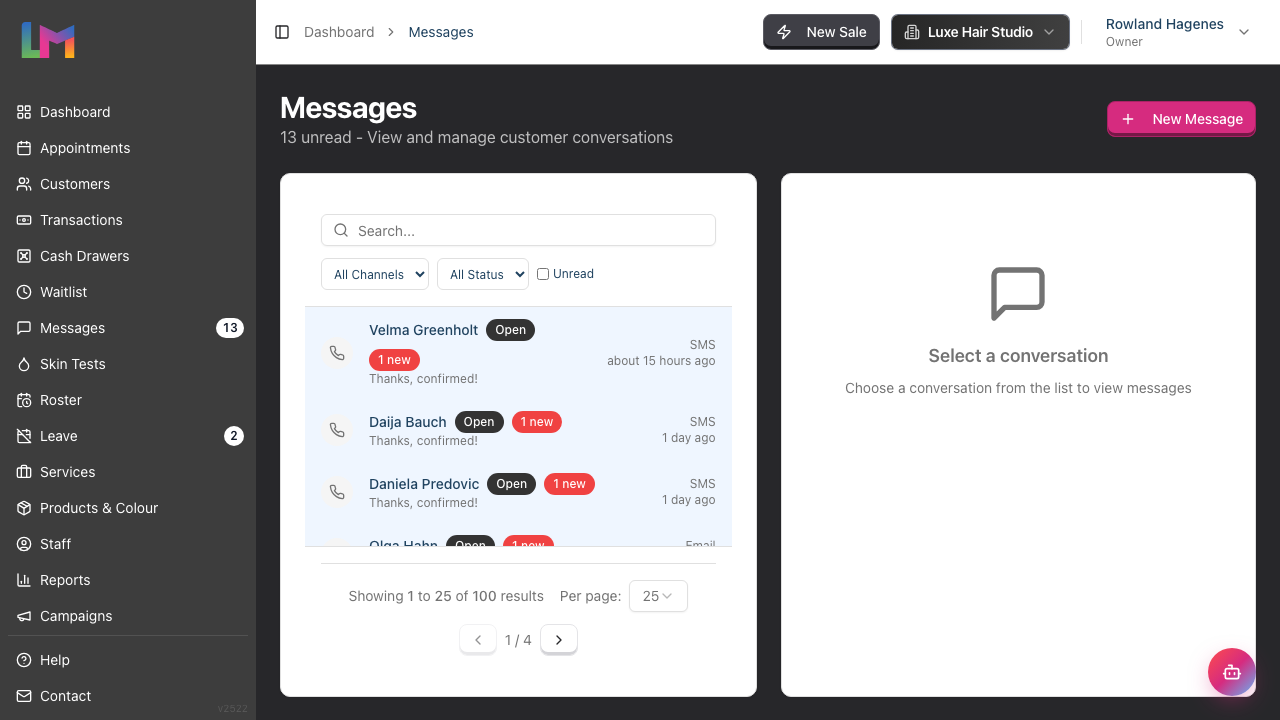 4. Review messages and respond as needed
Filtering conversations:
- Use the channel dropdown (All Channels) to see Email, SMS, or WhatsApp messages separately
- Use the status dropdown (All Status) to show Open, Closed, or Archived conversations. Archived conversations are hidden until you ask for them
- Search by customer name, email, or phone number
- The unread count appears as a badge next to Messages in the sidebar, and in the page subtitle
To respond to a message:
- Click on a conversation to open it in the right panel (on desktop) or full screen (on mobile)
- Type your reply in the text box at the bottom
- Send it. For SMS the button reads Send SMS; for email and WhatsApp it is the paper-plane button beside the box. Ctrl+Enter (Cmd+Enter on a Mac) sends it too
Step 7: Review the Roster
Confirm who's working today and that all shifts are correctly recorded.
- Click Roster in the sidebar menu
- The roster opens on the current week, with staff listed down the left side and a column for each day
- Use Previous Week and Next Week to move between weeks, Select to pick a date, and This Week to come back
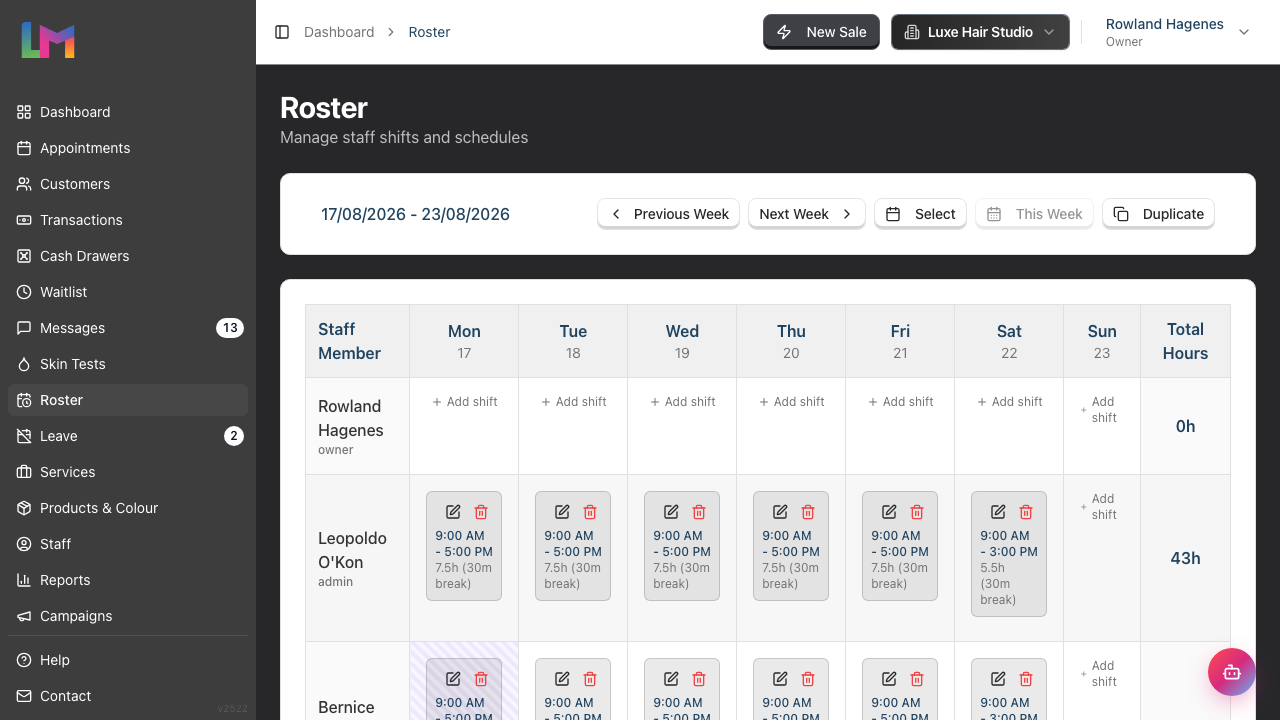 4. Verify that:
- All expected staff have shifts assigned
- Start and end times are correct
- Break times are recorded
Each shift shows its start and end times, the hours it counts for, and the break in minutes. Any note on the shift appears underneath. The Total Hours column on the right adds up each person's week, and each staff member's role appears under their name.
If someone calls in sick:
- You may need to update their shift or remove it
- Check the waitlist or contact customers if appointments need rescheduling
- Consider requesting leave on their behalf (sick leave)
Daily Opening Checklist
Use this quick reference checklist each morning:
| Task | Location | Time |
|---|---|---|
| Log in and review dashboard | Dashboard | 2 min |
| Open cash drawer with float | Cash Drawers | 2 min |
| Review today's appointments | Appointments (Day view) | 3 min |
| Check waitlist for opportunities | Appointments (Waitlist tab) or Waitlist | 2 min |
| Review pending leave requests | Leave (Status: Pending) | 2 min |
| Check messages inbox | Messages (Unread) | 2 min |
| Confirm today's roster | Roster | 2 min |
Total time: approximately 15 minutes
Common Pitfalls
"I forgot to open the cash drawer and processed a cash payment"
Cash payments can still be processed, but a sale that completes with no open session isn't counted against one. Open the drawer as soon as you realise, and make a note of any cash taken beforehand so you can account for it when you reconcile at closing.
"The waitlist shows customers but I don't know which services fit the gaps"
When viewing the appointments calendar, note the specific time slots that are empty and for how long. Then filter the waitlist by service duration that would fit. For example, a 45-minute gap could fit a cut but not a colour.
"I can't see the pending leave requests"
Only users with leave management permissions (typically Manager, Admin, or Owner) can see and action pending leave requests. If you're in a Staff or Receptionist role, ask your manager to handle these.
"I can see the request but there's no Approve button"
Approval follows the team hierarchy. A Manager can approve Staff and Receptionist requests, but not their own and not another Manager's - those go to an Admin or the Owner. If you're opening the salon and a request is outside what you can approve, pass it up rather than leaving it pending.
Tips and Best Practices
Arrive 15-30 minutes before opening - This gives you time to complete the checklist without rushing or delaying your first client.
Create a physical backup checklist - While this guide covers the digital tasks, you may also have physical tasks (unlocking doors, turning on lights, checking supplies). Create a combined checklist for your salon.
Delegate opening tasks - If you have a team, assign specific opening tasks to different people. For example, one person handles cash drawer while another reviews appointments.
Document any issues - If you notice problems during opening (discrepancies, missing staff, system issues), document them immediately so they can be addressed.
Check the weather and local events - External factors can affect appointment attendance. If there's severe weather or major local events, be prepared for cancellations or no-shows.
Review skin test alerts - The dashboard alerts panel shows customers with colour services who need valid patch tests. Contact them early in the day if action is needed.
Acknowledge birthday customers - The dashboard shows upcoming customer birthdays. Consider offering a small gesture or mentioning it during their visit for a personal touch.
Related Tutorials
- Tutorial 17.2: Daily Closing Procedures - Complete your end-of-day routines
- Tutorial 2.5: Using the Cash Drawer - Detailed cash drawer operations
- Tutorial 2.1: Managing Your Appointment Calendar - Master the calendar views
- Tutorial 2.3: Working with the Waitlist - Convert waiting customers to bookings
- Tutorial 5.1: Setting Up Your Weekly Roster - Build and adjust staff shifts
- Tutorial 6.3: Approving and Rejecting Leave Requests - Handle leave approvals
- Tutorial 10.4: Managing the Messaging Inbox - Work through customer conversations
Frequently Asked Questions
Should I always open the cash drawer, even if we only take card payments?
If your salon occasionally accepts cash (even rarely), it's good practice to open a cash drawer session. This creates an audit trail and helps with end-of-day reconciliation. If you're 100% card-only, you can skip this step.
What if I notice an appointment clash during my review?
If two appointments overlap for the same staff member, this indicates a scheduling error. Review both appointments to determine which was booked first, then contact the affected customers to reschedule one of them.
How early should I arrive to complete the opening procedure?
Plan to arrive 15-30 minutes before your first appointment. This gives you time to complete all checks without rushing. If your salon opens at 9:00 AM and the first appointment is at 9:30 AM, aim to arrive by 9:00 AM.
Can I complete these tasks from home before arriving?
Yes! Most of these checks can be done remotely. You can review appointments, check messages, and approve leave requests from any device. However, opening the cash drawer should be done on-site with the physical cash float.
Last Updated: August 2026