
Welcome to Luminate - Your First Steps
Introduction
New to Luminate? Welcome! This guide walks you through your first login, understanding the dashboard, and navigating the system. You'll learn how the main menu works, how to switch between different areas, and where to find help.
Who this is for: Salon owners and managers who've just signed up for Luminate.
What you'll learn:
- How to log in for the first time
- Social login options
- Understanding the main dashboard
- Navigating the sidebar menu
- Switching between salons (multi-salon owners)
- Finding help and using Lumen, the AI support assistant
- Managing your user profile and account settings
- Using keyboard shortcuts for quick navigation
Time to complete: 10-15 minutes
Prerequisites
Before you begin, make sure you have:
- Your Luminate account email and password (from your welcome email)
- A modern web browser (Chrome, Firefox, Safari, or Edge)
- An internet connection
Step-by-Step Instructions
Step 1: Log In to Your Account
- Open your web browser and go to your Luminate URL
- Enter your Email address
- Enter your Password
- Tick Remember me if you'd like to stay signed in on this device
- Click Log in
If you ever forget your password, click the Forgot password? link beside the password field.
If this is your first time logging in, you may be asked to verify your email address. Check your inbox for a verification email and click the link inside.
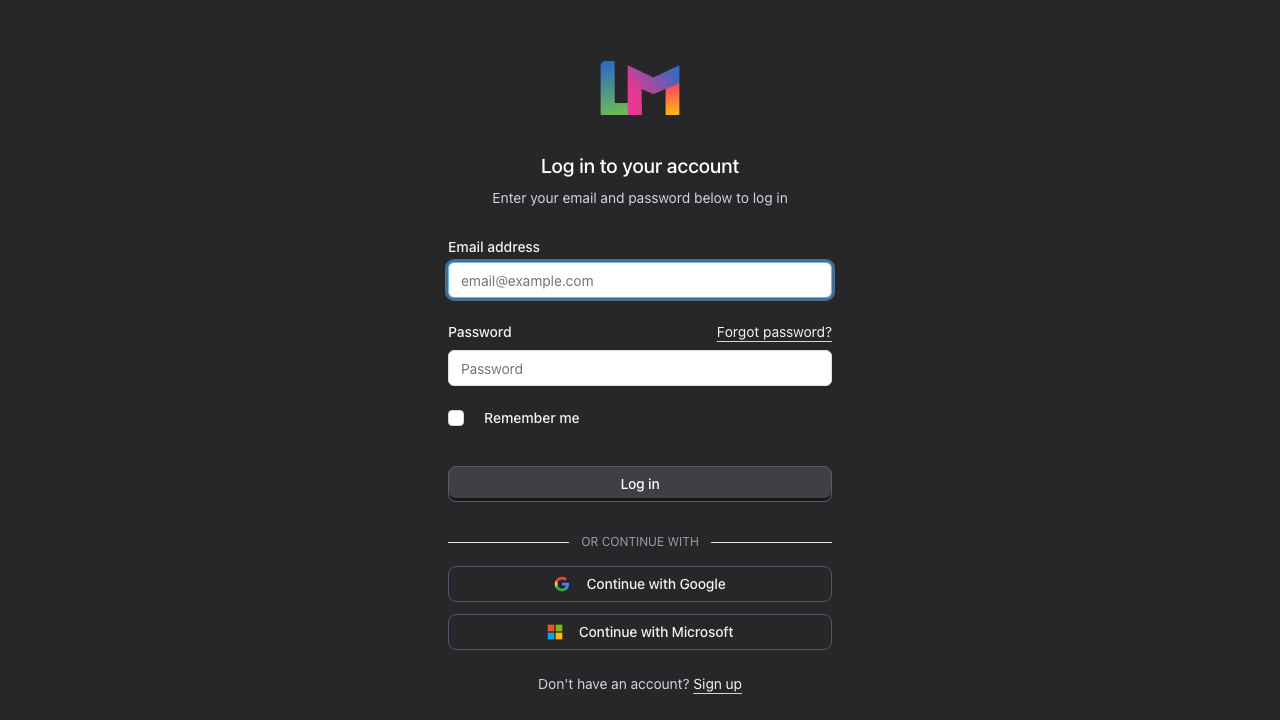
Social Login: You can also sign in using your Google account. Look for the Continue with button below the or continue with divider. The buttons shown depend on which providers your instance has enabled. For full details on social login, see Tutorial 1.5: Signing In with Google.
Step 2: Understanding the Dashboard
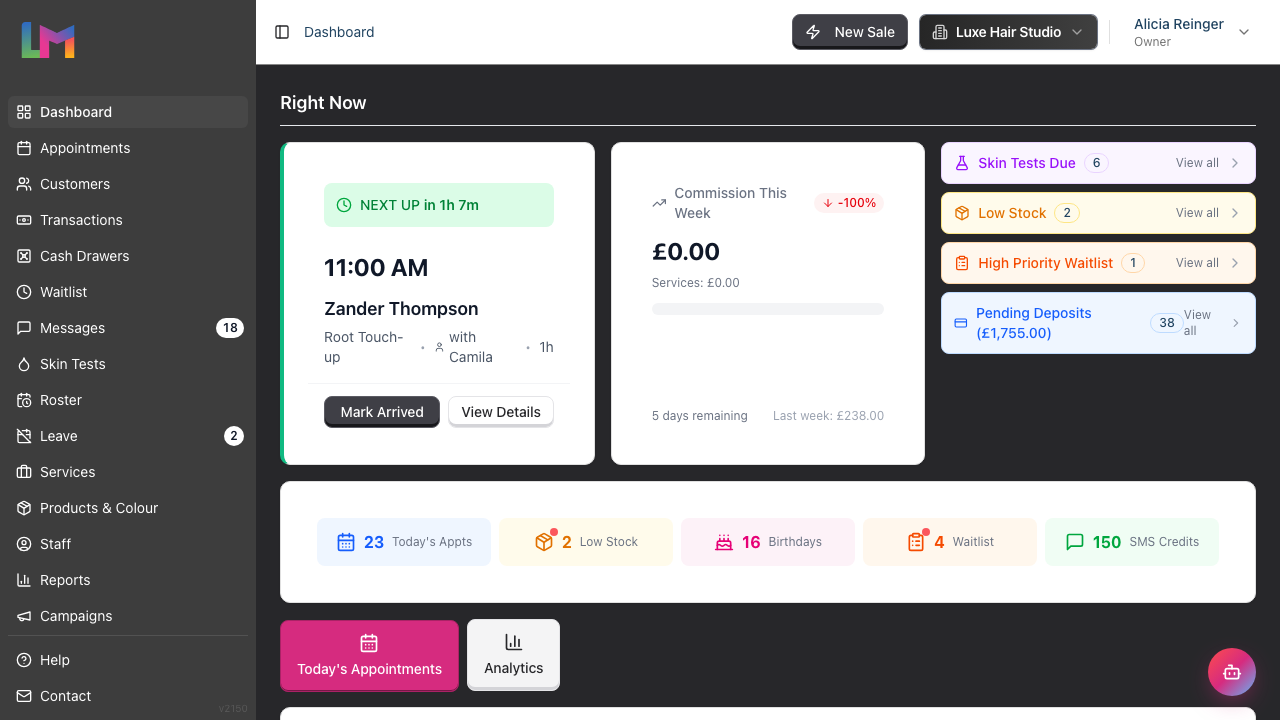
Once logged in, you'll see the Dashboard - your command centre for the salon. It opens at the active salon (the address always looks like /salons/{number}/dashboard). The dashboard has a Right Now section at the top, followed by two tabs - Today's Appointments and Analytics.
If your salon setup isn't finished, a setup checklist sits above Right Now until every task is done - see Tutorial 1.4: The Onboarding Checklist.
Right Now Section
The Right Now section shows what's happening today:
- Next Appointment - Your next upcoming appointment with a live countdown, customer, service, and staff details, plus Mark Arrived and View Details buttons. When there's nothing left today it reads No more appointments today.
- Commission This Week - For staff paid on commission, a card showing this week's commission so far against last week. (This card only appears for commission-based users.)
- Alerts panel - Expandable items that need attention, each with a count and a View all link:
- Skin Tests Due
- Low Stock
- High Priority Waitlist
- Pending Deposits (with the total amount in the heading)
- Quick Stats bar - Key metrics at a glance, each clickable to jump to the related screen:
- Today's Appts - Appointments scheduled for today
- Low Stock - Products running low
- Birthdays - Customers with upcoming birthdays
- Waitlist - Active waitlist entries
- SMS Credits - Your remaining SMS balance
Today's Appointments Tab
The Today's Appointments tab lists every appointment booked for today with its time, customer, service, staff member, price, and status. Alongside the heading you'll find:
- An All Stylists dropdown to filter the list down to one staff member
- A progress counter (for example 2/23 done)
- A Go to appointment calendar link that opens the full calendar
Appointments you've already completed are tucked into a collapsible Completed group at the bottom of the list - click it to expand them.
Analytics Tab (Owner/Admin/Manager)
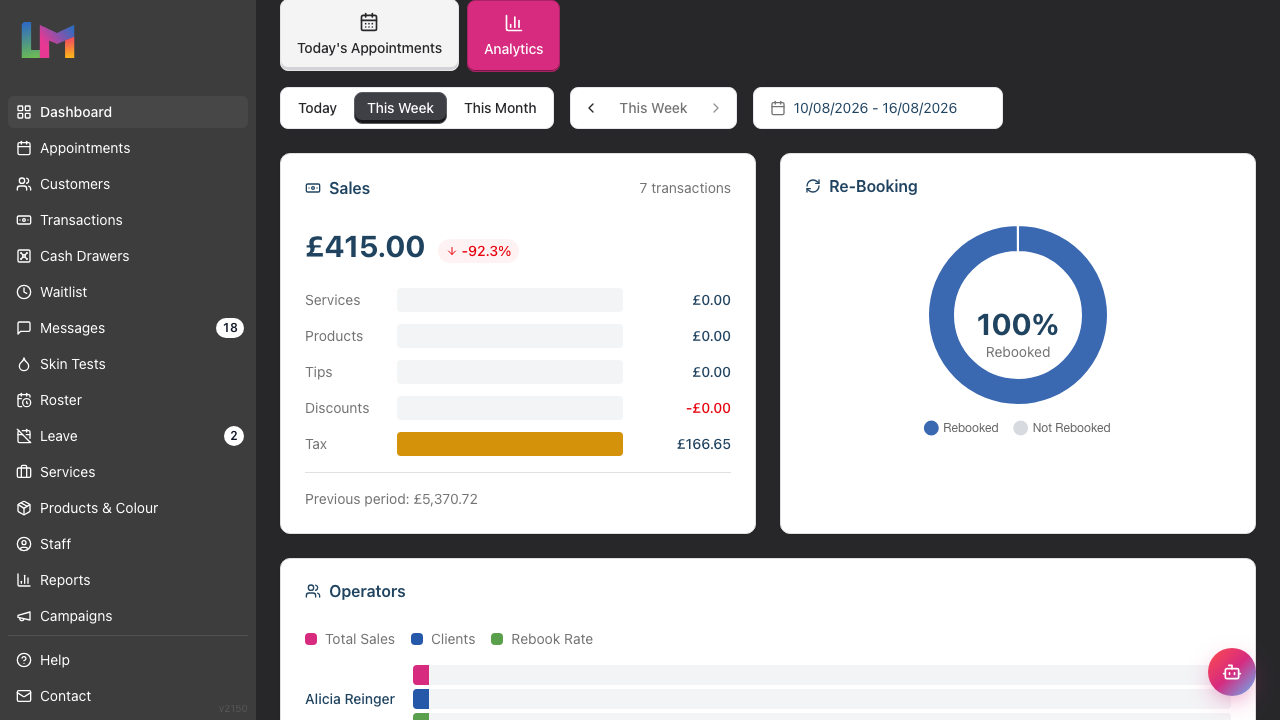
The Analytics tab provides business insights with a time period selector. (Staff without management permissions see a simpler set of personal stats here instead.)
Time period selector:
- Today
- This Week
- This Month
- Back and forward arrows either side of the current period label, for stepping through previous periods. Click the label itself to jump back to the current period
- A custom date range picker (Select custom date range...) alongside the selector
Analytics cards:
- Sales - Total takings and transaction count, broken down by services, products, tips, discounts, and tax, with a comparison to the previous period
- Re-Booking - Percentage of customers who rebooked after their appointment
- Operators - Staff performance ranking by total sales, clients, and rebook rate
- Revenue Trend - Chart showing revenue across the selected period
If you're paid on commission, a Commission Tracker also appears below the analytics cards with your daily trend and breakdown.
Step 3: Navigating the Sidebar Menu
The sidebar on the left is your main navigation. Here's what each section does, in the order they appear:
| Menu Item | What It Does |
|---|---|
| Dashboard | Return to your overview page |
| Appointments | View and manage the appointment calendar |
| Customers | Access your customer database |
| Transactions | Process transactions and view sales history |
| Cash Drawers | Manage cash drawer sessions and movements |
| Waitlist | Track customers waiting for appointments |
| Messages | View and respond to customer messages |
| Skin Tests | Track and manage customer skin tests |
| Roster | Create and manage staff schedules |
| Leave | Manage staff leave requests and allowances |
| Services | Set up your service menu |
| Products (or Products & Colour) | Manage retail inventory and colour stock. The label reads Products & Colour when colour formula tracking is enabled. |
| Staff | Manage your team members |
| Reports | Run business reports |
| Campaigns | Create and manage marketing campaigns |
| Notifications | Configure notification templates and reminders |
Note: Some menu items may not appear depending on your role and permissions. Menu items may also display badge counts (e.g., unread messages or pending leave requests) to highlight items needing attention. On an iPad running the Luminate app, a Colour Bar shortcut also appears at the bottom of the sidebar.
Above the main content sits the header bar: the sidebar toggle and breadcrumbs on the left, and on the right a New Sale button (which opens Quick POS), the salon switcher, and your user menu.
Step 4: Switching Between Salons (Multi-Salon Owners)
If you manage multiple salon locations:
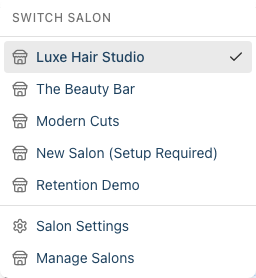
- Look for your salon name in the header bar (top of the page, next to your user profile)
- Click on it to open a dropdown menu
- Under Switch Salon, select a different salon to switch to it (the current salon is marked with a tick)
The dropdown also provides quick access to:
- Salon Settings - Configure the current salon's details
- Manage Salons - View and manage all your salons (owners only)
All data, appointments, and settings are specific to the currently selected salon.
Step 5: Finding Help
Need assistance? Here's where to find it:
Sidebar Links (bottom left):
- Click Help to open the Luminate documentation website in a new browser tab
- Click Contact to open the Luminate contact page in a new browser tab
In-App Help:
- Look for info tooltips (ℹ️) next to complex features
- Descriptive labels and placeholders guide you through forms
Email Support:
- Email: hello@luminate.salon
- Include your salon name and a description of your issue
Step 6: Using Lumen, the AI Support Assistant
Luminate includes a built-in AI assistant called Lumen that can answer questions about your salon data and help you navigate the system.
- Look for the round Lumen button in the bottom-right corner of the screen
- Click it to open the chat panel, headed Lumen. It greets you with "Hi! I'm Lumen. How can I help you today?" and a few suggested questions you can tap
- Type your question in the Ask a question... field and click the Send button (or press Enter)
- Lumen will stream a response, and you may see tool status badges (e.g., "Find customer...", "Get appointments...") as it looks up your salon data
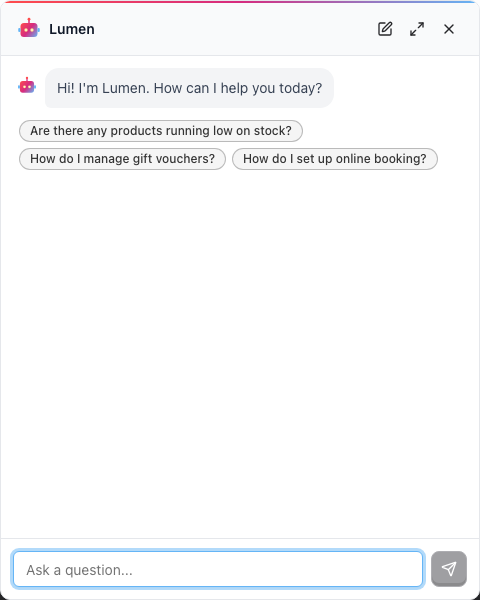
Chat controls (top-right of the panel):
- New chat (pencil icon) - Start a fresh conversation
- Open full page (expand icon) - Open the chat in a full-page view for longer conversations
- Close (X icon) - Collapse the chat widget
In the full-page view the same controls read New chat, Minimize to widget (which drops the conversation back into the corner widget), and Close chat (which returns you to the dashboard).
Lumen is permission-aware — the data it can access depends on your user role. For example, staff members will only see data relevant to their own appointments and customers.
Step 7: Your User Profile
To access your personal settings:
- Click your name in the top-right corner of the header to open the menu
- Select Profile to open the Settings page
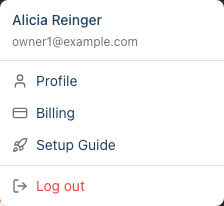
- In Settings, use the tabs to switch between:
- Profile - The Profile Information card holds your Name and Email address; change either and click Save. A Delete Account card sits below it (you can't delete your account while you still own salons).
- Password - The Update Password card asks for your Current password, a New password and Confirm password, then Save Password
- Two-Factor Auth - Turn two-factor authentication on or off for added security
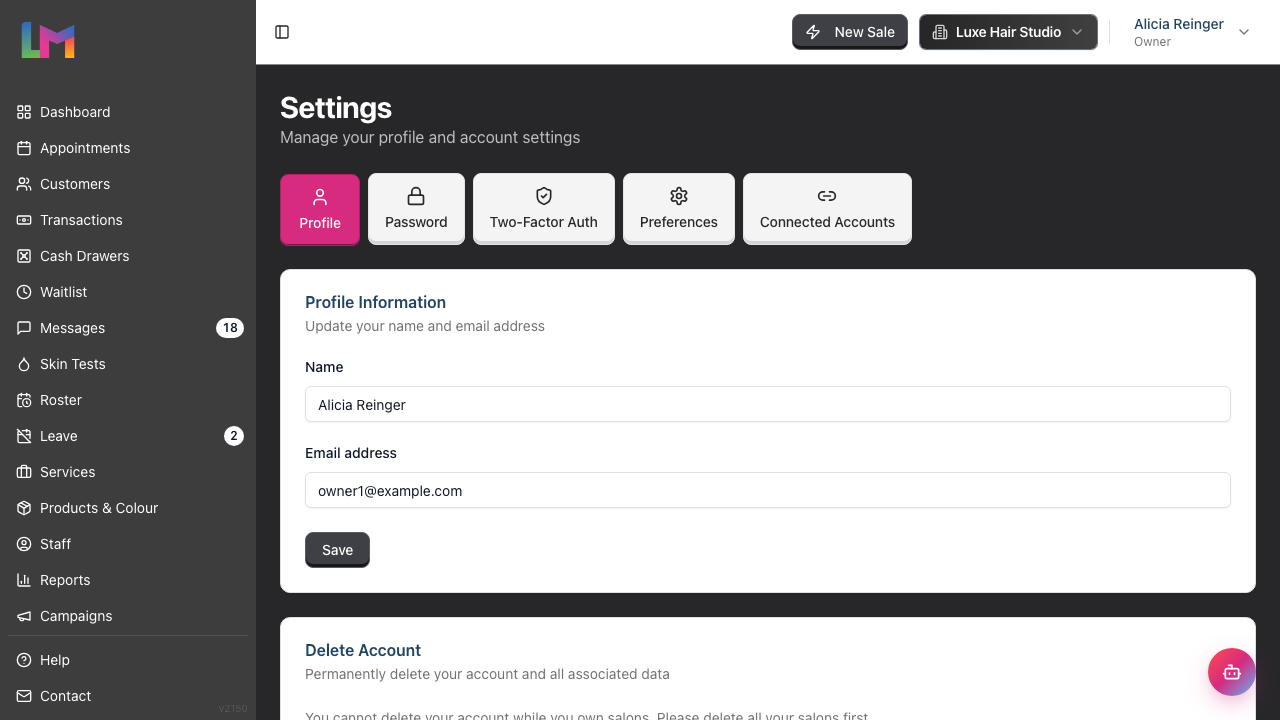
- Preferences - Choose which page appears after you log in
- Connected Accounts - Link or unlink social login providers. This tab only appears if social login is enabled for your instance, and it lists only the providers your instance has switched on (currently Google). Each connected provider shows a Connected badge and a Disconnect button; the rest show a Connect button.
Setting up two-factor authentication: the Two-Factor Auth tab is a secure area, so the first time you open it Luminate asks you to re-enter your password on a Confirm your password screen. Once past that, the card shows your current status (Disabled or Enabled). Click Enable 2FA and a dialog walks you through scanning the QR code (or typing the setup key) into an authenticator app, then entering the six-digit code to confirm. Afterwards, 2FA Recovery Codes on the same tab reveals your one-time backup codes - store them somewhere safe - and Disable 2FA turns it back off.
Choosing where you land after login: the Preferences tab has a Default Home Page card. Pick one of Dashboard, Appointments (Day View), Appointments (Week View), Customers, Quick POS, Roster, Waitlist, Reports or Messages, then click Save.
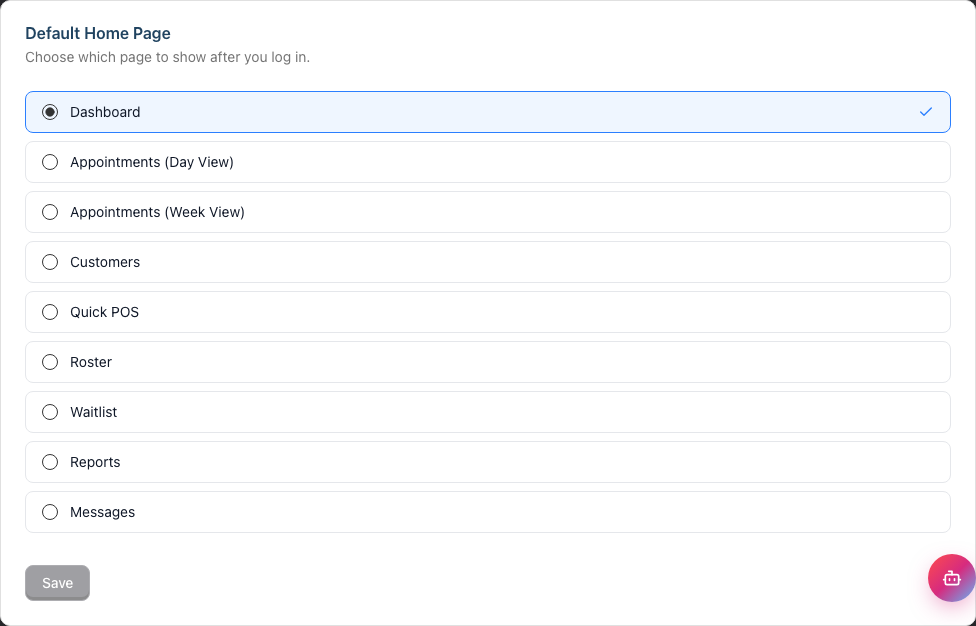
The profile menu also includes a Log out option at the bottom.
Additional menu options (owners only):
- Billing - Manage your subscription and payment details
- Setup Guide - Re-open the onboarding checklist if you've dismissed it
Common Pitfalls
"I can't see any data on my dashboard"
This is normal for new accounts. The dashboard shows real data from your salon operations. Once you add staff, services, and start booking appointments, you'll see metrics appear.
"I forgot my password"
Click Forgot password? on the login page. Enter your email address and we'll send you a reset link. Check your spam folder if it doesn't arrive within a few minutes.
"The page looks different from the screenshots"
Luminate receives regular updates. While the core functionality stays the same, button positions or colours may vary slightly. The overall workflow remains consistent.
Tips and Best Practices
- Bookmark your login page for quick access
- Enable two-factor authentication for added security - click your name in the header, select Profile, then choose the Two-Factor Auth tab (you'll be asked to confirm your password first)
- Check the dashboard daily to stay on top of appointments and salon performance
- Set your timezone correctly before adding any appointments - go to your salon's edit page via the salon switcher or Salons list
- Learn the keyboard shortcuts for quick navigation:
- Press d to go to Dashboard
- Press a to go to Appointments
- Press w to go to Appointments (Week view)
- Press t to open QuickPOS
- Set your preferred home page - Go to Settings > Preferences to choose which page appears after you log in (Dashboard, Appointments, QuickPOS, etc.)
Related Tutorials
- Tutorial 1.2: Setting Up Your Salon Profile - Configure your business details
- Tutorial 1.3: Understanding Roles and Permissions - Learn about user access levels
- Tutorial 1.4: The Onboarding Checklist - Complete your salon setup
- Tutorial 1.5: Signing In with Google - Social login setup
- Tutorial 2.1: Managing Your Appointment Calendar - Master the calendar view
Frequently Asked Questions
Can I access Luminate on my phone?
Yes! Luminate is fully responsive and works on mobile browsers. Simply navigate to your Luminate URL on your phone's browser.
How many people can use my Luminate account?
This depends on your subscription plan. You can add staff members with their own login accounts - see Tutorial 4.2 for details.
Is my data backed up?
Yes, Luminate automatically backs up your data. You don't need to do anything manually.
Can I customise the dashboard?
The dashboard shows the most important metrics for salon management. While the layout is fixed, you can use the time period selector to focus on the data that matters to you.
Can I see the full desktop calendar on my phone?
Yes. On mobile devices, look for the desktop mode toggle button in the header bar (it shows a monitor or phone icon). Tapping it switches between the mobile-optimised layout and the full desktop layout scaled to fit your screen. Your preference is remembered, so you don't need to toggle it every time you visit.
What browsers work with Luminate?
Luminate works best with:
- Google Chrome (recommended)
- Mozilla Firefox
- Apple Safari
- Microsoft Edge
We recommend keeping your browser updated to the latest version.
Are there keyboard shortcuts?
Yes! Luminate includes keyboard shortcuts for quick navigation:
- d - Dashboard
- a - Appointments
- w - Appointments (Week view)
- t - QuickPOS
These only work when you're not typing in a form field.
Last Updated: August 2026